

In this guide, I will explain how to set up your own website using the Hugo static site generator. I will also show how to create content with Obsidian and publish it automatically via CI/CD👨💻.
🖐️Hey!
Subscribe to our Telegram channel @r4ven_me📱, so you don’t miss new posts on the website 😉. If you have questions or just want to chat about the topic, feel free to join the Raven chat at @r4ven_me_chat🧐.
Preface: Why Do This?
While learning Linux, many users create a local knowledge base or collection of notes that often grows into a blog or something similar, accessible from the internet.
You could say that my website is a clear example of this approach😊. I recently migrated it from WordPress to Hugo, so this article can be considered a way to reinforce what I learned🙄.
Another important reason for writing this article was requests from subscribers to our Telegram channel for a guide like this.
Now, a little about the star of the show. Hugo🥳 is an open-source static site generator written in Go. Its main purpose is to transform templates (HTML, CSS, JS) and content (Markdown) into a fast, secure website ready to be hosted online.
Unlike dynamic systems such as WordPress, Hugo does not use a database or require a continuously running backend service. It simply generates all site pages in advance as plain HTML files served by a web server such as Nginx/Angie, Apache, Traefik, and so on. It is fast while maintaining a high level of security by reducing the number of failure and compromise points.
Besides, using Hugo is a great opportunity to try modern approaches and tools👨💻. It is fashionable now to call various concepts “something as Code.” Hugo is precisely a tool for implementing the so-called Docs as Code approach.
You write posts in Markdown format, stored as ordinary text files. You put them in a Git repository , configure CI/CD to initiate the static site build, and feed the resulting files to the web server.
In this article, I have tried to describe the process of configuring and launching a Hugo site as simply and clearly as I could. If you have questions or encounter any problems, please feel free to ask in our Raven chat. We have a fairly friendly microcommunity of IT connoisseurs there😇. I will certainly try to help you in my spare time.
Workflow
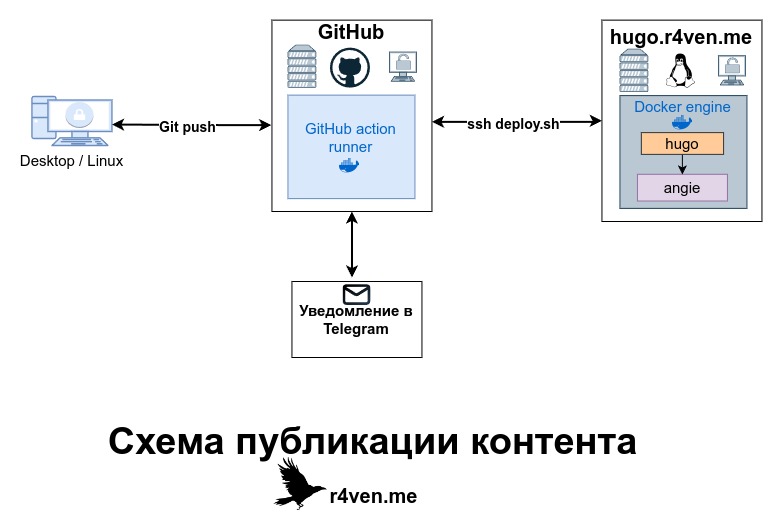
Now, briefly, here is what we will configure today and how it will work. The future content publishing system will work as follows:
- Edit
.mdfiles; commitandpushchanges to the remote repository;- Start the CI/CD process (GitHub Actions);
- Build: build and validate the site files;
- Deploy: execute an SSH command (run a script) on the server hosting the site;
- Notify: check the status and send a Telegram notification about deployment success or failure.
Below is a simplified visualization of the workflow described above:
Prerequisites
To implement our plan, we will need:
- An installed and configured Linux server where the site will run;
- Docker Engine installed and running on the server;
- A domain name and an A/AAA DNS record pointing to your server’s public IP address;
- A GitHub account for configuring CI/CD;
- A Telegram account for sending and receiving deployment status notifications.
Input Data
Below is the input data that will be used in the article:
| Key | Value |
|---|---|
| Server name | hugo.r4ven.me |
| Server SSH port | 2222 |
| Server OS | Debian 13 |
| Username | ivan |
| Local machine name | desktop.lan |
| Hugo Docker image | debian-0.151.0 |
| Angie Docker image | 1.10.2-alpine |
I recommend opening two terminals or two tabs right away: in the first, we will connect to the remote server, hugo.r4ven.me in my example, while the second will be our local machine (desktop.lan in my example).
Connect to our server over SSH and switch to the privileged root mode, for example via sudo:
ssh -p 2222 ivan@hugo.r4ven.me

sudo -sLaunching Angie and Hugo
☝️Perform the following actions on the remote server hugo.r4ven.me as the root user.
Create the required directory structure in /opt and move to the working directory:
mkdir -vp /opt/hugo/{hugo,angie}_data && cd /opt/hugo/
Now create a Compose file for the Angie and Hugo services:
nvim docker-compose.ymlAdd the following content:
---

services:

  angie:
    #image: docker.angie.software/angie:latest
    image: docker.angie.software/angie:1.10.2-alpine
    container_name: angie
    restart: on-failure
    stop_grace_period: 1m
    deploy: &default_deploy
      resources:
        limits:
          cpus: '0.70'
          memory: 512M
        reservations:
          cpus: '0.2'
          memory: 256M
    logging: &default_logging
      driver: json-file
      options:
        max-size: "50m"
        max-file: "5"
    hostname: angie
    environment:
      - TZ=Europe/Moscow
    #command: ["angie", "-g", "daemon off;"]
    volumes:
      - ./angie_data/angie.conf:/etc/angie/angie.conf:ro
      - ./angie_data/conf.d/:/etc/angie/conf.d/:ro
      - ./angie_data/certs/:/var/lib/angie/acme/
      - ./hugo_data/hugo.r4ven.me/public/:/usr/share/angie/html/:ro
    ports:
      - "80:80"
      - "443:443"
      - "443:443/udp"

  hugo:
    #image: docker.io/hugomods/hugo
    image: hugomods/hugo:debian-0.151.0
    container_name: hugo
    restart: on-failure
    stop_grace_period: 1m
    deploy: *default_deploy
    logging: *default_logging
    hostname: hugo
    environment:
      - TZ=Europe/Moscow
    working_dir: /src/hugo.r4ven.me
    volumes:
      - ./hugo_data/:/src/
command: ["hugo", "--minify", "--gc"]Replace the domain name with your own
sed 's|hugo.r4ven.me|example.com|g' ./docker-compose.ymlPlease note
The container described in docker-compose.yml is intentionally limited in hardware resources (the deploy directive) to cpus: '0.70' and memory: 512M, meaning the maximum permitted CPU usage is 70% of one core and 512 MB of RAM. Container log storage is also explicitly limited to five 50 MB files. Adjust these parameters to suit your needs if necessary. Read more about service resource limits in Docker Compose here and about logging here.
Configuring and Launching Angie
Next, create the angie.conf web server configuration file:
nvim ./angie_data/angie.confuser angie;
worker_processes auto;
worker_rlimit_nofile 65536;
load_module modules/ngx_http_zstd_filter_module.so;
load_module modules/ngx_http_zstd_static_module.so;
load_module modules/ngx_http_brotli_filter_module.so;
load_module modules/ngx_http_brotli_static_module.so;
events {
worker_connections 65536;
}
http {
include /etc/angie/mime.types;
default_type application/octet-stream;
sendfile on;
tcp_nopush on;
tcp_nodelay on;
keepalive_timeout 20;
server_tokens off;
brotli on;
brotli_comp_level 5;
zstd on;
zstd_comp_level 7;
gzip on;
gzip_comp_level 6;
gzip_types text/plain text/css application/javascript application/json application/xml image/svg+xml;
# application/rss+xml
access_log /var/log/angie/access.log;
error_log /var/log/angie/error.log notice;
add_header X-Content-Type-Options "nosniff" always;
add_header Referrer-Policy "strict-origin-when-cross-origin" always;
add_header Permissions-Policy "accelerometer=(), camera=(), microphone=()" always;
add_header X-Frame-Options "DENY" always;
# DNS resolver for ACME
resolver 8.8.8.8 8.8.4.4 ipv6=off;
acme_client le https://acme-v02.api.letsencrypt.org/directory
email=kar-kar@r4ven.me
key_type=ecdsa
renew_before_expiry=30d
# renew_on_load=on
;
server {
listen 80;
server_name hugo.r4ven.me;
location /.well-known/acme-challenge/ {
root /usr/share/angie/html;
}
return 301 https://$host$request_uri;
}
server {
listen 443 ssl;
http2 on;
http3 on;
server_name hugo.r4ven.me;
acme le;
ssl_certificate $acme_cert_le;
ssl_certificate_key $acme_cert_key_le;
ssl_protocols TLSv1.2 TLSv1.3;
ssl_prefer_server_ciphers on;
ssl_session_cache shared:SSL:50m;
ssl_session_timeout 1d;
add_header Strict-Transport-Security "max-age=63072000; includeSubDomains; preload" always;
root /usr/share/angie/html;
index index.html;
location /.well-known/acme-challenge/ {
root /usr/share/angie/html;
}
location ~* \.(?:css|js|mjs|png|jpg|jpeg|gif|webp|svg|ico|ttf|otf|woff|woff2)$ {
access_log off;
expires 1y;
add_header Cache-Control "public, max-age=31536000, immutable";
try_files $uri =404;
}
location = / {
add_header Cache-Control "public, max-age=3600, stale-while-revalidate=300";
try_files /index.html =404;
}
location ~* \.html$ {
add_header Cache-Control "public, max-age=3600, stale-while-revalidate=300";
try_files $uri =404;
}
# gzip_static on;
# brotli_static on;
open_file_cache max=10000 inactive=60s;
open_file_cache_valid 30s;
open_file_cache_min_uses 2;
open_file_cache_errors on;
error_page 404 /404.html;
error_page 500 502 503 504 /500.html;
}
include /etc/angie/conf.d/*.conf;
}📝 Note
This Angie configuration provides an optimized web server for serving a static site. Unlike Nginx, Angie features a built-in ACME client that automatically obtains and renews TLS certificates from Let’s Encrypt. The configuration supports HTTP/2 and HTTP/3, enables multi-layer compression with gzip, Brotli, and Zstandard for maximum performance, and implements strict security headers and static content caching.
Replace the following parameters in the configuration with your own:
email=kar-kar@r4ven.me;server_name hugo.r4ven.me;- in theserversection (http)server_name hugo.r4ven.me;- in theserversection (https)
sed 's|email=kar-kar@r4ven.me;|email=user@example.com;|' \
    ./angie_data/angie.conf

sed 's|server_name hugo.r4ven.me;|server_name example.com;|g' \
./angie_data/angie.confLaunch Angie and view the logs:
docker compose up -d angie

docker compose ps

docker compose logs -fDocker will download the required image and start the container. On its first launch, angie will request TLS certificates from Let’s Encrypt. You should see output similar to this:

That means everything is OK.
Verify that the certificates physically exist:
ls -lR ./angie_data/certs/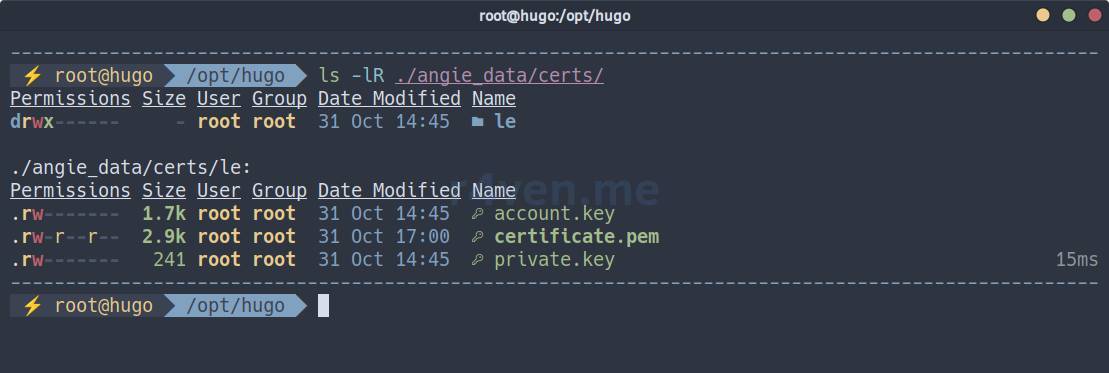
If everything started successfully, check the web server and inspect the TLS certificate details:
curl -I https://hugo.r4ven.me

openssl s_client -connect hugo.r4ven.me:443 < /dev/null 2> /dev/null | openssl x509 -text | head -n 20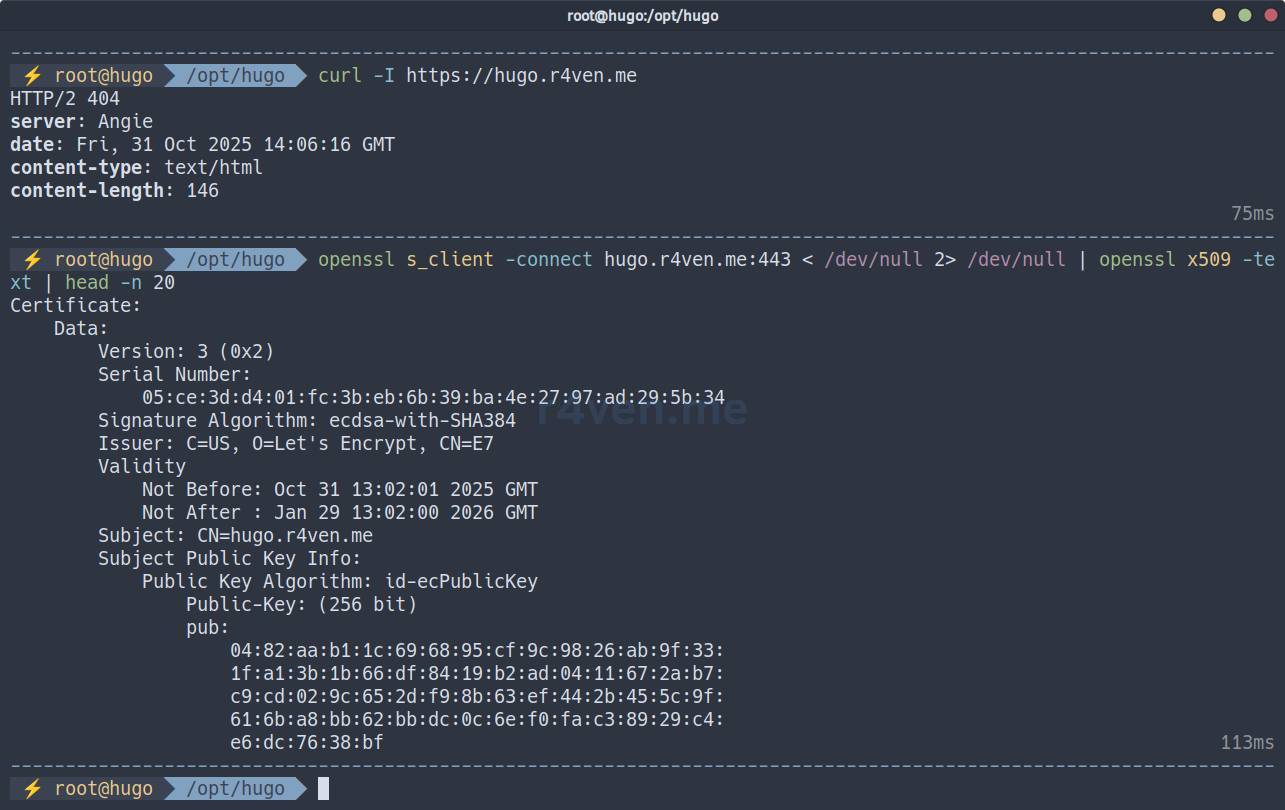
Excellent. Let’s move on.
Configuring and Launching Hugo
First, you need to choose a site theme, and there are plenty available. You can choose one on the official website: https://themes.gohugo.io/. In this article, I will use the theme used by my r4ven.me site: Narrow. You can view the live demo here. The theme documentation is here.
Run the Hugo container and create a new site project (replace hugo.r4ven.me with your address):
docker compose run --rm -w /src hugo new site hugo.r4ven.me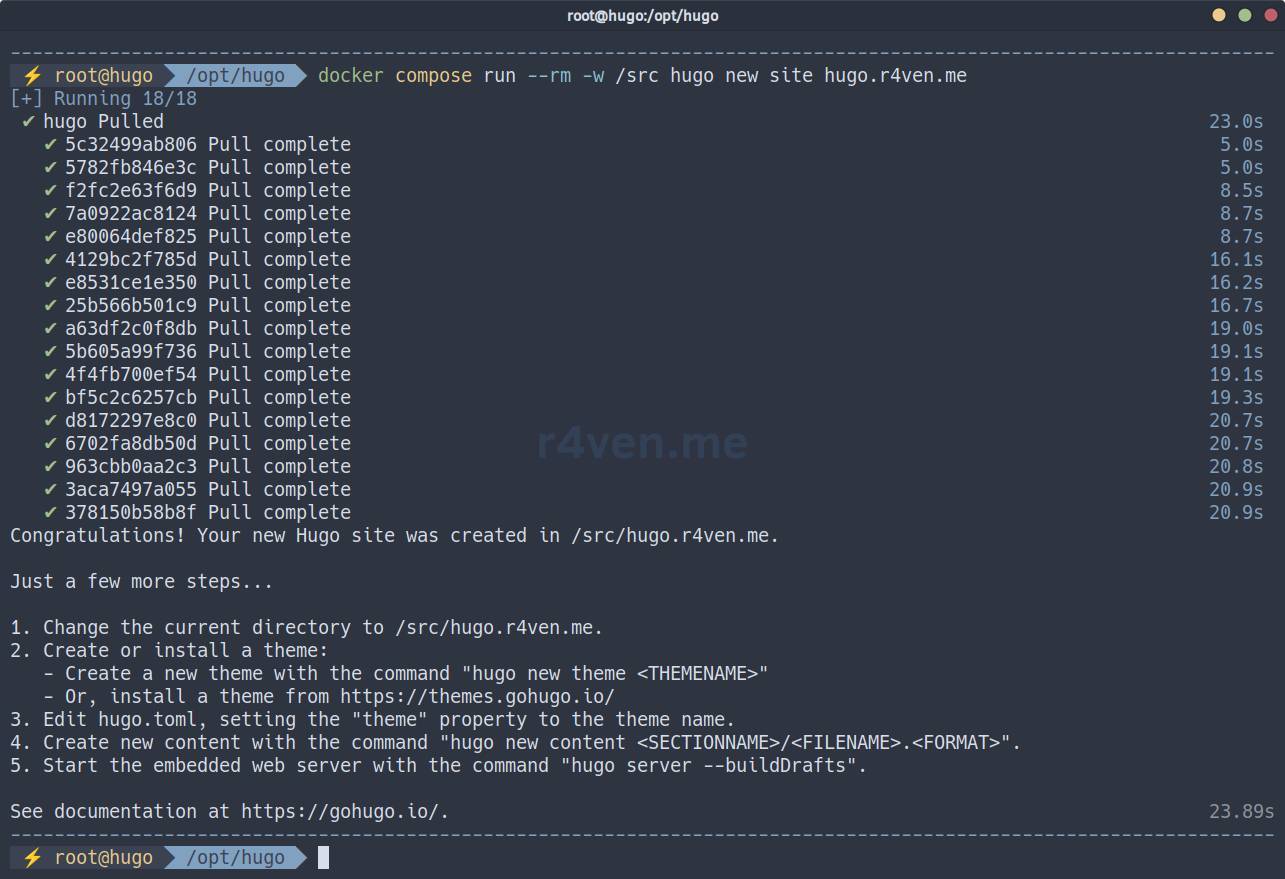
Clone the Narrow theme repository:
git clone https://github.com/tom2almighty/hugo-narrow.git \
    ./hugo_data/hugo.r4ven.me/themes/hugo-narrow

cp -r ./hugo_data/hugo.r4ven.me/themes/hugo-narrow/exampleSite/* \
    ./hugo_data/hugo.r4ven.me/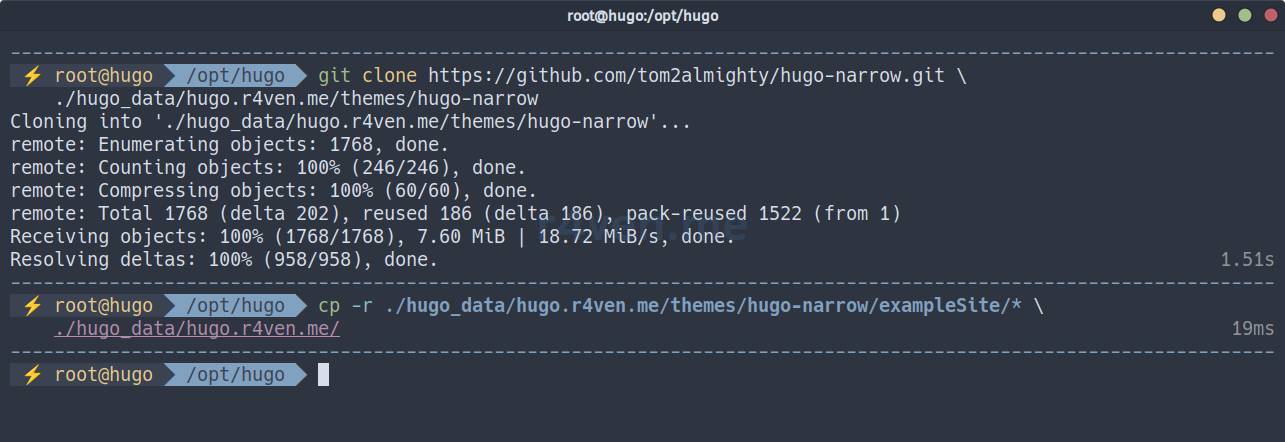
Remove the unnecessary files:
rm -f ./hugo_data/hugo.r4ven.me/hugo.toml

rm -rf ./hugo_data/hugo.r4ven.me/themes/hugo-narrow/.gitThen specify your address in the Hugo configuration file:
sed -i "s|^baseURL.*|baseURL: 'https://hugo.r4ven.me'|" \
./hugo_data/hugo.r4ven.me/hugo.yamlNow add a couple of test posts directly in the terminal:
cat << EOF > ./hugo_data/hugo.r4ven.me/content/posts/first-post.md
---
title: "My First Post"
date: 2025-06-13
draft: false
categories: ["Blog"]
tags: ["Hugo", "Tutorial"]
---

## Hello, world!
EOFcat << EOF > ./hugo_data/hugo.r4ven.me/content/posts/second-post.md
---
title: "My second Post"
date: 2025-07-20
draft: false
categories: ["Test"]
tags: ["Hugo", "Howto"]
---
## Hello, friend!
EOFCheck:
ls -l ./hugo_data/hugo.r4ven.me/content/posts/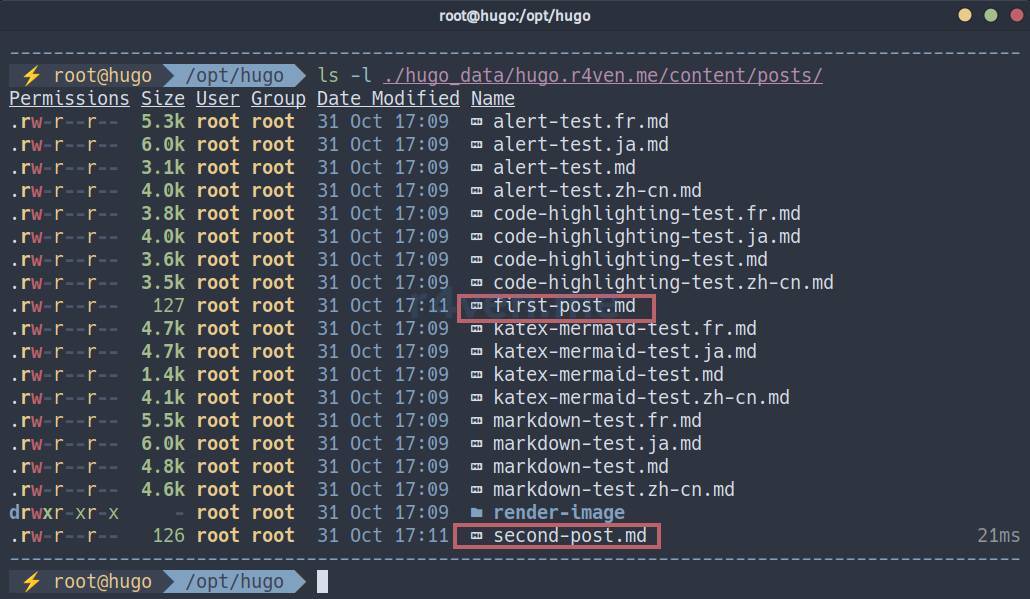
📝You can also see that the theme already contains several demo posts.
As you may have noticed, each post begins with some metadata known as front matter.
Now start updating/generating our site:
docker compose up hugoThe command will generate the site and, if everything is OK, show the final status of the site files:
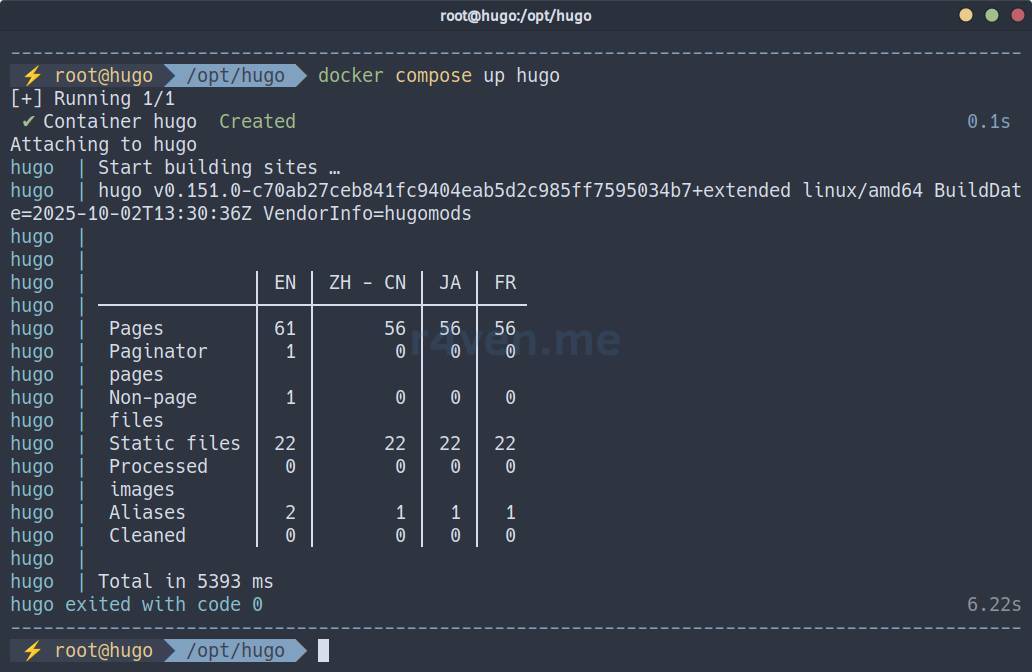
Check the site in the console:
curl https://hugo.r4ven.me/posts/first-post/

curl https://hugo.r4ven.me/posts/second-post/And, of course, in the browser at https://hugo.r4ven.me:
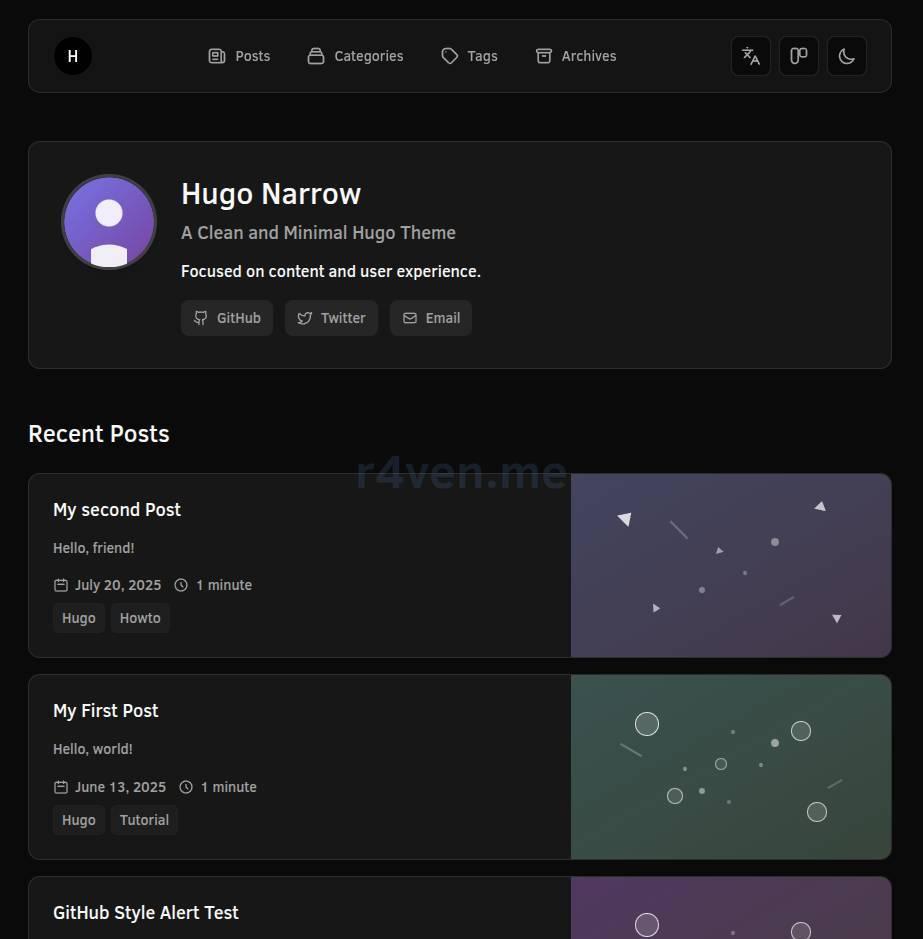
Site is up!
💡The main site configuration file is hugo.yaml. In my example: /opt/hugo/hugo_data/hugo.r4ven.me/hugo.yaml.
Optional: Configuring Hugo to Start with Systemd
I usually use Systemd to manage the entire Compose stack conveniently.
Create a Systemd service unit:
systemctl edit --full --force hugo.serviceAdd approximately the following content:
[Unit]
Description=Hugo service
Requires=docker.service
After=docker.service

[Service]
Restart=on-failure
RestartSec=5
ExecStart=/usr/bin/docker compose -f /opt/hugo/docker-compose.yml up
ExecStop=/usr/bin/docker compose -f /opt/hugo/docker-compose.yml down

[Install]
WantedBy=multi-user.target
Stop the current container and start it through Systemd:
docker compose down

systemctl enable --now hugo
Check the container/service status:
docker compose ps

systemctl status hugo

journalctl -fu hugo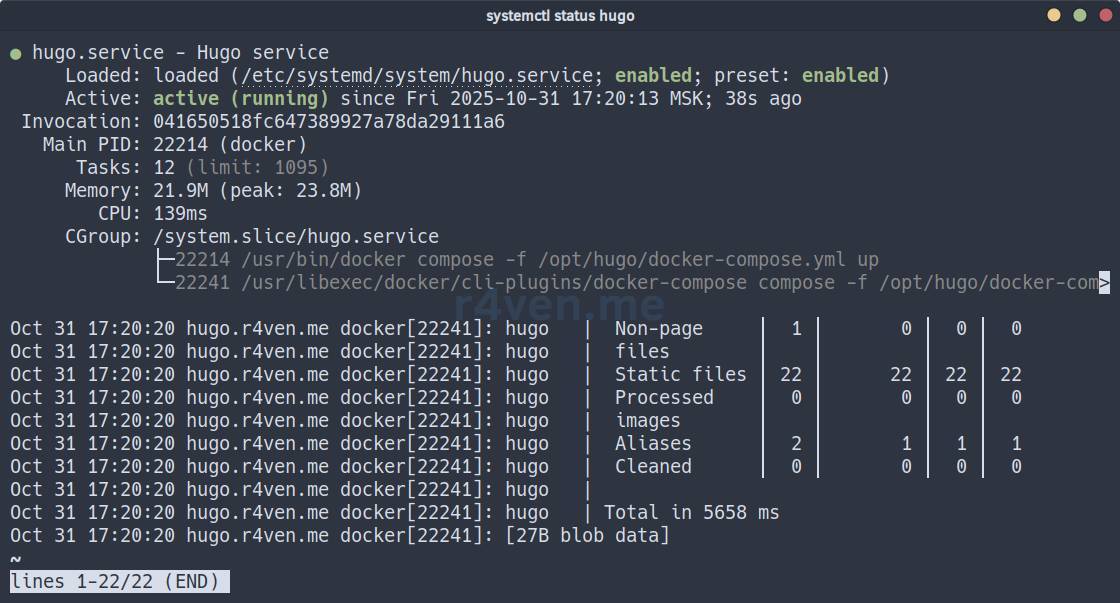
You can now use systemctl start|stop|restart hugo for management.
Configuring CI/CD with GitHub Actions
Well then. The site works, but updating and filling it with content through the console is a task for enthusiasts. We are not among them, so let’s configure some automation.
☝️Perform the following actions on the remote server hugo.r4ven.me as the root user.
First, create the SSH keys that will be used to access the repository during deployment:
mkdir -vp ~/.ssh/ && chmod 700 ~/.ssh/

ssh-keygen -q -N "" -t ed25519 -f ~/.ssh/id_ed25519_github_repo

ls -l ~/.ssh/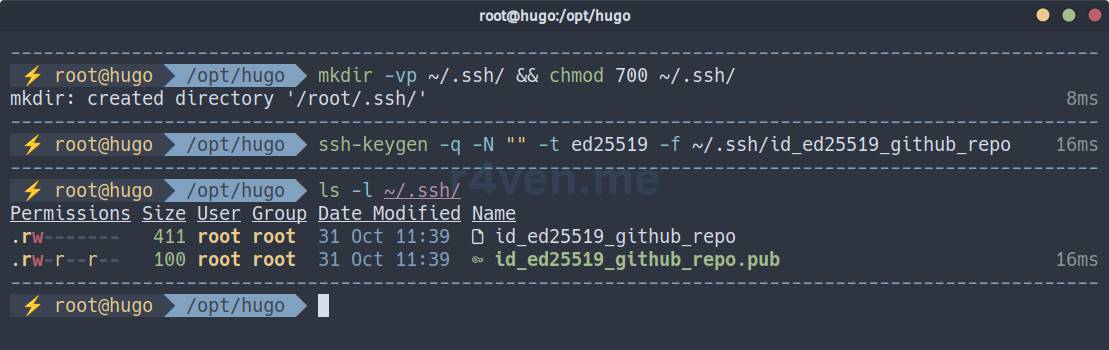
Immediately configure SSH to use this key when connecting to GitHub:
cat << EOF >> ~/.ssh/config
Host github.com
    HostName github.com
    User git
    IdentityFile ~/.ssh/id_ed25519_github_repo
    IdentitiesOnly yes
EOFBefore moving on to the next step, display and copy our public SSH key:
cat ~/.ssh/id_ed25519_github_repo.pub
We will add it as a “deploy key” for repository access.
Go to GitHub, sign in to your account (or create a new one), and then create a new repository:
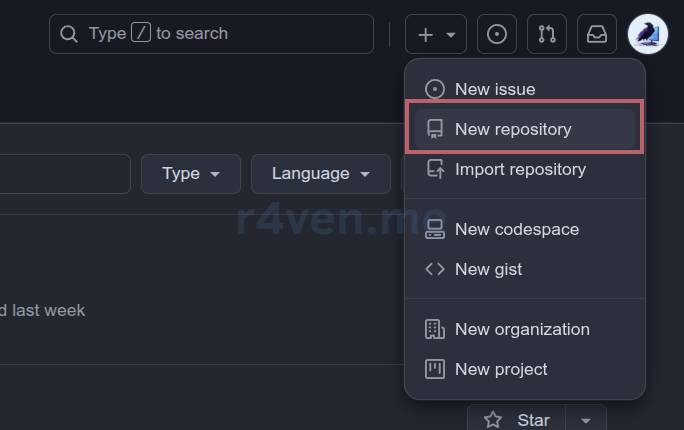
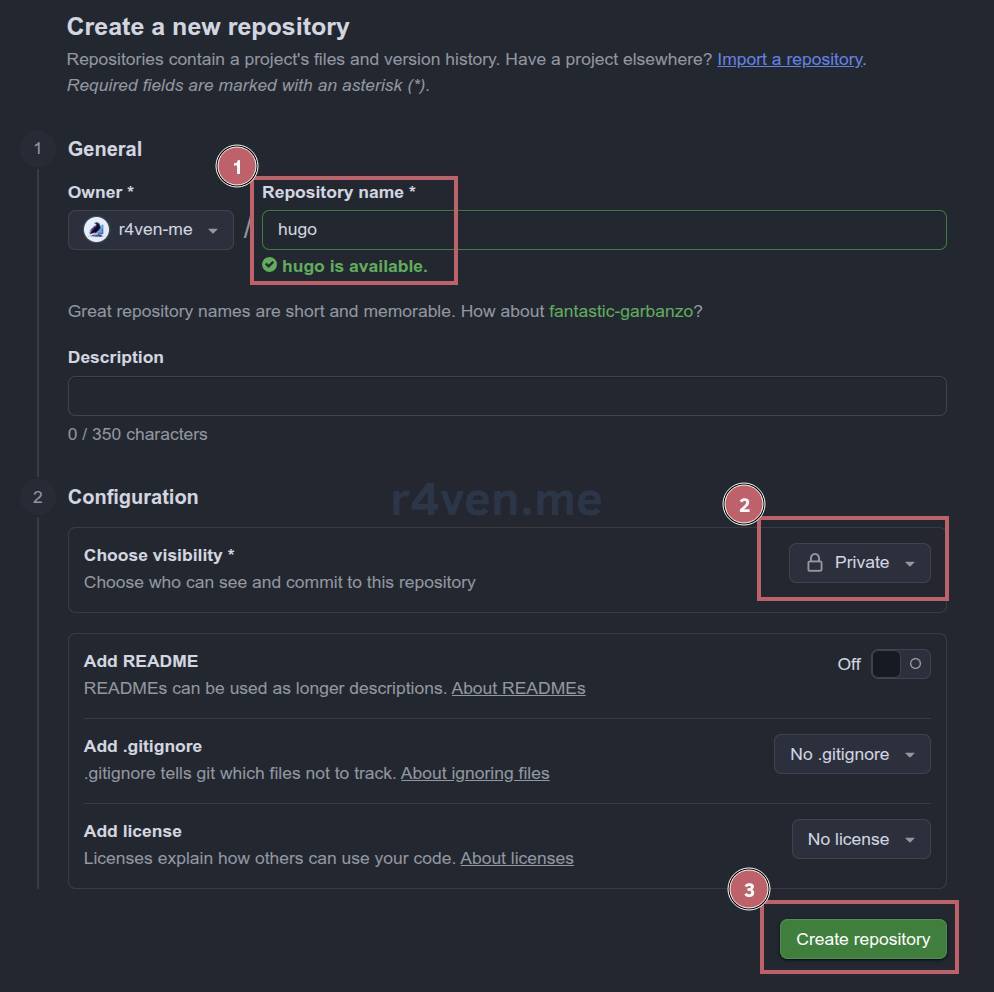
Specify a name, make it private, and click “Create”:
Now go to the repository settings:
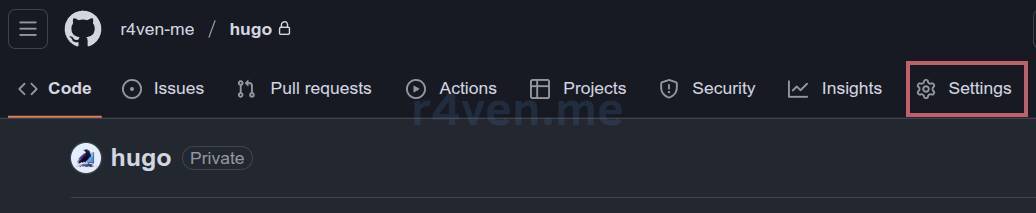
And click “Add deploy key”:

Also specify a name, enter the public SSH key itself in the “Key” field, and enable “Allow write access”:
💡After completing the entire setup, you can replace it with a key without write access if necessary.
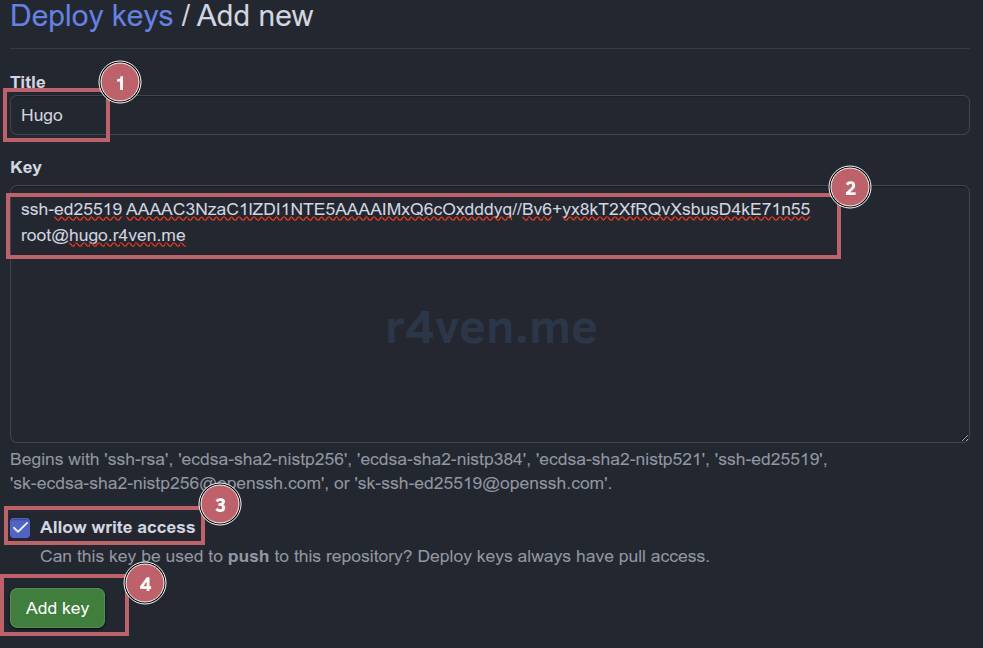
Now return to our server console and configure git.
Install it if it is not already present and move to the site directory:
apt update && apt install -y git

cd /opt/hugo/Initialize a new repository and configure exclusions:
git init

echo 'hugo_data/hugo.r4ven.me/public/' > .gitignore

echo 'hugo_data/hugo.r4ven.me/content/.obsidian/' >> .gitignore

echo 'hugo_data/hugo.r4ven.me/.hugo_build.lock' >> .gitignore

echo 'angie_data/certs/' >> .gitignore📝 Note
You will see this warning; ignore it:
Create placeholder files in every project directory (so they can be pushed to GitHub), add the files to the index, and commit the changes:
find ./hugo_data/hugo.r4ven.me/ -type d -empty -exec touch {}/.gitkeep \;

git add ./

git commit -m "Hugo initial commit"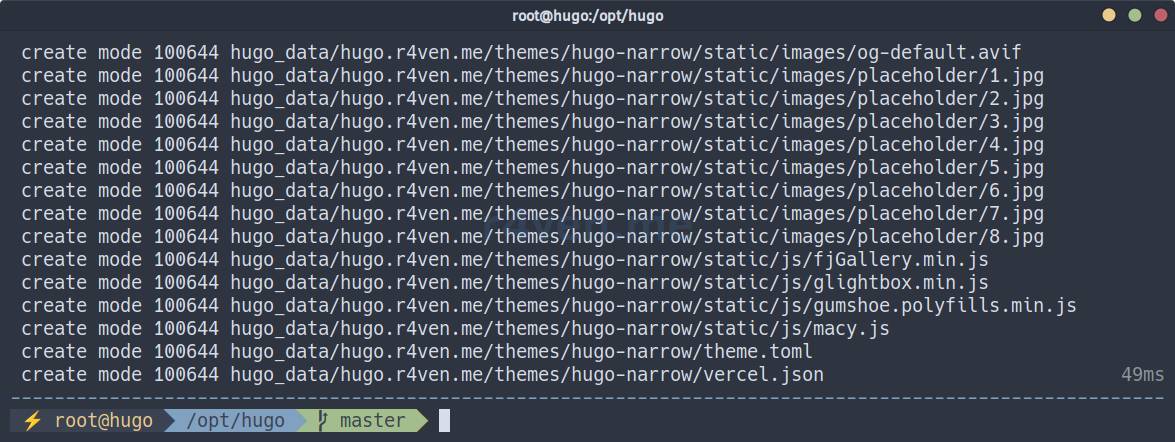
Finally, synchronize the local repository with the remote one:
git branch -M main

git remote add origin git@github.com:r4ven-me/hugo.git

git push -u origin main☝️Replace r4ven-me/hugo.git with your account and repository.

Check the repository on the web:
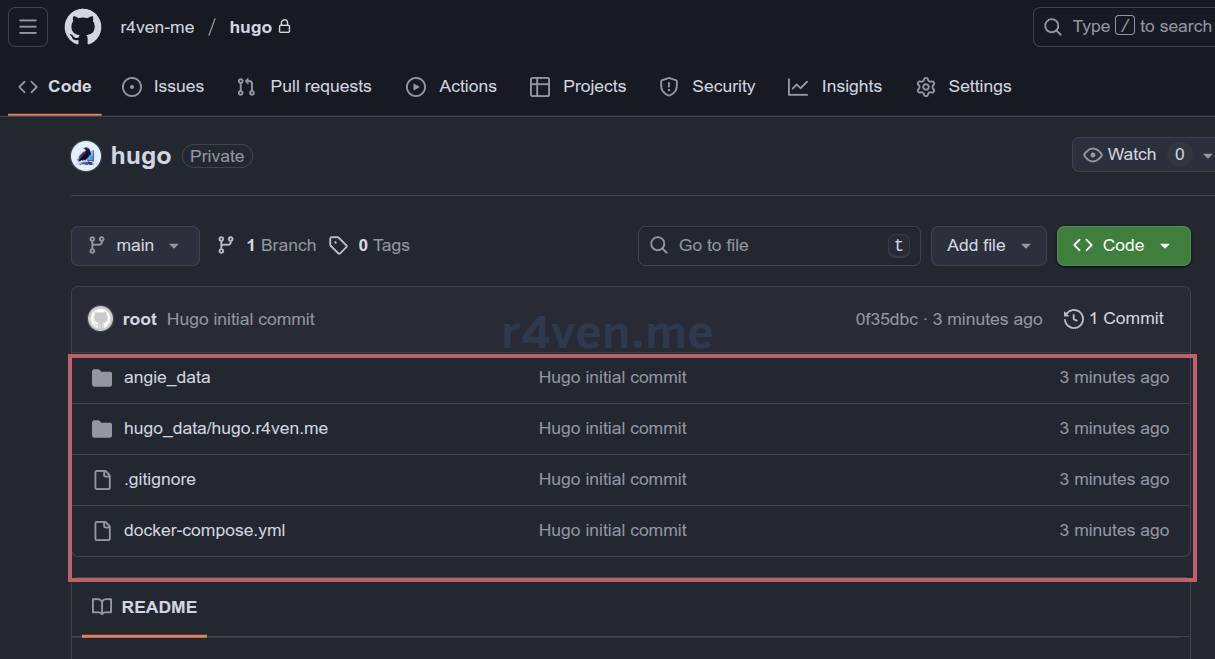
Everything looks good. Continue the setup.
☝️Perform the following actions on the local machine desktop.lan.
Now configure the client machine that will be used to add content to the site.
Create the project folder and clone our remote repository:
☝️This assumes that access from the client machine to your GitHub repositories is already configured.
git clone git@github.com:r4ven-me/hugo.git ~/Hugo

mkdir -p ~/Hugo/.github/workflows

cd ~/Hugo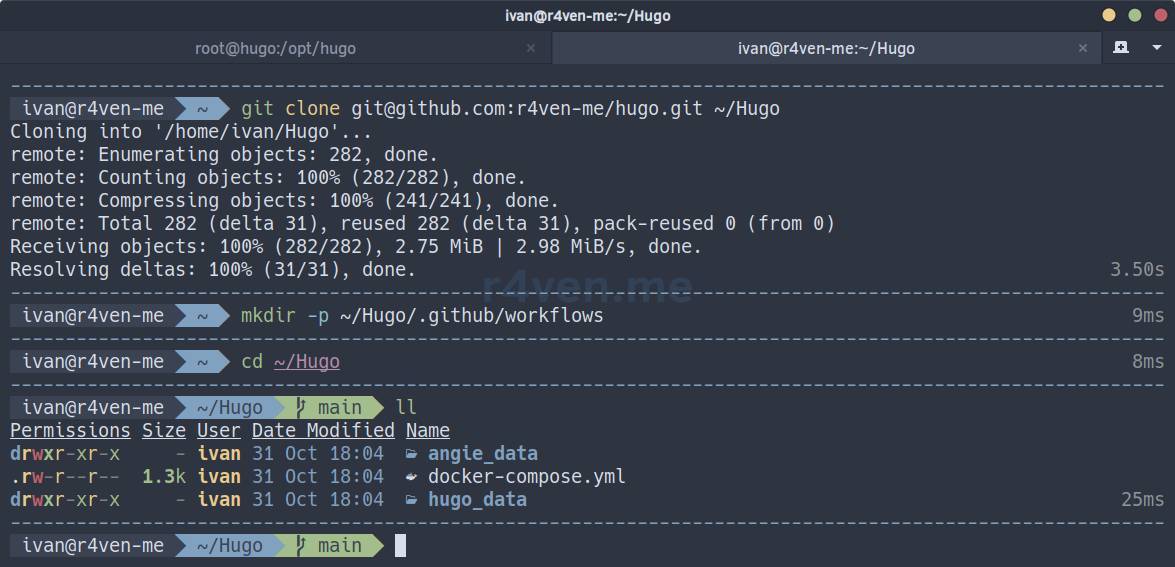
In this directory, create a special CI/CD pipeline definition file that GitHub automatically reads when changes are pushed to the repository:
nvim .github/workflows/deploy.yml---
name: Deploy Hugo site
on:
push:
branches: [ "main" ]
workflow_dispatch:
env:
HUGO_VERSION: 0.151.0
defaults:
run:
shell: bash
jobs:
build:
name: Build and test Hugo site
runs-on: ubuntu-latest
defaults:
run:
working-directory: hugo_data/hugo.r4ven.me
steps:
- name: Checkout repo
uses: actions/checkout@v4
- name: Set up Hugo
uses: peaceiris/actions-hugo@v3
with:
hugo-version: ${{ env.HUGO_VERSION }}
extended: true
- name: Build site
run: hugo --minify --gc
- name: Validate Hugo output
run: |
# Check the directory
if [ ! -d "public" ]; then
echo "❌ No 'public' directory!"
exit 1
fi
# Check index.html
if [ ! -f "public/index.html" ]; then
echo "❌ No index.html generated!"
exit 1
fi
# Check the size
if [ ! -s "public/index.html" ]; then
echo "❌ index.html is empty!"
exit 1
fi
# Check the number of files
FILE_COUNT=$(find public -type f | wc -l)
if [ "$FILE_COUNT" -lt 5 ]; then
echo "❌ Too few files ($FILE_COUNT) in public/ — probably build failed!"
exit 1
fi
echo "✅ Hugo output looks OK: $FILE_COUNT files generated."
- name: Check generated HTML
run: |
sudo apt install -y ruby ruby-dev
sudo gem install html-proofer
sudo htmlproofer ./public --disable-external --allow-missing-href
deploy:
name: Deploy to remote server
needs: build
if: success()
runs-on: ubuntu-latest
steps:
- name: Run a multi-line script
run: |
mkdir -p ~/.ssh
echo "${{ secrets.KEY }}" > ~/.ssh/id_ed25519
chmod 700 ~/.ssh/
chmod 600 ~/.ssh/id_ed25519
echo -e "Host *\nStrictHostKeyChecking no\n" > ~/.ssh/config
ssh ${{ secrets.HOST }} -p ${{ secrets.PORT }} -l ${{ secrets.USER }}
rm -rf ~/.ssh
notify:
runs-on: ubuntu-latest
needs: [build, deploy]
if: always()
steps:
- name: Send Telegram summary
uses: appleboy/telegram-action@master
with:
to: ${{ secrets.BLOG_TELEGRAM_ID }}
token: ${{ secrets.BLOG_TELEGRAM_TOKEN }}
message: |
🚀 **CI/CD Summary**
Repository: ${{ github.repository }}
Commit: ${{ github.sha }}
Author: ${{ github.actor }}
Message: ${{ github.event.head_commit.message }}
--------------------------------
🧱 Build: ${{ needs.build.result }}
📦 Deploy: ${{ needs.deploy.result }}Be sure to replace the domain name with your own:
sed -i 's|hugo.r4ven.me|example.com|g' .github/workflows/deploy.ymlPipeline description (GitHub Actions)
This pipeline runs on every push to the main branch (or when started manually on the web). It consists of three stages: build, deploy, and notify.
The build stage builds the Hugo site on GitHub servers, checks the generated HTML with htmlproofer, and validates the output file structure.
If the build and all checks succeed, the deploy stage runs a script on our remote server over SSH (more on that shortly).
The notify stage sends a Telegram notification with build and deployment information, regardless of whether they succeeded or failed.
This pipeline also uses external actions:
- actions/checkout@v4 - clones the repository into the runner so Hugo can access the site sources
- peaceiris/actions-hugo@v3 - installs the specified Hugo version in the runner
Now we need to create SSH access credentials for our remote server for the pipeline’s deploy stage.
On the client machine, generate a new SSH key and display its PRIVATE part in the terminal:
ssh-keygen -q -N "" -t ed25519 -f ~/.ssh/id_ed25519_github_cicd

cat ~/.ssh/id_ed25519_github_cicd-----BEGIN OPENSSH PRIVATE KEY-----
...
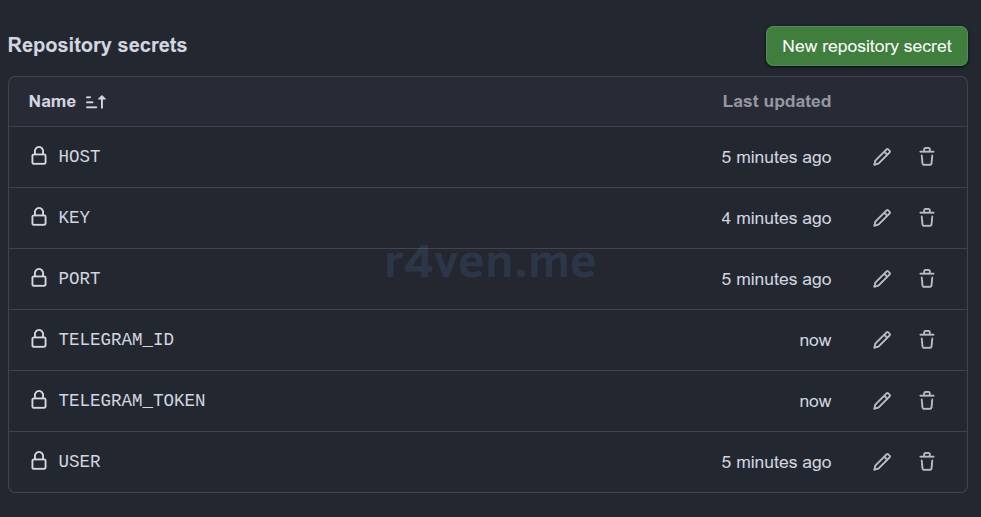
-----END OPENSSH PRIVATE KEY-----Now go to the repository settings, open the secrets and variables section, and add new secrets:
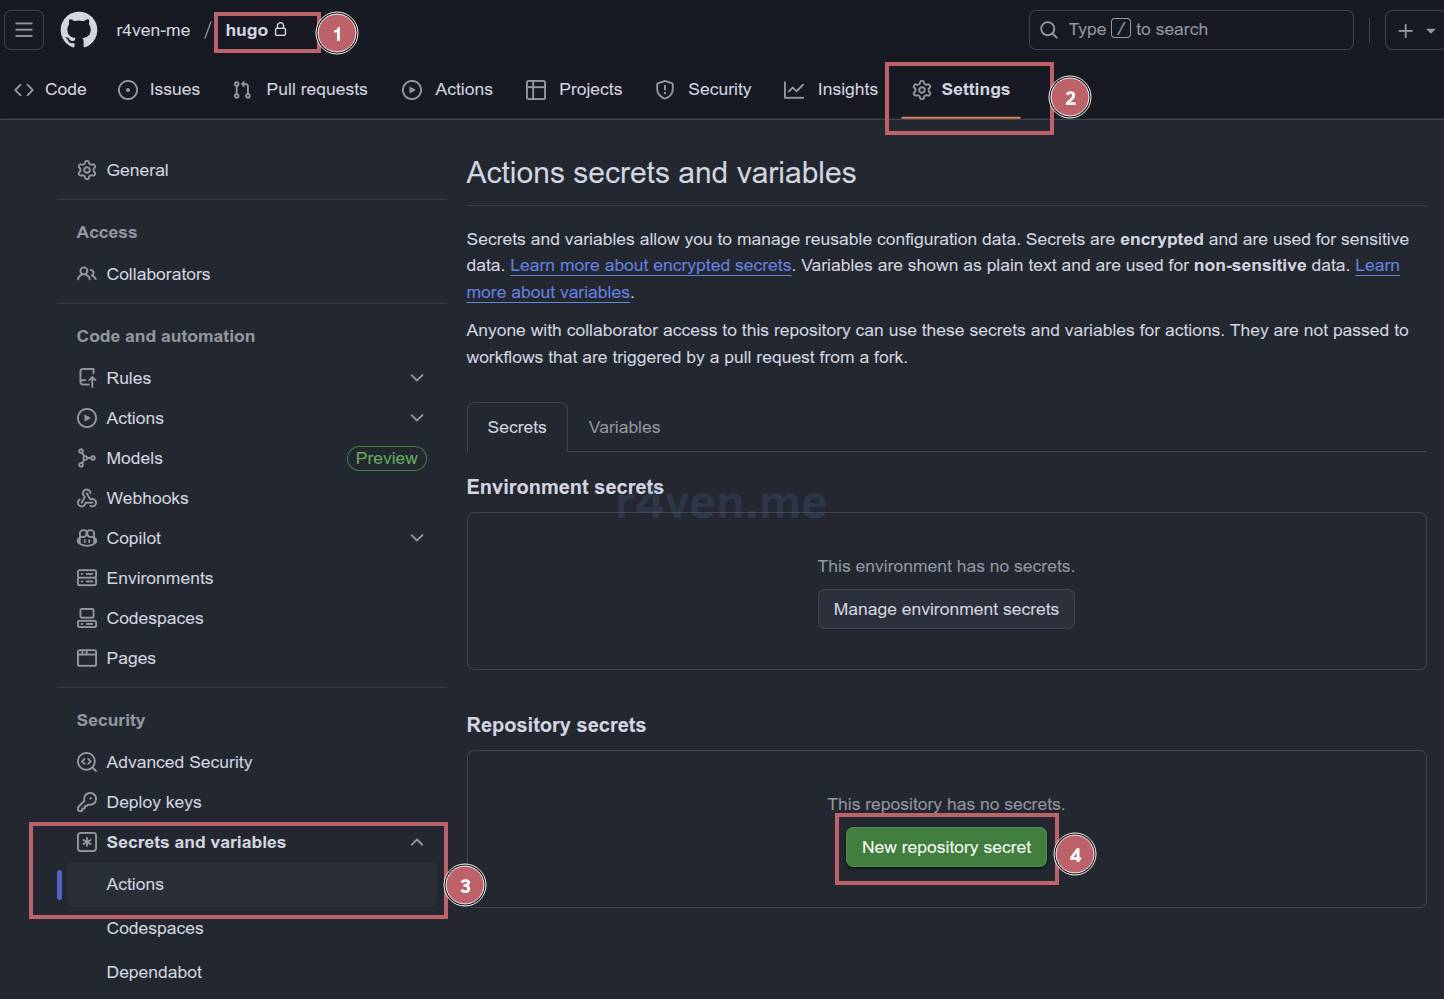
| Key | Value |
|---|---|
| USER | ivan |
| HOST | hugo.r4ven.me |
| PORT | 2222 |
| KEY | —–BEGIN OPENSSH PRIVATE KEY—– … —–END OPENSSH PRIVATE KEY—– |
| BLOG_TELEGRAM_ID | 12345678 |
| BLOG_TELEGRAM_TOKEN | 123456qwerty |
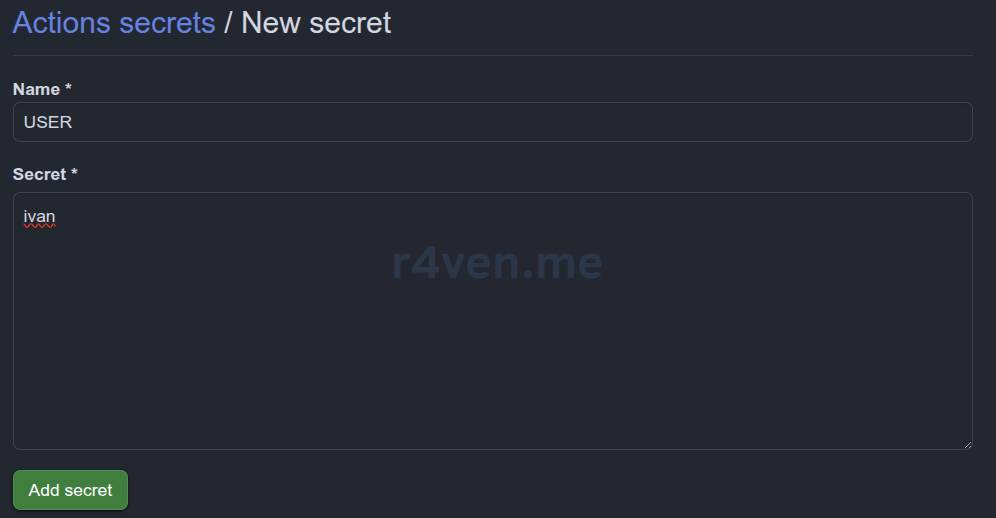
☝️ Important
For the KEY value, enter the private key contents exactly as they appeared in the terminal.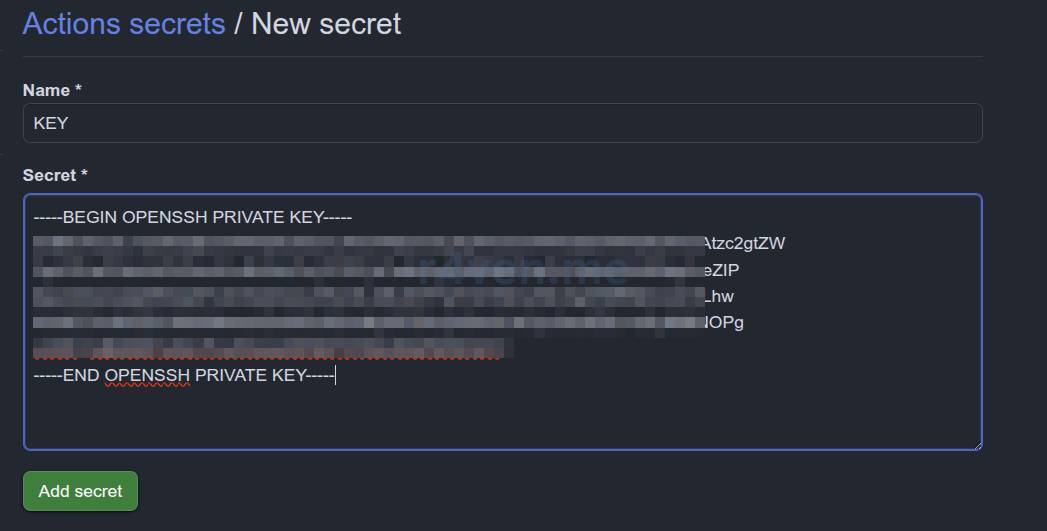
The spoiler below contains brief instructions for obtaining the bot token (BLOG_TELEGRAM_TOKEN) and chat ID (BLOG_TELEGRAM_ID):
Click the spoiler
Follow these steps to create a new Telegram bot and obtain a Telegram ID.
1) In Telegram search, find @BotFather, the bot used to create other bots, and follow the screenshot:
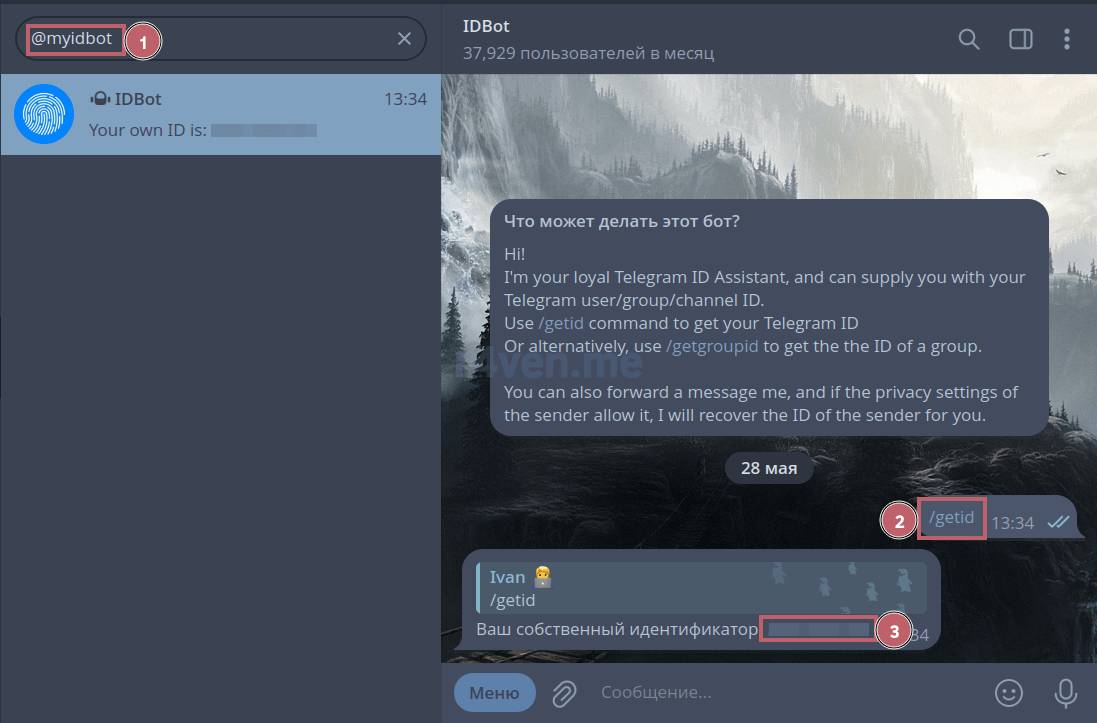
In my example:
- Bot address:
@r4ven_notes_bot - Bot token:
7894620308:AAHDi2w2RsgkIFE-qh0nujntiGruoTIQeuA
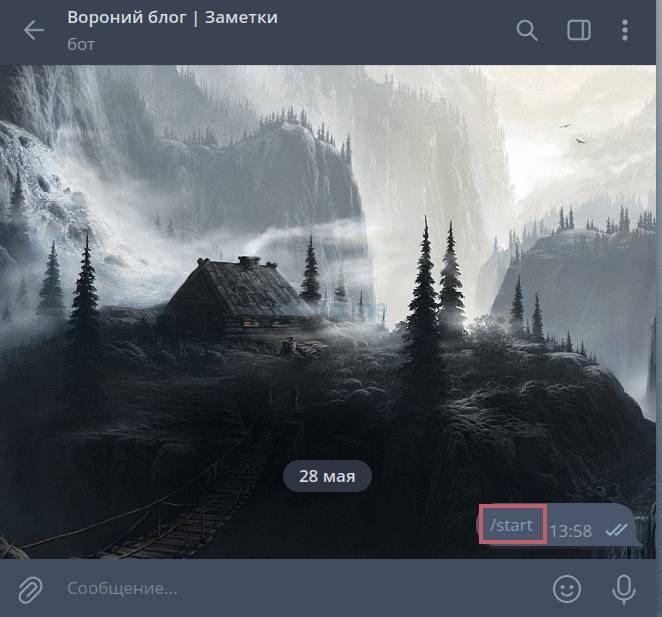
2) Click the bot address to open a chat with it, then click “Start”:
3) Now search Telegram for @myidbot, which will show us our Telegram ID:
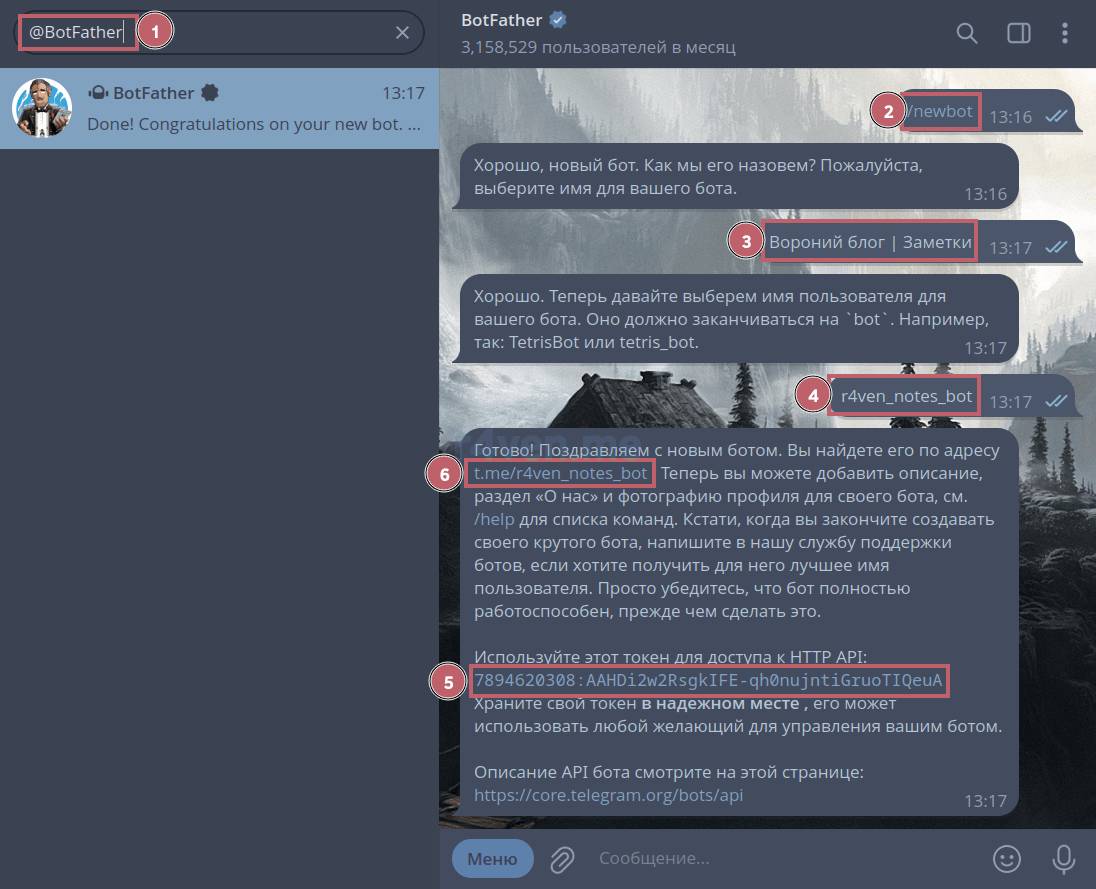
Example Telegram ID: 1234567890
You should now have secrets like these:
Now display the contents of the PUBLIC key in the terminal:
cat ~/.ssh/id_ed25519_github_cicd.pubssh-ed25519 AAAAC3NzaC1lZDI1NTE5AAAAIGvDu1omD1WwG1K68/mkvnBw/d4xRpREHDH4ytMDOl20Then configure the script to run when the pipeline connects during the deploy stage.
☝️Perform the following actions on the remote server hugo.r4ven.me as a regular user (ivan in my case).
Now create a specially configured SSH authorized_keys file on the server:
mkdir -p ~/.ssh/

chmod 700 ~/.ssh/

echo 'command="sudo /opt/hugo/deploy.sh",no-port-forwarding,no-X11-forwarding,no-agent-forwarding,no-pty ssh-ed25519 AAAAC3NzaC1lZDI1NTE5AAAAIGvDu1omD1WwG1K68/mkvnBw/d4xRpREHDH4ytMDOl20' >> ~/.ssh/authorized_keysWhere, instead of ssh-ed25519 AAAAC3NzaC1lZDI1NTE5AAAAIGvDu1omD1WwG1K68/mkvnBw/d4xRpREHDH4ytMDOl20,
specify your public key, which you displayed in the terminal on the client machine in the previous step.
📝 Note
The line in authorized_keys contains an SSH public key and a specific command. When connecting over SSH with the corresponding private key, only the specified command will run instead of opening an interactive shell; in this example, sudo /opt/hugo/deploy.sh. The no-port-forwarding, no-X11-forwarding, no-agent-forwarding, no-pty options restrict the SSH connection by disabling port forwarding, X11 forwarding, agent forwarding, and pseudo-terminal allocation. This improves security and limits SSH to a specific task, in this case deploying the site with the deploy.sh script.
Now configure the server so that sudo /opt/hugo/deploy.sh can run successfully.
☝️Perform the following actions on the remote server hugo.r4ven.me as the root user.
Create a sudoers file:
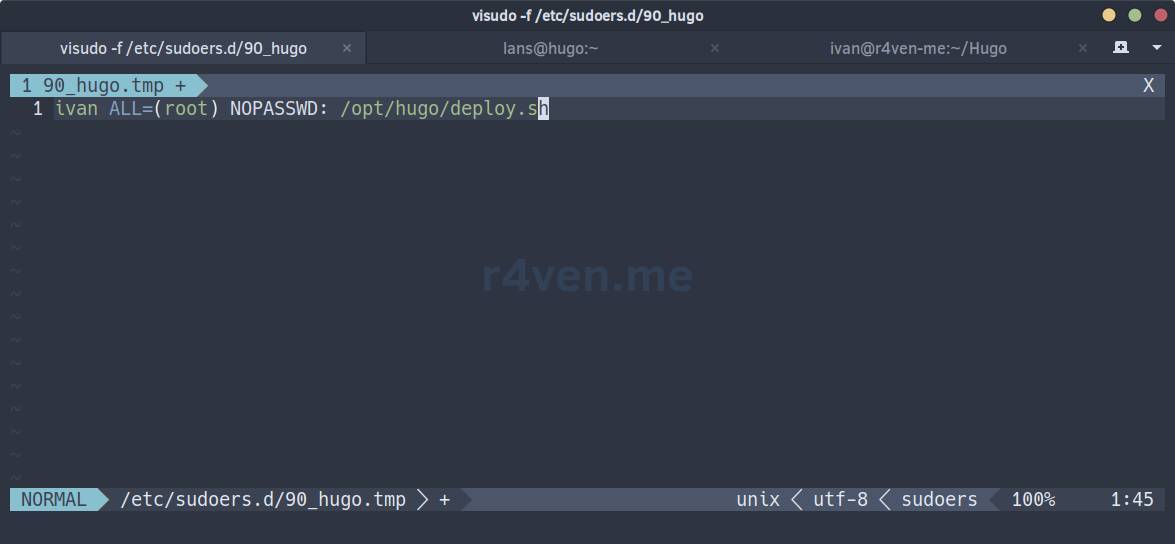
visudo -f /etc/sudoers.d/90_hugoAdd the following content:
ivan ALL=(root) NOPASSWD: /opt/hugo/deploy.sh☝️ Important
Replace ivan with your username.
❗️ Caution
Be very careful when editing sudo files. A syntax error may cause you to lose privileged access through sudo. Always keep a second terminal with the root account open just in case.
Now create a test deploy.sh on the server:
echo -e '#!/usr/bin/bash\necho Pong' > /opt/hugo/deploy.sh

chmod 700 /opt/hugo/deploy.shLet’s test it from the client where we generated the CI/CD key: id_ed25519_github_cicd.
☝️Perform the following actions on the local machine desktop.lan.
Try connecting to the server:
ssh -p 2222 -i ~/.ssh/id_ed25519_github_cicd ivan@hugo.r4ven.meIn response, you should receive Pong from our deploy.sh:
PTY allocation request failed on channel 0
Pong
Connection to hugo.r4ven.me closed.If so, everything is configured correctly.
Now let’s write a complete Bash script for deploying Hugo in the ~/Hugo project directory:
nvim ./deploy.shAdd the following content:
#!/usr/bin/env bash

# Safe script execution options:
# -E: functions inherit the trap
# -e: exit on any error
# -u: error when using uninitialized variables
# -o pipefail: return the error code of the last failed command in a pipeline
set -Eeuo pipefail

# Explicitly define PATH to avoid problems finding binaries
export PATH="/usr/local/bin:/usr/bin:/bin:/usr/local/sbin:/usr/sbin:/sbin"


# Project variables
PROJECT_NAME="hugo"           # Hugo project/service name
PROJECT_WEB="angie"           # Project web server name
PROJECT_DIR="/opt/hugo"       # Project directory


# Logging settings
LOG_TO_STDOUT=1       # output logs to stdout
LOG_TO_FILE=0         # log to a file (<script_name>.log)
LOG_TO_SYSLOG=0       # log to syslog with the <script_name> tag


# Main script variables
SCRIPT_PID=$$    # PID of the current script
# Absolute path to the script directory
SCRIPT_DIR=$(cd "$(dirname "${BASH_SOURCE[0]}")" &> /dev/null && pwd -P)
SCRIPT_NAME="$(basename "${BASH_SOURCE[0]}")"    # Script name
SCRIPT_LOG="${SCRIPT_DIR}/${SCRIPT_NAME%.*}.log" # Log file
SCRIPT_LOG_PREFIX='[%Y-%m-%d %H:%M:%S.%3N]'     # Log timestamp format
SCRIPT_LOCK="${SCRIPT_DIR}/${SCRIPT_NAME%.*}.lock" # Lock file


# Function for cleaning up resources on exit or errors
cleanup() {
    trap - SIGINT SIGTERM SIGHUP SIGQUIT ERR EXIT  # reset traps

    # Close the lock descriptor if it was opened
    [[ -n "${fd_lock-}" ]] && exec {fd_lock}>&-

    # Remove the lock file if it belongs to the current process
    if [[ -f "$SCRIPT_LOCK" && $(< "$SCRIPT_LOCK") -eq $SCRIPT_PID ]]; then
        rm -f "$SCRIPT_LOCK"
    fi
}


# Logging function
logging() {
    while IFS= read -r line; do
        # Format the log line with a timestamp
        log_line="$(date +"${SCRIPT_LOG_PREFIX}") - $line"

        # Output the log to stdout if enabled
        if (( "$LOG_TO_STDOUT" )); then echo "$log_line"; fi

        # Log to a file if enabled
        if (( "$LOG_TO_FILE" )); then echo "$log_line" >> "$SCRIPT_LOG"; fi

        # Log to syslog if enabled
        if (( "$LOG_TO_SYSLOG" )); then logger -t "$SCRIPT_NAME" -- "$line"; fi
    done
}


# Script locking function to prevent parallel execution
lock_script() {
    # Open the lock file descriptor for writing
    exec {fd_lock}>> "${SCRIPT_LOCK}"

    # Try to acquire an exclusive lock; exit if unsuccessful
    if ! flock -n "$fd_lock"; then
        echo "Another script instance is already running, exiting..."
        exit 1
    fi

    # Write the current script PID to the lock file
    echo "$SCRIPT_PID" > "$SCRIPT_LOCK"
}


# Main deployment function
deploy() {
    echo "Check git and docker binaries"
    # Check for git and docker
    if ! command -v git; then echo >&2 "Git is not installed"; fi
    if ! command -v docker; then echo >&2 "Docker is not installed"; fi

    # Move to the project directory if it is writable
    if [[ -w "$PROJECT_DIR" ]]; then
        cd "$PROJECT_DIR"
    else
        echo "No such directory: $PROJECT_DIR"
        exit 1
    fi

    # Update the git repository if it exists
    if [[ -d .git ]]; then
        echo "Pull changes from main branch"
        git checkout main
        git fetch --all
        git reset --hard origin/main
    else
        echo "No git files found"
        exit 1
    fi

    echo "Restart $PROJECT_NAME service"
    #systemctl restart "$PROJECT_NAME"   # systemctl can be used
    docker compose up hugo               # start the service through Docker Compose

    sleep 3  # short timeout

    echo "Waiting for site generation..."
    # Wait for the Hugo service to finish
    while docker compose ps --services --filter "status=running" | grep -q "^$PROJECT_NAME$"; do
        echo "Waiting for site generation..."
        sleep 1
    done

    echo 'Done!'

    # Check that the web server is running
    echo "Checking if webserver container is running"
    if docker compose ps --services --filter "status=running" | grep -q "^$PROJECT_WEB$"; then
        echo 'Up!'
    else
        echo "Container with $PROJECT_WEB webserver is not running"
        exit 1
    fi

    sleep 3

    # Output the latest service logs
    echo "Some output of running service"
    LOG=$(journalctl -n 50 --no-pager -u "$PROJECT_NAME")
    echo "------------------------------"
    echo "$LOG"
    echo "------------------------------"
}


# Main script function
main() {
    # Catch signals and errors and call cleanup
    trap 'RC=$?; cleanup; exit $RC' SIGINT SIGHUP SIGTERM SIGQUIT ERR EXIT
    # Redirect stdout and stderr to the logging function
    exec > >(logging) 2>&1
    lock_script   # lock the script
    deploy        # start deployment
}


# Entry point
if main; then
    sleep 1
    echo "Deploy completed successfully"
    exit 0
else
    echo "Deploy failed"
    exit 1
fiThe script provides safe execution, logs actions to stdout, a file, or syslog, prevents parallel execution with a lock, and performs the following steps:
- checks for the required utilities (
gitanddocker); - retrieves the latest changes from the
gitrepository; - restarts the
hugoservice withdocker compose; - waits for site generation to finish;
- checks that the web server is operational and displays the last 50 lines of the service journal.
On success, it displays a successful completion message; otherwise, it reports an error.
All script output will be visible in the CI/CD section on GitHub.
Make the script executable:
chmod 700 ./deploy.shFinally, commit the changes and push them to the remote repository:
git add .

git commit -m 'Get test deploy!'

git push origin main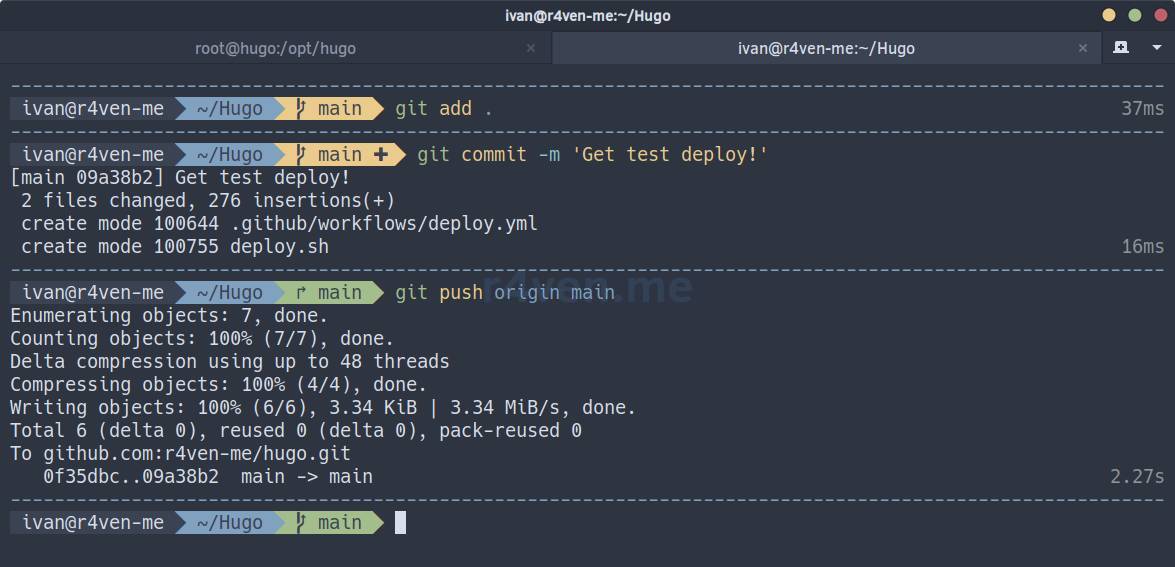
Open GitHub on the web and go to the Actions section:
We can see the running pipeline:
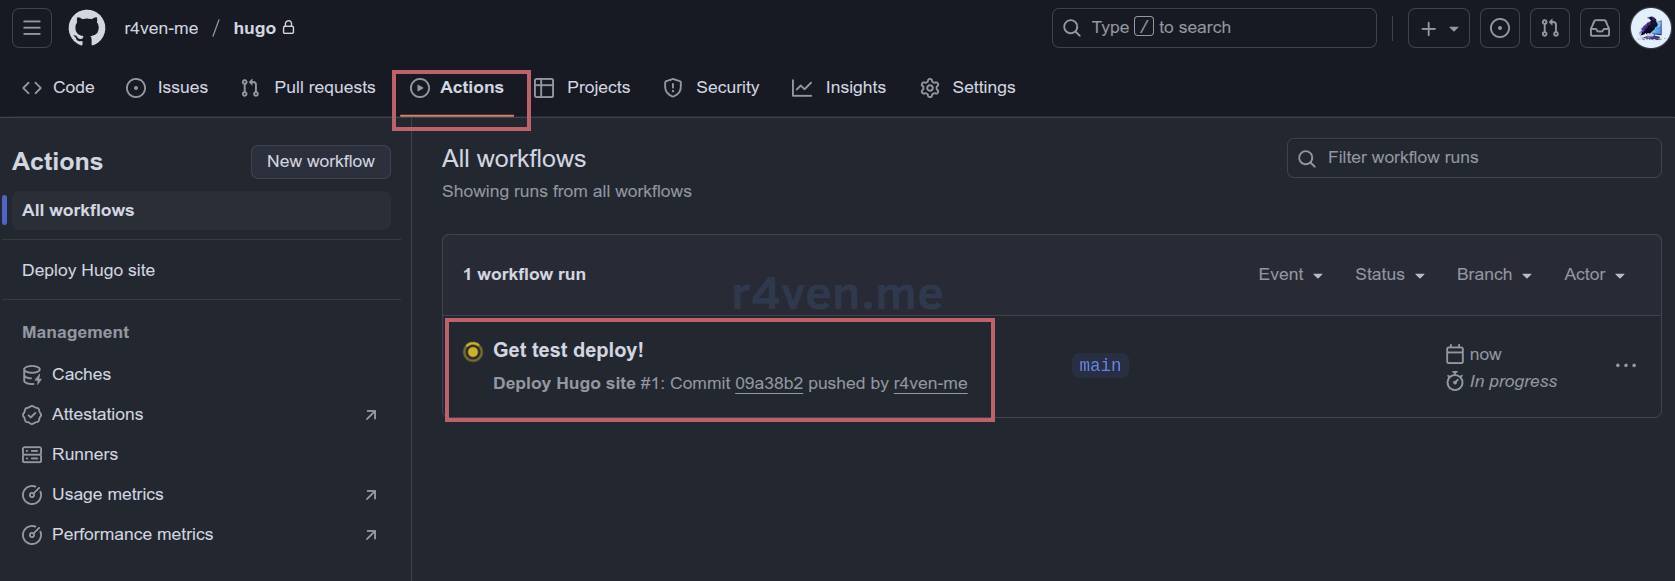
Open it to watch the CI/CD stages run in real time.
On successful completion, it will look like this:
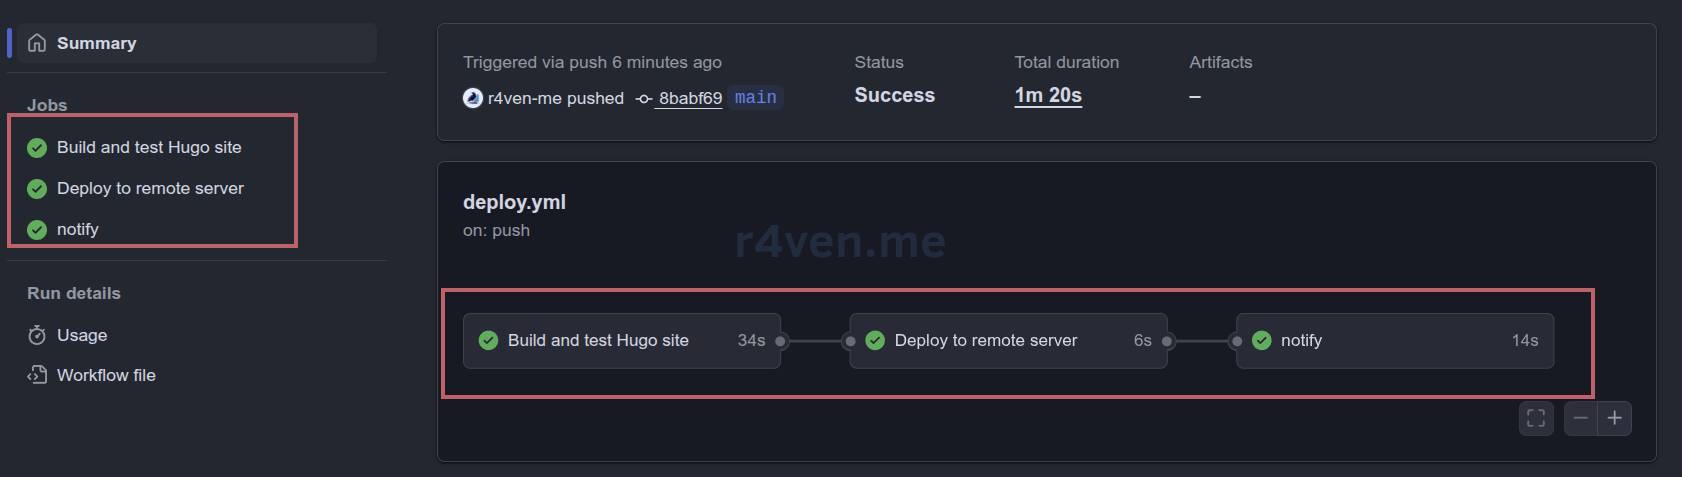
The deploy stage output should contain Pong!.
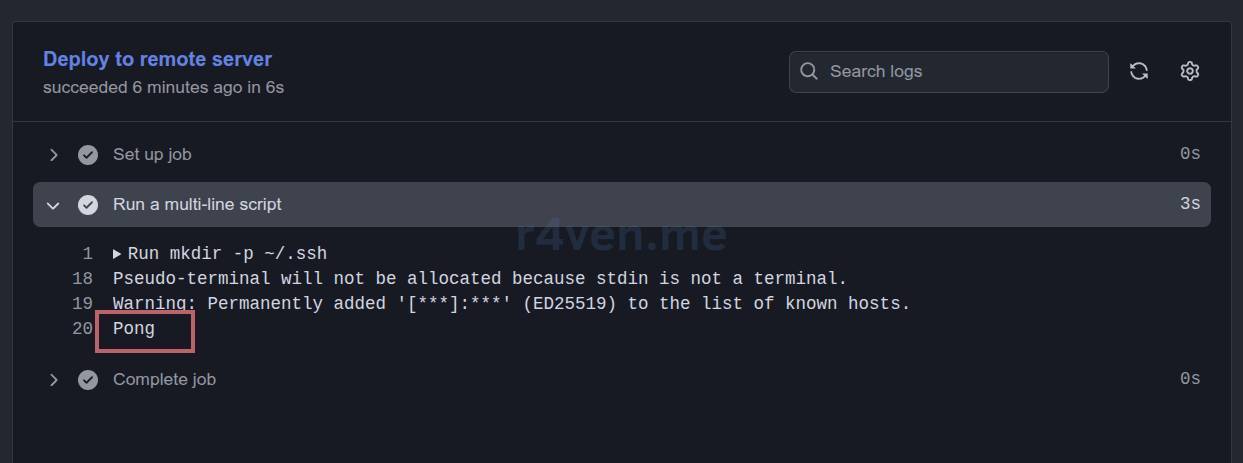
📝In any case, Telegram will receive a notification with the status of the completed (or failed) tasks: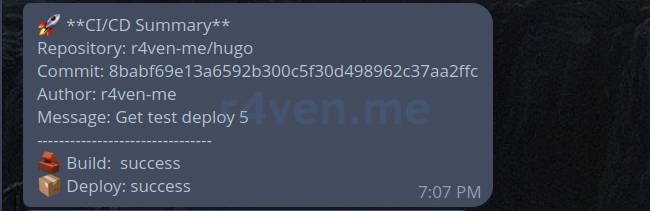
This is a good sign: the pipeline worked correctly. All that remains is to bring the deploy.sh script onto the server.
☝️Perform the following actions on the remote server hugo.r4ven.me as the root user.
In the project directory on the server, pull the changes that we previously pushed from the client:
cd /opt/hugo

git fetch --all

git reset --hard origin/main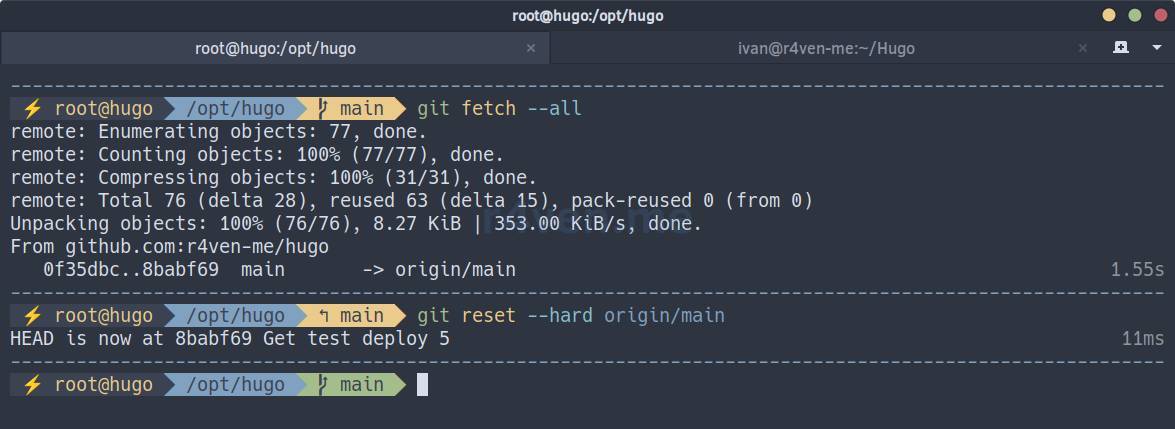
Check that the current script has arrived on the server:
less deploy.sh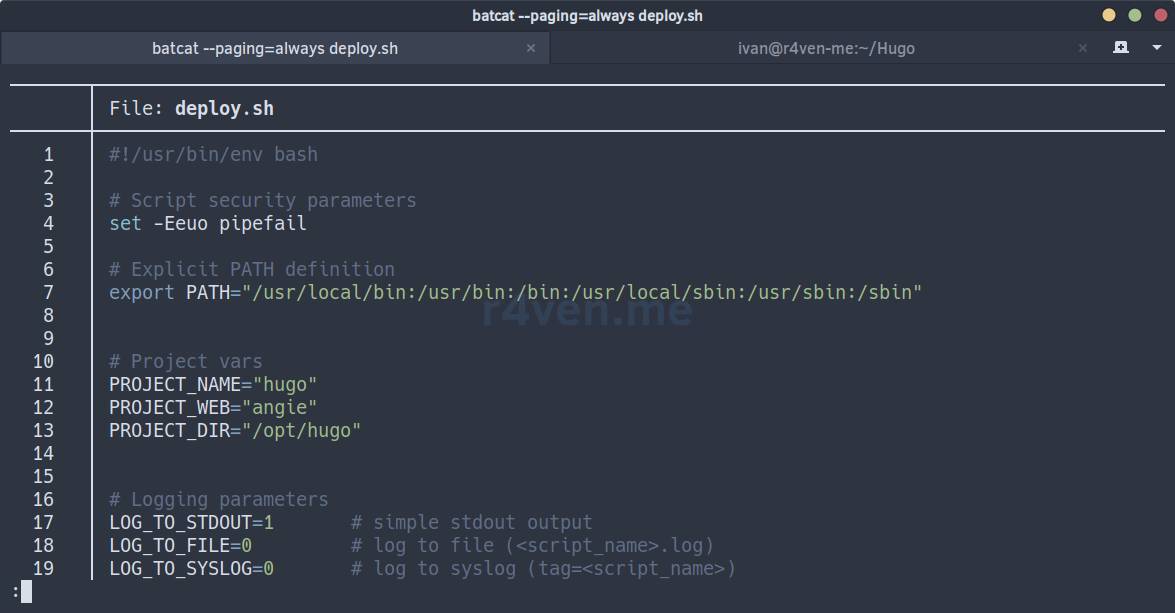
Everything is in place. Now perform a final test of the entire pipeline plus the deployment script.
☝️Perform the following actions on the local machine desktop.lan.
Add a new Markdown post from the client machine:
cd ~/Hugo

cat << EOF > ./hugo_data/hugo.r4ven.me/content/posts/my-third-post.md
---
title: "My third Post"
date: 2025-08-20
draft: false
categories: ["Test"]
tags: ["Hugo", "Guide"]
---

## Hello, R4ven!
EOFPush the changes to the repository:
git add . && git commit -m 'Get real deploy!' && git push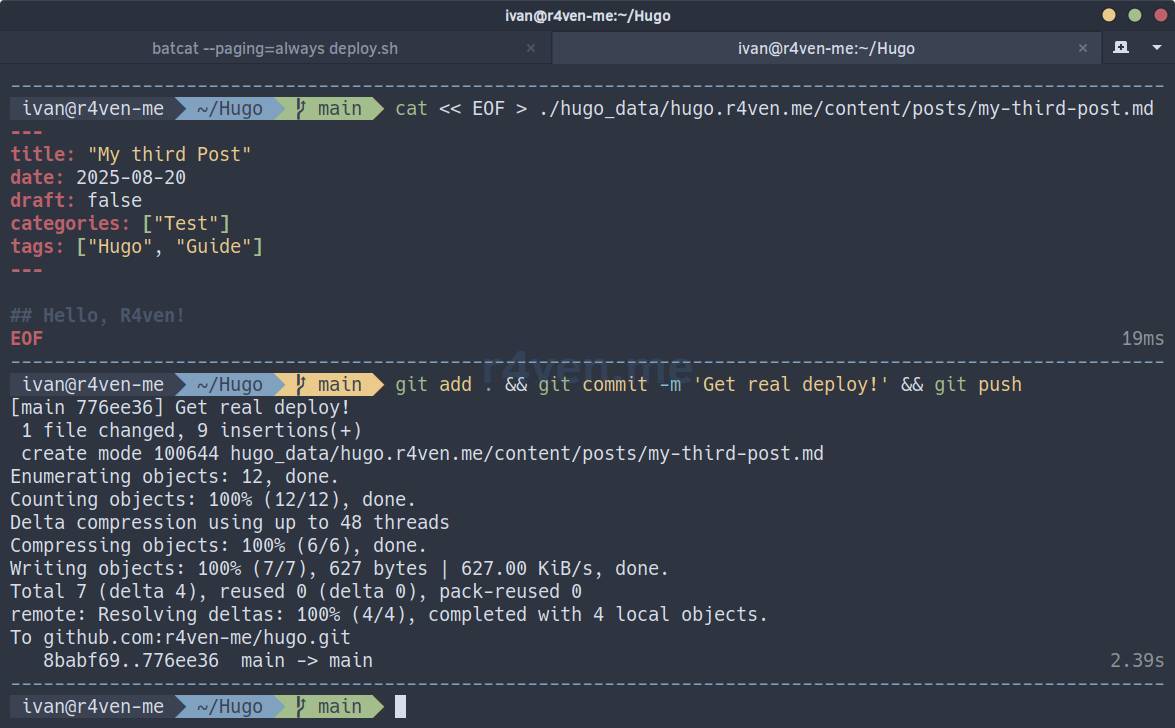
View the actions section on GitHub:
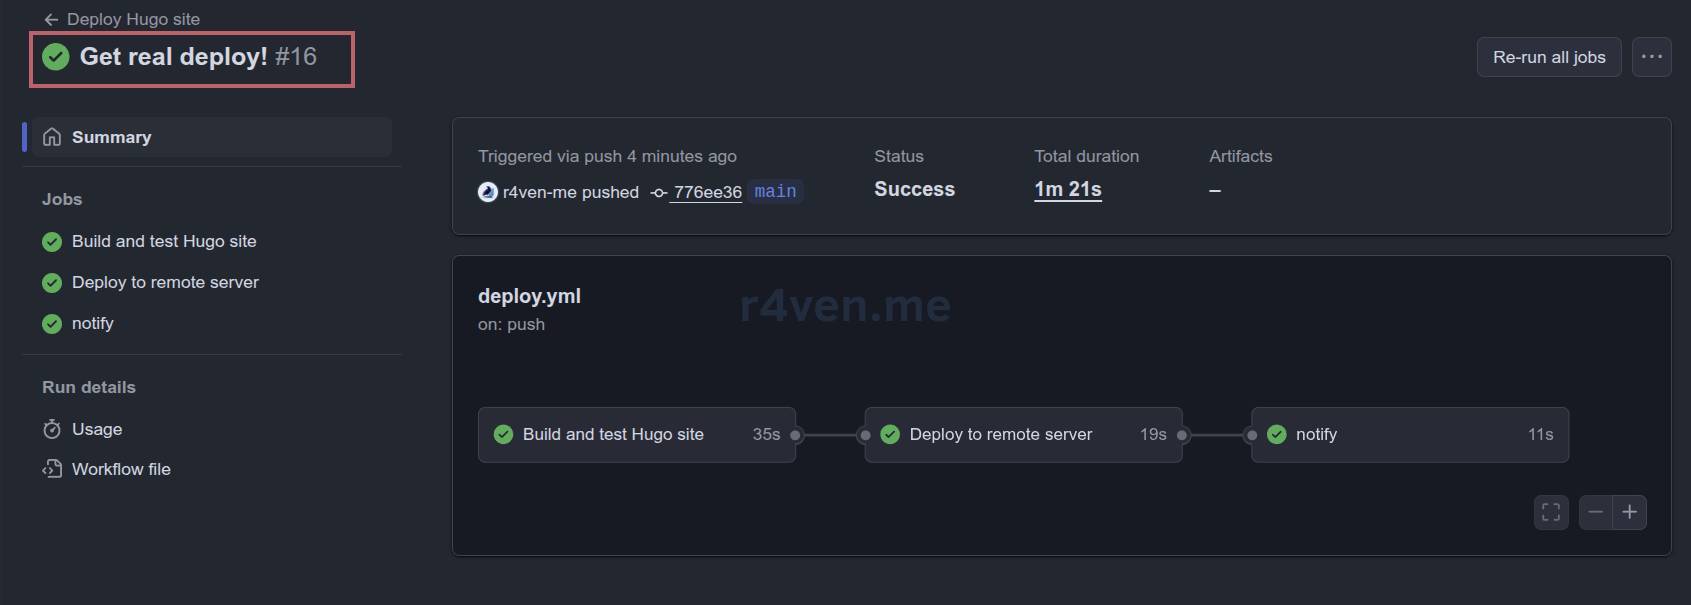
Excellent! The pipeline has run. The “Deploy to remote server” stage will contain our script output: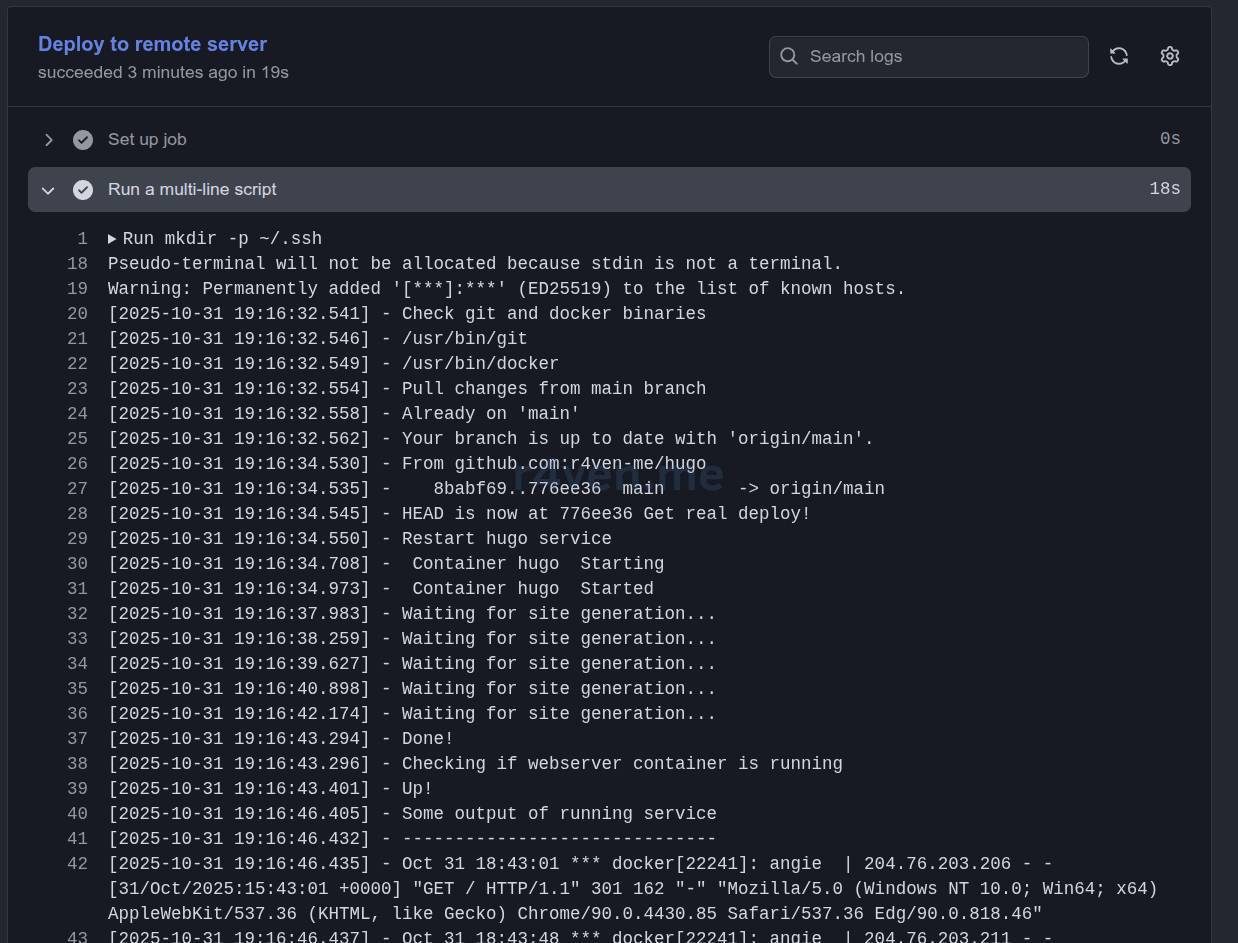
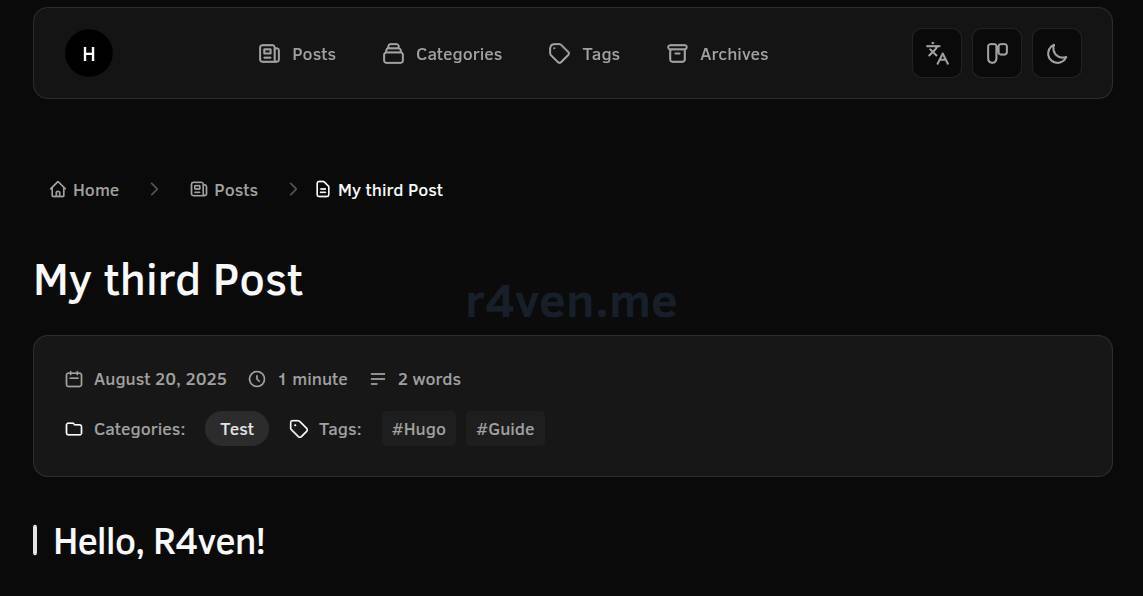
Now check in the browser whether our site has been updated:
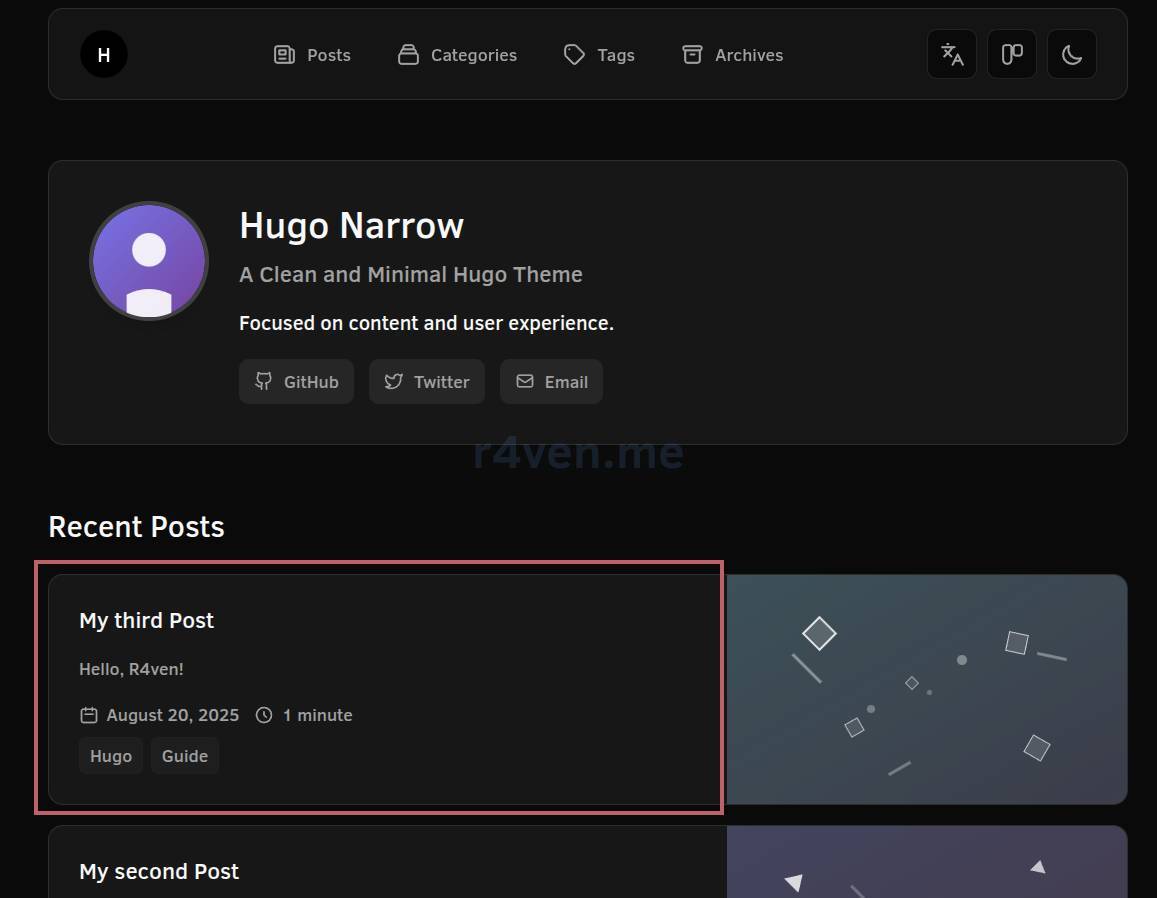
Indeed it has! A third post has appeared:
If you have successfully reached this point, congratulations! You have already completed the hardest part.
All that remains is to make publishing new content and configuring the site more convenient…
Configuring Obsidian
💡By the way, here is what Obsidian is and why you need it: 🔗 Obsidian - A Progressive Note-Taking Tool for PCs and Smartphones
Launch Obsidian and open the folder as a vault:
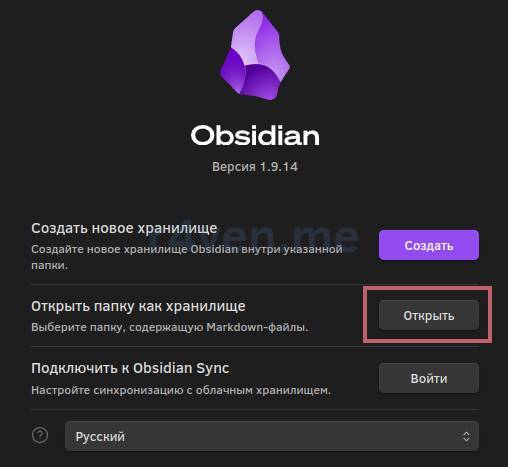
Select ~/Hugo/hugo.r4ven.me/content/:
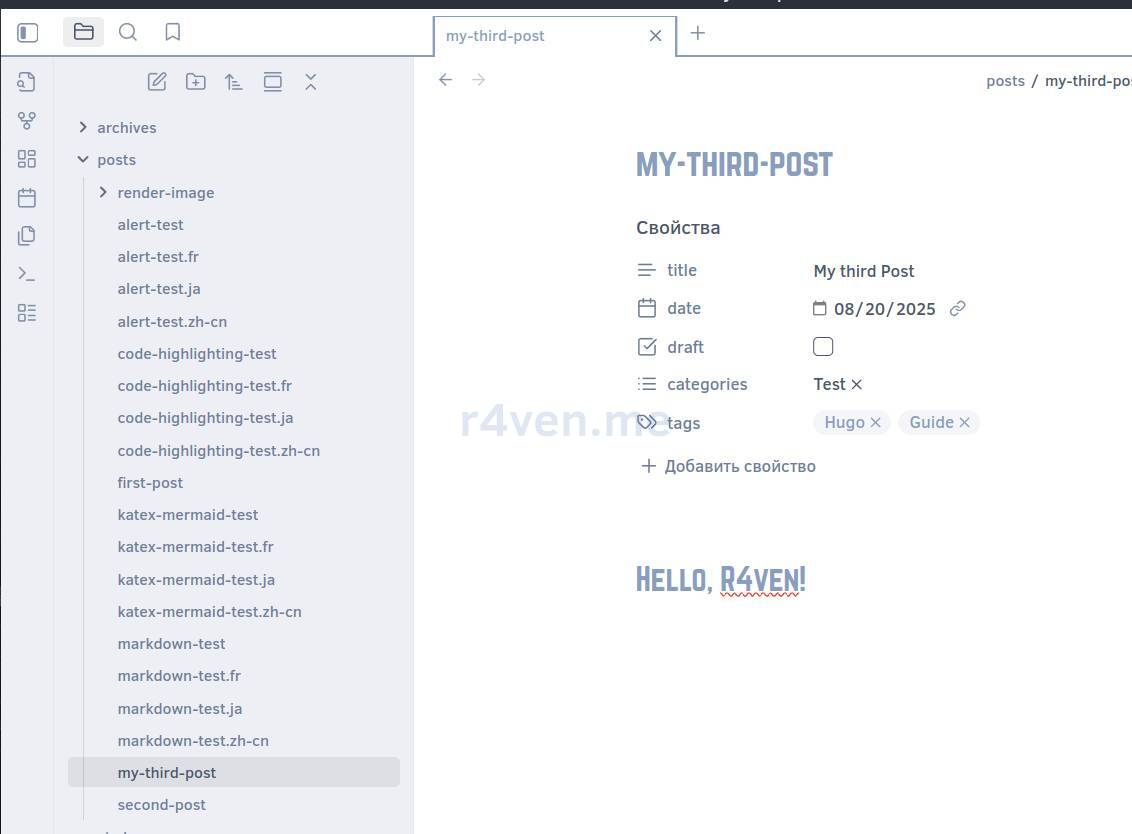
We can see our posts. Now go to the application settings:
Basic Markdown Configuration
The Editor section:
| Key | Value |
|---|---|
Strict line breaks | enable |
Use tabs | disable |
The Files and links section:
| Key | Value |
|---|---|
Default location for new notes | In the folder specified below |
Folder to create new notes in | posts |
New link format | Relative path to file |
Use [[Wikilinks]] | disable |
Default location for new attachments | In subfolder under current folder |
Subfolder name | attachments |
Installing the Git Plugin
Go to “Settings” –> “Community plugins” –> “Browse”
Install and enable the Git plugin:

Now the button on the left opens the panel on the right🤷♂️.
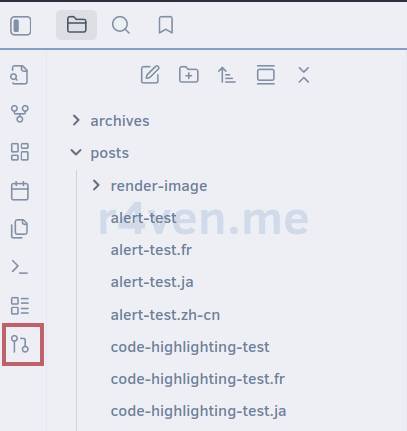
It will show the changes tracked by Git:
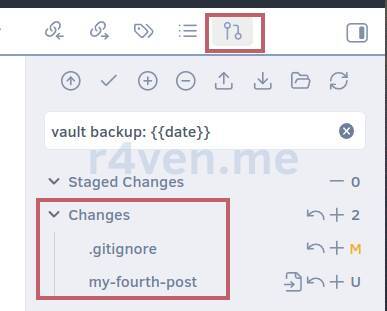
We did not have to configure the repository in the Git plugin because we had already initialized the ~/Hugo directory.
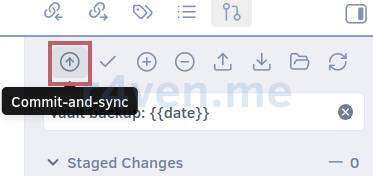
Add posts and click the “Commit-and-sync” button in the panel on the right:
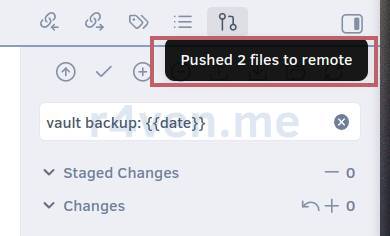
A notification will confirm that the push to the remote repository succeeded:
Installing the Templater Plugin (Optional)
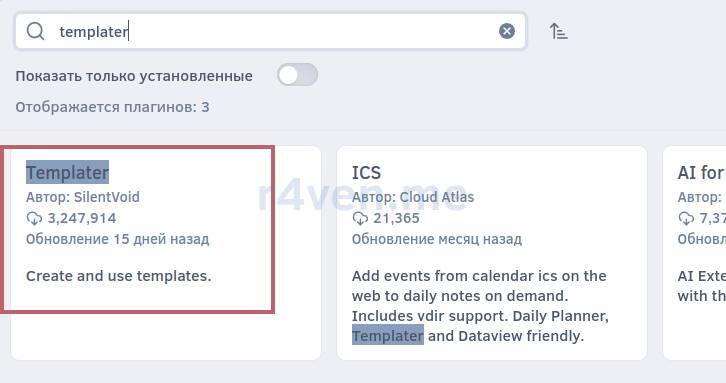
I recommend the Templater plugin. It lets you write scripts that automate actions with notes inside Obsidian.
Let me show you what I mean. First, install Templater:
Go to the plugin settings and set “Template folder location” to templates:
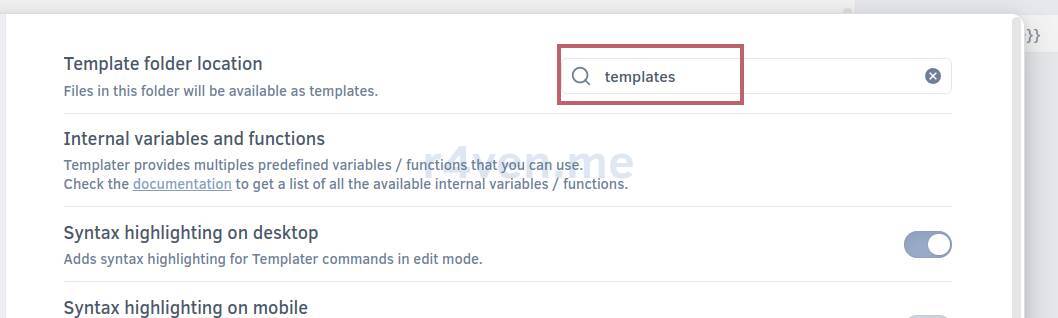
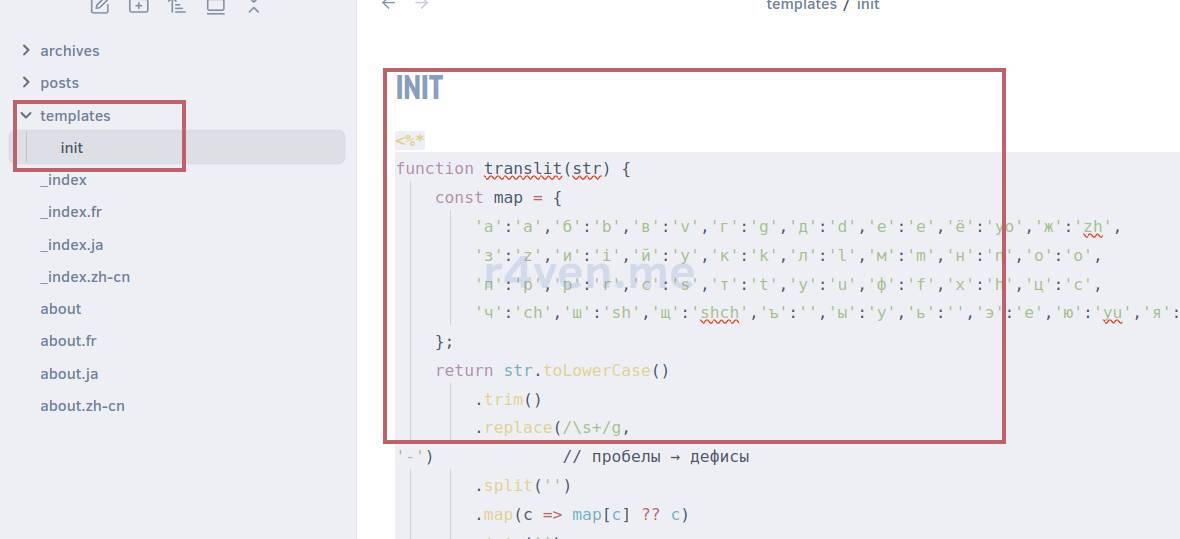
Now create a templates folder in the Obsidian root and an init file inside it. Add the following content:
<%*
function translit(str) {
    const map = {
        'а':'a','б':'b','в':'v','г':'g','д':'d','е':'e','ё':'yo','ж':'zh',
        'з':'z','и':'i','й':'y','к':'k','л':'l','м':'m','н':'n','о':'o',
        'п':'p','р':'r','с':'s','т':'t','у':'u','ф':'f','х':'h','ц':'c',
        'ч':'ch','ш':'sh','щ':'shch','ъ':'','ы':'y','ь':'','э':'e','ю':'yu','я':'ya'
    };
    return str.toLowerCase()
        .trim()
        .replace(/\s+/g,
'-')             // spaces to hyphens
        .split('')
        .map(c => map[c] ?? c)
        .join('')
        .replace(/[^a-z0-9\-_.]/g, '')
        .replace(/-+/g, '-')
        .replace(/^-+|-+$/g, '');
}

function getAllFolders() {
    const out = [];
    const root = app.vault.getRoot();
    function walk(folder) {
        out.push(folder.path);
        if (!folder.children) return;
        folder.children.forEach(c => {
            if (Array.isArray(c.children)) walk(c);
        });
    }
    walk(root);
    return out;
}

try {
    const folders = getAllFolders();
    if (!folders || folders.length === 0) {
        new Notice("Failed to get the list of folders in the vault.");
        return;
    }

    // select the base folder (for example, content/posts/linux)
    const basePath = await tp.system.suggester(folders, folders);
    if (!basePath) {
        new Notice("Folder selection canceled.");
        return;
    }

    const today = tp.date.now("YYYY-MM-DD");
    const rusName = await tp.system.prompt("Enter the title (in Russian):");
    if (!rusName) {
        new Notice("No title entered; canceled.");
        return;
    }

    const slug = translit(rusName) || "untitled";
    const folderName = `${today}-${slug}`;
    const finalPath = `${basePath}/${folderName}`;

    // create a new folder for the post
    await app.vault.createFolder(finalPath).catch(()=>{});

    // category is the last element of basePath
    const categoryName = basePath.split("/").pop();

    // front matter
    const frontmatter =
`---
draft: true
title: ${JSON.stringify(rusName)}
date: ${today}
lastmod:
author: Иван Чёрный
toc: false
slug: ${slug}
url: /${categoryName}/${slug}
aliases:
categories:
  - ${categoryName}
tags:
  - raven
cover: cover.jpg
description: Post description.
---

## Introduction

## Article Content

## Conclusion
`;

    // create index.md
    const targetPath = `${finalPath}/index.md`;
    const existing = app.vault.getAbstractFileByPath(targetPath);
    if (existing) {
        new Notice(`⚠️ Already exists: ${targetPath}`);
    } else {
        await app.vault.create(targetPath, frontmatter);
        new Notice(`✅ Created: ${targetPath}`);
    }

} catch (err) {
    new Notice("Script error: " + (err?.message ?? String(err)));
    console.error(err);
}
%>
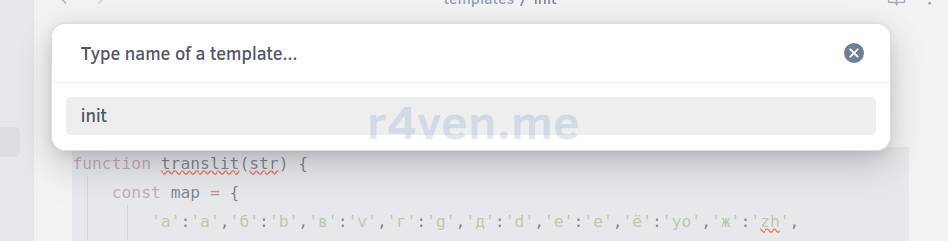
Try using the template: press Alt+e (or the plugin button on the left) and select init:
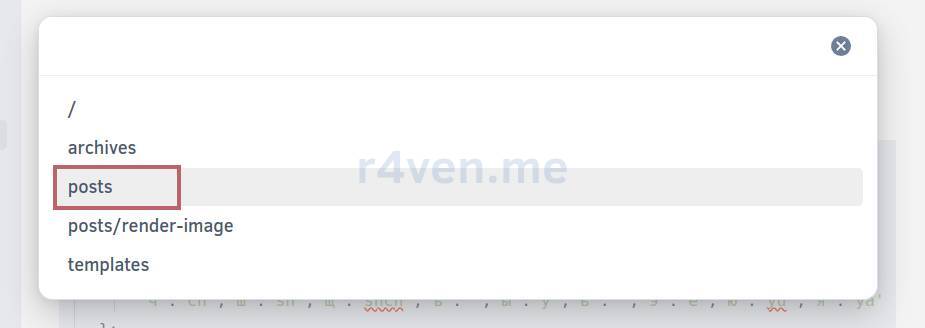
The template will ask which directory should contain the new post:
Next, specify the post title, preferably one that will work well as the heading of your new website article:

Press Enter. As a result, a separate folder for the post (date + transliterated name) and an index.md file with prefilled front matter and article body will be created in the posts folder.
💡You can easily adjust the init template to suit your needs.
Convenient? I think so!👍
Before publishing, be sure to remove the draft “flag” from the front matter: draft.
Add a couple of images to the post with a simple Ctrl+c, Ctrl+v, plus a small code block for variety:
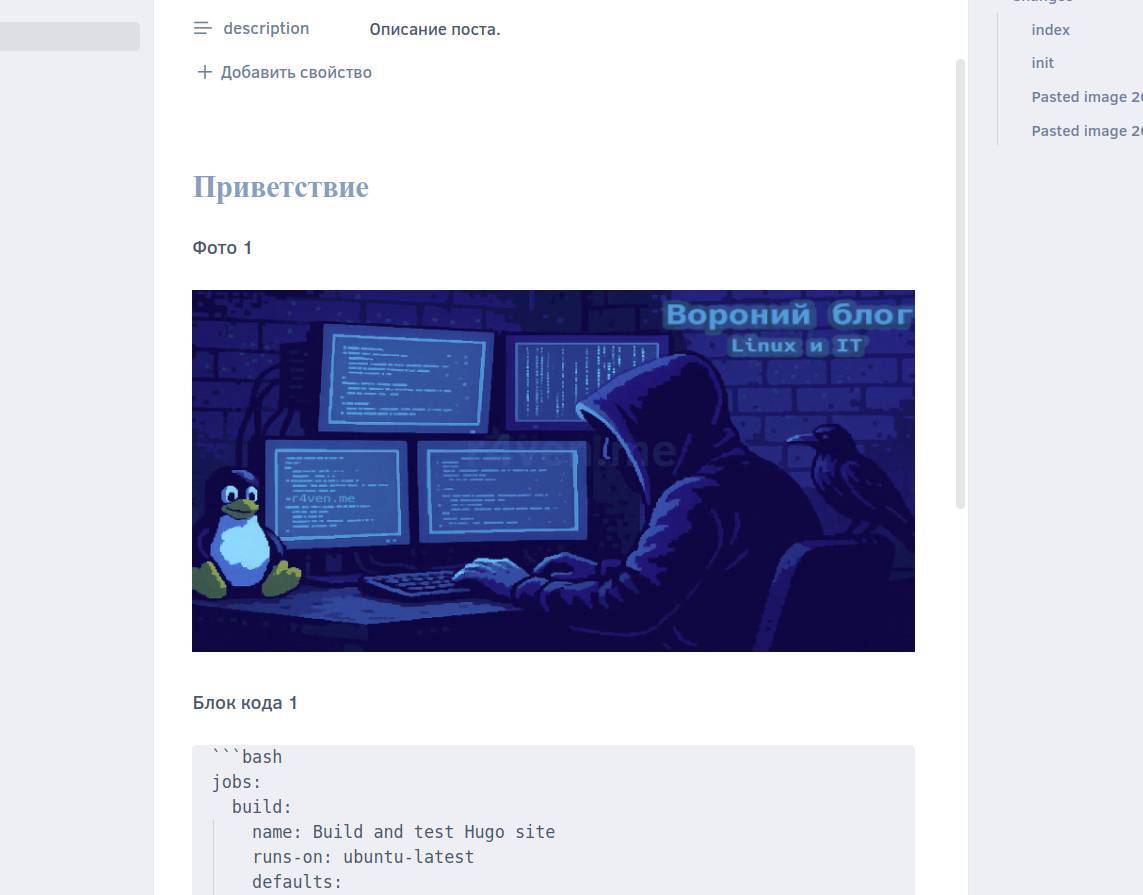
Also place the article cover, cover.png (specified in the front matter), next to the post’s index.md file. The name must match.
💡Read more about how the Narrow theme handles image paths here.
Now let’s publish all of this.
Testing the Content Publishing Process
Click Commit-and-sync:
Open GitHub on the web to check:
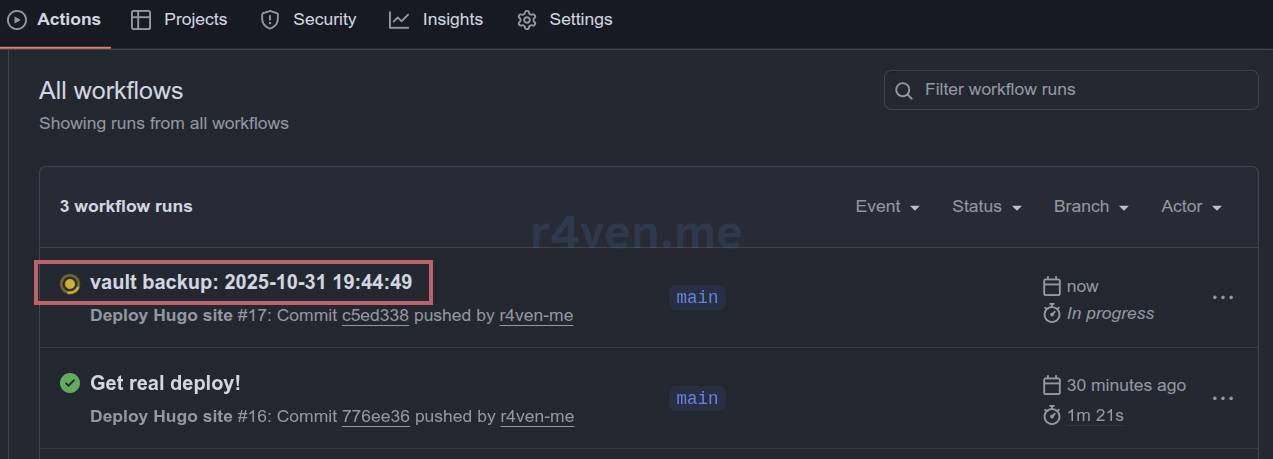
💡 Tip
You can configure the commit message template in the Git plugin settings.
Deployment is complete🏁:
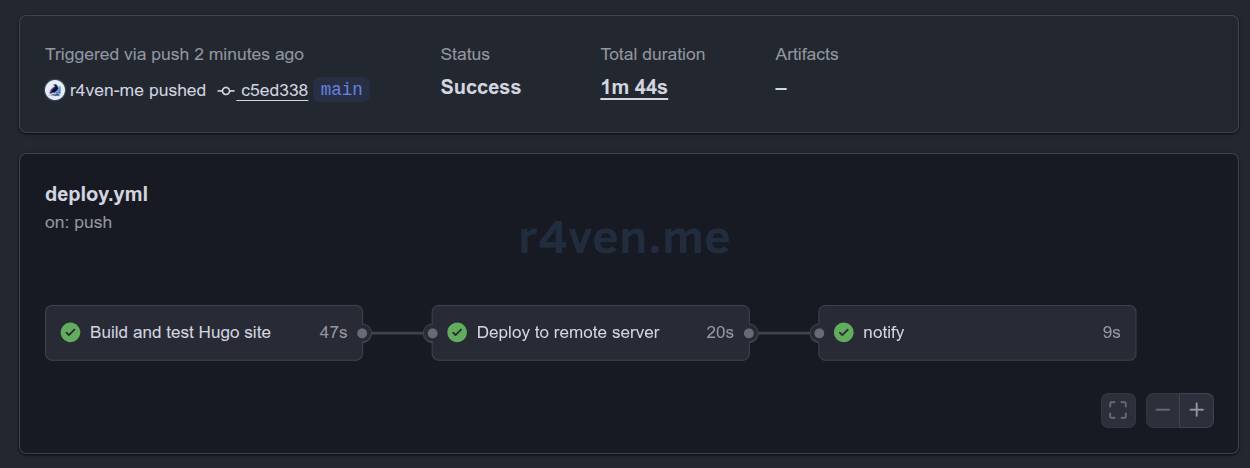
The Telegram notification has arrived📬:
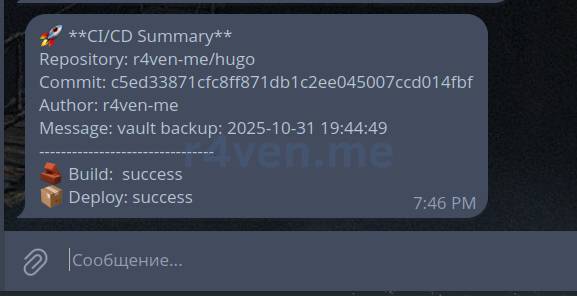
The article has appeared on the site🌐:

Cool!🎉
Conclusion
Whew..😔 That was a long and fascinating journey! In the end, we built a fast and secure static site with Hugo and, most importantly, configured a convenient publishing process: write posts in Obsidian, click “one button,” and within a few minutes the content is automatically updated on the server. This is what people now call the modern “Docs as Code” approach to blogging: efficient, automated, and enjoyable😎.
Thank you for reading!
P.S. I recommend taking a closer look at Obsidian; it is quite a powerhouse. In my experience, it greatly simplifies writing and organizing articles and notes.
References
- Source files from the article on GitHub
- Official Hugo project website
- List of Docker images with Hugo
- Source files for Docker images with Hugo
- Official documentation for installing Angie in Docker
- Narrow theme documentation for Hugo
- Narrow theme live demo
- Narrow theme source files
- Habr article: “Blogging Like Freaks”
👨💻And…
Don’t forget about our Telegram channel 📱 and chat
Or maybe you want to become a co-author? Then click here🔗
💬 All the best ✌️
That should be it. If not, check the logs 🙂

Comments