
In this article, we will use OpenTofu with the bpg provider to manage Proxmox infrastructure.
🖐️Эй!
Subscribe to our Telegram channel @r4ven_me📱, so you don’t miss new posts on the website 😉. If you have questions or just want to chat about the topic, feel free to join the Raven chat at @r4ven_me_chat🧐.
TLDR
Actions on Proxmox server:
## =======================
## Preparing a VM template
## =======================

# Update package list and install libguestfs-tools
apt update && apt install -y libguestfs-tools

# Download Debian 13 (Trixie) generic AMD64 qcow2 image
wcurl https://cloud.debian.org/images/cloud/trixie/latest/debian-13-generic-amd64.qcow2

# Resize the downloaded image to 20 GB
qemu-img resize ./debian-13-generic-amd64.qcow2 20G

# Customize the image if necessary
virt-customize -a ./debian-13-generic-amd64.qcow2 \
    --run-command "echo 'en_US.UTF-8 UTF-8' >> /etc/locale.gen" \
    --run-command "locale-gen" \
    --update --install qemu-guest-agent,sudo,gpg,git,curl,vim

# Create a new virtual machine with ID 7777, name, memory, and cores
qm create 7777 --name "debian13-k8s-template" \
    --memory 2048 --cores 2 --net0 virtio,bridge=vmbr0

# Import the resized disk image into VM 7777 on 'storage'
qm importdisk 7777 ./debian-13-generic-amd64.qcow2 storage --format qcow2

# Set SCSI controller and attach the imported disk
qm set 7777 --scsihw virtio-scsi-single \
    --scsi0 storage:7777/vm-7777-disk-0.qcow2

# Set boot order from the SCSI disk
qm set 7777 --boot order=scsi0

# Add Cloud-Init image to IDE0
qm set 7777 --ide0 storage:cloudinit

# Configure serial console for VNC output
qm set 7777 --serial0 socket --vga serial0

# Enable QEMU Guest Agent for better VM interaction
qm set 7777 --agent enabled=1

# Convert the virtual machine into a template
qm template 7777

# Rescan VM ID 7777 (to update state after template creation)
qm rescan --vmid 7777

# ! To destroy template use command: qm destroy 7777

## ============================
## Creating Proxmox access data
## ============================

# Output the configuration of the created template
qm config 7777

# Create a new Proxmox role 'TFUser' with specified privileges
pveum role add TFUser -privs "Pool.Allocate VM.Console VM.Allocate VM.Clone VM.Config.CDROM VM.Config.CPU VM.Config.Cloudinit VM.Config.Disk VM.Config.HWType VM.Config.Memory VM.Config.Network VM.Config.Options VM.Audit VM.PowerMgmt VM.GuestAgent.Audit Datastore.AllocateSpace Datastore.Allocate Datastore.Audit SDN.Use"

# Create a new Proxmox user 'tfuser@pve'
pveum user add tfuser@pve

# Apply the 'TFUser' role to the 'tfuser@pve' user at the root level
pveum aclmod / -user tfuser@pve -role TFUser

# Create an API token for user 'tfuser@pve' with the name 'tf'
pveum user token add tfuser@pve tf --privsep 0Actions on client machine:
## =============================
## Installing OpenTofu on Debian
## =============================

# Update package list
sudo apt update

# Install necessary packages for HTTPS repositories and GPG
sudo apt install -y apt-transport-https ca-certificates curl gnupg

# Create directory for APT keys
sudo install -m 0755 -d /etc/apt/keyrings

# Download official OpenTofu GPG key
curl -fsSL https://get.opentofu.org/opentofu.gpg | \
    sudo tee /etc/apt/keyrings/opentofu.gpg > /dev/null

# Download OpenTofu repository GPG key
curl -fsSL https://packages.opentofu.org/opentofu/tofu/gpgkey | \
    sudo gpg --no-tty --batch --dearmor \
    --output /etc/apt/keyrings/opentofu-repo.gpg > /dev/null

# Set permissions for GPG keys
sudo chmod a+r /etc/apt/keyrings/opentofu.gpg /etc/apt/keyrings/opentofu-repo.gpg

# Add OpenTofu repository to APT sources list
echo \
    "deb [signed-by=/etc/apt/keyrings/opentofu.gpg,/etc/apt/keyrings/opentofu-repo.gpg] https://packages.opentofu.org/opentofu/tofu/any/ any main
    deb-src [signed-by=/etc/apt/keyrings/opentofu.gpg,/etc/apt/keyrings/opentofu-repo.gpg] https://packages.opentofu.org/opentofu/tofu/any/ any main" | \
    sudo tee /etc/apt/sources.list.d/opentofu.list > /dev/null

# Set permissions for the repository file
sudo chmod a+r /etc/apt/sources.list.d/opentofu.list

# Update package list and install OpenTofu
sudo apt update && sudo apt install -y tofu

# Check OpenTofu installation and output version
command -v tofu && tofu --version

## =======================
## Preparing project files
## =======================

# Clone the repository with opentofu files for k8s
git clone https://github.com/r4ven-me/opentofu-proxmox-k8s ~/TF

# Navigate to the project directory
cd ~/TF

# Open the variables file for the dev environment
vim dev.tfvars

# Open the variables file for the prod environment
vim prod.tfvars

# Open the environment file and load variables
vim .env && source .env

## ==================================
## Creating infrastructure in Proxmox
## ==================================

# Initialize the OpenTofu working directory (update modules)
tofu init -upgrade

# Validate OpenTofu configuration
tofu validate

# Reconfigure the backend to use the local dev state file
tofu init -reconfigure -backend-config="path=./dev.tfstate"

# Create an execution plan for the dev environment
tofu plan -var-file=./dev.tfvars

# Apply changes for the dev environment
tofu apply -var-file=./dev.tfvars

# Reconfigure the backend to use the local prod state file
tofu init -reconfigure -backend-config="path=./prod.tfstate"

# Create an execution plan for the prod environment
tofu plan -var-file=./prod.tfvars

# Apply changes for the prod environment with parallelism limit
tofu apply -var-file=./prod.tfvars -parallelism=2

## ================================================
## Example of deleting previously created resources
## ================================================

# Reconfigure the backend back to the dev environment
tofu init -reconfigure -backend-config="path=./dev.tfstate"

# Destroy dev environment resources
tofu destroy -var-file=./dev.tfvars

## ==============
## Debug commands
## ==============

tofu fmt -check          # check if formatting is needed
tofu fmt                 # format files
tofu fmt -recursive      # recursively through directories
tofu validate            # check configuration syntax and logic
export TF_LOG=DEBUG      # enable logging (DEBUG level)
export TF_LOG_PATH="tofu.log" # set path to log file
tail -f ./tofu.log       # view logs
unset TF_LOG TF_LOG_PATH # disable loggingIntroduction
Below is a brief overview for those who are new to the software mentioned in the title and the IaC concept.
What is IaC?
Infrastructure as Code (IaC) is an approach to managing and provisioning infrastructure (servers, networks, databases, storage, etc.) using configuration files and program code, rather than manual processes or interactive tools.
What is Proxmox?
Proxmox Virtual Environment (Proxmox VE) is an Open source virtualization platform designed to manage virtual machines (based on KVM) and containers (based on LXC). It operates as a type-1 hypervisor (bare-metal), installing directly on hardware, and provides a convenient web interface for centralized management of all resources.
What is Terraform?
Terraform is an Infrastructure as Code (IaC) tool that allows you to describe, create, modify, and delete cloud and on-premises infrastructure (servers, databases, networks, etc.) using the declarative HashiCorp Configuration Language (HCL). Its main advantage is the ability to manage infrastructure from various providers (AWS, Azure, Proxmox, etc.) in a consistent way, ensuring reproducibility, versioning, and automation of deployment processes. In general, it’s a useful tool👍.
What is OpenTofu?
OpenTofu is an open, community-driven alternative to Terraform, which emerged as a fork after HashiCorp changed Terraform’s license from MPL to BSL. The project is under the auspices of the Linux Foundation and aims to ensure the continuous development of the Infrastructure as Code (IaC) tool with a guaranteed open license and transparent governance.
What is a Terraform/OpenTofu Provider?
A Terraform/OpenTofu provider is a plugin that serves as the primary interface for interacting with a specific platform or service. Whether it’s a cloud provider like Google Cloud, on-premises infrastructure like Proxmox or VMware, or a SaaS service like GitHub. In short: the provider abstracts the complexities of that platform’s API, allowing you to create, read, update, and delete (CRUD) resources described in the configuration. It’s a very versatile tool🤷♂️.
As an example, we will automate the process of creating and preparing virtual machines for a k8s (Kubernetes) cluster infrastructure.
This infrastructure includes 3 VM roles:
- balancers
- master nodes (control plane)
- worker nodes
All VM parameters are conveniently set using var files separated by environment.
The project also provides custom server preparation scripts after their deployment. Cloud-Init is used as a bootstrap script - templates are available for each role and can be easily customized.
Input Data
Software used in the article:
| Software | Version |
|---|---|
| Proxmox | 9.0.3 (Debian 13) |
| OpenTofu | 1.11.1 |
| Provider bpg | 0.87.0 |
| Client with OpenTofu | Debian 13 |
Enough talk, let’s get to automation🚘.
Proxmox Preparation
Let’s start with the hypervisor🖥️.
Preparing a VM Image in qcow2 Format
Connect to the Proxmox server via SSH:
ssh root@proxmox.home.lan⚠️ПWarning
In my example, I connect via SSH as the root user. This is acceptable for test environments. For production work, I highly recommend using sudo.
☝️The following actions are performed on the Proxmox server (proxmox.home.lan in my case) as the root user.
Update package cache and install necessary utilities:
apt update && apt install -y libguestfs-toolsDownload the latest Debian 13 base image in qcow2 format:
wcurl https://cloud.debian.org/images/cloud/trixie/latest/debian-13-generic-amd64.qcow2

ls -l ./debian-13-generic-amd64.qcow2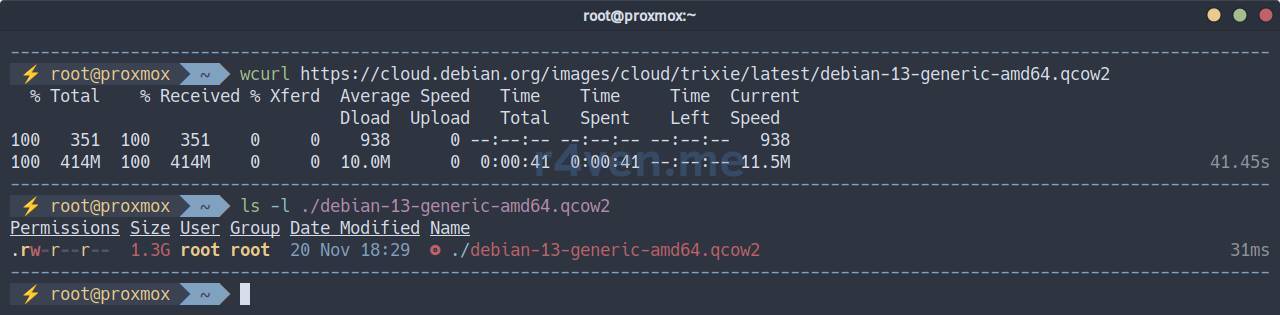
Resize the disk (specify a suitable value):
qemu-img resize ./debian-13-generic-amd64.qcow2 20GImage resized.Now let’s customize our image to our preferences. I will update packages, configure locale, and install a gentleman’s set of utilities for the virtual machine:
# The process may take some time
virt-customize -a ./debian-13-generic-amd64.qcow2 \
    --run-command "echo 'en_US.UTF-8 UTF-8' >> /etc/locale.gen" \
    --run-command "echo 'ru_RU.UTF-8 UTF-8' >> /etc/locale.gen" \
    --run-command "locale-gen" \
    --run-command "echo 'Europe/Moscow' > /etc/timezone" \
    --run-command "ln -sf /usr/share/zoneinfo/Europe/Moscow /etc/localtime" \
    --run-command "dpkg-reconfigure --frontend noninteractive tzdata" \
    --update --install qemu-guest-agent,sudo,gpg,git,curl,vim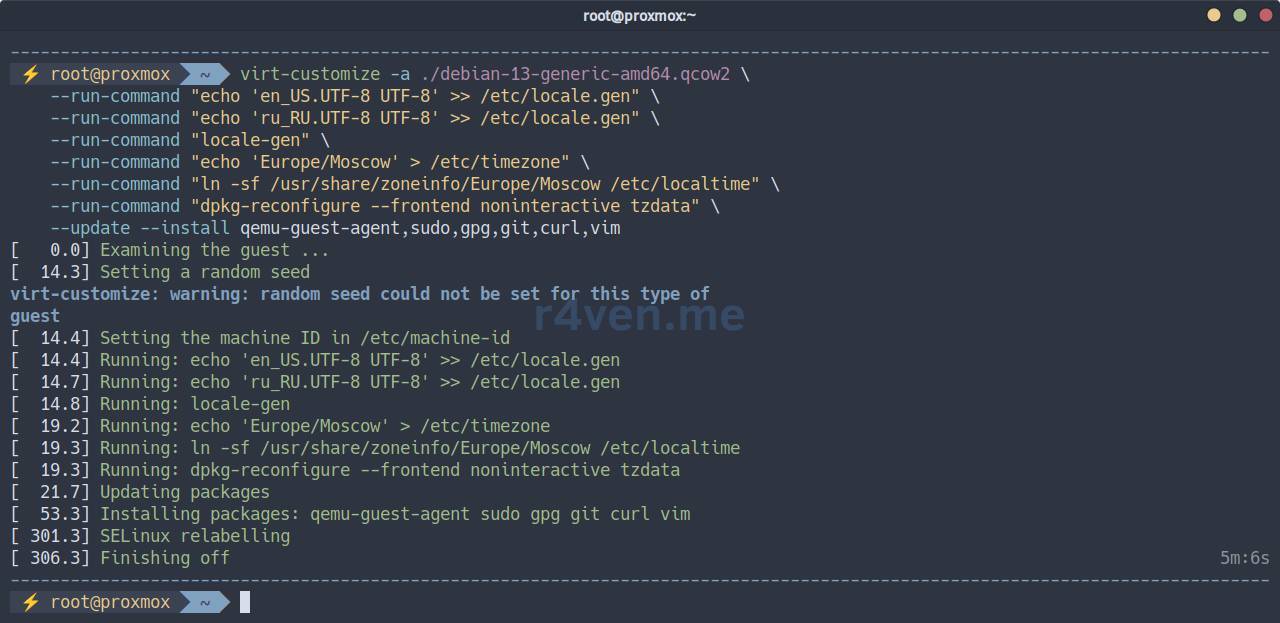
💡 Read more about preparing a virtual machine image in qcow2 format using Debian as an example in a separate article.
Preparing a VM Template in Proxmox
Let’s proceed with importing the disk into Proxmox:
# Create a new virtual machine with ID 7777 and basic settings
qm create 7777 --name "debian13-k8s-template" \
    --memory 2048 --cores 2 --net0 virtio,bridge=vmbr0

# Import the disk image into 'storage' (replace with your own)
qm importdisk 7777 ./debian-13-generic-amd64.qcow2 storage --format qcow2

# Install SCSI controller and add the disk to the VM as 'scsi0'
qm set 7777 --scsihw virtio-scsi-single \
    --scsi0 storage:7777/vm-7777-disk-0.qcow2

# Set boot order: 'scsi0' as the first boot disk
qm set 7777 --boot order=scsi0

# Add cloud-init disk to the virtual machine as 'ide0'
qm set 7777 --ide0 storage:cloudinit

# Configure serial port and video card associated with it
qm set 7777 --serial0 socket --vga serial0

# Enable 'QEMU Guest Agent' for host-guest interaction
qm set 7777 --agent enabled=1

# Convert the virtual machine into a template
qm template 7777

# Rescan VM configuration
qm rescan --vmid 7777

# View the full configuration of our template
qm config 7777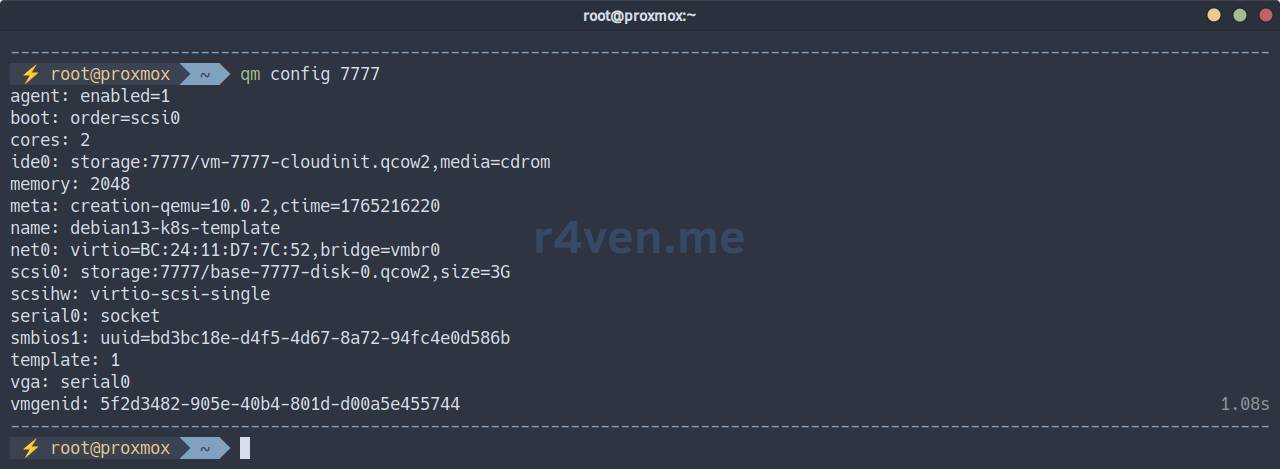
💡 Read more about creating a virtual machine template in Proxmox in this article.
Output the list of files in the VM directory (storage storage), in my case it is: /mnt/storage/images/7777/:
ls -l /mnt/storage/images/7777/
We see the image itself and the cloud-init disk👌.
❗️ Caution
If you need to destroy the VM template, use the command:
qm destroy 7777Creating Proxmox Access Credentials
Create a separate role for working with OpenTofu:
pveum role add TFUser -privs \
    "Pool.Allocate
    VM.Console
    VM.Allocate
    VM.Clone
    VM.Config.CDROM
    VM.Config.CPU
    VM.Config.Cloudinit
    VM.Config.Disk
    VM.Config.HWType
    VM.Config.Memory
    VM.Config.Network
    VM.Config.Options
    VM.Audit
    VM.PowerMgmt
    VM.GuestAgent.Audit
    Datastore.AllocateSpace
    Datastore.Allocate
    Datastore.Audit
SDN.Use"Create a service user and assign the new TFUser role to them:
pveum user add tfuser@pve

pveum aclmod / -user tfuser@pve -role TFUserCreate a token for our service account:
# token with all privileges, like user tfuser
pveum user token add tfuser@pve tf --privsep 0We will get the following output:
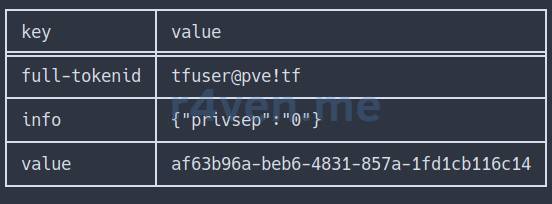
Save full-tokenid and the value of the token somewhere. We will need them when configuring OpenTofu.
All the above actions could have been performed in the Proxmox GUI, in the Datacenter —> Permissions section:
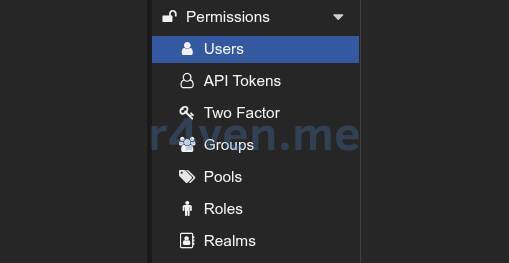
But using the command line is faster, and for an instruction - clearer🙃.
OpenTofu Preparation
Installing OpenTofu in Debian
☝️The following actions are performed on the client machine by a regular user.
According to the official documentation, connect the OpenTofu repository and perform a native installation:
# Update cache
sudo apt update

# Install auxiliary utilities
sudo apt install -y apt-transport-https ca-certificates curl gnupg

# Create gpg key directories
sudo install -m 0755 -d /etc/apt/keyrings

# Install OpenTofu repository keys
curl -fsSL https://get.opentofu.org/opentofu.gpg | \
    sudo tee /etc/apt/keyrings/opentofu.gpg > /dev/null

curl -fsSL https://packages.opentofu.org/opentofu/tofu/gpgkey | \
    sudo gpg --no-tty --batch --dearmor \
    --output /etc/apt/keyrings/opentofu-repo.gpg > /dev/null

# Add read permissions for all
sudo chmod a+r /etc/apt/keyrings/opentofu.gpg /etc/apt/keyrings/opentofu-repo.gpg

# Add repository addresses to the list
echo \
    "deb [signed-by=/etc/apt/keyrings/opentofu.gpg,/etc/apt/keyrings/opentofu-repo.gpg] https://packages.opentofu.org/opentofu/tofu/any/ any main
    deb-src [signed-by=/etc/apt/keyrings/opentofu.gpg,/etc/apt/keyrings/opentofu-repo.gpg] https://packages.opentofu.org/opentofu/tofu/any/ any main" | \
    sudo tee /etc/apt/sources.list.d/opentofu.list > /dev/null

# Also add read permissions
sudo chmod a+r /etc/apt/sources.list.d/opentofu.list
Now update the package cache and install OpenTofu:
sudo apt update

sudo apt install -y tofu

command -v tofu

tofu --version⚠️ There may be issues accessing OpenTofu online resources from Russia.
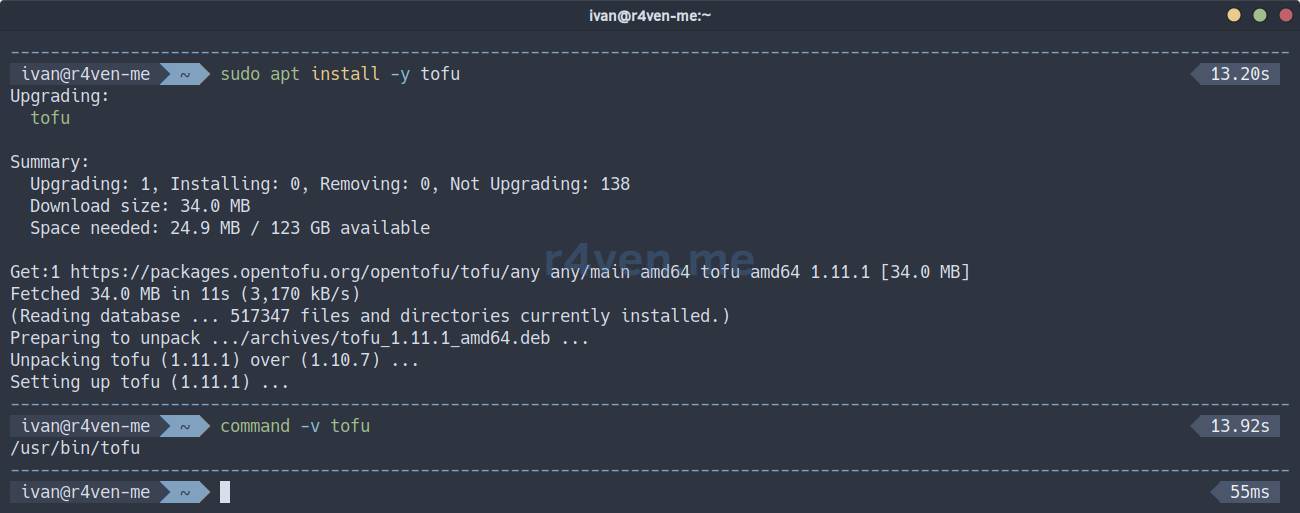
Now a new command line utility, tofu, has appeared in our system.
Creating Project Files for a k8s Cluster
Let’s move on to preparing project files for the k8s cluster. First, create a directory, for example, in your home folder, and navigate into it:
mkdir -vp ~/TF/k8s && cd ~/TF/k8s☝️ To keep the article concise, I will not describe the syntax of each file in detail. I will only outline their purpose. If necessary, I recommend consulting AI for clarification on unclear points.
Before starting, I want to note a couple more points:
- OpenTofu/Terraform files have the
tfextension and are written in a special language called HCL - HashiCorp Configuration Language. - In my provided configuration, the source of truth is variable files (they can have any extension, in my case
*.tfvars). All necessary values are taken from these files and substituted into the OpenTofu configuration during operation.
Provider Description File - provider.tf
Well, let’s start with the provider file for Proxmox:
vim ./provider.tfPopulate it:
terraform {
  required_providers {
    proxmox = {
      source  = "bpg/proxmox"
      version = "0.87.0"
    }
  }
}

provider "proxmox" {
  endpoint  = var.proxmox_api_url
  api_token = "${var.proxmox_api_token_id}=${var.proxmox_api_token_secret}"

  insecure = true

  ssh {
    agent       = false
    username    = var.proxmox_ssh_user
    private_key = file(var.proxmox_ssh_key)
  }
}Here, the provider itself is specified - bpg, its version, as well as the Proxmox server address and access credentials: API for virtual machine manipulation and SSH for using external cloud-init scripts. All parameter values are variables that we will fill in a bit later.
State Management File - backend.tf
Create the file:
vim ./backend.tfPopulate it:
terraform {
  backend "local" {}
}With this configuration, we define local storage for state files, which will store the infrastructure state and information about created resources.
In our case, this is necessary to manage two different environments (dev and prod) without conflicts.
VM Configuration Description File - main.tf
Now let’s create the main configuration file for the servers of our 3 roles: balancers, master, and worker nodes:
vim ./main.tf############################################################
# Cloud-Init Files (Snippets)
############################################################
resource "proxmox_virtual_environment_file" "balancer_cloud_init" {
count = var.vm_count_balancer
content_type = "snippets"
datastore_id = var.proxmox_snippets_storage
node_name = var.proxmox_node
source_raw {
data = templatefile("${path.module}/cloudinit/balancer.tftpl", {
hostname = "${var.vm_name_balancer}-${var.project_env}-${count.index + 1}"
user = var.user_name
password = var.user_password
ssh_key = var.user_ssh_key
})
file_name = "balancer-${var.project_env}-${count.index + 1}-user-data.yaml"
}
}
resource "proxmox_virtual_environment_file" "master_cloud_init" {
count = var.vm_count_master
content_type = "snippets"
datastore_id = var.proxmox_snippets_storage
node_name = var.proxmox_node
source_raw {
data = templatefile("${path.module}/cloudinit/master.tftpl", {
hostname = "${var.vm_name_master}-${var.project_env}-${count.index + 1}"
user = var.user_name
password = var.user_password
ssh_key = var.user_ssh_key
})
file_name = "master-${var.project_env}-${count.index + 1}-user-data.yaml"
}
}
resource "proxmox_virtual_environment_file" "worker_cloud_init" {
count = var.vm_count_worker
content_type = "snippets"
datastore_id = var.proxmox_snippets_storage
node_name = var.proxmox_node
source_raw {
data = templatefile("${path.module}/cloudinit/worker.tftpl", {
hostname = "${var.vm_name_worker}-${var.project_env}-${count.index + 1}"
user = var.user_name
password = var.user_password
ssh_key = var.user_ssh_key
})
file_name = "worker-${var.project_env}-${count.index + 1}-user-data.yaml"
}
}
############################################################
# k8s balancer
############################################################
resource "proxmox_virtual_environment_vm" "k8s_balancer" {
count = var.vm_count_balancer
name = "${var.vm_name_balancer}-${var.project_env}-${count.index + 1}"
node_name = var.proxmox_node
vm_id = var.vm_id_first + 100 + count.index + 1
tags = split(",", "${var.vm_tags_balancer},${var.project_env}")
on_boot = false
agent {
enabled = true
}
cpu {
cores = var.vm_cpu_balancer
type = "x86-64-v2-AES"
}
memory {
dedicated = var.vm_ram_balancer
}
clone {
vm_id = var.vm_template_id
full = true
}
disk {
datastore_id = var.vm_disk_storage_balancer
interface = "scsi0"
file_format = var.vm_disk_format
size = var.vm_disk_size_balancer
}
initialization {
datastore_id = var.vm_disk_storage_balancer
user_data_file_id = proxmox_virtual_environment_file.balancer_cloud_init[count.index].id
dns {
servers = [var.vm_ip_dns]
}
ip_config {
ipv4 {
#address = "dhcp"
address = "${var.vm_ip_prefix}.${var.vm_ip_first_balancer + count.index + 1}/${var.vm_ip_cidr}"
gateway = var.vm_ip_gateway
}
}
}
network_device {
bridge = "vmbr0"
model = "virtio"
}
#lifecycle {
# prevent_destroy = true
# create_before_destroy = true
# ignore_changes = [agent, disk, initialization,]
#}
}
############################################################
# k8s master
############################################################
resource "proxmox_virtual_environment_vm" "k8s_master" {
count = var.vm_count_master
name = "${var.vm_name_master}-${var.project_env}-${count.index + 1}"
node_name = var.proxmox_node
vm_id = var.vm_id_first + 200 + count.index + 1
tags = split(",", "${var.vm_tags_master},${var.project_env}")
on_boot = false
agent {
enabled = true
}
cpu {
cores = var.vm_cpu_master
type = "x86-64-v2-AES"
}
memory {
dedicated = var.vm_ram_master
}
clone {
vm_id = var.vm_template_id
full = true
}
disk {
datastore_id = var.vm_disk_storage_master
interface = "scsi0"
file_format = var.vm_disk_format
size = var.vm_disk_size_master
}
initialization {
datastore_id = var.vm_disk_storage_master
user_data_file_id = proxmox_virtual_environment_file.master_cloud_init[count.index].id
dns {
servers = [var.vm_ip_dns]
}
ip_config {
ipv4 {
#address = "dhcp"
address = "${var.vm_ip_prefix}.${var.vm_ip_first_master + count.index + 1}/${var.vm_ip_cidr}"
gateway = var.vm_ip_gateway
}
}
}
network_device {
bridge = "vmbr0"
model = "virtio"
}
#lifecycle {
# prevent_destroy = true
# create_before_destroy = true
# ignore_changes = [agent, disk, initialization,]
#}
}
############################################################
# k8s worker
############################################################
resource "proxmox_virtual_environment_vm" "k8s_worker" {
count = var.vm_count_worker
name = "${var.vm_name_worker}-${var.project_env}-${count.index + 1}"
node_name = var.proxmox_node
vm_id = var.vm_id_first + 300 + count.index + 1
tags = split(",", "${var.vm_tags_worker},${var.project_env}")
on_boot = false
agent {
enabled = true
}
cpu {
cores = var.vm_cpu_worker
type = "x86-64-v2-AES"
}
memory {
dedicated = var.vm_ram_worker
}
clone {
vm_id = var.vm_template_id
full = true
}
disk {
datastore_id = var.vm_disk_storage_worker
interface = "scsi0"
file_format = var.vm_disk_format
size = var.vm_disk_size_worker
}
disk {
datastore_id = var.vm_disk_storage_worker
interface = "scsi1"
file_format = var.vm_disk_format
size = var.vm_disk_size_worker
}
initialization {
datastore_id = var.vm_disk_storage_worker
user_data_file_id = proxmox_virtual_environment_file.worker_cloud_init[count.index].id
dns {
servers = [var.vm_ip_dns]
}
ip_config {
ipv4 {
#address = "dhcp"
address = "${var.vm_ip_prefix}.${var.vm_ip_first_worker + count.index + 1}/${var.vm_ip_cidr}"
gateway = var.vm_ip_gateway
}
}
}
network_device {
bridge = "vmbr0"
model = "virtio"
}
#lifecycle {
# prevent_destroy = true
# create_before_destroy = true
# ignore_changes = [agent, disk, initialization,]
#}
}At the beginning of the file, a cloud-init block is specified for each role, which determines where to find the necessary script files, and OpenTofu variables are defined that will be passed to the cloud-init scripts: hostname, user, password, and ssh_key.
The following blocks describe the virtual machine configuration in Proxmox itself. All values are also taken from variables.
Variable Definition File - variables.tf
In OpenTofu/Terraform, it is customary to declare variables and specify their values in different files. This is not a mandatory condition, but it simplifies project organization. Additionally, the file where variables are declared can specify default values and a description:
vim ./variables.tfvariable "project_env" {
type = string
default = "dev"
}
variable "proxmox_node" {
type = string
default = "proxmox"
}
variable "proxmox_api_url" {
type = string
default = "https://proxmox.example.com:8006/api2/json"
description = "Proxmox API url"
}
variable "proxmox_api_token_id" {
type = string
}
variable "proxmox_api_token_secret" {
type = string
sensitive = true
}
variable "proxmox_ssh_user" {
type = string
default = "root"
description = "SSH user to manage cloud-init snippets"
}
variable "proxmox_ssh_key" {
type = string
default = "~/.ssh/id_ed25519"
description = "Path to SSH private key"
}
variable "proxmox_snippets_storage" {
type = string
default = "local"
description = "Storage ID for Cloud-Init snippets (must support 'snippets' content type)"
}
variable "vm_id_first" {
type = number
default = 1000
}
variable "vm_template_id" {
type = number
default = 7777
}
variable "vm_tags_balancer" {
type = string
default = "k8s,balancer"
}
variable "vm_tags_master" {
type = string
default = "k8s,master"
}
variable "vm_tags_worker" {
type = string
default = "k8s,worker"
}
variable "vm_name_balancer" {
type = string
default = "k8s-balancer"
}
variable "vm_name_master" {
type = string
default = "k8s-master"
}
variable "vm_name_worker" {
type = string
default = "k8s-worker"
}
variable "vm_count_balancer" {
type = number
default = 1
}
variable "vm_count_master" {
type = number
default = 1
}
variable "vm_count_worker" {
type = number
default = 1
}
variable "vm_cpu_balancer" {
type = number
default = 2
}
variable "vm_cpu_master" {
type = number
default = 2
}
variable "vm_cpu_worker" {
type = number
default = 2
}
variable "vm_ram_balancer" {
type = number
default = 2048
}
variable "vm_ram_master" {
type = number
default = 2048
}
variable "vm_ram_worker" {
type = number
default = 2048
}
variable "vm_disk_storage_balancer" {
type = string
default = "storage"
}
variable "vm_disk_storage_master" {
type = string
default = "storage"
}
variable "vm_disk_storage_worker" {
type = string
default = "storage"
}
variable "vm_disk_format" {
type = string
default = "qcow2"
}
variable "vm_disk_size_balancer" {
type = number
default = 20
}
variable "vm_disk_size_master" {
type = number
default = 20
}
variable "vm_disk_size_worker" {
type = number
default = 20
}
variable "vm_ip_prefix" {
type = string
default = "192.168.122"
}
variable "vm_ip_first_balancer" {
type = number
default = 10
}
variable "vm_ip_first_master" {
type = number
default = 20
}
variable "vm_ip_first_worker" {
type = number
default = 30
}
variable "vm_ip_cidr" {
type = number
default = 24
}
variable "vm_ip_gateway" {
type = string
default = "192.168.122.1"
}
variable "vm_ip_dns" {
type = string
default = "8.8.8.8"
}
variable "vm_cloud_init_file" {
type = string
default = "null"
}
variable "user_name" {
type = string
default = "terraform"
}
variable "user_password" {
type = string
sensitive = true
}
variable "user_ssh_key" {
type = string
}Variable Value Files - dev.tfvars and prod.tfvars
Now let’s fill in the value file. In our example, we will use two different files: one for the test environment and one for production. Let’s start with the test environment:
vim ./dev.tfvarsproject_env = "dev"
proxmox_node = "proxmox"
proxmox_api_url = "https://proxmox.example.com:8006/api2/json"
proxmox_api_token_id = "tfuser@pve!tf"
#proxmox_api_token_secret = "12345-qwerty-qwerty-qwerty-12345"
proxmox_ssh_user = "root"
proxmox_ssh_key = "~/.ssh/id_ed25519"
proxmox_snippets_storage = "local" # /var/lib/vz/snippets/
vm_id_first = "1000"
vm_template_id = "7777" # debian13-test-template
vm_tags_balancer = "k8s,balancer"
vm_tags_master = "k8s,master"
vm_tags_worker = "k8s,worker"
vm_name_balancer = "k8s-balancer"
vm_name_master = "k8s-master"
vm_name_worker = "k8s-worker"
vm_count_balancer = "1"
vm_count_master = "1"
vm_count_worker = "1"
vm_cpu_balancer = "2"
vm_cpu_master = "2"
vm_cpu_worker = "2"
vm_ram_balancer = "2048"
vm_ram_master = "4096"
vm_ram_worker = "4096"
vm_disk_storage_balancer = "storage"
vm_disk_storage_master = "storage"
vm_disk_storage_worker = "storage2"
vm_disk_format = "qcow2"
vm_disk_size_balancer = "20"
vm_disk_size_master = "20"
vm_disk_size_worker = "20"
vm_ip_prefix = "192.168.122"
vm_ip_first_balancer = "10"
vm_ip_first_master = "20"
vm_ip_first_worker = "30"
vm_ip_cidr = "24"
vm_ip_gateway = "192.168.122.1"
vm_ip_dns = "8.8.8.8"
user_name = "ivan"
#user_password = "SecretPassword"
user_ssh_key = "ssh-ed25519 AAAA..."project_env- arbitrary name of the working environment (dev / stage / prod)proxmox_node- name of the Proxmox node where VMs will be deployedproxmox_api_url- API address of the Proxmox serverproxmox_api_token_id- ID of the API token we created during Proxmox preparationproxmox_api_token_secret- the API token itself (better not to specify here, see below)proxmox_ssh_user- Proxmox SSH user (user’s shell must bebash)proxmox_ssh_key- SSH key for accessing the Proxmox server (needed for working with cloud-init user data files)proxmox_snippets_storage- datastore for cloud-init snippets, in my examplelocalis used, which by default is equivalent to/var/lib/vz/snippets/vm_id_first- base ID for virtual machines in Proxmoxvm_template_id- ID of the VM template from which future servers will be clonedvm_tags_balancer- tags in Proxmox for balancer role serversvm_tags_master- tags in Proxmox for master role serversvm_tags_worker- tags in Proxmox for worker role serversvm_name_balancer- name prefix for balancer role serversvm_name_master- name prefix for master role serversvm_name_worker- name prefix for worker role serversvm_count_balancer- number of balancer role serversvm_count_master- number of master role serversvm_count_worker- number of worker role serversvm_cpu_balancer- number of CPU cores for balancer role servers (pcs.)vm_cpu_master- number of CPU cores for master role servers (pcs.)vm_cpu_worker- number of CPU cores for worker role servers (pcs.)vm_ram_balancer- RAM size for balancer role servers (MB)vm_ram_master- RAM size for master role servers (MB)vm_ram_worker- RAM size for worker role servers (MB)vm_disk_storage_balancer- name of storage for balancer role serversvm_disk_storage_master- name of storage for master role serversvm_disk_storage_worker- name of storage for worker role serversvm_disk_format- disk format (qcow2 / raw)vm_disk_size_balancer- disk size for balancer (GB)vm_disk_size_master- disk size for master (GB)vm_disk_size_worker- disk size for worker (GB) (workers will have 2 disks)vm_ip_prefix- IP subnet prefixvm_ip_first_balancer- IP suffix for balancer role server, then +1vm_ip_first_master- IP suffix for master role server, then +1vm_ip_first_worker- IP suffix for worker role server, then +1vm_ip_cidr- network mask in CIDR formatvm_ip_gateway- IP address of the gatewayvm_ip_dns- IP address of the DNS serveruser_name- username created with cloud-inituser_password- password for the user created with cloud-init (better not to specify here, see below)user_ssh_key- public SSH key for the user created with cloud-init
It is worth noting separately the sensitive data in the proxmox_api_token_secret and user_password variables. You can fill them in here, but I recommend using a separate .env file for this and loading it with source before working. We’ll talk about it a bit later. When storing your OpenTofu configuration in a git repository, simply add the .env file to the .gitignore list.
If you are using a DHCP server for virtual machine network configuration, simply change the address parameter of the ip_config section in the main.tf file for each role:
ip_config {
  ipv4 {
    address = "dhcp"
    gateway = var.vm_ip_gateway
  }
}💡 If necessary, create an SSH key using the command:
ssh-keygen -t ed25519 -f ~/.ssh/id_ed25519⚠️ I repeat: the SSH user’s shell must be bash! This is a requirement of the bpg provider.
Now, similarly, fill in the values for production:
vim ./prod.tfvarsproject_env = "prod"
proxmox_node = "proxmox"
proxmox_api_url = "https://proxmox.example.com:8006/api2/json"
proxmox_api_token_id = "tfuser@pve!tf"
#proxmox_api_token_secret = "12345-qwerty-qwerty-qwerty-12345"
proxmox_ssh_user = "root"
proxmox_ssh_key = "~/.ssh/id_ed25519"
proxmox_snippets_storage = "local" # /var/lib/vz/snippets/
vm_id_first = "2000"
vm_template_id = "7777" # debian13-test-template
vm_tags_balancer = "k8s,balancer"
vm_tags_master = "k8s,master"
vm_tags_worker = "k8s,worker"
vm_name_balancer = "k8s-balancer"
vm_name_master = "k8s-master"
vm_name_worker = "k8s-worker"
vm_count_balancer = "2"
vm_count_master = "3"
vm_count_worker = "5"
vm_cpu_balancer = "2"
vm_cpu_master = "2"
vm_cpu_worker = "4"
vm_ram_balancer = "2048"
vm_ram_master = "4096"
vm_ram_worker = "4096"
vm_disk_storage_balancer = "storage"
vm_disk_storage_master = "storage"
vm_disk_storage_worker = "storage2"
vm_disk_format = "qcow2"
vm_disk_size_balancer = "20"
vm_disk_size_master = "20"
vm_disk_size_worker = "20"
vm_ip_prefix = "192.168.122"
vm_ip_first_balancer = "110"
vm_ip_first_master = "120"
vm_ip_first_worker = "130"
vm_ip_cidr = "24"
vm_ip_gateway = "192.168.122.1"
vm_ip_dns = "8.8.8.8"
user_name = "ivan"
#user_password = "SecretPassword"
user_ssh_key = "ssh-ed25519 AAAA..."⚠️ When adding new variables or changing existing metadata, both the variables.tf file and the *.tfvars files must be updated. Otherwise, you may get an error.
Adjust all parameters to your preferences.
File for Storing Sensitive Data - .env
As I mentioned earlier, it’s better to store sensitive data in a separate file and load it as shell environment variables before working with OpenTofu:
vim ./.envHere, a special format for variables is used with the TF_VAR prefix, followed by the variable name and value:
export TF_VAR_user_password="SecretPassword"
export TF_VAR_proxmox_api_token_secret="12345-qwerty-qwerty-qwerty-12345"Specify the Proxmox server API token here, which we obtained during the hypervisor preparation phase. Also, set the password for the future user that will be created on the servers using cloud-init.
You can export variables to the environment with the command:
source ./.envCloud-Init Script Files - {balancer,master,worker}.tftpl
For convenient storage of cloud-init files, create a separate directory:
mkdir ./cloudinitNext, create a separate file for each role.
Balancers:
vim ./cloudinit/balancer.tftpl#cloud-config
hostname: ${hostname}
manage_etc_hosts: true
users:
- name: ${user}
groups: sudo
shell: /usr/bin/bash
sudo: ['ALL=(ALL) NOPASSWD:ALL']
ssh_authorized_keys:
- ${ssh_key}
chpasswd:
list: |
${user}:${password}
expire: false
package_update: true
package_upgrade: true
packages:
- vim
- curl
- mtr-tiny
- haproxy
runcmd:
- systemctl enable haproxy
- echo "Hello from Balancer node" > /greetingsMaster:
vim ./cloudinit/master.tftpl#cloud-config
hostname: ${hostname}
manage_etc_hosts: true
users:
- name: ${user}
groups: sudo
shell: /usr/bin/bash
sudo: ['ALL=(ALL) NOPASSWD:ALL']
ssh_authorized_keys:
- ${ssh_key}
chpasswd:
list: |
${user}:${password}
expire: false
package_update: true
package_upgrade: true
packages:
- vim
- curl
- mtr-tiny
runcmd:
- echo "Hello from Master node" > /greetingsWorker:
vim ./cloudinit/worker.tftpl#cloud-config
hostname: ${hostname}
manage_etc_hosts: true
users:
- name: ${user}
groups: sudo
shell: /usr/bin/bash
sudo: ['ALL=(ALL) NOPASSWD:ALL']
ssh_authorized_keys:
- ${ssh_key}
chpasswd:
list: |
${user}:${password}
expire: false
package_update: true
package_upgrade: true
packages:
- vim
- curl
- mtr-tiny
runcmd:
- echo "Hello from Worker node" > /greetingsThe content is arbitrary. Customize the scripts to your needs and preferences.
⚠️ Cloud-init script files must contain the first line:
#cloud-configWithout it, cloud-init will ignore the files.
Link to cloud-init documentation with examples.
We have finished with the project files. Let’s move on to testing our prepared configuration.
💡 You can always find the current versions of the source files from the article on my GitHub:
Initializing the proxmox/bpg module
First, you need to initialize the project. During initialization, OpenTofu will download the required provider version if it is not already installed:
tofu init -upgrade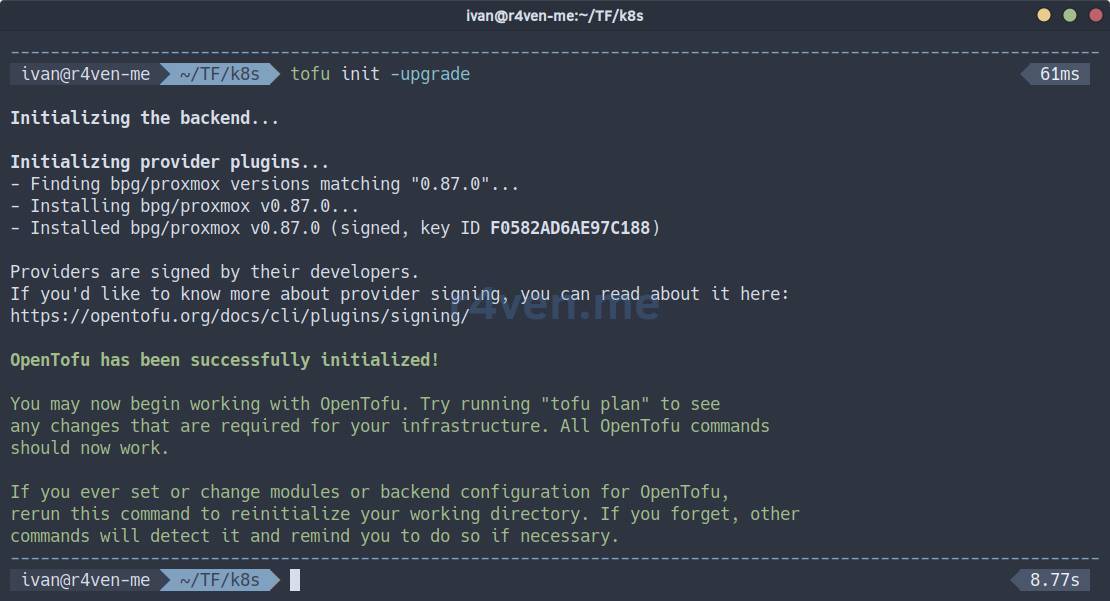
System files will appear in the current directory, including the provider’s executable file:
tree ./.terraform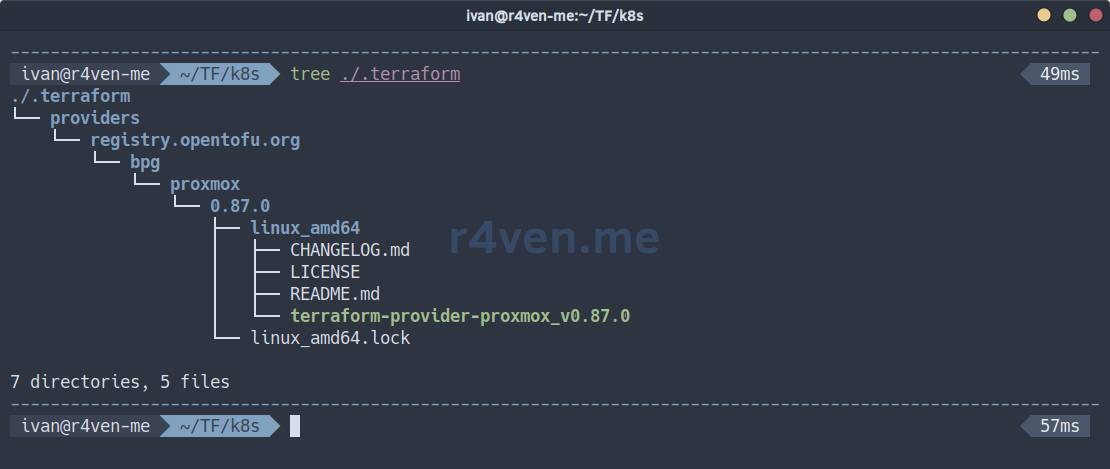
Now let’s validate our configuration:
tofu validateIf you see something like this:
Success! The configuration is valid.Let’s continue🏃.
Starting the creation of dev infrastructure
First, a plan of the changes to be made is always generated. But before that, we will define the environment context (dev, prod), which we discussed when filling out the backend.tf file:
tofu init -reconfigure -backend-config="path=./dev.tfstate"Now let’s look at the plan, specifying the dev environment variable file:
tofu plan -var-file=./dev.tfvarsIf you have filled in all the values correctly, the command will execute without errors and show you the future changes/additions in Proxmox:
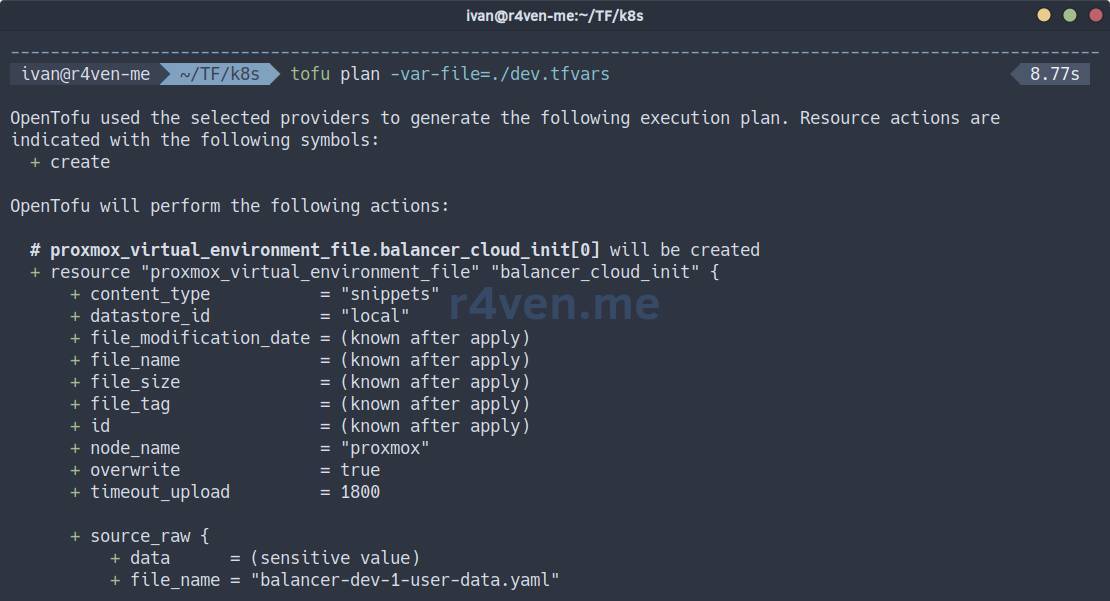
| Symbol | Meaning |
|---|---|
+ | create |
~ | modify |
- | delete |
-/+ | delete and recreate |
<= | read-only (data source) |
It is also a popular practice to save the plan to an external file of a special format, known as a plan file:
tofu plan -var-file=./dev.tfvars -out ./dev.tfplanWhat is a plan file for?
A tfplan file is a serialized representation of an execution plan generated by the tofu plan -out <filename> command. It captures the exact changes that OpenTofu (or Terraform) intends to make to your infrastructure. Its main purpose is to ensure that the tofu apply command performs precisely the operations that were shown and approved during the planning phase, preventing any discrepancies if the configuration or variables change between plan and apply execution. This is critically important for review processes, auditing, and automated CI/CD pipelines, where a plan can be generated, saved as an artifact, and then applied later, ensuring predictable and controlled deployments.
You can view the contents of a plan file with the command:
tofu show ./dev.tfplanIf you agree with the plan, to apply the configuration, execute:
tofu apply -var-file=./dev.tfvarsCheck everything one more time and type yes, then Enter:
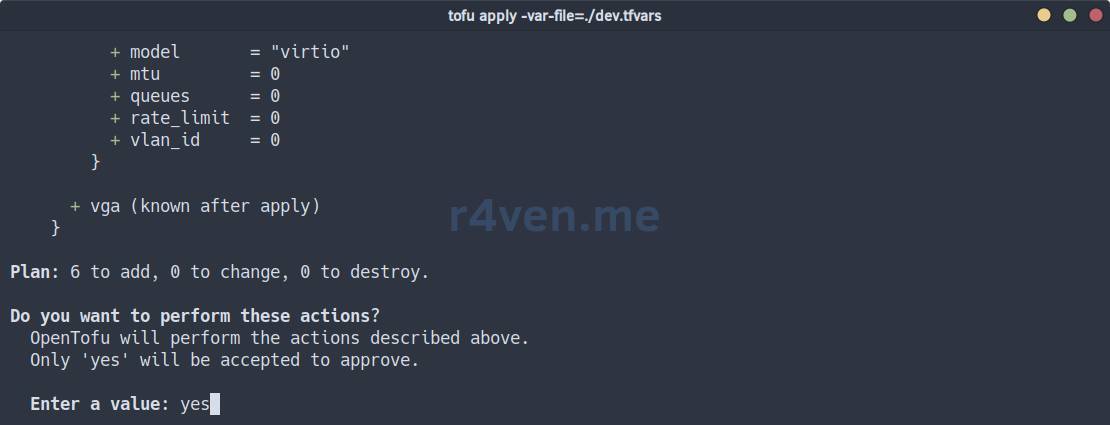
Or in the case of a plan file, the command is:
tofu apply ./dev.tfplan⚠️ When applying a plan file, there will be no interactive confirmation! Be careful.
After starting, we await the completion of the procedure⏳.
In the Proxmox web interface, you can observe the appearance of new machines:
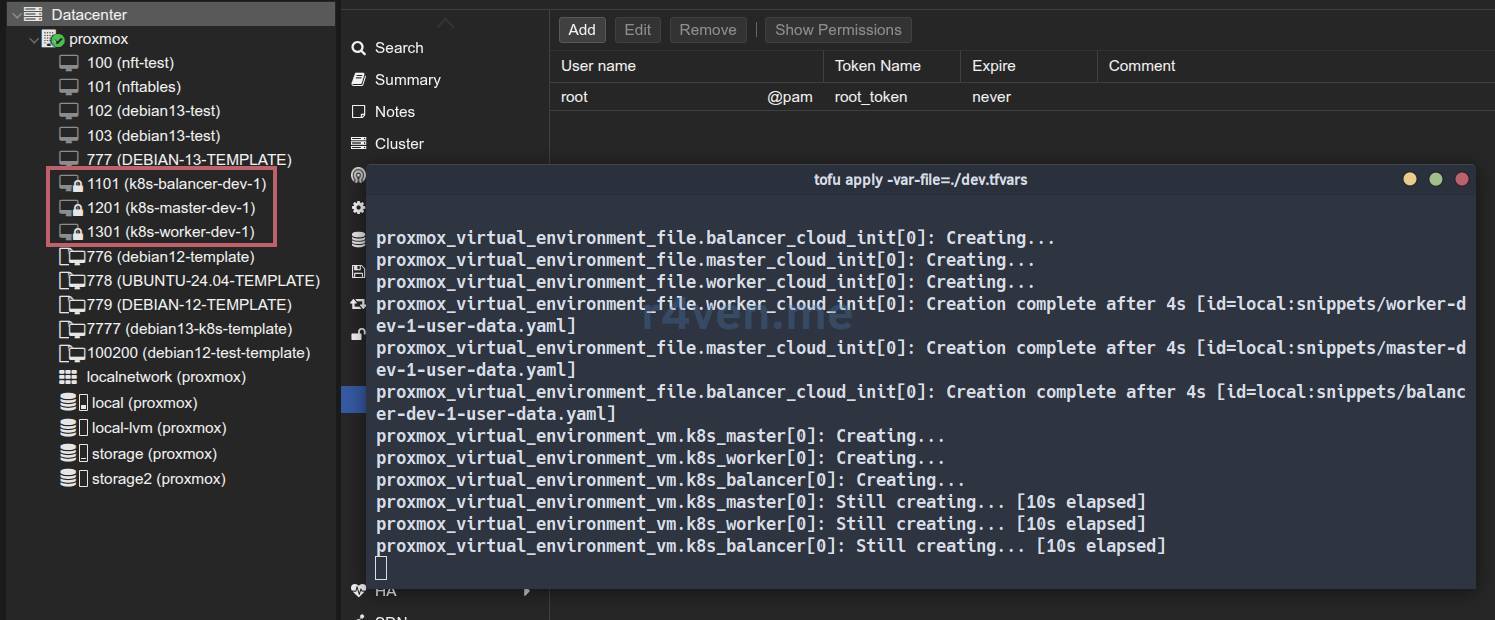
After completion, the VMs will be automatically started, and the cloud-init script will begin execution:

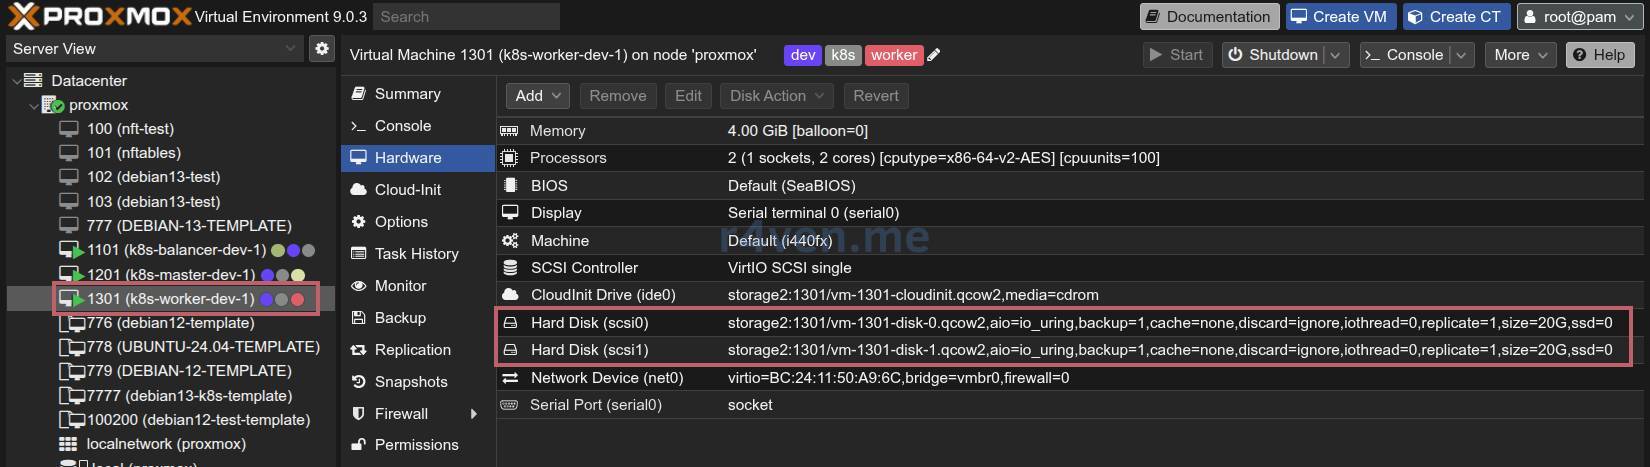
As you can see, the virtual machines have the desired configurations: node, name, ID, CPU, RAM, Disk, IP:

Also note that the Worker node configuration implies the presence of two disks (described in main.tf):
Server Verification
First, check access to the servers by password from the hypervisor console:
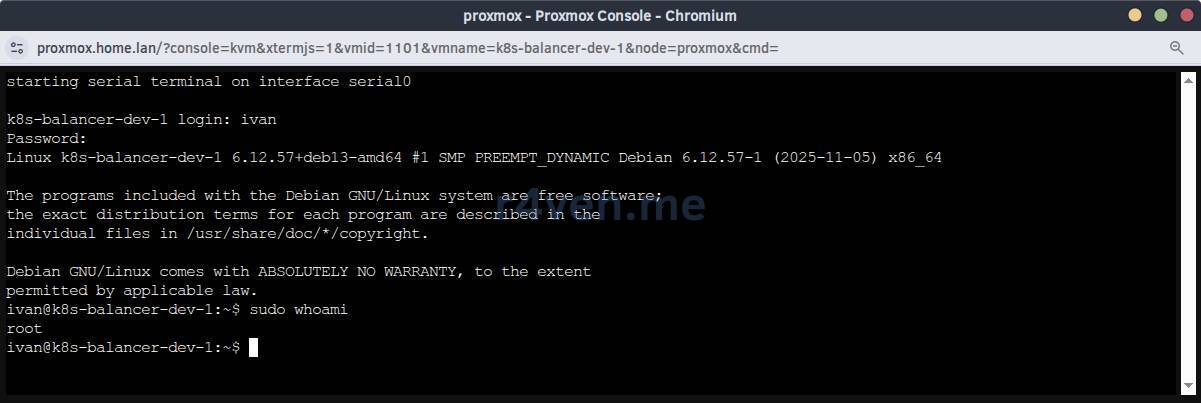
And SSH access:

If the /greetings file was created on the servers, everything is working correctly👍.
💡 Tip
For debugging cloud-init on target servers, use the commands:
cloud-init status

journalctl -u cloud-initStarting the creation of prod infrastructure
Similarly, we create the production infrastructure.
It is essential to switch the execution context to prod before applying:
tofu init -reconfigure -backend-config="path=./prod.tfstate"☝️ Important. To work with the dev environment, you will also need to switch the context back using the command:
tofu init -reconfigure -backend-config="path=./dev.tfstate"View the plan:
tofu plan -var-file=./prod.tfvars
# or with a plan file
tofu plan -var-file=./prod.tfvars -out ./prod.tfplanIf everything is okay, apply the changes:
tofu apply -var-file=./prod.tfvars -parallelism=2
# or
tofu apply ./prod.tfplan -parallelism=2📝 In OpenTofu / Terraform, the parallelism parameter determines the maximum number of resources that can be created / modified / deleted simultaneously. When creating large infrastructure in Proxmox, it is recommended to specify a value of 1-2 to avoid errors such as:
TASK ERROR: clone failed: can't lock file '/var/lock/pve-manager/pve-storage-storage' - got timeoutEspecially when working with large disks.
As a result, this “zoo” appears after a few minutes:

Now, after thorough preparation, a complex infrastructure can be created in a matter of minutes. In my opinion, it’s very convenient, especially for testing😌.
Modifying Existing Infrastructure
To modify existing infrastructure, simply make the necessary changes to the configuration and apply it.
For example, let’s increase the RAM for dev environment balancers from 2048 to 4096:
sed -i '/^vm_ram_balancer/s/2048/4096/' ./dev.tfvarsAnd let’s look at the plan:
tofu init -reconfigure -backend-config="path=./dev.tfstate"

tofu plan -var-file=./dev.tfvars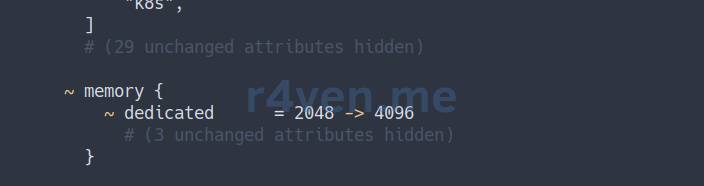
If all is well, apply the changes:
⚠️ Changing RAM size will cause the server to restart.
tofu apply -var-file=./dev.tfvarsChecking:

All excellent.
❗️ Caution
Changing some parameters may lead to resource recreation, i.e., the destruction of running virtual machines.
Consider using useful resource lifecycle management options:
lifecycle {
    prevent_destroy = true # forbid deleting the resource
    create_before_destroy = true # create a new resource before deleting the old one
    ignore_changes = [agent, disk, initialization,] # list of blocks whose changes should be ignored
}Destroying Infrastructure
To delete infrastructure, switch to the desired context and use the destroy command.
For example, deleting the dev environment:
# Be sure to change the environment context
tofu init -reconfigure -backend-config="path=./dev.tfstate"

tofu destroy -var-file=./dev.tfvarsA Little About Debugging OpenTofu/Terraform
Configuration Validation
Command for validating file syntax:
tofu validateShould be:
Success! The configuration is valid.Formatting
The tofu fmt command aligns indents, sorts arguments, and normalizes quotes/lists:
tofu fmt -check        # checks if formatting is needed
tofu fmt               # formats files
tofu fmt -recursive    # recursively through directories

# test
tofu plan -var-file=./dev.tfvarsLogging
Enable logging for the current shell session:
export TF_LOG=DEBUG

export TF_LOG_PATH="tofu.log"📝 Logging levels:
- TRACE
- DEBUG
- INFO
- WARN
- ERROR
During subsequent work with OpenTofu, a file will be created in the current directory.
View log:
tail -f ./tofu.logDisable logging:
unset TF_LOG TF_LOG_PATHConclusion
We have explored how to implement the “Infrastructure as Code” concept using OpenTofu for automatic deployment of infrastructure for a hypothetical Kubernetes cluster.
In the next notes, we will focus on installing it on the infrastructure from this article: configuring load balancing, installing and configuring the control plane and workers.
Be sure to subscribe to Telegram😉 so you don’t miss anything. Plus, we have Linux quizzes there🐧.
Thank you for reading. Good luck with automating your processes!
Materials Used
- Source files from the article in the GitHub repo
- List of OpenTofu providers
- Documentation for the proxmox/bpg provider for OpenTofu
- Debian base images
👨💻Ну и…
Don’t forget about our Telegram channel 📱 and chat 💬 All the best ✌️
That should be it. If not, check the logs 🙂