Let’s figure out how to correctly build Cloud-Init templates in Proxmox VE when using ZFS. The material is based on practical experience and typical issues encountered when migrating from classical storage schemes (mdadm + LVM) to ZFS.
🖐️Hey!
Subscribe to our Telegram channel @r4ven_me📱, so you don’t miss new posts on the website 😉. If you have questions or just want to chat about the topic, feel free to join the Raven chat at @r4ven_me_chat🧐.
Introduction
My acquaintance with Proxmox VE began with version 7, when the system was often deployed on top of Debian manually. Initially, I used mdadm + LVM - it was simple and predictable. After migrating to server hardware and moving to ZFS (with VM restoration from backups), a problem emerged: when deploying virtual machines (VMs) via Terraform, dynamic inventory in Ansible stopped working correctly.
The cause turned out not to be Terraform or Ansible, but deeper - an incompatibility between the ZFS storage model (zvol) and the qcow2 format. This analysis became the foundation of this article.
In this article we will cover:
- differences between
qcow2,raw,zvol, andZFS dataset; - why conflict arises on ZFS;
- the correct way to build Cloud-Init templates;
- typical errors;
- how to add Cloud-Init to already existing templates.
Software used in the article:
| Software | Version |
|---|---|
| Proxmox VE | 9.1 |
| Debian | 13 |
For a better understanding of this material, it’s important to clarify the theoretical side of this case.
The Problem: ZFS and QCOW2
The key issue is the difference in storage models.
In Proxmox VE with ZFS:
- VM disks are placed in zvol (block device);
- Cloud-Init images are mostly distributed in qcow2 format (file).
This creates an architectural conflict:
| Characteristic | qcow2 | zvol |
|---|---|---|
| Type | File | Block device |
| Requires filesystem | Yes | No |
| Copy-on-Write | Inside file | at ZFS level |
| Usage in Proxmox VE | directory storage | ZFS storage |
Differences between qcow2, raw, zvol, and ZFS dataset
QCOW2
qcow2 is a file format with support for:
- Copy-on-Write (CoW);
- snapshots;
- compression;
- thin provisioning.
Essentially, it’s a layer on top of the filesystem.
The problem on ZFS is double CoW:
- qcow2 performs CoW inside the file;
- ZFS performs CoW at the block level.
Consequences:
- double writes (write amplification);
- increased latency;
- reduced I/O system performance (drop in IOPS);
- additional fragmentation.
Therefore, the Proxmox VE documentation does not recommend using qcow2 on ZFS.
RAW
RAW is a linear image without additional logic.
- no metadata;
- write directly to blocks;
- CoW is delegated to ZFS.
Advantages: minimal overhead, predictable performance, and optimization for ZFS.
ZVOL
ZVOL is a block device inside ZFS.
- used by Proxmox VE by default for VM disks;
- does not require a filesystem;
- managed by ZFS;
- supports snapshots and cloning at the pool level.
Key parameter: volblocksize (block size). The block size directly affects I/O system performance, so it’s important to set an optimal value.
Typical values:
- 8K–16K - VM or database disks;
- 64K–128K - general-purpose scenario for file storage and backups;
- 256K - images and photos;
- 512K-1M - media files (video, movies, TV series, etc.).
In Proxmox VE by default, a zvol is created with a block size of 16K, which is optimal for VM disks on ZFS.
ZFS Dataset
ZFS dataset is a filesystem inside ZFS.
Used for:
- file storage (including qcow2);
- directory storage in Proxmox.
Features:
- the
recordsizeparameter affects write behavior; - an additional layer appears (FS → file → ZFS);
- when using qcow2, double CoW occurs.
Why conflict arises
The problem appears when trying to use a file image (qcow2) as a source for a block device (zvol).
In practice it looks like this:
- Proxmox imports qcow2;
- converts to raw;
- writes the result to zvol.
A typical error in instructions:
qm importdisk 7777 ./debian-13-generic-amd64.qcow2 storage --format qcow2Here qcow2 is explicitly set, which is incorrect for zvol.
Result:
- disk imports with errors;
- Cloud-Init does not initialize;
- VM in inconsistent state.
Solution options
Approach 1: ZFS Dataset (directory storage)
Create a dataset with a filesystem, for example:
rpool/data/imagesAnd use it as a directory (directory storage).
Advantages: simple setup.
- compatibility with typical instructions in open sources.
Disadvantages: double CoW.
- extra layer of abstraction;
- noticeable performance degradation (especially on HDD).
Conclusion: acceptable, but not optimal.
Approach 2 (recommended): using RAW
At the stage of importing the disk into an empty virtual machine, specify the RAW format instead of the standard qcow2:
qm importdisk <VMID> <image> <storage> --format rawFor example, for a machine with id 7777 from the instruction on the website, the command would be:
qm importdisk 7777 ./debian-13-generic-amd64.qcow2 storage --format rawDuring import, qcow2 is converted to raw during import, raw is written to zvol.
Advantages: no double CoW, maximum performance, and Cloud-Init works correctly.
Building a Cloud-Init template on ZFS
There isn’t much information, but readers unfamiliar with ZFS have probably gotten confused. So I propose once again to sequentially examine the typical process of creating a virtual machine template using Cloud-Init, taking into account the peculiarities of working with ZFS.
1. Image import
- Increase disk size:
qemu-img resize ./debian-13-generic-amd64.qcow2 32GWhere debian-13-generic-amd64.qcow2 is the cloud-init disk image, and 32G is the final size (32GB).
- Create a new virtual machine without a disk:
qm create 9998 --name "debian-13-ci" --memory 2048 --cores 2 --net0 virtio,bridge=vnet01Explanation:
9998- ID of the new VM;debian-13-ci- VM name displayed in Proxmox VE;--memory 2048- amount of allocated RAM in MB (2GB);--cores 2- number of vCPUs allocated to the machine;--net0- primary network interface with typevirtio, using bridgevnet01.
- Import the
qcow2image inrawformat (key difference):
qm importdisk 9998 debian-13-generic-amd64.qcow2 vm-hdd --format rawWhere vm-hdd is the name of your zvol in Proxmox VE.
- Set up the SCSI controller and add the previously imported disk:
qm set 9998 --scsihw virtio-scsi-single --scsi0 vm-hdd:vm-9998-disk-0,discard=on- Update boot order:
qm set 9998 --boot order=scsi0- Add Cloud-Init disk:
qm set 9998 --ide1 vm-hdd:cloudinit- Configure user, password and SSH for cloud-init:
# --- User ---
# Create user:
qm set 9998 --ciuser ansible
qm set 9998 --cipassword <USER_PASSWORD>
# Add SSH key:
qm set 9998 --sshkeys ~/.ssh/id_ed25519.pub

# ------- NETWORK -------
# Configure IP via DHCP:
qm set 9998 --ipconfig0 ip=dhcp
# Static IP:
qm set 9998 --ipconfig0 ip=10.10.10.254/24,gw=10.10.10.1
# Set DNS server address 10.10.10.15:
qm set 9998 --nameserver 10.10.10.15
# Set search domain infra.lan:
qm set 9998 --searchdomain infra.lan

# ----- Updates -----
# Install updates on startup:
qm set 9998 --ciupgrade 1
# Do not install updates:
qm set 9998 --ciupgrade 0- Add a serial port:
qm set 9998 --serial0 socket --vga serial0- Enable QEMU Guest Agent for interaction between hypervisor and guest system:
qm set 9998 --agent enabled=1- Save the machine as a template:
qm template 9998- Create a clone of the previously assembled template to verify Cloud-Init functionality:
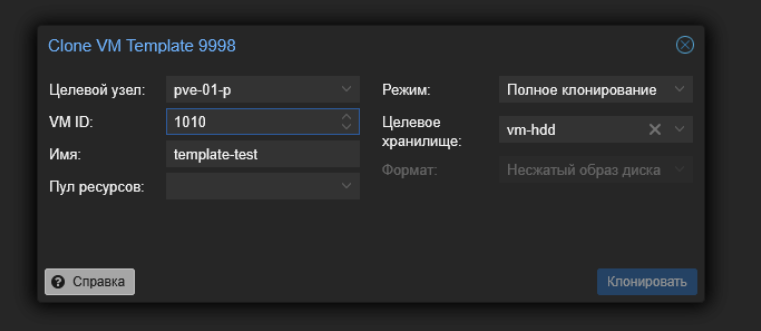
- Run the test machine and verify:
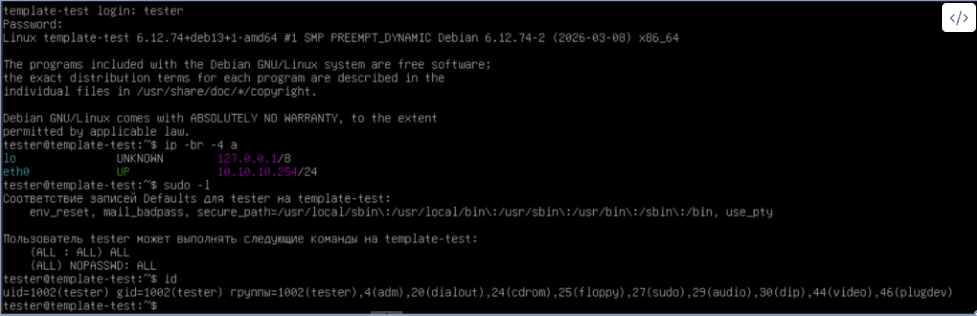
Done! Now the Cloud-Init template works correctly and is stored on your zvol.
2. Adding Cloud-Init to an existing template
If you recently learned about Cloud-Init and have already managed to build templates for typical virtual machines for your infrastructure, don’t worry!
There is a way to add Cloud-Init support to already existing templates, let’s look at an example with Debian 13 Trixie.
- Make a full copy of the template (Full Clone).
- Connect to the terminal of the new machine via VNC or SSH.
- Switch to
rootuser (if using a custom account):
sudo -i- Update the system:
apt update && apt full-upgrade -y- Install the guest agent (if you haven’t done so before) and
cloud-initpackage:
apt install -y qemu-guest-agent cloud-init- Create a new Cloud-Init configuration for Proxmox VE:
/etc/cloud/cloud.cfg.d/99-pve.cfgInsert a line like this into the file:
datasource_list: [ NoCloud, ConfigDrive ]Save the changes and exit the text editor.
- Clean up logs and machine-id:
cloud-init clean --logs
rm -f /etc/machine-id
truncate -s 0 /etc/machine-id- If desired, you can clean up system logs and apt cache:
journalctl --rotate
journalctl --vacuum-time=1s
apt clean- Shut down the machine:
poweroff- Switch to the hypervisor terminal and add the Cloud-Init disk to this machine:
qm set <VMID> --ide2 <storage>:cloudinit- Then add a serial port:
qm set <VMID> --serial0 socket --vga serial0 - Enable the agent:
qm set <VMID> --agent enabled=1- Save this machine as a template:
qm template <VMID>After this you can add additional Cloud-Init parameters and verify the updated template works.
Typical errors
The most common issues:
- using qcow2 on ZFS in production environment;
- importing qcow2 to zvol without explicit conversion to raw;
- ignoring the
volblocksizeparameter when creating zvol; - unclean cloud-init state (leads to incorrect cloning);
- missing serial console (cloud-init logs are unavailable);
- incorrectly set datasource.
These errors often don’t manifest immediately, but create problems at scale.
Conclusion
If you use Proxmox VE with ZFS, the optimal scheme would be:
- VM disks - zvol;
- disk format - raw;
- Cloud-Init - separate disk.
ZFS already implements CoW, snapshots, and thin provisioning. Using qcow2 on top of ZFS duplicates these mechanisms and leads to performance degradation and architecture complexity.
👨💻And…
Don’t forget about our Telegram channel 📱 and chat
Or maybe you want to become a co-author? Then click here🔗
💬 All the best ✌️
That should be it. If not, check the logs 🙂