In this article, we will look at installing and basic configuration of RustFS - S3-compatible object storage that we will deploy on a Linux server using Docker Compose.
Goal: get our own S3 endpoint, a web console, a valid HTTPS connection (via Caddy + Let’s Encrypt), and check that all this works with the excellent rclone and restic utilities 😌.
📝 By the way, RustFS is positioned by its developers as an alternative to the infamous MinIO.
🖐️Hey!
Subscribe to our Telegram channel @r4ven_me📱, so you don’t miss new posts on the website 😉. If you have questions or just want to chat about the topic, feel free to join the Raven chat at @r4ven_me_chat🧐.
Input data
To configure our installation, it is assumed that we already have 📃:
- A Linux server based on Debian 13, available via a public IP from the internet;
- Docker Engine installed on this Linux server;
- Domains like
rustfs.r4ven.meandrustfs-console.r4ven.me, pointing to the public IP address of our server; - Privileged access to the system.
Installing RustFS S3 storage

Connect to the rustfs.r4ven.me server using SSH and switch to the root account using sudo:
ssh ivan@rustfs.r4ven.me

sudo -i📝 Note
This time we will store project files under /etc/compose. Application data will be stored in a Docker volume.
Create the project directory and restrict access to it using the chmod command:
mkdir -vp /etc/compose/rustfs && cd /etc/compose/rustfs

chmod 700 /etc/composeNow create the compose file, for example using the vim editor:
vim ./compose.yamlFill it with:
---
# https://github.com/rustfs/rustfs
# https://caddyserver.com/docs/running#docker-compose

volumes:
  rustfs:
    name: rustfs
  caddy:
    name: caddy

services:
  rustfs:
    image: docker.io/rustfs/rustfs:1.0.0-beta.8
    container_name: rustfs
    restart: unless-stopped
    stop_grace_period: 30s
    cpus: 1
    mem_limit: 1G
    hostname: rustfs
    user: "root:root"
    env_file: ./.env
    healthcheck:
      test:
        ["CMD", "sh", "-c", "curl -f http://127.0.0.1:9000/health && curl -f http://127.0.0.1:9001/rustfs/console/health"]
      interval: 30s
      timeout: 10s
      retries: 3
      start_period: 40s
    expose:
      - "9000" # S3 API port
      - "9001" # Console port
    volumes:
      - rustfs:/data/
      - /etc/timezone:/etc/timezone:ro
      - /etc/localtime:/etc/localtime:ro

  caddy:
    image: docker.io/caddy:2.9.1-alpine
    depends_on:
      rustfs:
        condition: service_healthy
    container_name: caddy
    restart: unless-stopped
    stop_grace_period: 30s
    cpus: 1
    mem_limit: 512M
    hostname: caddy
    env_file: ./.env
    environment:
      TZ: Europe/Moscow
    configs:
      - source: caddy_config
        target: /etc/caddy/Caddyfile
    command: caddy run --config /etc/caddy/Caddyfile --adapter caddyfile
    healthcheck:
      test: ["CMD", "sh", "-c", "wget --no-verbose --tries=1 --spider https://${RUSTFS_DOMAIN}:443/health && wget --no-verbose --tries=1 --spider https://${RUSTFS_CONSOLE_DOMAIN}:443/rustfs/console/auth/login"]
      interval: 30s
      timeout: 10s
      retries: 3
      start_period: 40s
    ports:
      - "80:80/tcp"
      - "443:443/tcp"
      - "443:443/udp"
    volumes:
      - caddy:/data/
      - /etc/timezone:/etc/timezone:ro
      - /etc/localtime:/etc/localtime:ro

configs:
  caddy_config:
    content: |
      {
          email ${ACME_EMAIL}
          admin off
      }

      ${RUSTFS_DOMAIN} {
          reverse_proxy rustfs:9000

          header {
              Strict-Transport-Security "max-age=31536000; includeSubDomains; preload"
              X-Content-Type-Options "nosniff"
              X-Frame-Options "DENY"
              Referrer-Policy "no-referrer"
          }
      }

      ${RUSTFS_CONSOLE_DOMAIN} {
          reverse_proxy rustfs:9001

          header {
              Strict-Transport-Security "max-age=31536000; includeSubDomains; preload"
              X-Content-Type-Options "nosniff"
              X-Frame-Options "DENY"
              Referrer-Policy "no-referrer"
          }
}This file describes two services: rustfs and caddy. The first one is clear enough, but it is worth adding a bit of information about the second one.
📝 Caddy is a modern web server and reverse proxy with automatic TLS certificate issuance and renewal, simple declarative configuration, and built-in support for HTTP/2, HTTP/3, load balancing, proxying, and static content. It is often used as an easier-to-configure alternative to Nginx, especially in small and medium infrastructures.
Now create the env file:
vim ./.envFill it with:
# https://docs.rustfs.com/installation/docker/#complete-parameter-configuration-example

TZ=Europe/Moscow

ACME_EMAIL=kar-kar@r4ven.me
RUSTFS_DOMAIN=rustfs.r4ven.me
RUSTFS_CONSOLE_DOMAIN=rustfs-console.r4ven.me

# RUSTFS_UID="root"
# RUSTFS_GID="root"
# RUSTFS_VOLUMES=/data/rustfs{0..3} # Define 4 storage volumes
RUSTFS_ADDRESS=0.0.0.0:9000
RUSTFS_CONSOLE_ENABLE=true
RUSTFS_CONSOLE_ADDRESS=0.0.0.0:9001
RUSTFS_CORS_ALLOWED_ORIGINS=https://rustfs-console.r4ven.me
RUSTFS_CONSOLE_CORS_ALLOWED_ORIGINS=https://rustfs-console.r4ven.me
RUSTFS_ACCESS_KEY=
RUSTFS_SECRET_KEY=
RUSTFS_OBS_LOGGER_LEVEL=info☝️ The values from the RUSTFS_ACCESS_KEY and RUSTFS_SECRET_KEY variables will be used as the login and password for authorization in the RustFS web console.
We do not create Caddyfile as a separate file. Docker Compose passes it into the container via the configs parameter, and substitutes environment variables while processing the compose file. Caddy will store Let’s Encrypt certificates and other files in a docker volume named caddy.
☝️ As I already mentioned, to issue certificates, DNS records defined in RUSTFS_DOMAIN and RUSTFS_CONSOLE_DOMAIN must point to your server address, and ports 80/tcp and 443/tcp must be accessible from outside.
Set the “login” and generate the “password”:
sed -iE "s/^RUSTFS_ACCESS_KEY=.*/RUSTFS_ACCESS_KEY=ivan/" ./.env

sed -iE "s/^RUSTFS_SECRET_KEY=.*/RUSTFS_SECRET_KEY=$(openssl rand -hex 32)/" ./.envNow start the stack:
docker compose up -d && docker compose logs -fCheck it:
docker compose ps

docker volume ls | grep -E "rustfs|caddy"

ls -lR /var/lib/docker/volumes/caddy/_data/caddy/Immediately configure autostart using Systemd:
cat > ./rustfs.service << EOF
[Unit]
Description=RustFS S3 service
Requires=docker.service
After=docker.service

[Service]
Restart=always
RestartSec=5
User=root
Group=root
WorkingDirectory=/etc/compose/rustfs
ExecStart=/usr/bin/docker compose up --remove-orphans
ExecStop=/usr/bin/docker compose down

[Install]
WantedBy=multi-user.target
EOFchmod 600 ./rustfs.service
ln -s $(realpath ./rustfs.service) /etc/systemd/system
systemctl daemon-reload
systemctl enable --now rustfs
systemctl status rustfsNow the rustfs service can be managed using systemctl:
systemctl stop rustfs
systemctl start rustfs
systemctl restart rustfs
systemctl status rustfsConfiguring RustFS
Open a web browser and enter the address:
https://rustfs-console.r4ven.meWe will see the login window for the S3 storage management console. Pay attention to the secure connection:
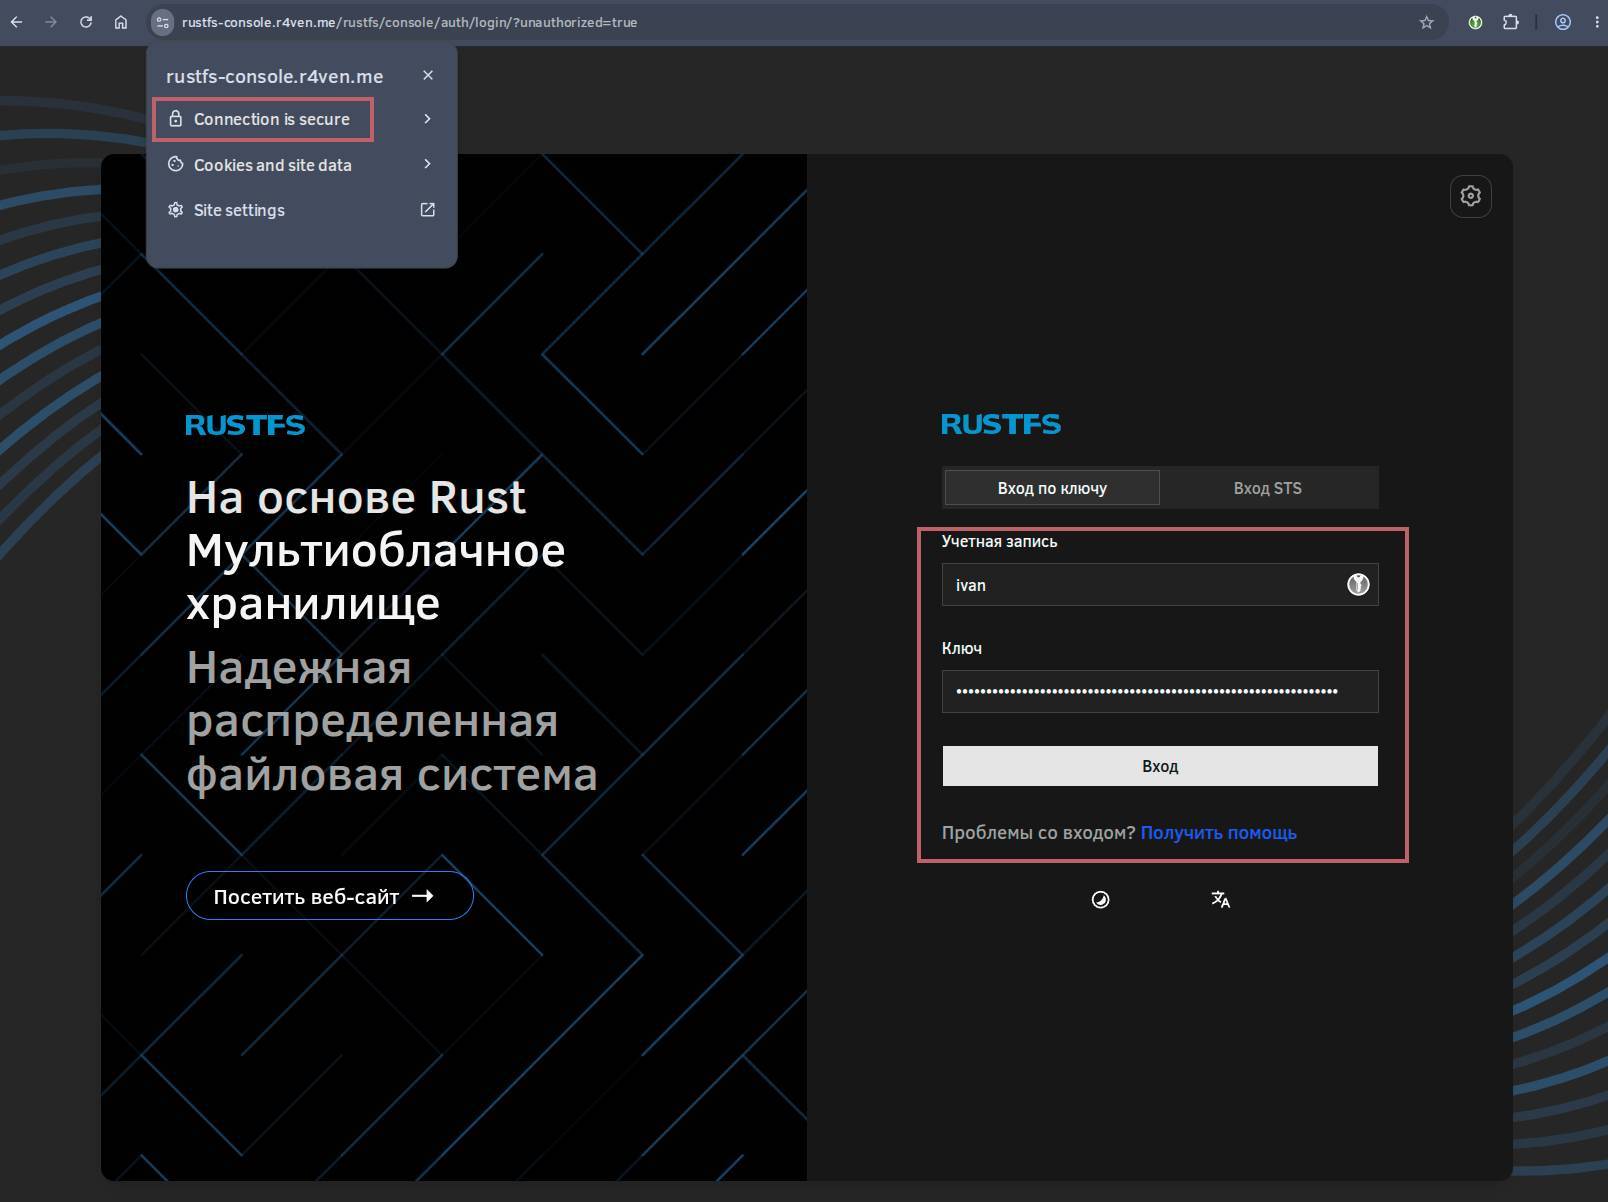
Use the credentials we generated in the previous step to log in:
grep -E 'RUSTFS_ACCESS_KEY|RUSTFS_SECRET_KEY' /etc/compose/rustfs/.envCreating buckets
Below I will show the bucket creation process:
📝 Note
A Bucket in S3 is like a container for “files”. It is an analogue of a top-level folder where objects (files) are stored and access rights, versions, and retention policies are configured. The bucket name is arbitrary, for example, the backups bucket.
On the “Browser” tab, click “Create bucket”: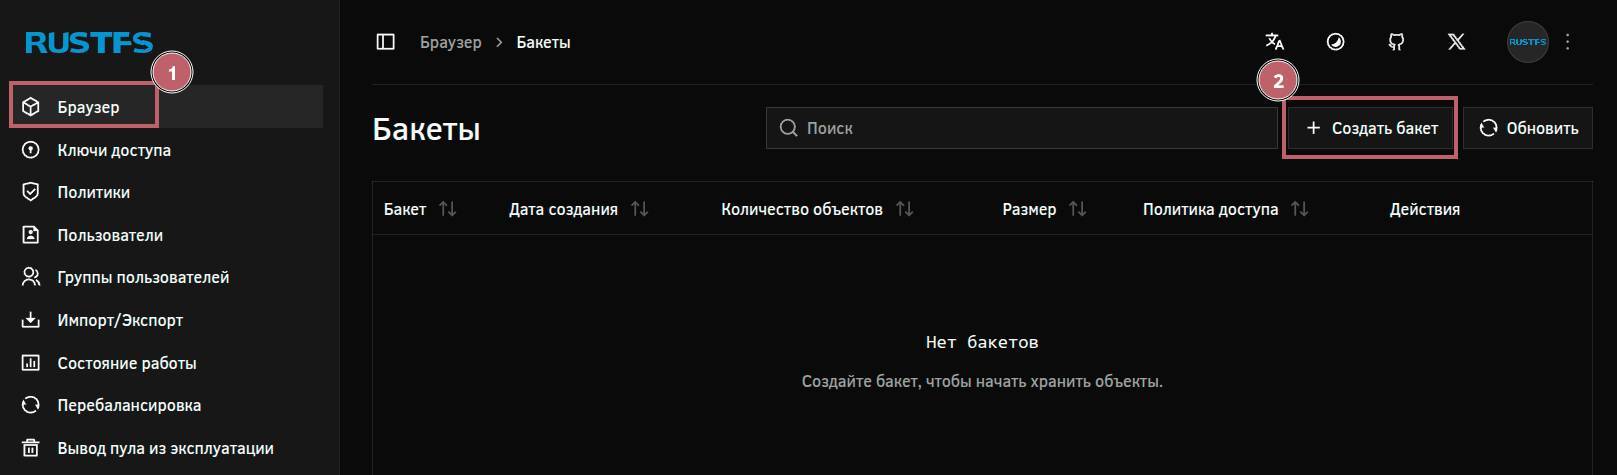
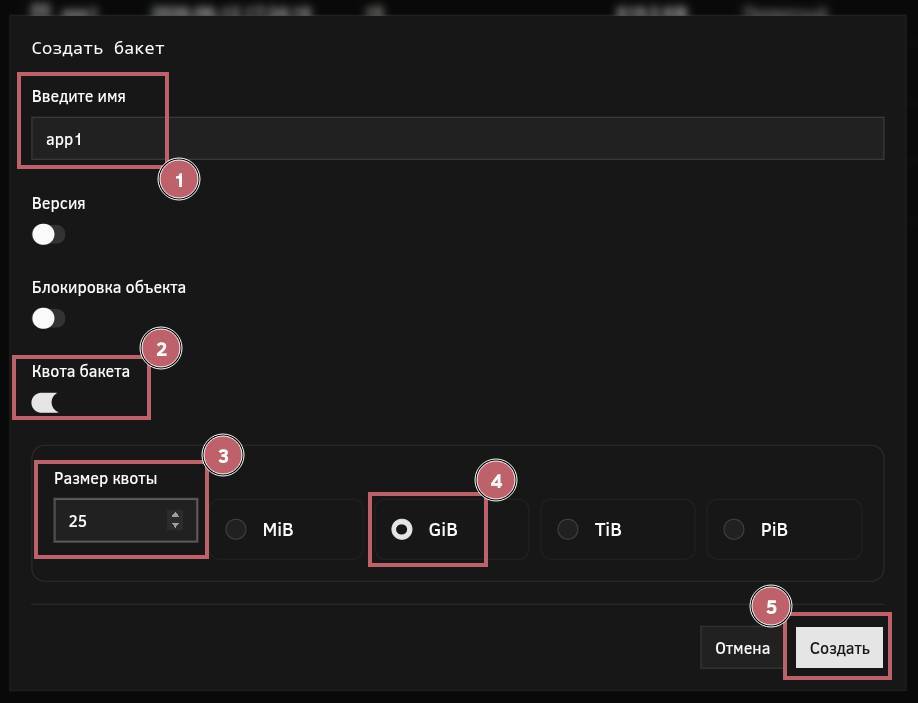
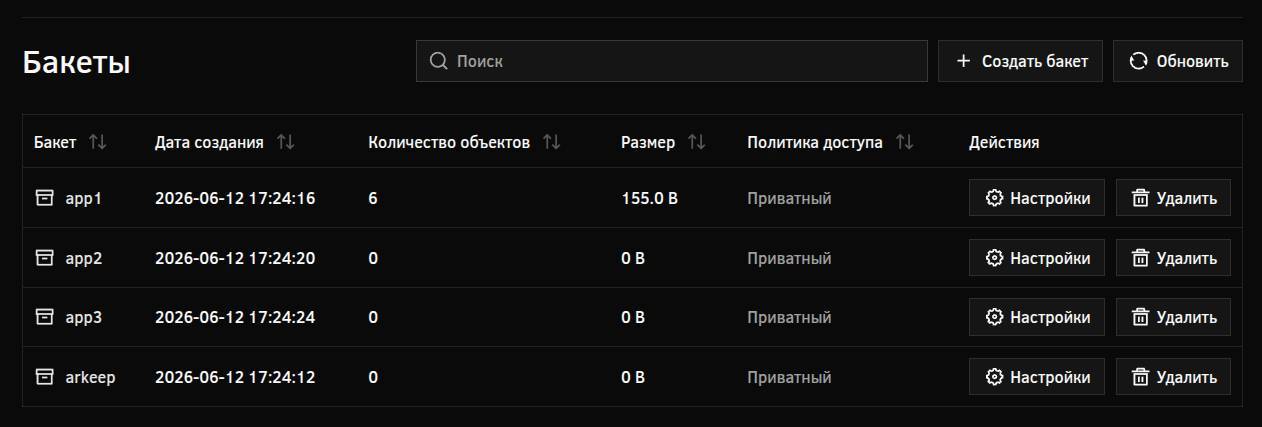
In the popup window, set its name, for example app1, set the quota (storage size limit), and click “Create”:
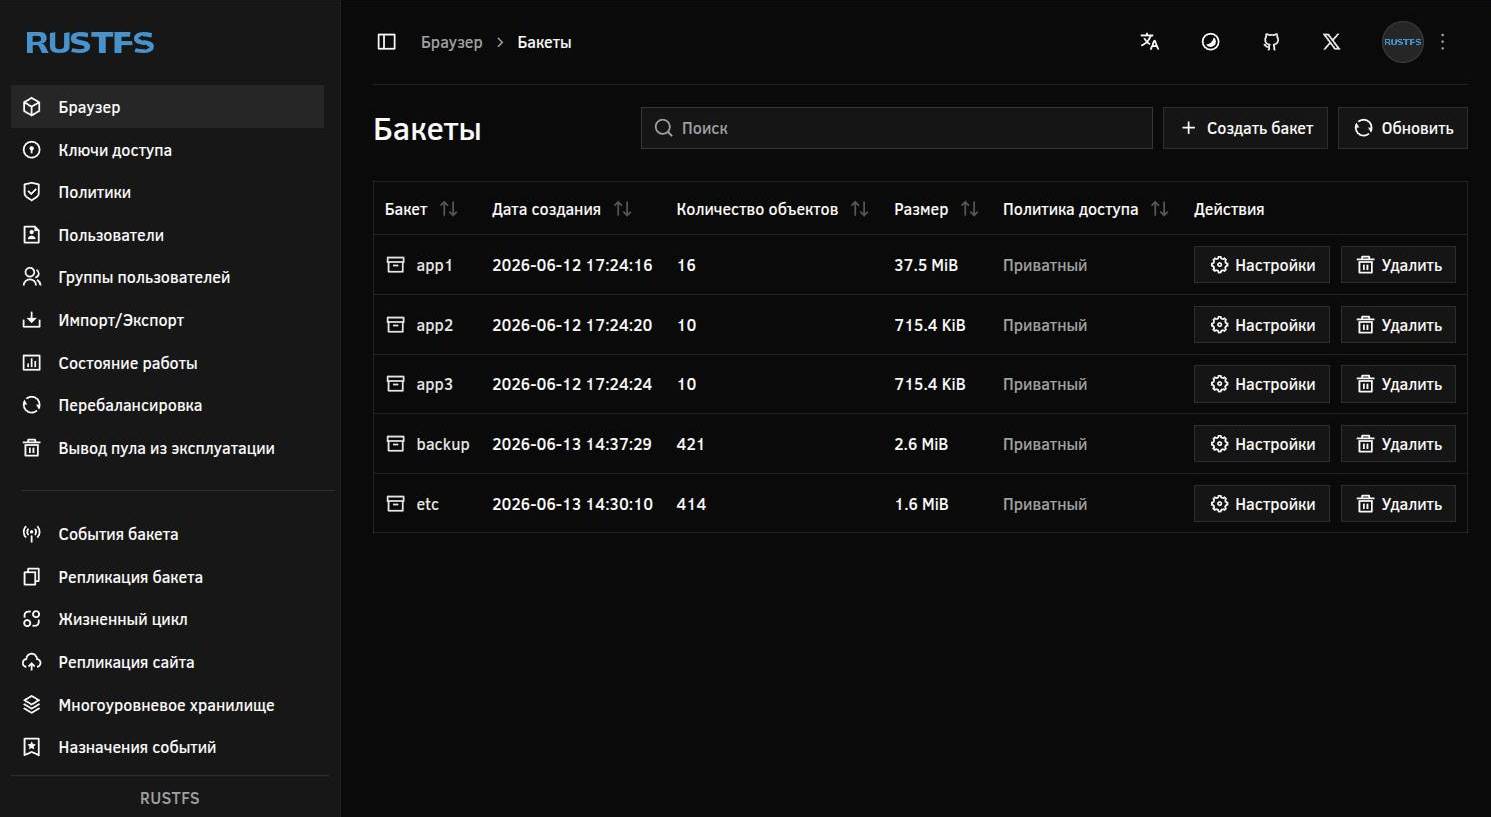
In the bucket list, we will see the one we created:
Creating access credentials
Next, we will create access credentials for the bucket for client connections. Using a separate account for performing various bucket operations via the API is considered good practice.
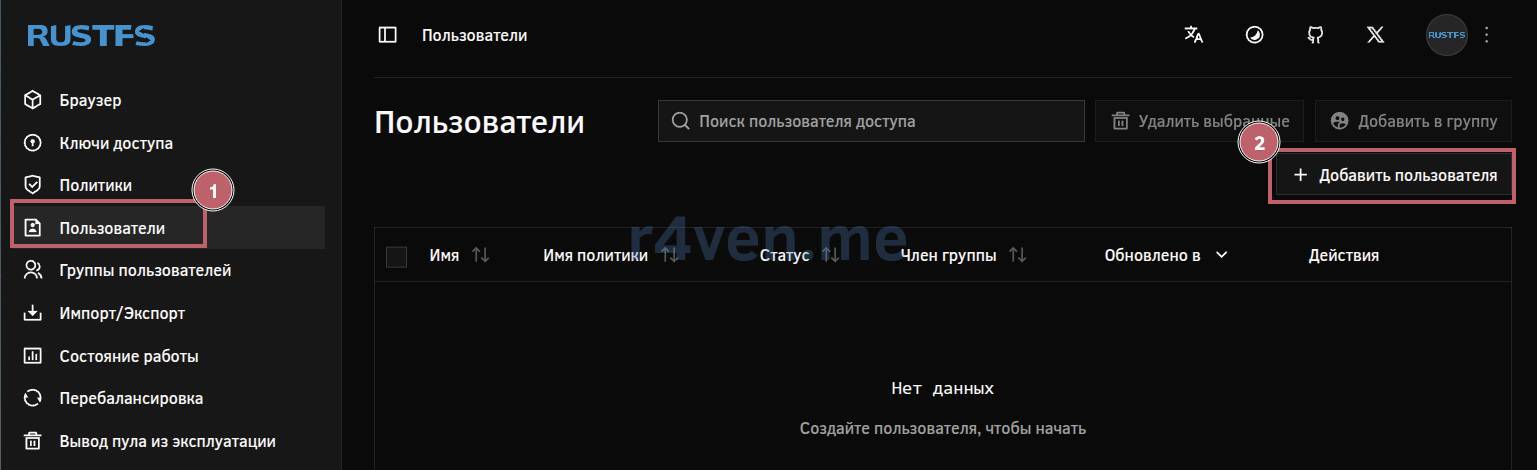
Go to “Users” –> “Add user”:
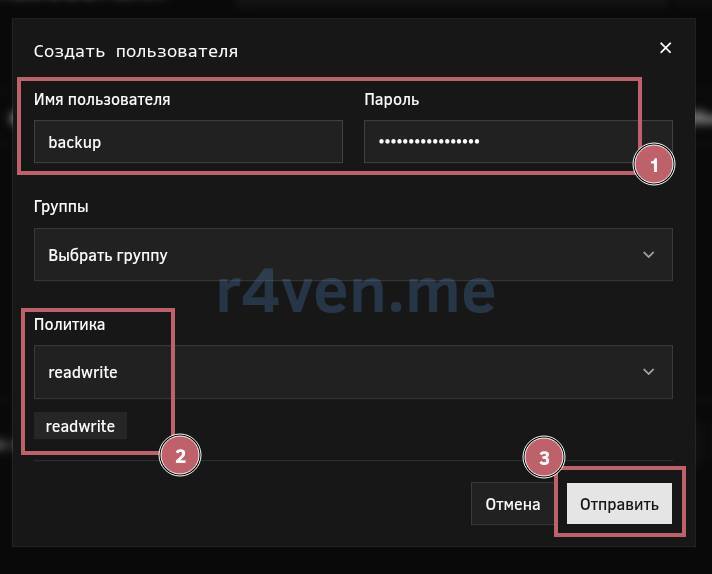
Here, specify the name, in our example backup, and set a password for it. In the “Policy” section, select readwrite and click “Submit”:
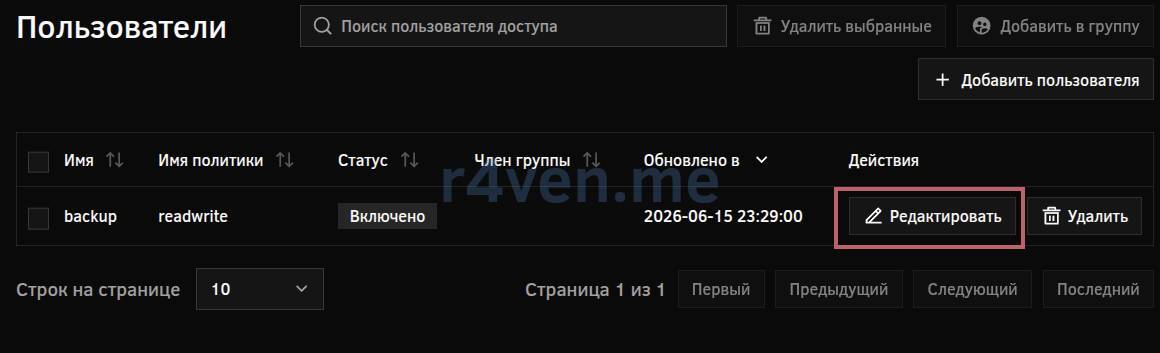
After creation, click “Edit” next to the new user:
Go to the “Access keys” tab and click “Add access keys”:
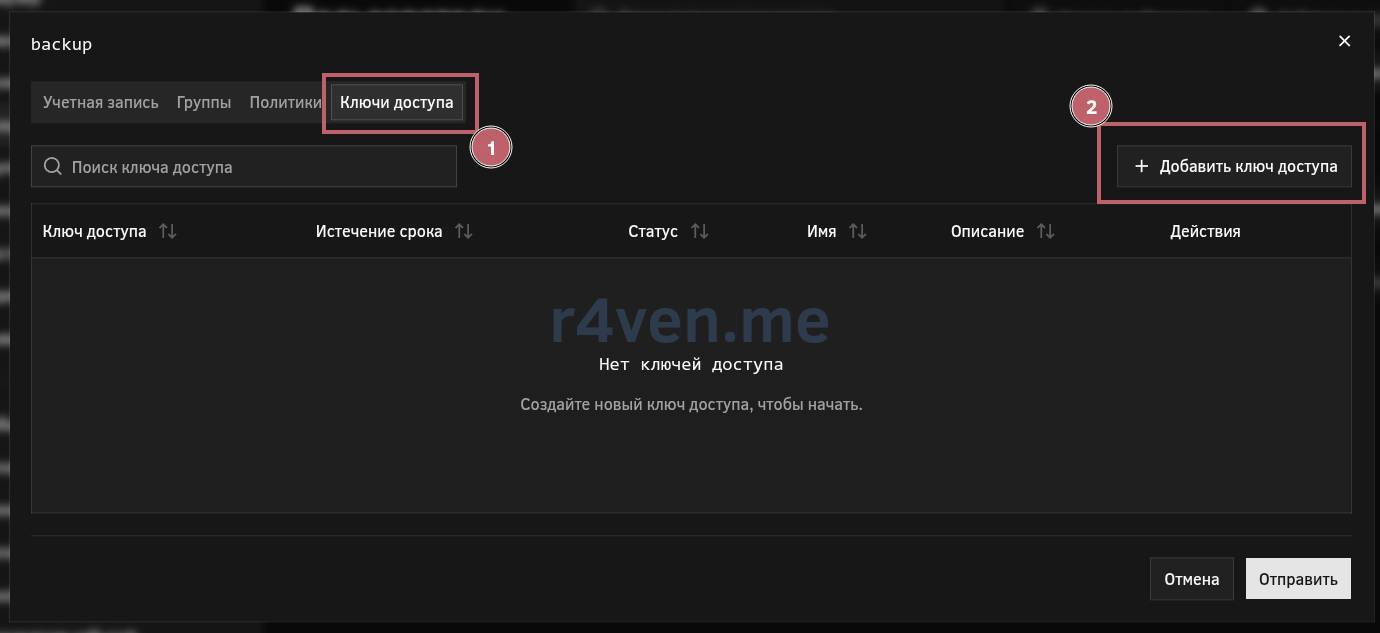
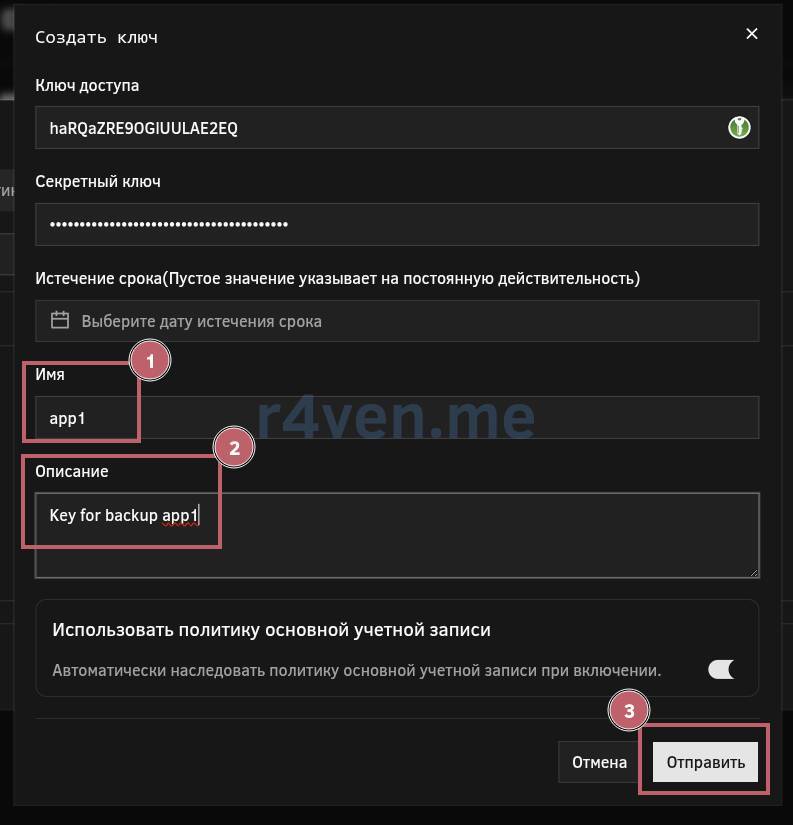
Here, specify an arbitrary name and description. You can also set the key expiration date. If you do not select a date, the key will be active indefinitely. Complete creation with the “Submit” button:
A window with the new access key and secret key will appear. Be sure to save them, maybe even export them, because you will not be able to view them again:
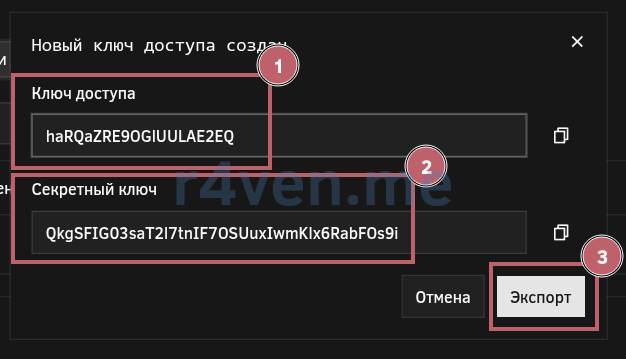
In our example, the data is as follows:
- Access key:
haRQaZRE9OGlUULAE2EQ - Secret key:
QkgSFIG03saT2l7tnIF7OSUuxIwmKlx6RabFOs9i
You can create many such keys for one user with different access policies.
Checking S3 operation with Rclone

To test our object storage, we will use the excellent rclone utility, about which I recently wrote an article on mounting remote storage.
📝 Note
rclone is a console utility for working with cloud and S3-compatible storage. It allows you to copy, sync, mount, and manage files between the local system and remote storage (S3, MinIO, RustFS, Google Drive, OneDrive, and dozens of other services). It is often used as an rsync analogue for cloud storage.
The utility is available in standard Linux repositories. Install it and create a config using the shell here doc mechanism. Do not forget to substitute your own values for endpoint, access_key_id (access key), and secret_access_key (secret key):
apt install -y rclone

mkdir -vp ~/.config/rclone

cat > ~/.config/rclone/rclone.conf << EOF
[rustfs]
type = s3
provider = Minio
endpoint = https://rustfs.r4ven.me
access_key_id = haRQaZRE9OGlUULAE2EQ
secret_access_key = QkgSFIG03saT2l7tnIF7OSUuxIwmKlx6RabFOs9i
EOFCheck access to the storage:
rclone lsd rustfs:If you see the name of your bucket, the connection is successful:

Now create a “directory” inside the bucket and copy a tar archive with the contents of the /etc directory there using the stream redirection mechanism:
tar -czf - /etc | rclone rcat rustfs:app1/rclone/backup_etc_$(date '+%F').tar.gz

rclone ls rustfs:app1/rclone
💡 As usual, you can view the list of available commands with rclone --help.
📝 Note
Why a tar archive and not direct file copying to S3? The thing is that regular copying with rclone does not work well with symbolic links. That is why it is most often used together with our favorite tar archiver.
You can restore files from S3 using rclone like this:
mkdir -vp /tmp/restore/rclone

# Archive in one file
rclone copy rustfs:app1/rclone/backup_etc_2026-06-16.tar.gz /tmp/restore/rclone

# Unzip immediately
rclone cat rustfs:app1/rclone/backup_etc_2026-06-16.tar.gz | tar -xzf - -C /tmp/restore/rclone

ls -l /tmp/restore/rcloneChecking S3 operation with Restic

Another popular S3 use case is backups with another excellent utility, restic.
📝 Note
restic is a console backup program that creates deduplicated, encrypted, and versioned backups of files and directories. It can store backups locally, over SFTP, or in S3-compatible storage (for example, MinIO or RustFS), allowing you to restore data to any point in time from saved snapshots.
restic is also available in standard Linux repositories. Its configuration method is somewhat different from the same rclone. All parameters are set in environment variables, which must be loaded for each terminal session.
Let’s install restic and save all the required parameters to an env file so they can be loaded all at once:
☝️ Do not forget to substitute your own values.
apt install -y restic

mkdir -vp ~/.config/restic

cat > ~/.config/restic/env << EOF
export AWS_ACCESS_KEY_ID="haRQaZRE9OGlUULAE2EQ"
export AWS_SECRET_ACCESS_KEY="QkgSFIG03saT2l7tnIF7OSUuxIwmKlx6RabFOs9i"
export AWS_DEFAULT_REGION="us-east-1"
export RESTIC_REPOSITORY="s3:https://rustfs.r4ven.me/app1/restic"
export RESTIC_PASSWORD="12345678"
EOF

source ~/.config/restic/env📝 The RESTIC_PASSWORD variable specifies the password used to encrypt files in the restic repository.
💡 Tip
If needed, you can add the export of these variables to your environment through the *rc file of your shell. Example for Bash:
echo 'source ~/.config/restic/env' >> ~/.bashrcNow let’s initialize the restic repository and create a backup of the /etc directory, as we did earlier with rclone, but now without tar:
restic init

restic backup /etc

restic stats

restic snapshots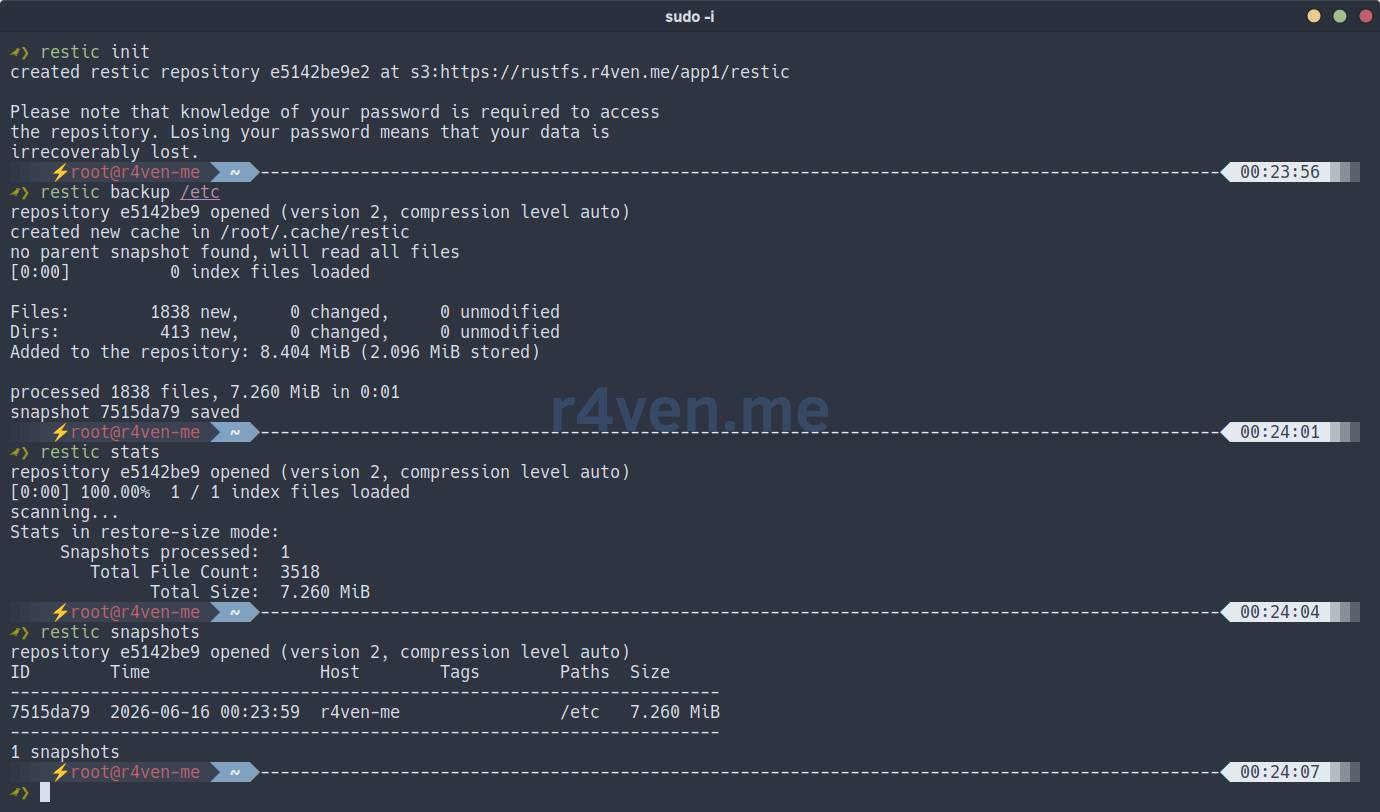
View the repository contents:
restic ls latest | less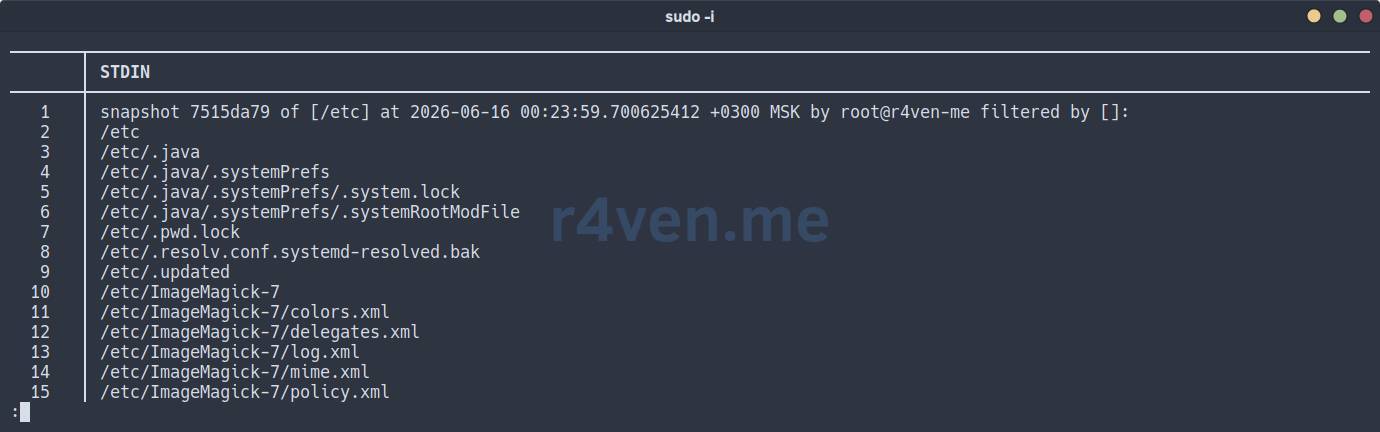
You can restore files to the specified directory from the latest backup like this:
restic restore latest --target /tmp/restore

ls -l /tmp/restore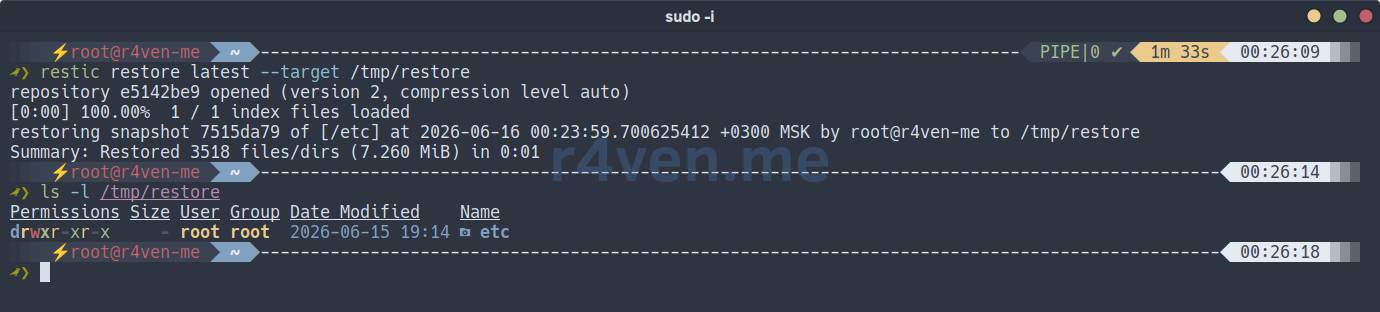
Afterword
So, we have configured our own S3-compatible RustFS storage, protected behind the Caddy reverse proxy. For a small personal server, backups, test buckets, and all kinds of internal services - this is quite an excellent option 👍.
The RustFS project itself still looks young, so I would recommend keeping an eye on updates and using it in production with a bit more caution than the same MinIO.
Thank you for reading. And remember, admins are divided into two types: those who make backups, and those who definitely will. All the best!
References
- https://docs.rustfs.com/installation/
- https://github.com/rustfs/rustfs
- https://docs.rustfs.com/installation/docker/
- https://caddyserver.com/docs/
- https://rclone.org/docs/
- https://github.com/rclone/rclone
- https://restic.net/#quickstart
- https://github.com/restic/restic
👨💻Ну и…
Don’t forget about our Telegram channel 📱 and chat 💬 All the best ✌️
That should be it. If not, check the logs 🙂