
In this article, we will look at the process of mounting remote network storage SFTP, WebDAV, and S3 as a regular directory in the Linux file system.
We will do this using the cool rclone utility👩🚀👩🚀.
🖐️Эй!
Subscribe to our Telegram channel @r4ven_me📱, so you don’t miss new posts on the website 😉. If you have questions or just want to chat about the topic, feel free to join the Raven chat at @r4ven_me_chat🧐.
Briefly about SFTP, WebDAV, S3, and rclone
SFTP (SSH File Transfer Protocol) is a network protocol designed for secure file transfer over a network. SFTP operates over the SSH (Secure Shell) protocol.
WebDAV (Web-based Distributed Authoring and Versioning) is a set of extensions to the HTTP protocol that allows managing files stored on remote web servers. Essentially, it turns a web server into something similar to a network drive.
S3 (Amazon Simple Storage Service) is a cloud object storage provided by AWS, as well as many other providers (S3-compatible storage, for example, MinIO).
rclone is a powerful Open source command-line utility for synchronizing files and directories with/to many different cloud storage services, including SFTP, WebDAV, S3, Google Drive, Dropbox, and many others. rclone can also mount cloud storage as local file systems (via the FUSE subsystem), which is what this article is about 😉.
Why not SFTP/SSHFS and DAVFS?
Yes, SFTP can be connected directly or even using the FUSE variant - SSHFS. A similar situation exists for WebDAV: DAVFS is available. But the peculiarity of mounting with rclone lies in its unification and additional capabilities.
For example, both sshfs and rclone mount use SFTP as a backend. The difference is that rclone doesn’t just proxy the request; it is also capable of:
- caching files;
- buffering;
- reading in chunks;
- re-opening connections.
Parameters can be flexibly adjusted for various operating conditions.
How to read this article?
The sections of the article for each mounting type are self-contained. You can choose any one, and by performing the rclone installation + all steps of the desired section, you will get a working configuration.
Now, let’s move on to practice👨💻.
📝 All examples in the article were performed in a Debian GNU/Linux 13 distribution environment.
rclone installation
The rclone utility is available in standard repositories. Open the terminal and execute:
sudo apt update && sudo apt install fuse rcloneInitially, rclone is designed for direct file exchange between different storages: move|copy|sync. But this article will only focus on the mount command, which allows mounting different types of storage as a regular directory.
Mounting SFTP as a directory
📝 In the example below, we will mount a remote Linux server directory. But this method is relevant for any SFTP.
First, you need to add the SFTP remote storage access credentials to the rclone config (you can specify multiple instances of different types in the config):
mkdir -vp ~/.config/rclone

vim ~/.config/rclone/rclone.confFill it with:
[sftp-storage-1]
type = sftp
host = sftp.r4ven.me
user = ivan
port = 22
#pass = ObfuscatedSecretPassword
key_file = /home/ivan/.ssh/id_ed25519
md5sum_command = md5sum
sha1sum_command = sha1sum📝 If you decide to use a password for connection, it must be specified in obfuscated form. You can get one with the command:
rclone obscure 'SecretPassword'Parameter description:
[sftp-storage-1]- arbitrary name for your remote storage;type = sftp- tellsrclonethat this is a configuration for SFTP storage;host = sftp.r4ven.me- IP address or domain name of the SFTP server;user = ivan- username for login;port = 22- SFTP port (default 22);#pass = ObfuscatedSecretPassword- (commented out) obfuscated SSH user password - I do not recommend storing it here, it’s better to use an SSH key for authentication, but if absolutely necessary, obfuscate it with the command:rclone obscure 'SecretPassword';key_file = /home/ivan/.ssh/id_ed25519= SSH key, you can create it with the commandssh-keygen -t ed25519 -f /home/ivan/.ssh/id_ed25519;md5sum_command = md5sumandsha1sum_command = sha1sum- commands for checking file integrity on the remote server;
💡 Tip
More rclone parameters are available; you can find them when creating the config in interactive mode:
rclone configManual SFTP mounting
First, let’s create a local directory where we will mount the remote one:
mkdir -vp ~/Storage/sftpNow, to manually mount the remote directory to the local one, execute the following command:
rclone mount --daemon sftp-storage-1:/home/ivan/data ~/Storage/sftpWhere:
mount- mount command;--daemon- runs thercloneprocess in the background;sftp-storage-1:/home/ivan/data- remote source (SFTP storagesftp-storage-1, path/home/ivan/data);~/Storage/sftp- local mount point.
☝️ It is important that the directory /home/ivan/data exists on the remote host. Or simply mount the root.
📝 The --daemon flag is used for rclone to operate in the background, which frees up the console and suppresses system messages from being output to standard output. For debugging in case of problems, it should be removed.
Check mounting:
findmnt --real

df -h ~/Storage/sftp

ls -l ~/Storage/sftp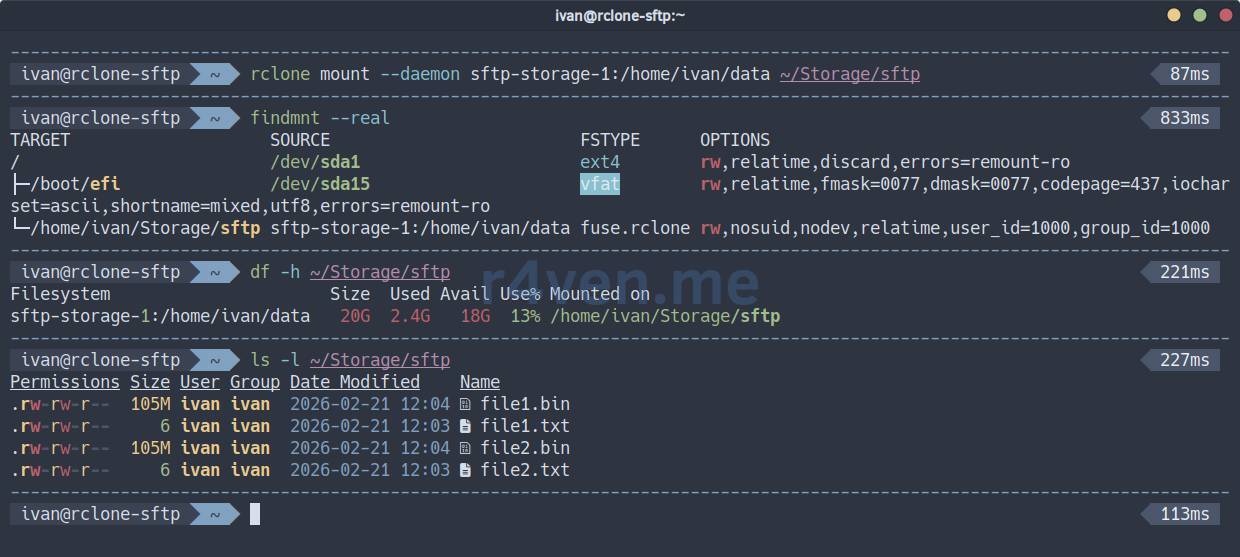
To unmount the directory, execute the fusermount command with the -u (unmount) flag:
fusermount -u ~/Storage/sftpIt seems like nothing special, but the whole point of such mounting lies in additional parameters, which can be many. For example:
rclone mount --daemon sftp-storage-1:/home/ivan/data ~/Storage/sftp \
    --dir-cache-time 48h \
    --vfs-cache-mode full \
    --vfs-cache-max-size 10G \
    --vfs-cache-max-age 24h \
    --vfs-write-back 5s \
    --vfs-read-chunk-size 128M \
    --vfs-read-chunk-size-limit 1G \
    --buffer-size 128M \
    --transfers 8 \
    --checkers 8 \
    --umask 002 \
    --log-level INFO \
    --retries 10 \
    --low-level-retries 10 \
    --sftp-set-modtime=false \
--sftp-disable-hashcheckSee the rclone parameter description under the spoiler.
Spoiler
--dir-cache-time 48h- directory content caching time;--vfs-cache-mode full- enables full file caching on disk for reading and writing;--vfs-cache-max-size 10G- maximum cache size on disk;--vfs-cache-max-age 24h- maximum time files are kept in cache without access;--vfs-write-back 5s- delay before writing modified data from cache back to the remote resource;--vfs-read-chunk-size 128M- size of blocksrclonereads data into cache;--vfs-read-chunk-size-limit 1G- maximum block size for reading large files;--buffer-size 128M- buffer size for read/write operations;--transfers 8- number of parallel file transfer operations;--checkers 8- number of parallel file verification operations;--umask 002- sets access permissions for new files/directories;--log-level INFO- log detail level;--retries 10- number of retries for operations that might fail;--low-level-retries 10- number of retries for low-level operations;--sftp-set-modtime=false- disables setting file modification time on the SFTP server;--sftp-disable-hashcheck- disables file hash checking for SFTP.
⚠️ПWarning
Please keep in mind that optimization is a delicate matter. Significantly changing any parameter can harm other parts of your system. Approach this thoughtfully.
I recommend studying the necessary parameters in more detail in the official documentation:
To check write speed, you can use the dd utility:
dd if=/dev/urandom of=./Storage/sftp/bigfile.bin bs=100M count=10📝 The command above will create a 1GB file and output write speed statistics.
Below in the screenshot is an example of writing with standard mounting and with additional parameters:
❗️ Caution
Please note that the additional speed is provided by the local file system cache. The file may appear on the remote host with a delay. Everything depends on the backend type and network speed.
📝 Note
It is worth noting separately the case when the uid/gid of your local and remote user differ, and writing to the mounted directory will be impossible. In this scenario, enabling the user_allow_other parameter in your FUSE system and using the --allow-other key in rclone might help.
sudo vim /etc/fuse.conf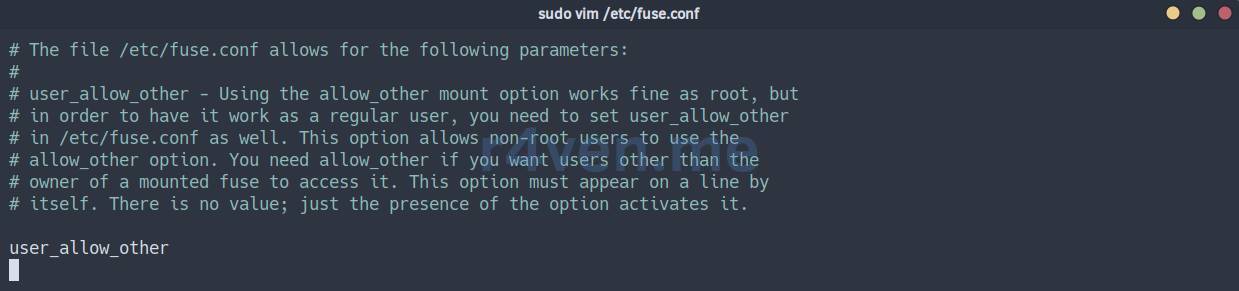
rclone mount --daemon --allow-other sftp-storage-1:/home/ivan/data ~/Storage/sftpAutomatic SFTP mounting
To automatically start the mounting process, we will use the Systemd initialization system.
Create a unit file with the command:
mkdir -vp ~/.config/systemd/user

vim ~/.config/systemd/user/sftp-storage-1.serviceFill it with:
[Unit]
Description=Rclone SFTP mount
After=network-online.target
Wants=network-online.target

[Service]
Type=simple

ExecStartPre=/usr/bin/sleep 5

ExecStart=/usr/bin/rclone mount \
    sftp-storage-1:/home/ivan/data /home/ivan/Storage/sftp \
    --dir-cache-time 48h \
    --vfs-cache-mode full \
    --vfs-cache-max-size 10G \
    --vfs-cache-max-age 24h \
    --vfs-write-back 5s \
    --vfs-read-chunk-size 128M \
    --vfs-read-chunk-size-limit 1G \
    --buffer-size 128M \
    --transfers 8 \
    --checkers 8 \
    --umask 002 \
    --log-level INFO \
    --retries 10 \
    --low-level-retries 10 \
    --sftp-set-modtime=false \
    --sftp-disable-hashcheck

ExecStop=/usr/bin/fusermount -u -z /home/ivan/Storage/sftp
ExecStopPost=/usr/bin/sleep 2
TimeoutStopSec=20

Restart=always
RestartSec=60

KillMode=mixed

[Install]
WantedBy=default.target☝️ Don’t forget to specify your values.
The unit parameter description is under the spoiler.
Spoiler
[Unit]:Description- human-readable description of the unit;After=network-online.target- indicates that this unit should start after the network is fully available;Wants=network-online.target- expresses a “desire” to startnetwork-online.target, but is not a strict dependency (the unit will start even ifnetwork-online.targetdoes not start);
[Service]:Type=simple- the main process of the unit is launched directly by theExecStartcommand;ExecStartPre=/usr/bin/sleep 5- command executed beforeExecStart(5 seconds delay);ExecStart=/usr/bin/rclone ...- the main command to start the service (rclone mount);ExecStop=/usr/bin/fusermount -u -z ...- command to stop the service (rcloneunmounting);ExecStopPost=/usr/bin/sleep 2- command executed after ExecStop (2 seconds delay);TimeoutStopSec=20- maximum time (in seconds) forExecStopto complete;Restart=always- the service will be restarted if it terminates incorrectly;RestartSec=60- 60 seconds delay before restarting;KillMode=mixed- defines how systemd will kill service processes;
[Install]:WantedBy=default.target- indicates that this unit will be started at system boot if it is enabled (systemctl enable).
📝 Please note that the --daemon flag has been removed from the ExecStart parameter of the unit, as Systemd will manage the service and its output. Also, absolute paths to directories are specified everywhere - this is important.
Reload Systemd configuration:
systemctl --user daemon-reload☝️ If the remote storage is mounted, unmount it:
fusermount -u ~/Storage/sftpNow activate the unit start/autostart:
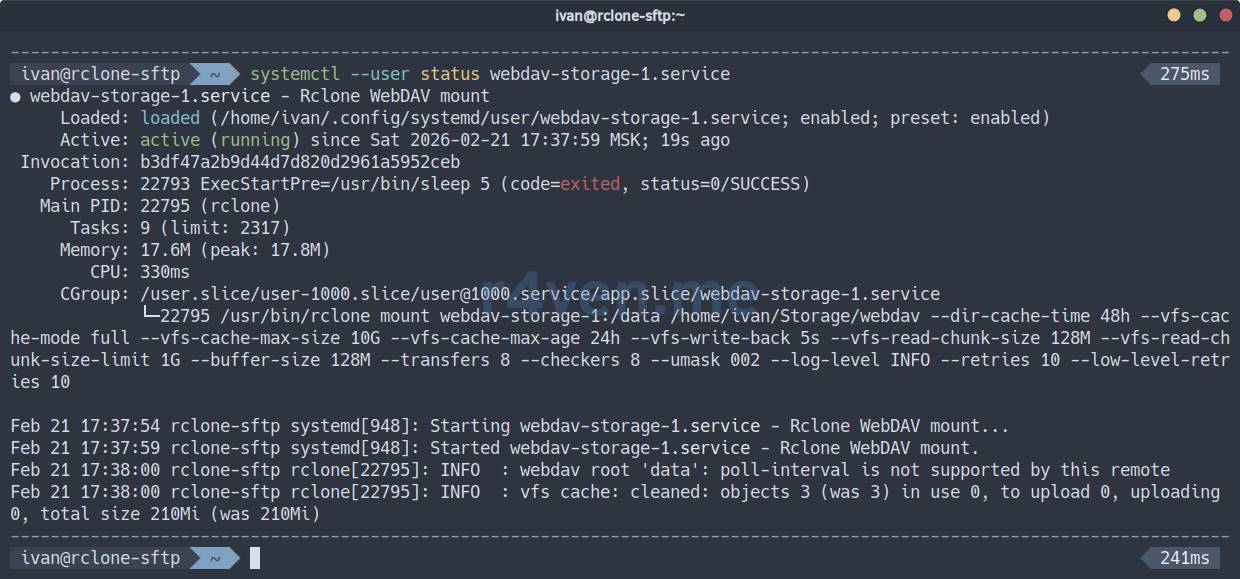
systemctl --user enable --now sftp-storage-1.service

systemctl --user status sftp-storage-1.serviceIf everything is OK:
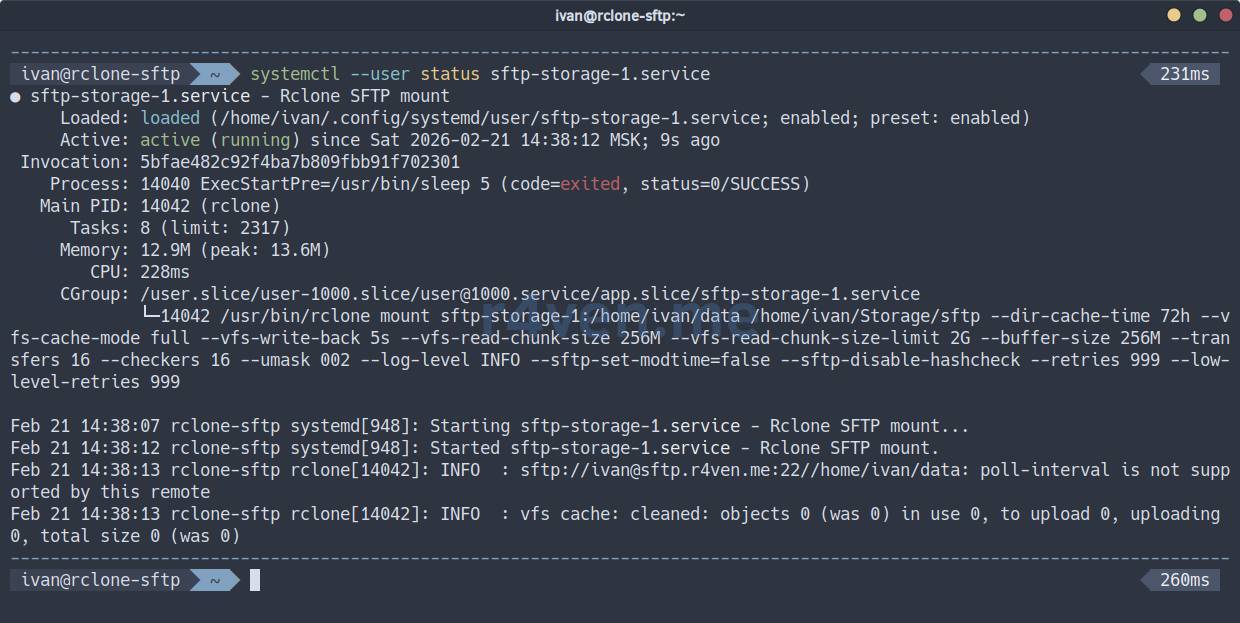
Check the mount point:
findmnt --real

df -h ~/Storage/sftp

ls -l ~/Storage/sftpTo view the service journal:
journalctl --user -u sftp-storage-1.serviceNow the service will start when the user logs into the system.
💡 Tip
If you need to mount storage at OS startup, simply create a unit as a root user and add rclone parameters that override the uid/gid to the required user: --uid 1000 --gid 1000.
Mounting WebDAV as a directory
📝 The WebDAV mounting example below is also relevant for public storages, such as Mail.ru Cloud or Yandex.Disk.
Here, you also need to add the WebDAV remote storage access credentials to the rclone config (you can specify multiple instances of different types in the config):
mkdir -vp ~/.config/rclone

vim ~/.config/rclone/rclone.confFill it with:
[webdav-storage-1]
type = webdav
url = https://webdav.r4ven.me/
vendor = auto
user = ivan@r4ven.me
pass = ObfuscatedSecretPassword📝 The password is specified in obfuscated form. You can get one with the command:
rclone obscure 'SecretPassword'Parameter description:
[webdav-storage-1]- arbitrary name for the remote resource;type = webdav- tellsrclonethat this is a configuration for WebDAV storage;url = https://webdav.r4ven.me/- the full URL of your WebDAV server. This can be the root URL or the path to a specific folder you want to mount;vendor = auto- allowsrcloneto automatically determine the type of WebDAV server (e.g., Nextcloud, Owncloud, SharePoint). You can explicitly specify the type if known;user = ivan@r4ven.me- username used for authentication;pass = ObfuscatedSecretPassword- obfuscated password.
💡 Tip
More rclone parameters are available; you can find them when creating the config in interactive mode:
rclone configThe output of the command should be used as pass in the config.
Manual WebDAV mounting
First, let’s create a local directory where we will mount the remote one:
mkdir -vp ~/Storage/webdavNow, to manually mount the remote directory to the local one, execute the following command:
☝️ If you are using self-signed certificates, add the --no-check-certificate parameter.
rclone mount --daemon webdav-storage-1:/data ~/Storage/webdavWhere:
mount- mount command;--daemon- runs thercloneprocess in the background;webdav-storage-1:/data- remote source (WebDAV directory);~/Storage/webdav- local mount point.
☝️ It is important that the /data directory exists on the WebDAV server. Or simply mount the root.
📝 The --daemon flag is used for rclone to operate in the background, which frees up the console and suppresses system messages from being output to standard output. For debugging in case of problems, it should be removed.
Check mounting:
findmnt --real

df -h ~/Storage/webdav

ls -l ~/Storage/webdav
To unmount the directory, execute the fusermount command with the -u (unmount) flag:
fusermount -u ~/Storage/webdavHere, too, many rclone parameters can be used. Example:
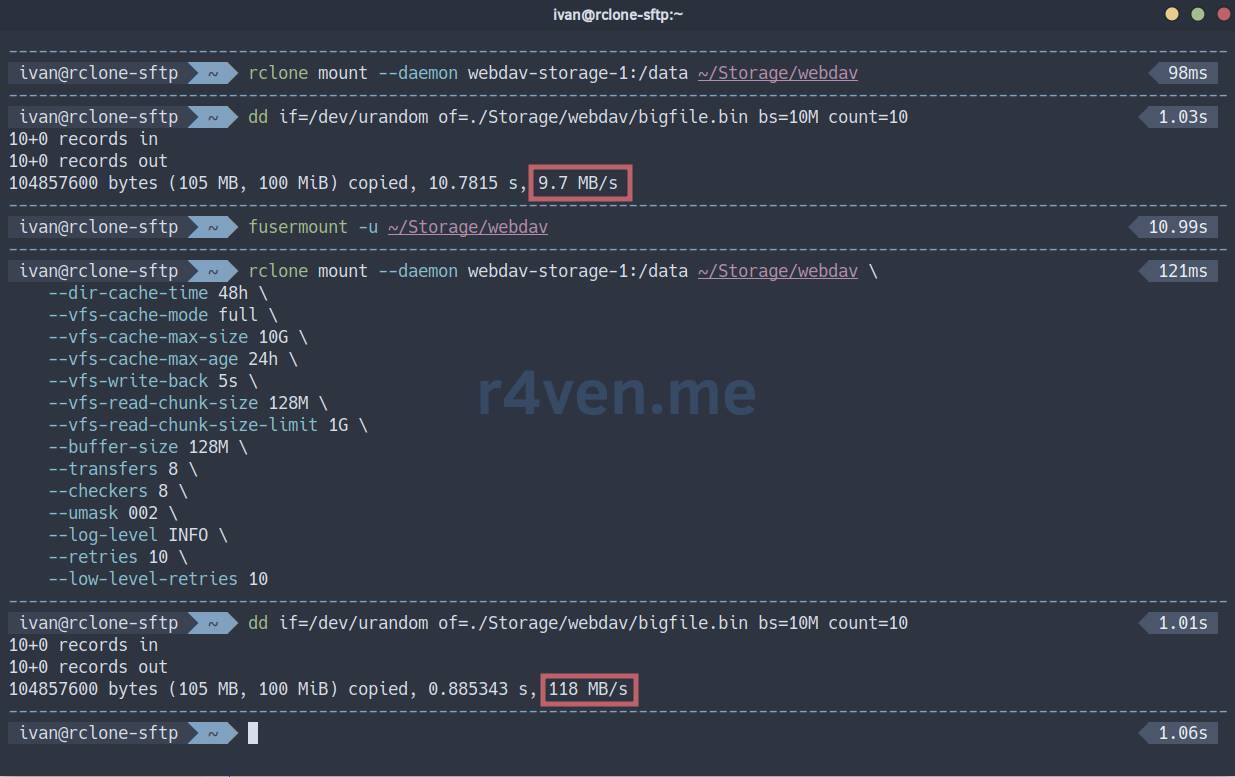
rclone mount --daemon webdav-storage-1:/data ~/Storage/webdav \
    --dir-cache-time 48h \
    --vfs-cache-mode full \
    --vfs-cache-max-size 10G \
    --vfs-cache-max-age 24h \
    --vfs-write-back 5s \
    --vfs-read-chunk-size 128M \
    --vfs-read-chunk-size-limit 1G \
    --buffer-size 128M \
    --transfers 8 \
    --checkers 8 \
    --umask 002 \
    --log-level INFO \
    --retries 10 \
--low-level-retries 10See the rclone parameter description under the spoiler.
Spoiler
--dir-cache-time 48h- directory content caching time;--vfs-cache-mode full- enables full file caching on disk for reading and writing;--vfs-cache-max-size 10G- maximum cache size on disk;--vfs-cache-max-age 24h- maximum time files are kept in cache without access;--vfs-write-back 5s- delay before writing modified data from cache back to the remote resource;--vfs-read-chunk-size 128M- size of blocksrclonereads data into cache;--vfs-read-chunk-size-limit 1G- maximum block size for reading large files;--buffer-size 128M- buffer size for read/write operations;--transfers 8- number of parallel file transfer operations;--checkers 8- number of parallel file verification operations;--umask 002- sets access permissions for new files/directories;--log-level INFO- log detail level;--retries 10- number of retries for operations that might fail;--low-level-retries 10- number of retries for low-level operations;
⚠️ПWarning
I remind you again: please keep in mind that optimization is a delicate matter. Significantly changing any parameter can harm other parts of your system. Approach this thoughtfully.
I recommend studying the necessary parameters in more detail in the official documentation:
To check write speed, you can use the dd utility:
dd if=/dev/urandom of=./Storage/webdav/bigfile.bin bs=10M count=10📝 The command above will create a 100MB file and output write speed statistics.
Below in the screenshot is an example of writing with standard mounting and with additional parameters:
❗️ Caution
I draw your attention to the fact that additional speed is provided by the local file system cache. The file may appear on the remote host with a delay. Everything depends on the backend type and network speed.
Automatic WebDAV mounting
For automatic startup of the mounting process, we also use Systemd.
Create a unit file with the command:
mkdir -vp ~/.config/systemd/user

vim ~/.config/systemd/user/webdav-storage-1.serviceFill it with:
[Unit]
Description=Rclone WebDAV mount
After=network-online.target
Wants=network-online.target

[Service]
Type=simple

ExecStartPre=/usr/bin/sleep 5

ExecStart=/usr/bin/rclone mount \
    webdav-storage-1:/data /home/ivan/Storage/webdav \
    --dir-cache-time 48h \
    --vfs-cache-mode full \
    --vfs-cache-max-size 10G \
    --vfs-cache-max-age 24h \
    --vfs-write-back 5s \
    --vfs-read-chunk-size 128M \
    --vfs-read-chunk-size-limit 1G \
    --buffer-size 128M \
    --transfers 8 \
    --checkers 8 \
    --umask 002 \
    --log-level INFO \
    --retries 10 \
    --low-level-retries 10

ExecStop=/usr/bin/fusermount -u -z /home/ivan/Storage/webdav
ExecStopPost=/usr/bin/sleep 2
TimeoutStopSec=20

Restart=always
RestartSec=60

KillMode=mixed

[Install]
WantedBy=default.target☝️ Don’t forget to specify your values.
The unit parameter description is under the spoiler.
Spoiler
[Unit]:Description- human-readable description of the unit;After=network-online.target- indicates that this unit should start after the network is fully available;Wants=network-online.target- expresses a “desire” to startnetwork-online.target, but is not a strict dependency (the unit will start even ifnetwork-online.targetdoes not start);
[Service]:Type=simple- the main process of the unit is launched directly by theExecStartcommand;ExecStartPre=/usr/bin/sleep 5- command executed beforeExecStart(5 seconds delay);ExecStart=/usr/bin/rclone ...- the main command to start the service (rclone mount);ExecStop=/usr/bin/fusermount -u -z ...- command to stop the service (rcloneunmounting);ExecStopPost=/usr/bin/sleep 2- command executed after ExecStop (2 seconds delay);TimeoutStopSec=20- maximum time (in seconds) forExecStopto complete;Restart=always- the service will be restarted if it terminates incorrectly;RestartSec=60- 60 seconds delay before restarting;KillMode=mixed- defines how systemd will kill service processes;
[Install]:WantedBy=default.target- indicates that this unit will be started at system boot if it is enabled (systemctl enable).
📝 Please note that the --daemon flag has been removed from the ExecStart parameter of the unit, as Systemd will manage the service and its output. Also, absolute paths to directories are specified everywhere - this is important.
Reload Systemd configuration:
systemctl --user daemon-reload☝️ If the remote storage is mounted, unmount it.
fusermount -u ~/Storage/webdavNow activate the unit start/autostart:
systemctl --user enable --now webdav-storage-1.service

systemctl --user status webdav-storage-1.serviceIf everything is OK:
Check the mount point:
findmnt --real

df -h ~/Storage/webdav

ls -l ~/Storage/webdavTo view the service journal:
journalctl --user -u webdav-storage-1.serviceNow the service will start when the user logs into the system.
💡 Tip
If you need to mount storage at OS startup, simply create a unit as a root user and add rclone parameters that override the uid/gid to the required user: --uid 1000 --gid 1000.
Mounting S3 as a directory
📝 Below will be an example of mounting S3 storage based on MinIO. But this method is suitable for any S3-compatible storage.
Again, we start with the rclone config. Open the file and add the credentials for the S3 instance (you can specify multiple instances of different types in the config):
mkdir -vp ~/.config/rclone

vim ~/.config/rclone/rclone.confFill it with:
[s3-storage-1]
type = s3
provider = Minio
endpoint: https://s3.r4ven.me:443
access_key_id: ivan
secret_access_key: SecretAccessKey
bucket: data📝 secret_access_key is specified in plain text.
Parameter description:
[s3-storage-1]- arbitrary name for the remote resource;type = s3- tellsrclonethat this is a configuration for S3 storage;provider = Minio- name of the S3 provider;endpoint: https://s3.r4ven.me:443- URL of your S3 instance;access_key_id: ivan- Access key for the bucket;secret_access_key: SecretAccessKey- Secret key for accessing the bucket;bucket: data- respectively, the name of the existing bucket.
💡 Tip
More rclone parameters and providers are available; you can find them when creating the config in interactive mode:
rclone configManual S3 mounting
Create a local directory where we will mount the remote one:
mkdir -vp ~/Storage/s3The mount command is identical to the previous ones:
☝️ If you are using self-signed certificates, add the --no-check-certificate parameter.
rclone mount --daemon s3-storage-1:/data ~/Storage/s3Where:
mount- mount command;--daemon- runs thercloneprocess in the background;s3-storage-1:/data- remote source (S3 instance);~/Storage/s3- local mount point.
☝️ It is important that the data bucket exists on the S3 server. Or simply mount the root /.
📝 The --daemon flag is used for rclone to operate in the background, which frees up the console and suppresses system messages from being output to standard output. For debugging in case of problems, it should be removed.
Check mounting:
findmnt --real

df -h ~/Storage/s3

ls -l ~/Storage/s3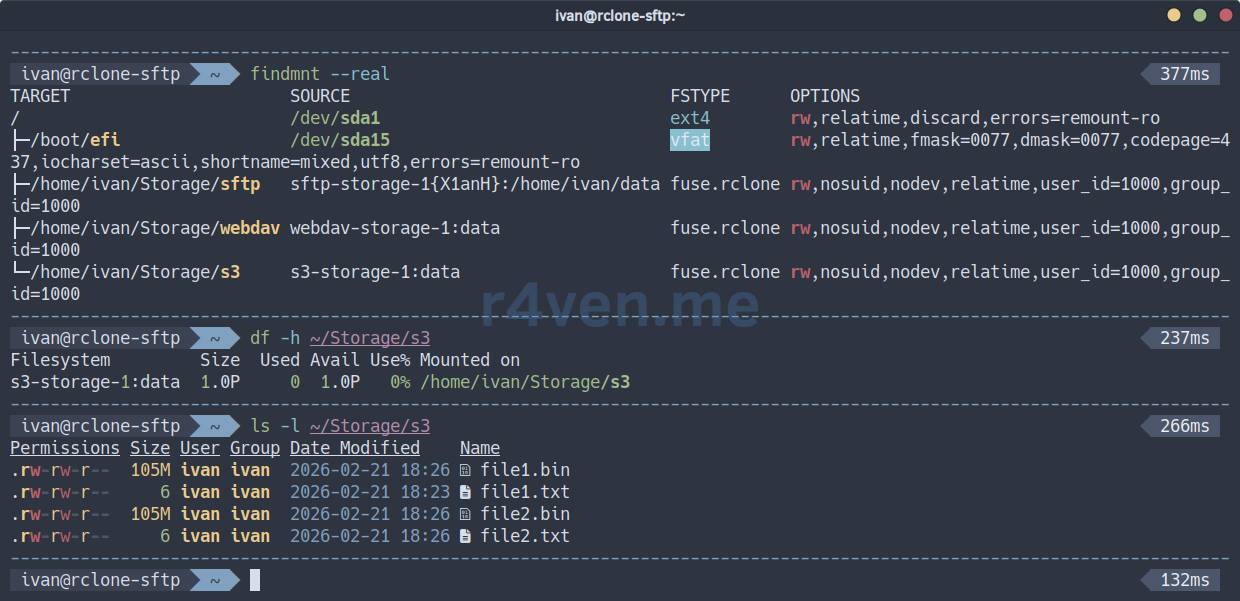
To unmount the directory, execute the fusermount command with the -u (unmount) flag:
fusermount -u ~/Storage/s3Many rclone parameters are also available here. Example:
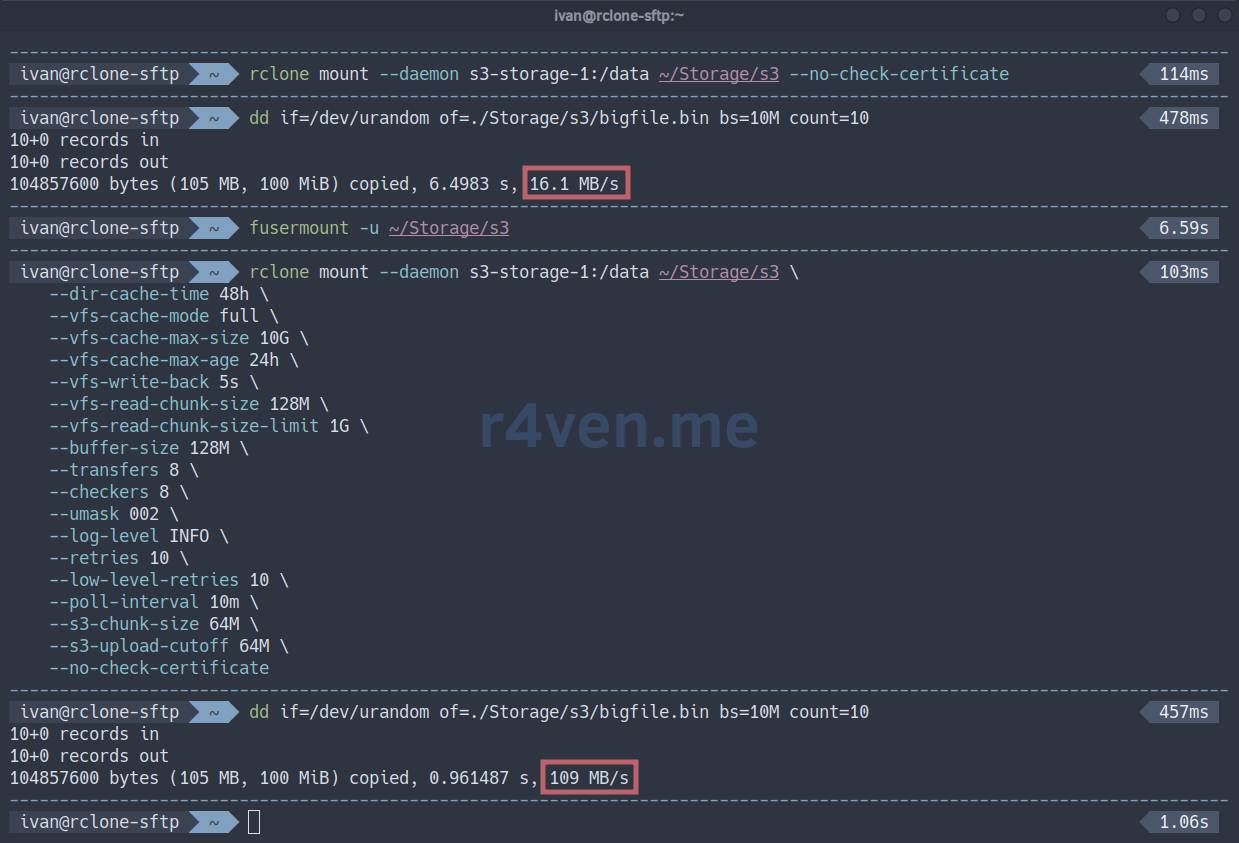
rclone mount --daemon s3-storage-1:/data ~/Storage/s3 \
    --dir-cache-time 48h \
    --vfs-cache-mode full \
    --vfs-cache-max-size 10G \
    --vfs-cache-max-age 24h \
    --vfs-write-back 5s \
    --vfs-read-chunk-size 128M \
    --vfs-read-chunk-size-limit 1G \
    --buffer-size 128M \
    --transfers 8 \
    --checkers 8 \
    --umask 002 \
    --log-level INFO \
    --retries 10 \
    --low-level-retries 10 \
    --poll-interval 10m \
    --s3-chunk-size 64M \
--s3-upload-cutoff 64MSee the rclone parameter description under the spoiler.
Spoiler
--dir-cache-time 48h- directory content caching time;--vfs-cache-mode full- enables full file caching on disk for reading and writing;--vfs-cache-max-size 10G- maximum cache size on disk;--vfs-cache-max-age 24h- maximum time files are kept in cache without access;--vfs-write-back 5s- delay before writing modified data from cache back to the remote resource;--vfs-read-chunk-size 128M- size of blocksrclonereads data into cache;--vfs-read-chunk-size-limit 1G- maximum block size for reading large files;--buffer-size 128M- buffer size for read/write operations;--transfers 8- number of parallel file transfer operations;--checkers 8- number of parallel file verification operations;--umask 002- sets access permissions for new files/directories;--log-level INFO- log detail level;--retries 10- number of retries for operations that might fail;--low-level-retries 10- number of retries for low-level operations;--poll-interval 10m- sets the interval at whichrclonewill check the remote storage for changes. This helps to update the directory cache (--dir-cache-time) sooner than it expires if changes occur on S3 externally;--s3-chunk-size 64M- defines the size of parts for multipart upload to S3;--s3-upload-cutoff 64M- threshold after which rclone starts using multipart upload. Must be equal to or greater than--s3-chunk-size.
⚠️ПWarning
I remind you again: please keep in mind that optimization is a delicate matter. Significantly changing any parameter can harm other parts of your system. Approach this thoughtfully.
I recommend studying the necessary parameters in more detail in the official documentation:
To check write speed, you can use the dd utility:
dd if=/dev/urandom of=./Storage/s3/bigfile.bin bs=10M count=10📝 The command above will create a 100MB file and output write speed statistics.
Below in the screenshot is an example of writing with standard mounting and with additional parameters:
❗️ Caution
I draw your attention to the fact that additional speed is provided by the local file system cache. The file may appear on the remote host with a delay. Everything depends on the backend type and network speed.
It is also worth noting that the S3 concept does not imply direct file modification: in the case of a mounted folder, everything will look transparent to the user, but under the hood, rclone will first make a copy of the file on the remote storage, and then delete the old one.
Automatic S3 mounting
To automatically start the mounting process, we will again use Systemd.
Create a unit file:
mkdir -vp ~/.config/systemd/user

vim ~/.config/systemd/user/s3-storage-1.serviceFill it with:
[Unit]
Description=Rclone S3 mount
After=network-online.target
Wants=network-online.target

[Service]
Type=simple

ExecStartPre=/usr/bin/sleep 5

ExecStart=/usr/bin/rclone mount \
    s3-storage-1:/data /home/ivan/Storage/s3 \
    --dir-cache-time 48h \
    --vfs-cache-mode full \
    --vfs-cache-max-size 10G \
    --vfs-cache-max-age 24h \
    --vfs-write-back 5s \
    --vfs-read-chunk-size 128M \
    --vfs-read-chunk-size-limit 1G \
    --buffer-size 128M \
    --transfers 8 \
    --checkers 8 \
    --umask 002 \
    --log-level INFO \
    --retries 10 \
    --low-level-retries 10 \
    --poll-interval 10m \
    --s3-chunk-size 64M \
    --s3-upload-cutoff 64M

ExecStop=/usr/bin/fusermount -u -z /home/ivan/Storage/s3
ExecStopPost=/usr/bin/sleep 2
TimeoutStopSec=20

Restart=always
RestartSec=60

KillMode=mixed

[Install]
WantedBy=default.target☝️ Don’t forget to specify your values.
The unit parameter description is under the spoiler.
Spoiler
[Unit]:Description- human-readable description of the unit;After=network-online.target- indicates that this unit should start after the network is fully available;Wants=network-online.target- expresses a “desire” to startnetwork-online.target, but is not a strict dependency (the unit will start even ifnetwork-online.targetdoes not start);
[Service]:Type=simple- the main process of the unit is launched directly by theExecStartcommand;ExecStartPre=/usr/bin/sleep 5- command executed beforeExecStart(5 seconds delay);ExecStart=/usr/bin/rclone ...- the main command to start the service (rclone mount);ExecStop=/usr/bin/fusermount -u -z ...- command to stop the service (rcloneunmounting);ExecStopPost=/usr/bin/sleep 2- command executed after ExecStop (2 seconds delay);TimeoutStopSec=20- maximum time (in seconds) forExecStopto complete;Restart=always- the service will be restarted if it terminates incorrectly;RestartSec=60- 60 seconds delay before restarting;KillMode=mixed- defines how systemd will kill service processes;
[Install]:WantedBy=default.target- indicates that this unit will be started at system boot if it is enabled (systemctl enable).
📝 Please note that the --daemon flag has been removed from the ExecStart parameter of the unit, as Systemd will manage the service and its output. Also, absolute paths to directories are specified everywhere - this is important.
Reload Systemd configuration:
systemctl --user daemon-reload☝️ If the remote storage is mounted, unmount it.
fusermount -u ~/Storage/s3Now activate the unit start/autostart:
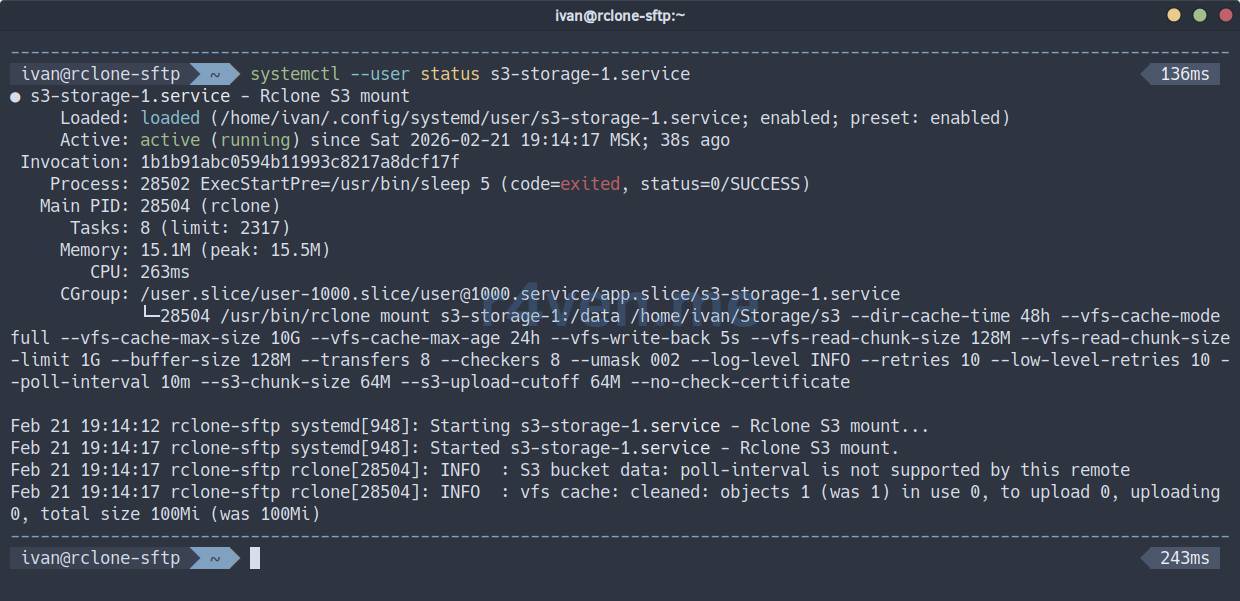
systemctl --user enable --now s3-storage-1.service

systemctl --user status s3-storage-1.serviceIf everything is OK:
Check the mount point:
findmnt --real

df -h ~/Storage/s3

ls -l ~/Storage/s3To view the service journal:
journalctl --user -u s3-storage-1.serviceNow the service will start when the user logs into the system.
💡 Tip
If you need to mount storage at OS startup, simply create a unit as a root user and add rclone parameters that override the uid/gid to the required user: --uid 1000 --gid 1000.
Afterword
This is how you can conveniently mount and use remote storage as a local directory📁. And simultaneously!

I discovered rclone relatively recently and was pleasantly surprised by its functionality. I will continue to study this useful tool🔧.
That’s all for today. Thank you for reading my blog📝. Good luck!
Materials used
- Official rclone website
- rclone main options
- Specific parameters for mount mode
- rclone repository on GitHub
- About the FUSE kernel module
- About SFTP protocol
- About WebDAV protocol
- About S3 protocol
- SSH — Secure connection to remote hosts: introduction
👨💻Ну и…
Don’t forget about our Telegram channel 📱 and chat 💬 All the best ✌️
That should be it. If not, check the logs 🙂