
In this article I’ll show how to easily deploy your own instance of a Syncthing server using docker compose🐳 on a system running Linux🐧. And of course I’ll go into detail about connecting clients, using Linux Mint, Windows, and Android as examples.
For those who don’t know, Syncthing is a popular client-server open source solution for synchronizing files🗃 between different devices📱💻.
🖐️Hey!
Subscribe to our Telegram channel @r4ven_me📱, so you don’t miss new posts on the website 😉. If you have questions or just want to chat about the topic, feel free to join the Raven chat at @r4ven_me_chat🧐.
Preface
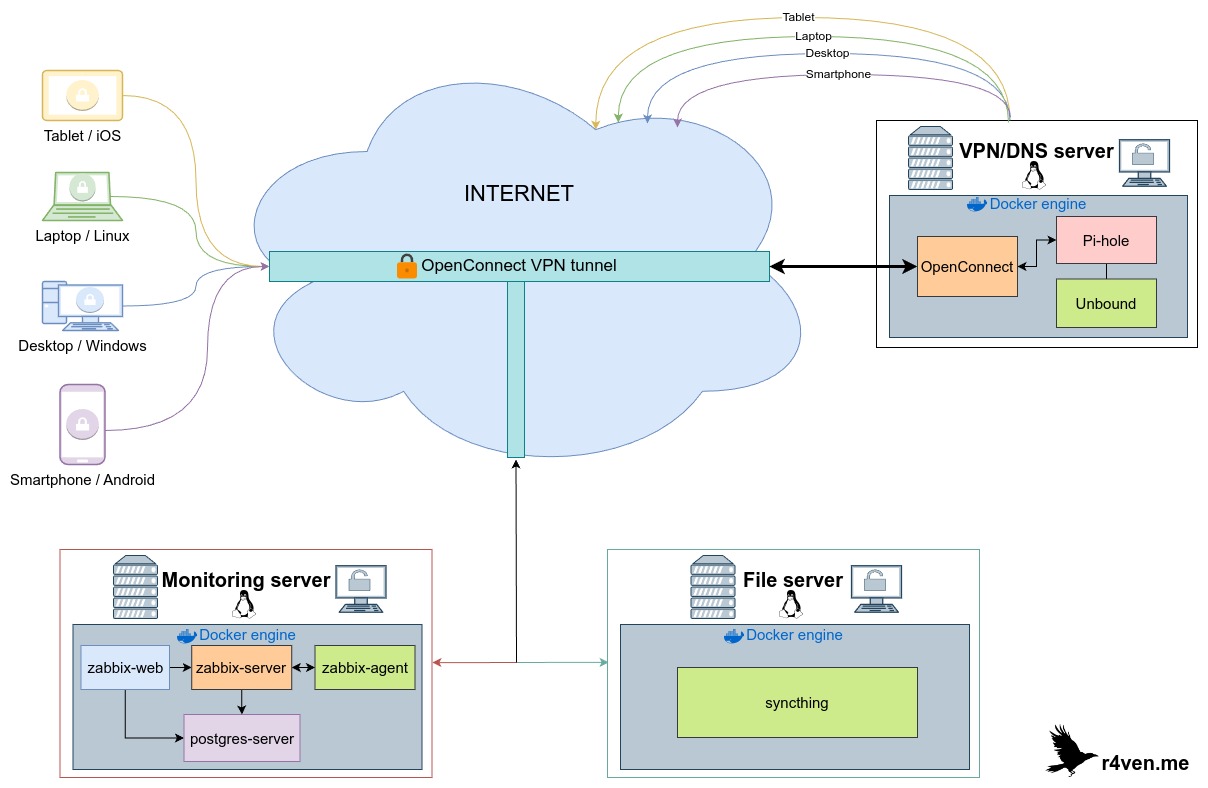
This article is part of a series about setting up personal infrastructure☝️. Here’s what we’ve already installed and configured in previous entries:
- OpenConnect SSL VPN server (ocserv) in docker for internal projects
- Your own Unbound DNS server and Pihole ad blocker in docker
- Zabbix 7 + TimescaleDB monitoring server in docker
Today, a Syncthing server will be added to our little infrastructure✅. The resulting scheme will look like this:
Introduction
Most often I deploy my services in a distribution environment based on Debian. Today’s case is no exception — the demonstration will be carried out on Debian 12🔥.
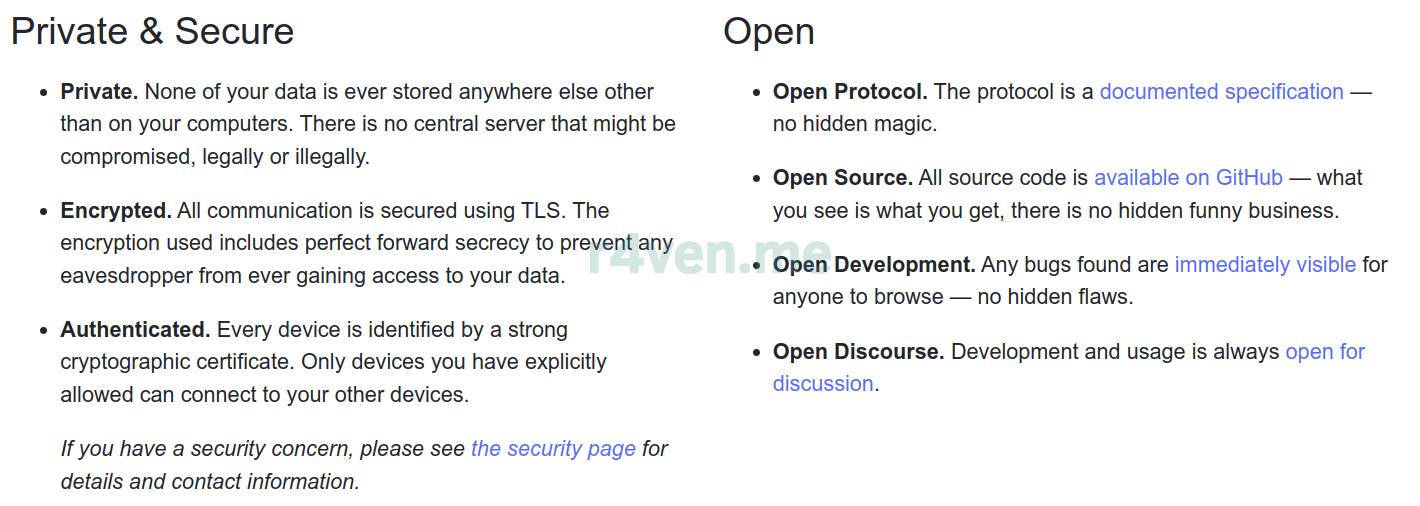
As already mentioned, Syncthing is software for synchronizing files between different devices. Here are the main points from the developers:
The project is written in Go and distributed under the open MPL-2.0 license.
For a better understanding of what follows, let me list the main entities of the Syncthing service📋:
- Nodes (devices) — computers or devices participating in synchronization;
- Folders — directories synchronized between nodes;
- Device ID — a unique node identifier;
- Discovery servers — servers for discovering devices through global or local lookup;
- Relay servers — intermediate servers for routing traffic between devices behind NAT;
- P2P — Syncthing uses peer-to-peer principles: nodes can exchange data directly without centralized storage servers. If devices are behind NAT, centralized servers (relay, discovery) are used only to establish the connection, while the data itself is transferred directly.
This article describes a way to set up centralized file synchronization using your own server, which will act as a hub for external devices such as a smartphone, laptop, PC, etc.
It’s worth warning right away that, by default, Syncthing uses both local discovery and global discovery via a network of public servers, the list and status of which you can view here. This means devices connected to Syncthing will be able to exchange files from anywhere in the world.
For users who prefer more privacy — at the end of the article there’s an example of setting up file synchronization only within an internal network, such as a VPN. This method is less convenient, but more private.
Preparation
To set up our own Syncthing service, we’ll need a Linux server with docker engine installed and running. If you don’t have your own server yet, the following articles might be helpful:
- Installing a Debian 12 server
- Initial setup of a Linux server using Debian as an example
- Installing Docker engine on a Debian-based Linux server
If the Linux server is ready, connect to it, for example, via SSH🔐, and first install the git version control system:
sudo apt update && sudo apt install -y git
Next, download the project files from my GitHub into the /opt directory:
sudo git clone https://github.com/r4ven-me/syncthing /opt/syncthing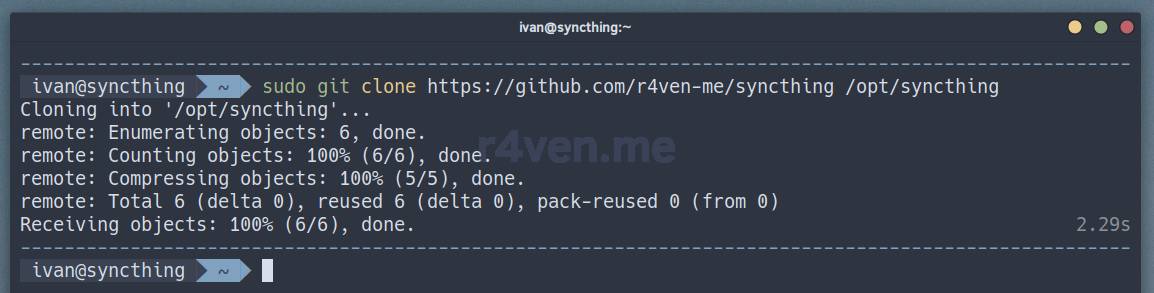
File listing:
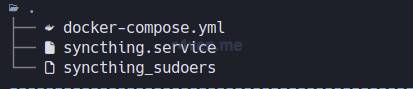
Click the spoiler🏎 to view the file contents.
docker-compose.yml - the description file for the syncthing service, run in a docker container
---

### NETWORKS ###
networks:
  syncthing_network:
    driver: bridge
    driver_opts:
      com.docker.network.enable_ipv6: "false"
      com.docker.network.bridge.name: "br-syncthing"

### SERVICES ###
services:
  syncthing:
    image: syncthing/syncthing:1.28
    container_name: syncthing
    restart: on-failure
    stop_grace_period: 1m
    deploy:
      resources:
        limits:
          cpus: '0.70'
          memory: 512M
        reservations:
          cpus: '0.2'
          memory: 256M
    hostname: syncthing.r4ven.me
    environment:
      - PUID=3113
      - PGID=3113
      #- STGUIADDRESS='0.0.0.0:80'
    volumes:
      - ./data/:/var/syncthing/
    # expose:
    #   - 8384
    #   - 22000/tcp
    #   - 22000/udp
    #   - 21027/udp
    ports:
      - 127.0.0.1:8384:8384 # Web UI
      - 127.0.0.1:22000:22000/tcp # TCP file transfers
      - 127.0.0.1:22000:22000/udp # QUIC file transfers
      - 127.0.0.1:21027:21027/udp # Receive local discovery broadcasts
    networks:
      syncthing_network:
        aliases:
          - syncthing
- syncsyncthing.service - a systemd unit file for convenient service management and autostart at system boot
[Unit]
Description=Syncthing service
Requires=docker.service
After=docker.service

[Service]
Restart=always
RestartSec=5
User=syncthing
Group=syncthing
ExecStart=/usr/bin/sudo --group=docker /usr/bin/docker compose --file /opt/syncthing/docker-compose.yml up
ExecStop=/usr/bin/sudo --group=docker /usr/bin/docker compose --file /opt/syncthing/docker-compose.yml down

[Install]
WantedBy=multi-user.targetsyncthing_sudoers - a file describing the limited (via sudo) permissions for launching the syncthing container by the service user
Cmnd_Alias SYNC = \
    /usr/bin/docker compose --file /opt/syncthing/docker-compose.yml up, \
    /usr/bin/docker compose --file /opt/syncthing/docker-compose.yml down

syncthing ALL = (:docker) NOPASSWD: SYNCNote that the
syncthingservice described in thedocker-compose.ymlfile is intentionally limited in hardware resource usage tocpus: '0.70'andmemory: 512M, i.e., the maximum allowed usage is 70% of one core and 512 MB of RAM. Adjust these parameters as needed for your own use case. Read more about resource limits for services when using docker-compose here.
Now let’s create the service group and user syncthing for running the service:
sudo addgroup --system --gid 3113 syncthing

sudo adduser --system --gecos "Syncthing file synchronization system" \
    --disabled-password --uid 3113 --ingroup syncthing  \
    --shell /sbin/nologin --home /opt/syncthing/data syncthing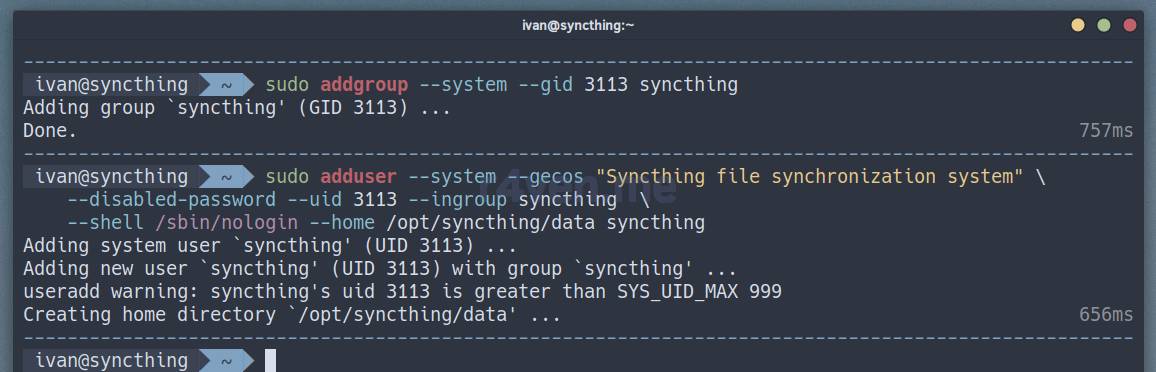
Click here to view a description of the command parameters
adgroup — the command for creating a group;
--system— marks the group as a system group and applies the established policies to it;--gid 3113— specifies an explicit group identifier (GID) — in this case 3113 (the same GID is specified in the environment variables of the syncthing container);syncthing— the name of the group being created;
adduser — the command for creating a user
--system— marks the group as a system group and applies the established policies to it;--gecos— allows setting a user description;--disabled-password— disables the user’s password (in this case you can’t log in as this user with a password);--uid 3113— specifies an explicit user identifier (UID) — in this case 3113 (the same UID is specified in the environment variables of the syncthing container);--ingroup syncthing— adds the user to the previously created syncthing group;--shell /sbin/nologin— sets nologin as the user’s shell — you cannot log into the system as this user;--home /opt/syncthing/data— sets the user’s home directory, in our case this is the directory with the syncthing service files;syncthing— the name of the user being created.
Don’t forget to set restricted permissions on the directory☝️ where our files will be stored:
sudo chmod 700 /opt/syncthing/dataFor more on file permissions, see a separate article.
Let’s check that all the required files and folders are present:
sudo ls -l /opt/syncthing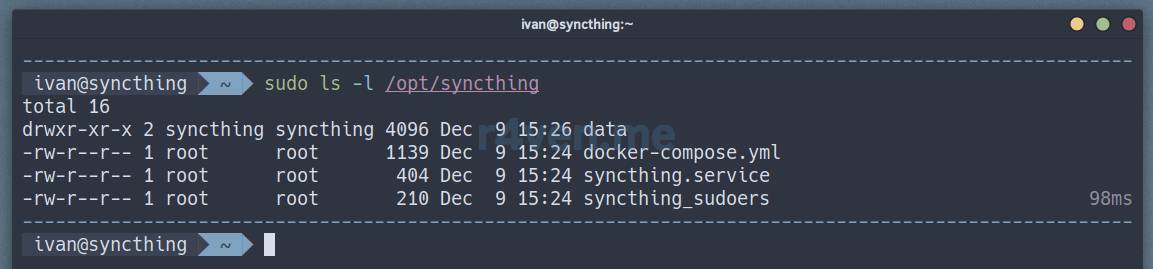
Great, let’s move on 🚶.
Starting the Syncthing server with docker compose
Let’s check the syntax of the compose file and bring up our new service:
sudo docker compose -f /opt/syncthing/docker-compose.yml config --quiet

sudo docker compose -f /opt/syncthing/docker-compose.yml up -d

sudo docker ps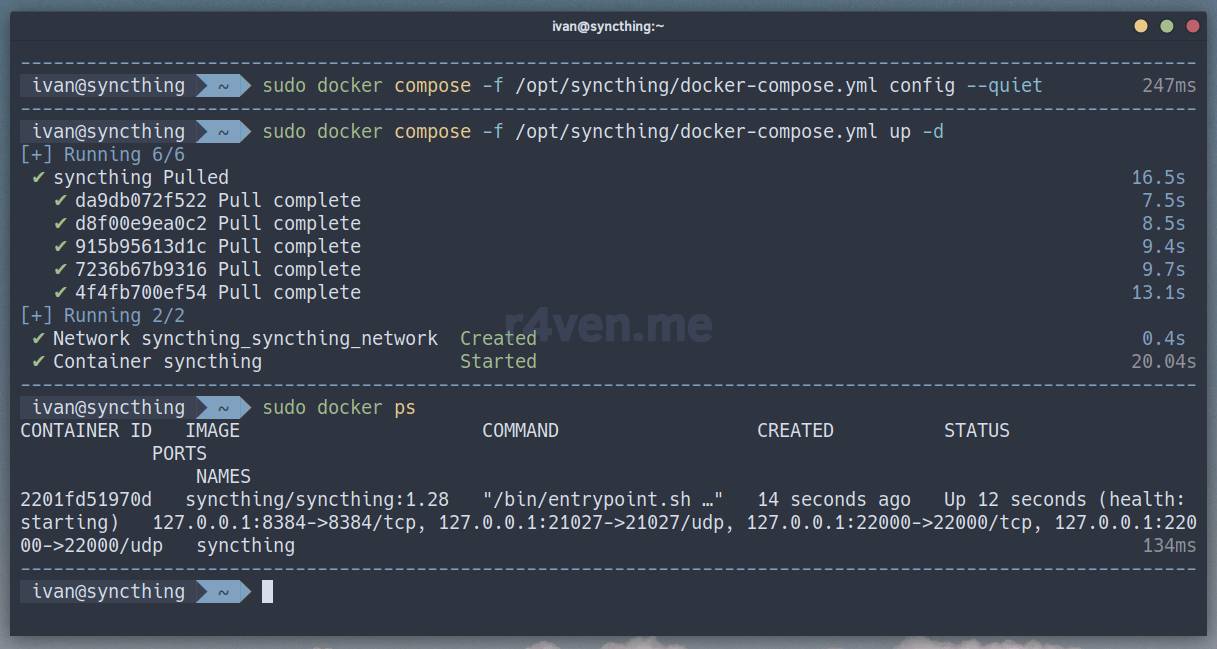
Yep, great. Let’s check the container output:
sudo docker logs -f syncthingShould look something like this:
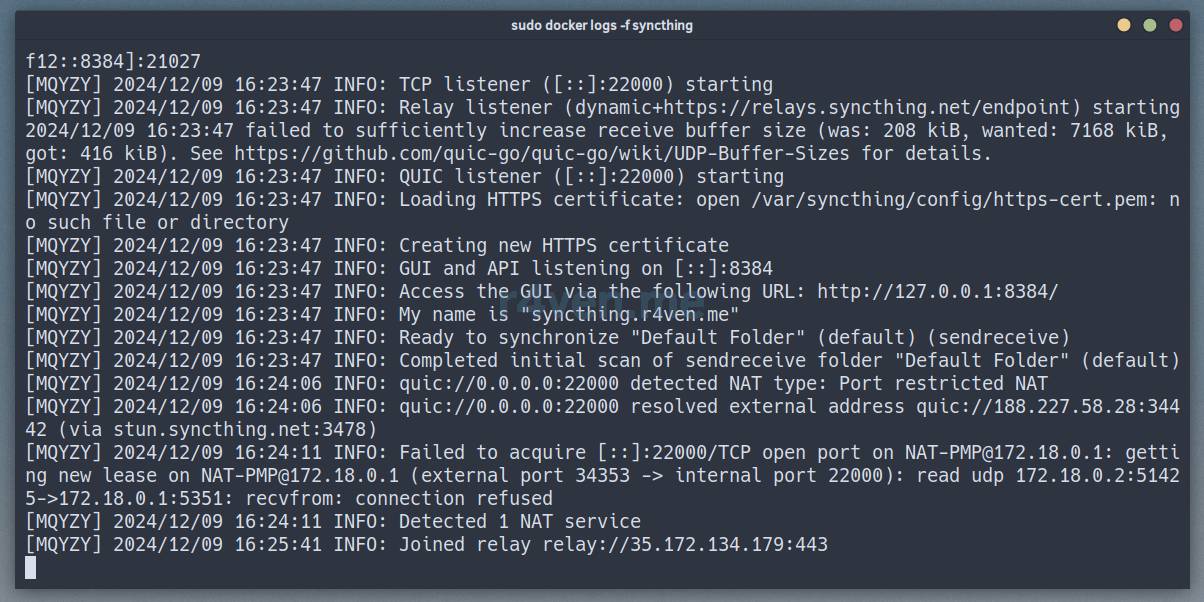
All good👌.
Setting up autostart with systemd
At the beginning of the article we created the service user syncthing. We’ll use it to securely run our new service via sudo💪.
Copy the file describing the restricted sudoers permissions for the syncthing user, first checking it for syntax errors:
sudo visudo --check --file=/opt/syncthing/syncthing_sudoers

sudo cp /opt/syncthing/syncthing_sudoers /etc/sudoers.d/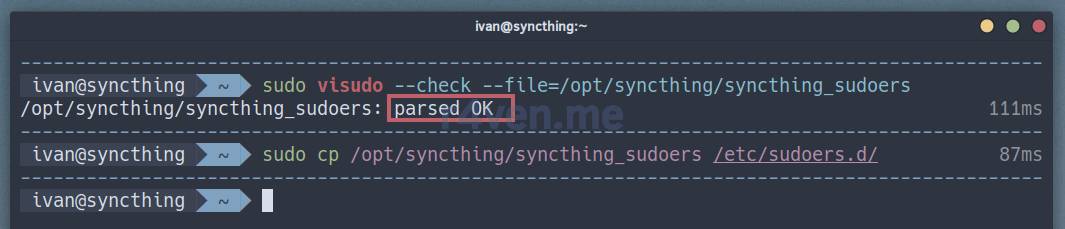
The syncthing_sudoers file describes privileges📝 that allow the syncthing user to start and stop the services described in our docker-compose.yml, on behalf of the privileged docker group via sudo. These are exactly the commands that will be used in the systemd service unit.
I recently looked into the intricacies of the privilege escalation mechanism in Linux. For a better understanding, I recommend reading this article: Linux command line, privilege escalation: su, sudo commands 😌.
Now let’s also check, then copy the systemd service file and reload the configuration:
sudo systemd-analyze verify /opt/syncthing/syncthing.service

sudo cp /opt/syncthing/syncthing.service /etc/systemd/system/

sudo systemctl daemon-reload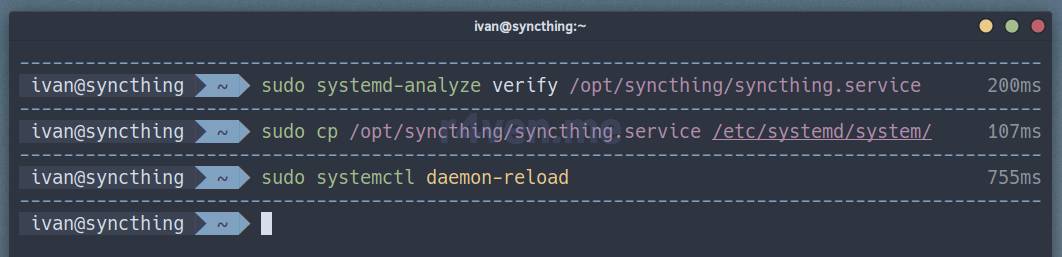
The syncthing.service file describes the startup🛠 conditions for the syncthing container, such as: checking that the docker daemon is running, restarting the service on failure (with a 5-sec. interval), determining the user/group under which the service should run, and the actual start/stop commands for this service.
Stop the container we started manually earlier, and start it via systemd instead + enable the service to autostart at system boot:
sudo docker compose -f /opt/syncthing/docker-compose.yml down

sudo systemctl enable --now syncthing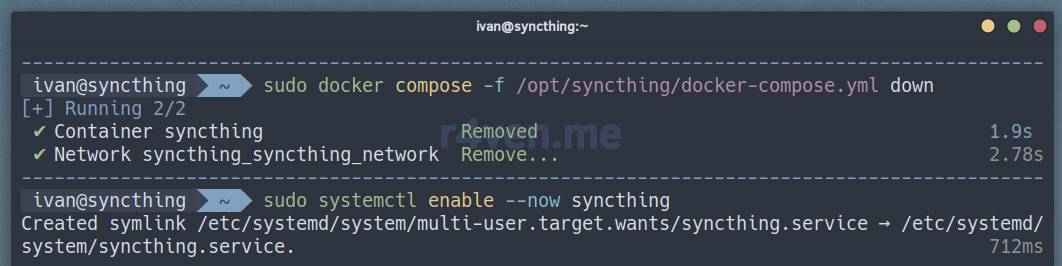
Check the status:
sudo systemctl status syncthingShould look like this:
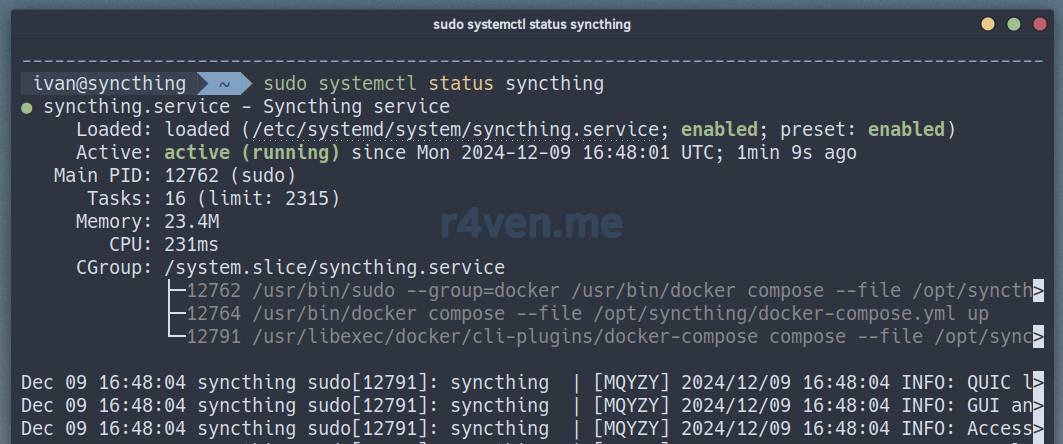
The server is up and running😎!
Configuring the Syncthing server via the web interface
In my example, for security reasons, Syncthing was set up on the local interface with address 127.0.0.1. If you’re setting up the service on a remote machine, then to access the Syncthing web interface run the following SSH command on the client machine to forward the needed port (8384):
ssh -N -f -L 7777:127.0.0.1:8384 user@example.comWhere (in order):
-N— only use port forwarding;-f— go into the background right before executing the (forwarding) command;-L— the local port forwarding flag;7777— the port the client machine will listen on and forward to the server’s port8384;127.0.0.1— the address of the server where it listens on the Syncthing web interface port;8384— the port we’re forwarding to, accordingly;user@example.com— the user and address of the SSH server.
In my example, the command looks like this:

Now open a web browser and go to:
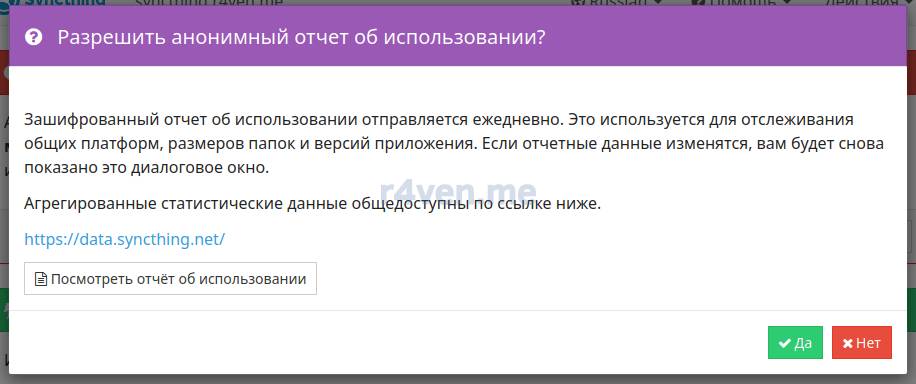
http://127.0.0.1:7777First we’re greeted with a question about sending anonymous reports. I’ll leave that up to you😉.
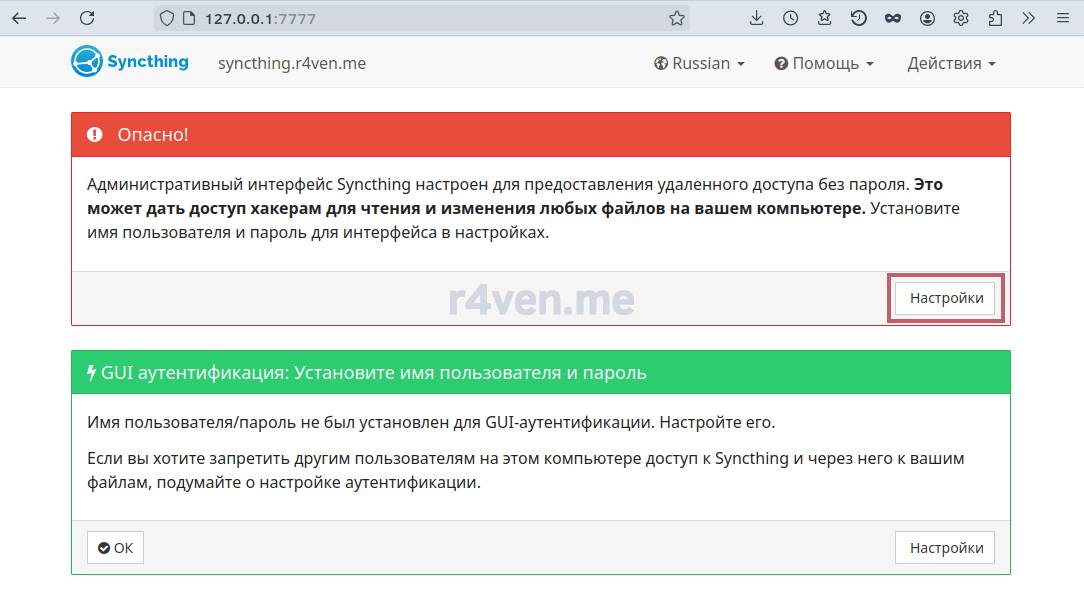
Next, we’re notified that logging into the control panel is done without a password and that this is unsafe😳.
So let’s go into the settings and create a new user there and set a password for them:
This is done on the “Interface” tab:
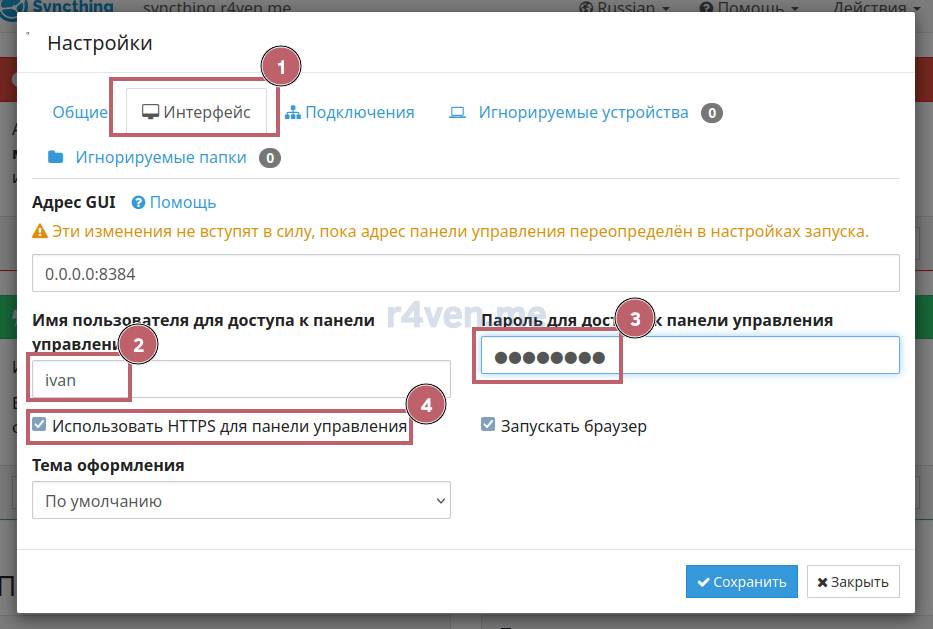
Don’t forget to click “Save”. After this, the service will restart and we’ll be kindly asked to log in with the new credentials:
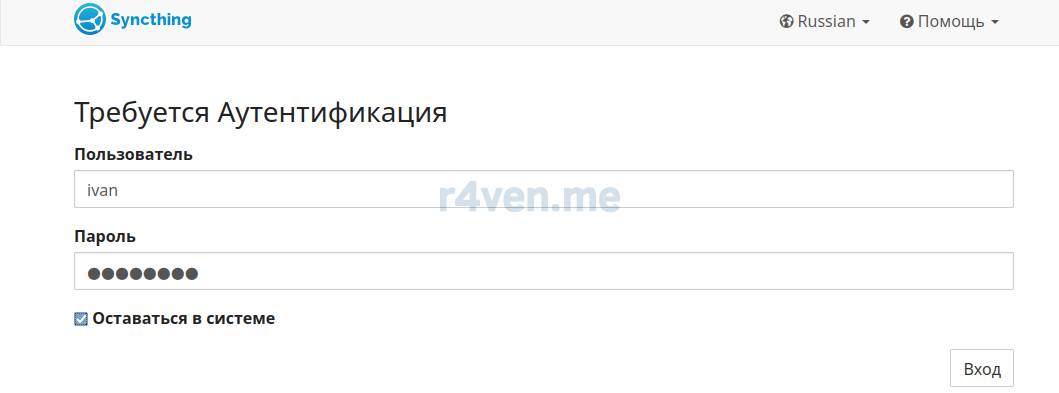
The main Syncthing management menu will open in front of us🧑💻.
By default, the server already uses one directory, “Default folder”, located at:
/var/syncthing/Sync— inside the container;/opt/syncthing/data/Sync— on the host as a docker volume.
Installing and connecting clients
Syncthing clients exist for all popular platforms💻📱. You can find the full list here and here😇.
Under the hood, clients run the Syncthing backend (similar to the server) plus a graphical frontend + a system tray icon. By default, the service also listens for web connections🌐, so you can always connect to it via a browser (this feature can be disabled if desired). The listening port depends on the client. Most often it’s 8080 or 8384🤷♂️.
Next I’ll show the client connection process using Linux Mint 22, Windows 10, and Android 13🫡 as examples.
Recommendation: during the initial client setup, use directories without important files to minimize risks in case of any mistakes.
Linux Mint
Open a terminal, update the package cache, and install the Syncthing graphical client with system tray support from the standard repositories:
sudo apt update && sudo apt install -y syncthing-gtk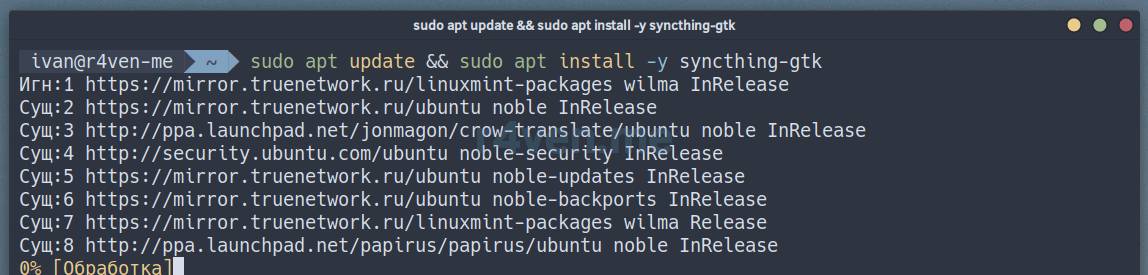
There’s also a qt version.
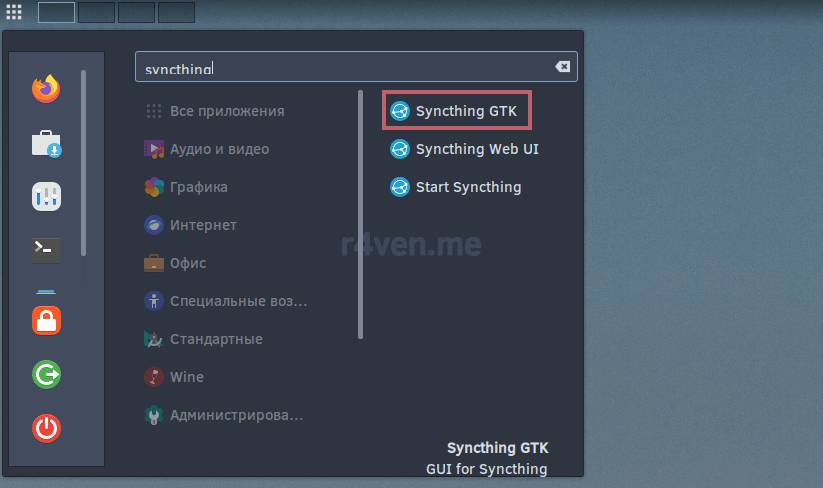
After installation, launch the program from the main menu:
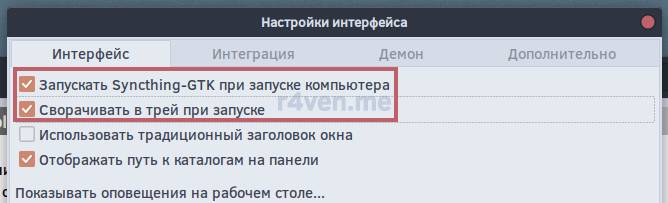
Let’s go straight to the settings and enable Syncthing autostart🚀 when the user’s graphical session starts:
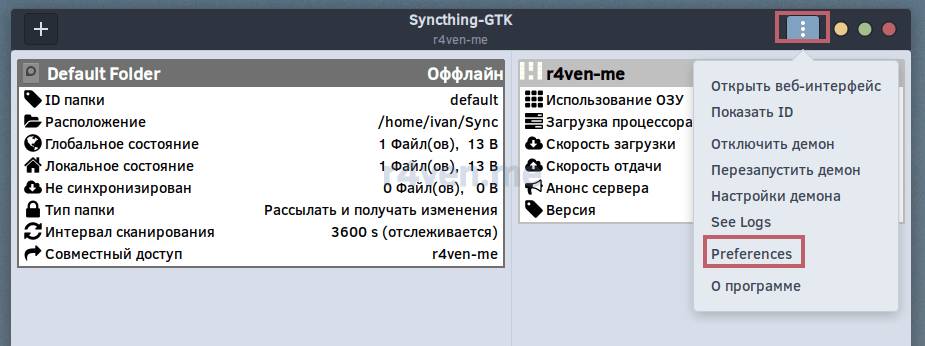
Enable these checkboxes and click “Save”:
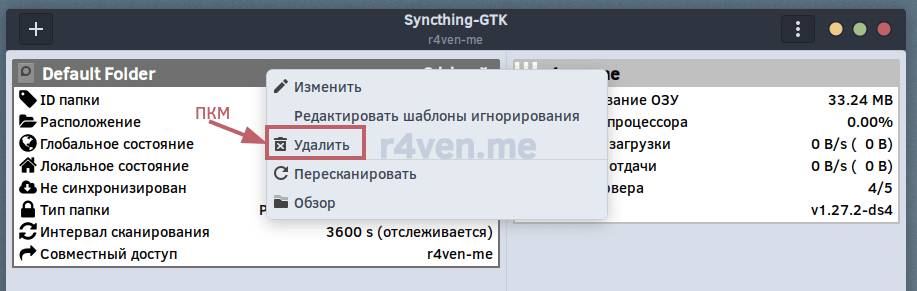
A default synchronization directory is created by default. Delete it so there’s no confusion when we add the centralized folder:
Now we need to find out our client ID. This is done here:
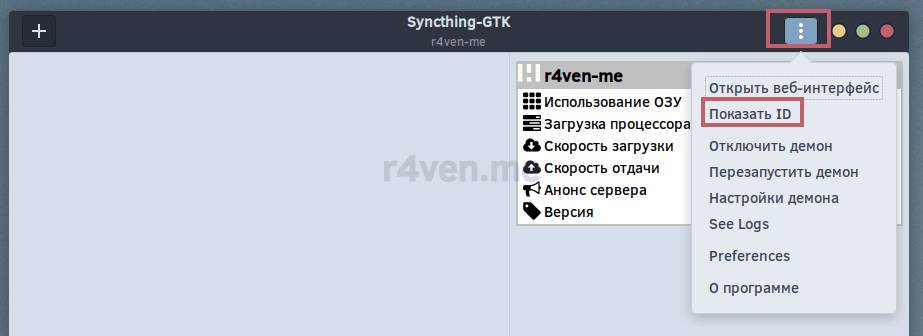
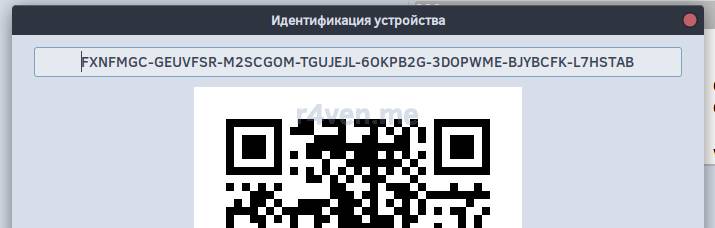
Copy it, then go back to the server’s control panel and add a new device:
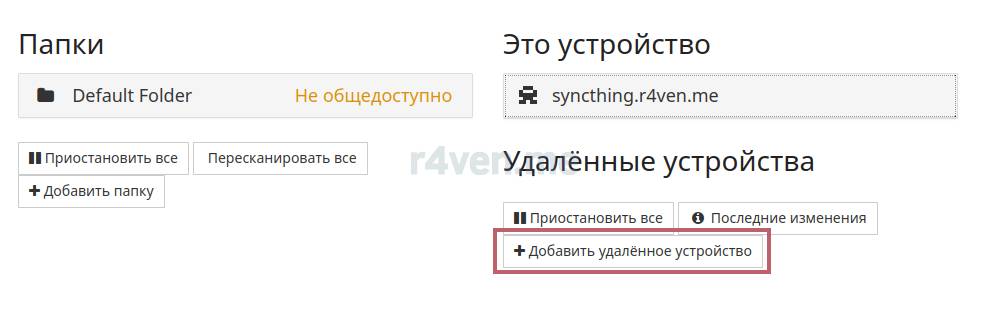
Paste the ID on the “General” tab and specify a device name if needed:
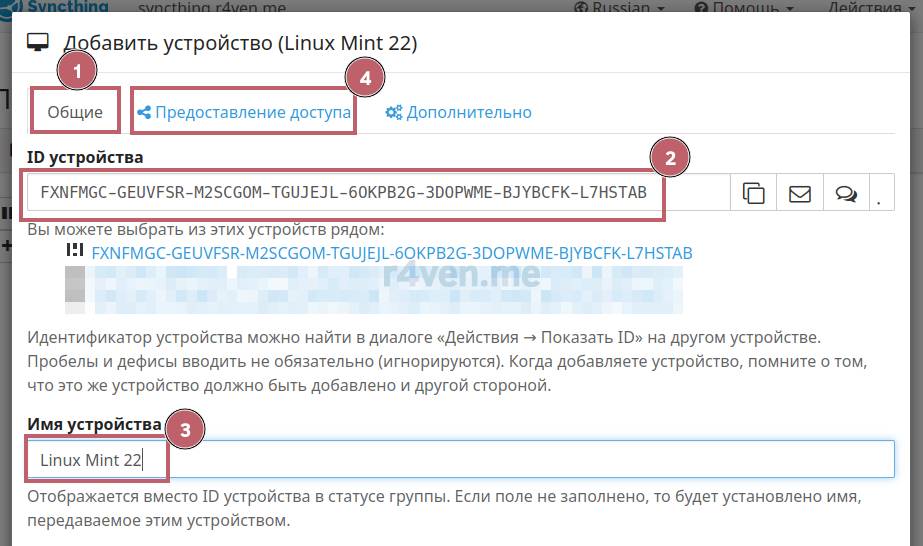
Then go to the “Sharing” tab and check the box to share the directory on the server:
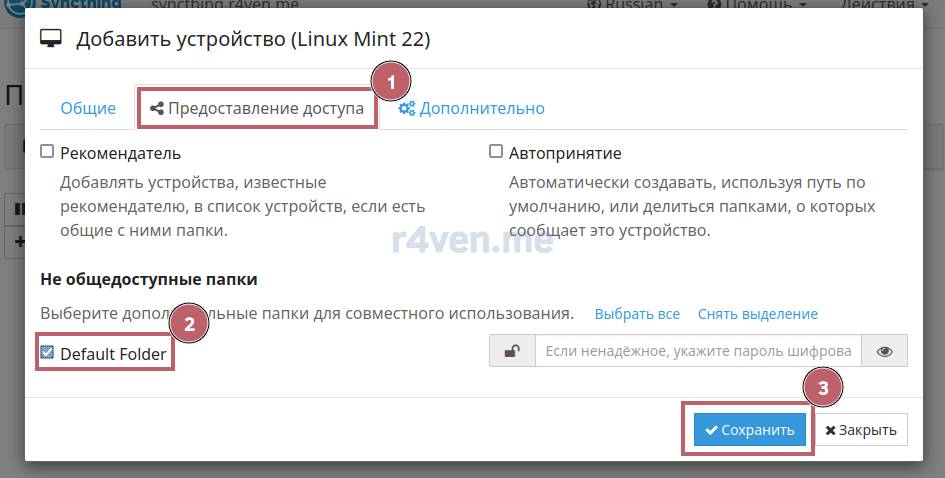
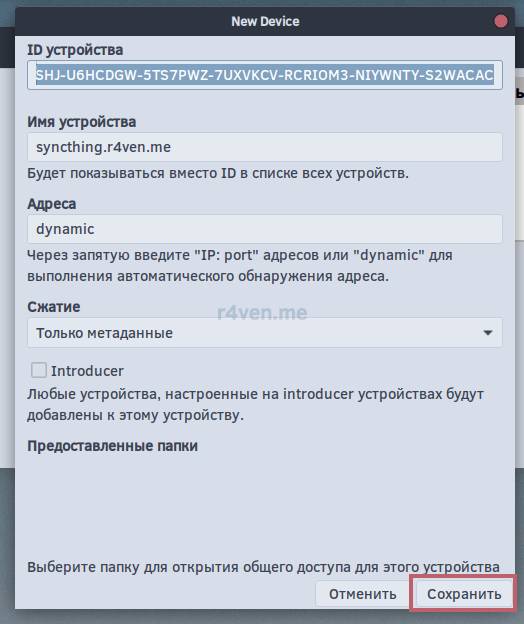
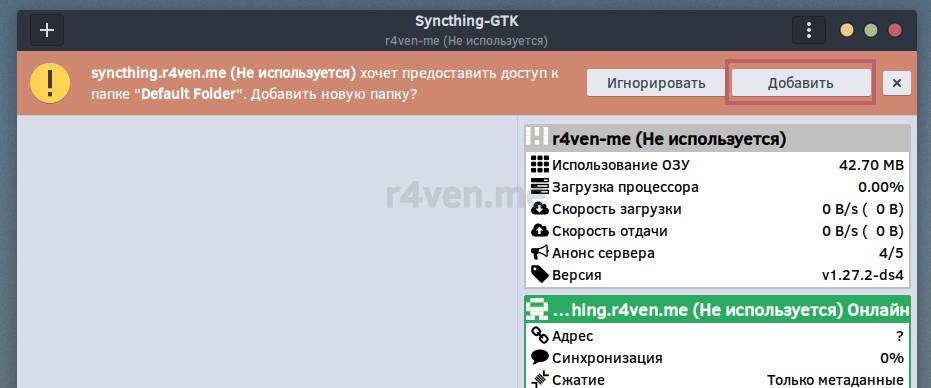
After clicking “Save”, after a while the client should receive two requests:
1. A request to add a device (the server):
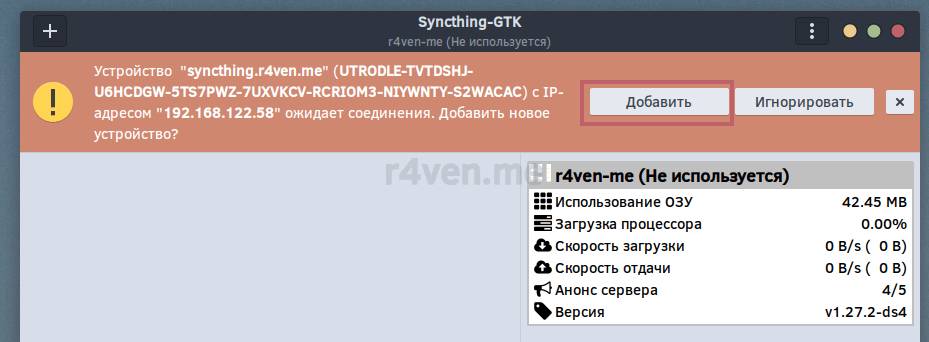
2. A request to add a shared directory:
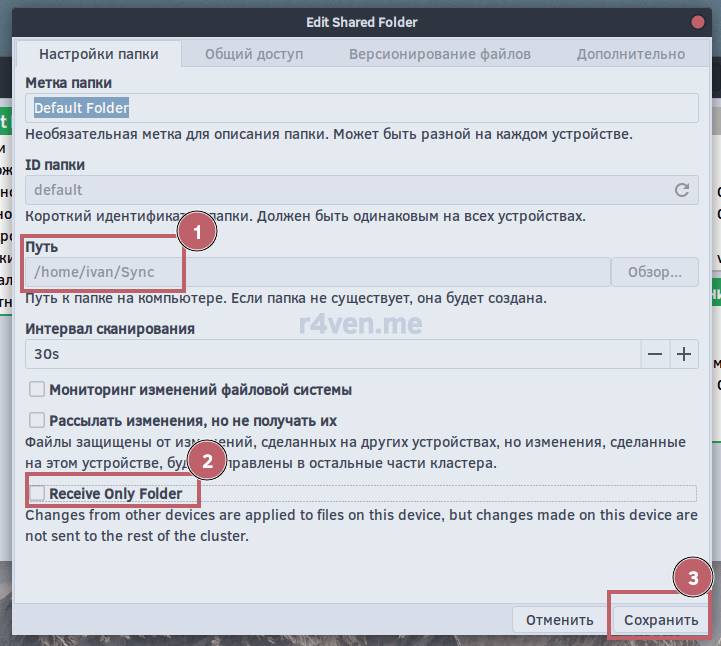
Here we specify the path to the local folder we’ll be syncing, and also uncheck the “Receive Only Folder” checkbox:
Be sure to wait for and accept both requests!
That’s it, the first client is ready:
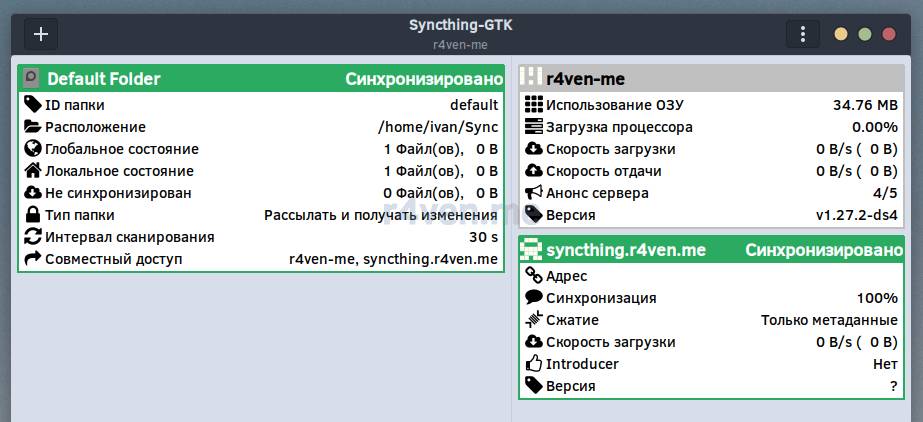
Linux Mint client
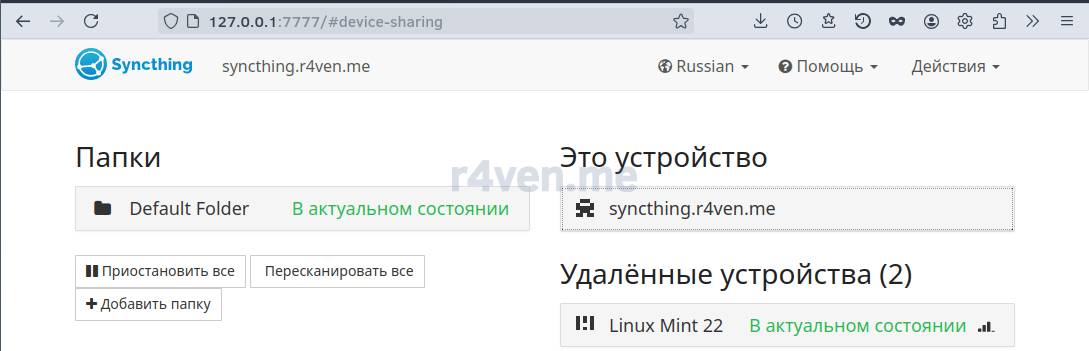
Syncthing server
At this point, we have synchronization configured for the directories:
/opt/syncthing/data/Sync— on the server;/home/$USER/Sync— on the Linux client (for me it’s/home/ivan/Sync)
Let’s check that synchronization works🛠. As an example, let’s create 20 empty files on the server with this command:
sudo -u syncthing touch /opt/syncthing/data/Sync/test_file{1..20}.txt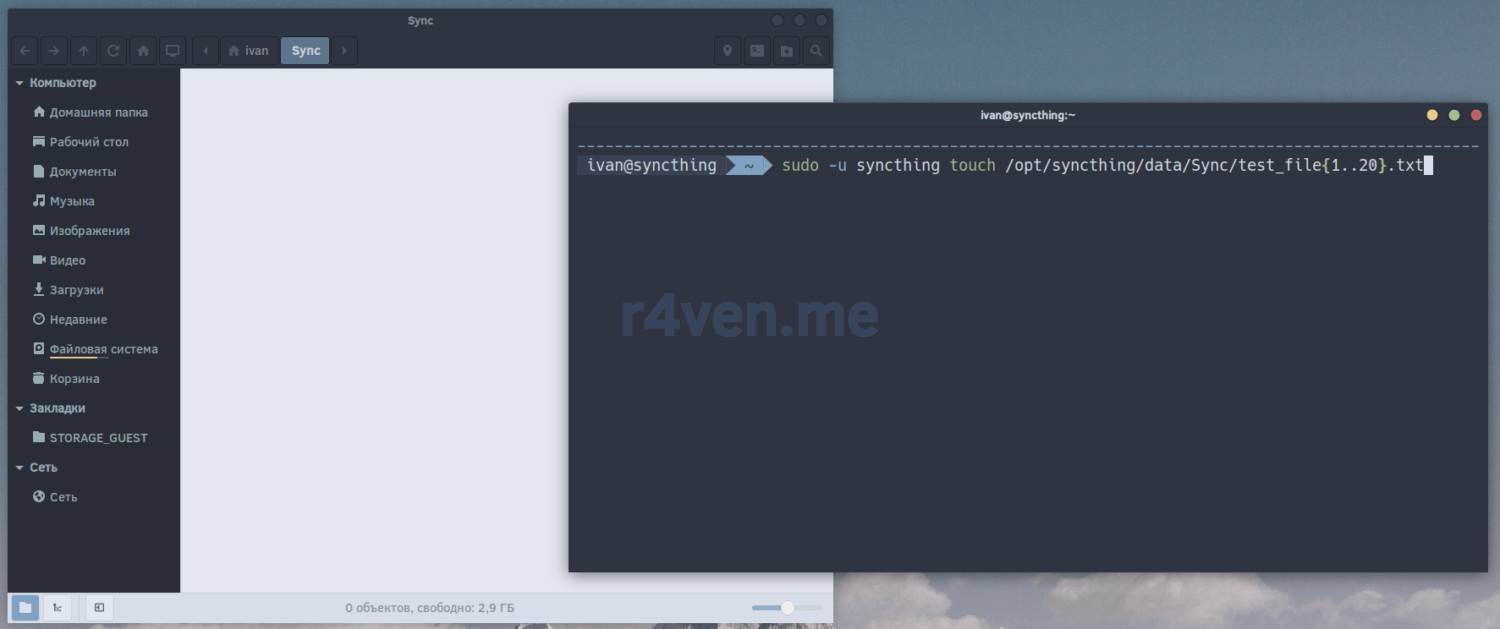
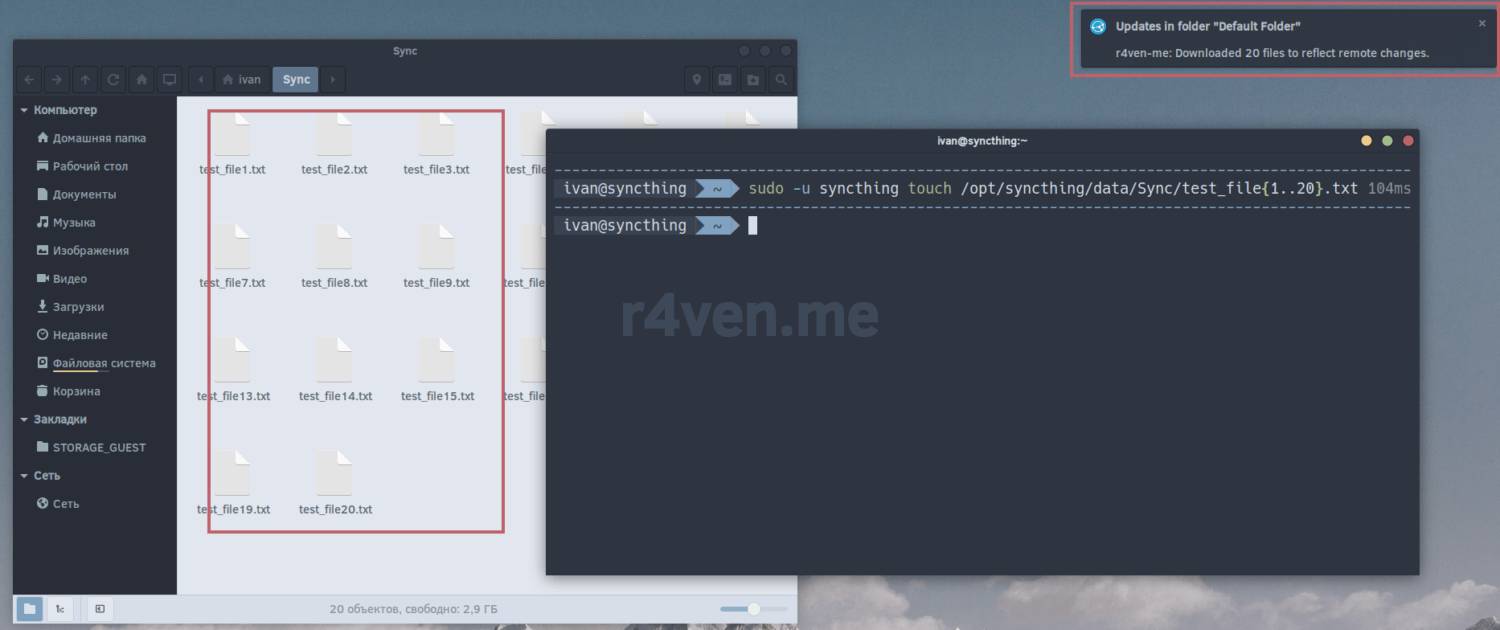
The files appeared on the client and a notification arrived:
Now if we delete all the files but one in the file manager:
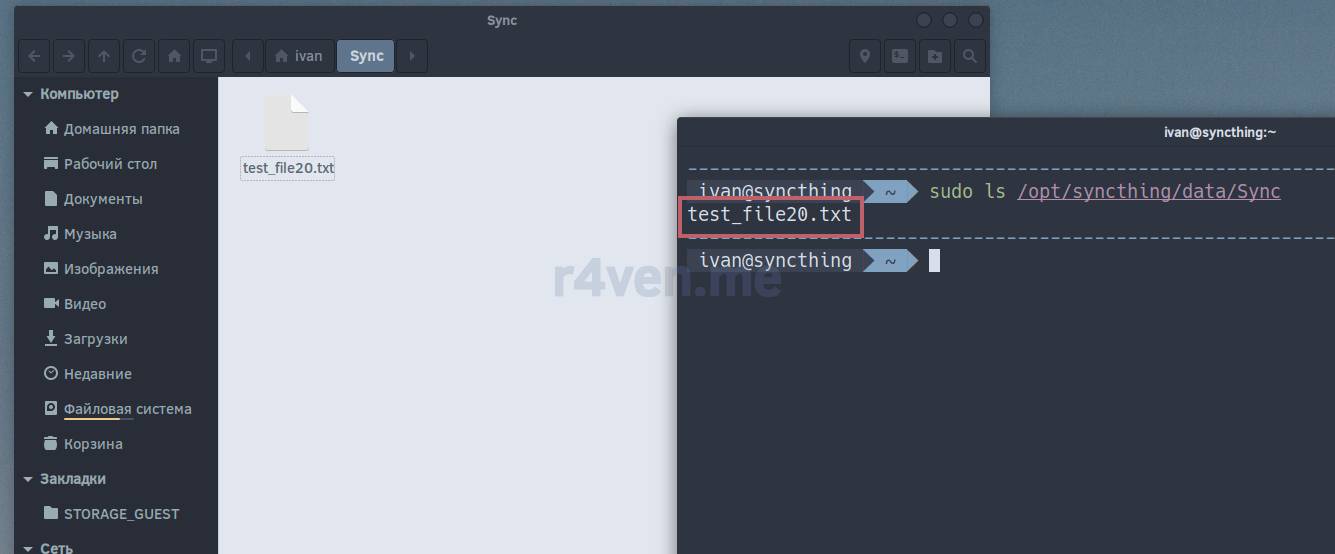
They will also be deleted on the server✍️. Synchronization is configured😌.
Important! In the main synchronized directory (on both the client and the server), there’s a hidden service folder .stfolder. Don’t delete it, otherwise synchronization will break and you’ll have to reconnect everything from scratch.
To avoid turning this article into a wall of text📜 (although it’s already too late🙃), I’ve hidden the client setup steps for Windows and Android under spoilers. Just click on them if needed.
Windows
Click the spoiler🏎
There’s an official Syncthing build for Windows, but it doesn’t include system tray support, which isn’t very convenient🥲. That’s why the developers recommend on their site using the third-party app SyncTrayzor. You can download it on the GitHub releases page⬇️.
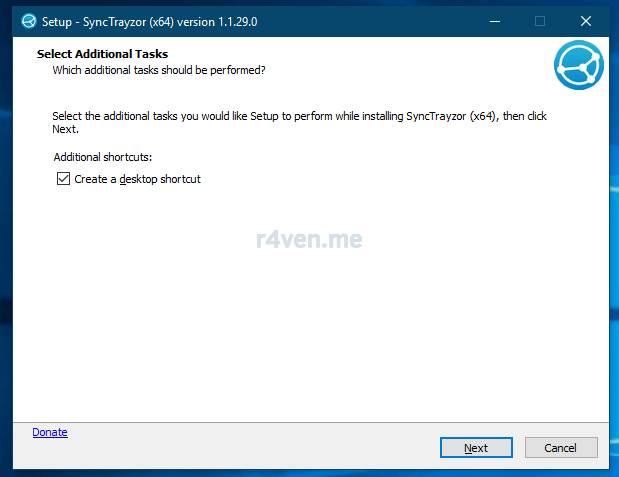
Installation is the typical “next-next-next” for Windows systems:
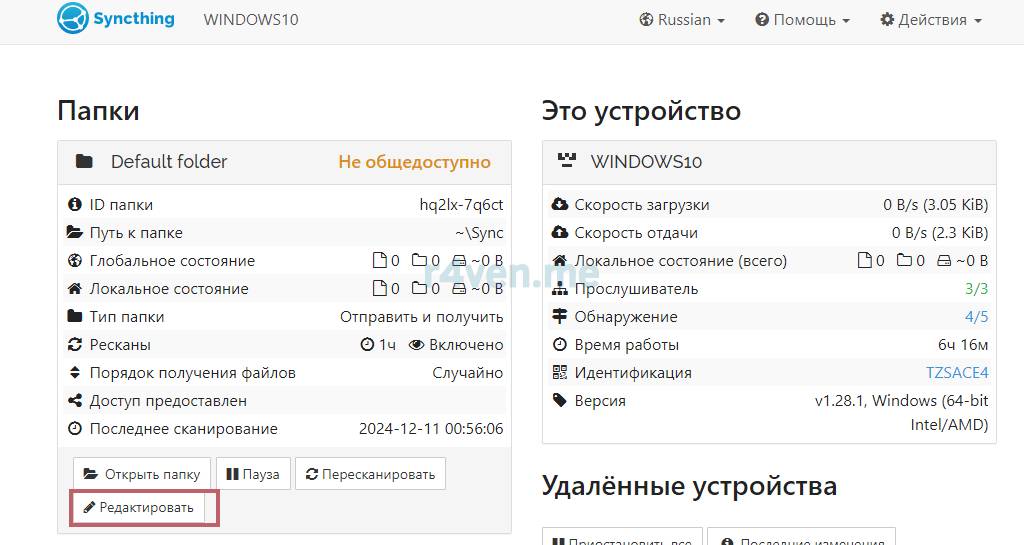
After installation, open the app (you’ll get an icon in the system tray🧐). We see an interface here similar to the server’s.
Delete the default directory:

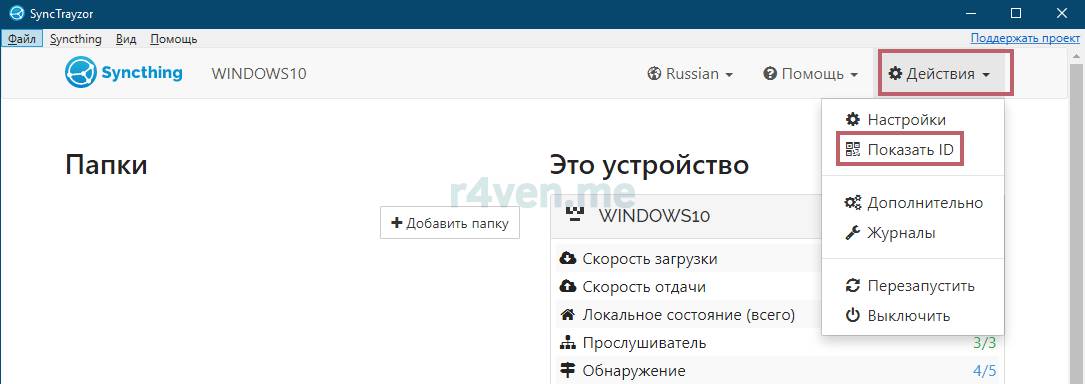
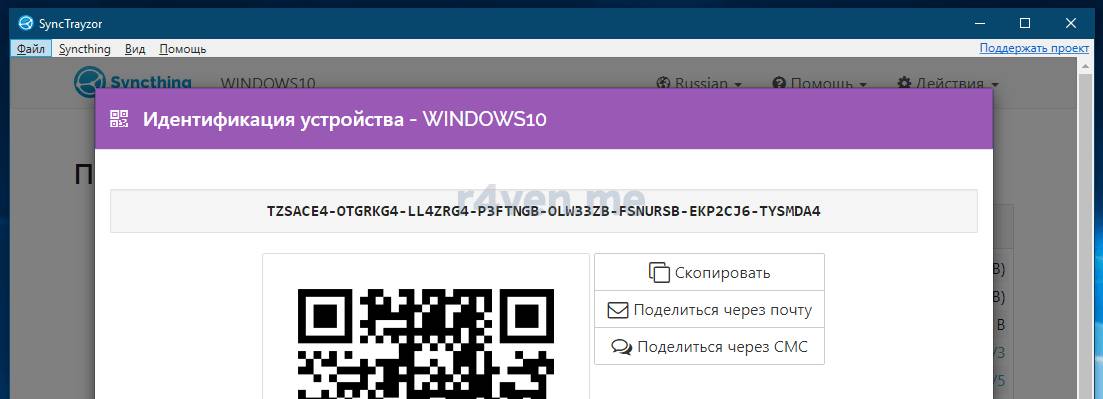
Then find and copy the client ID:
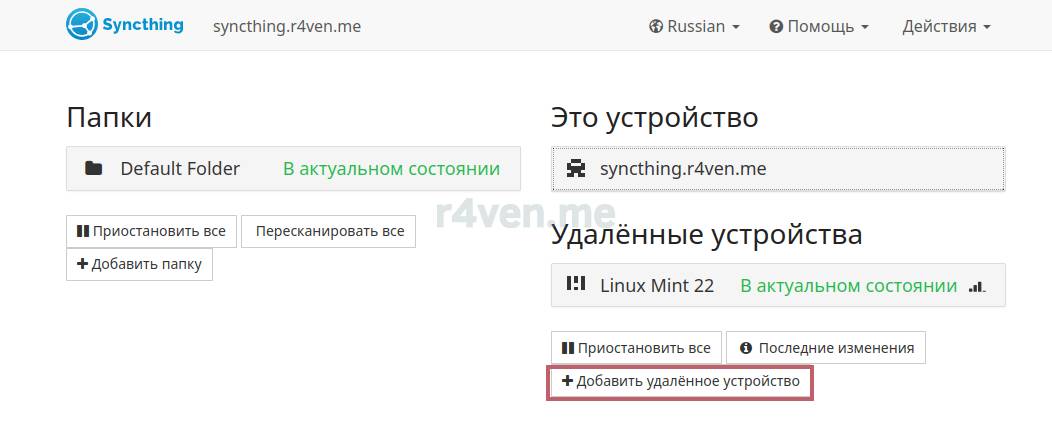
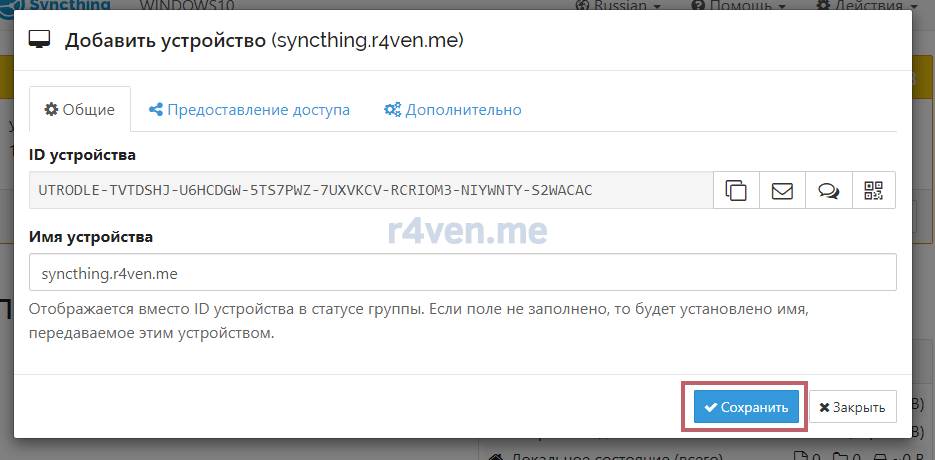
After that, go back to the server’s control panel and add a new device:
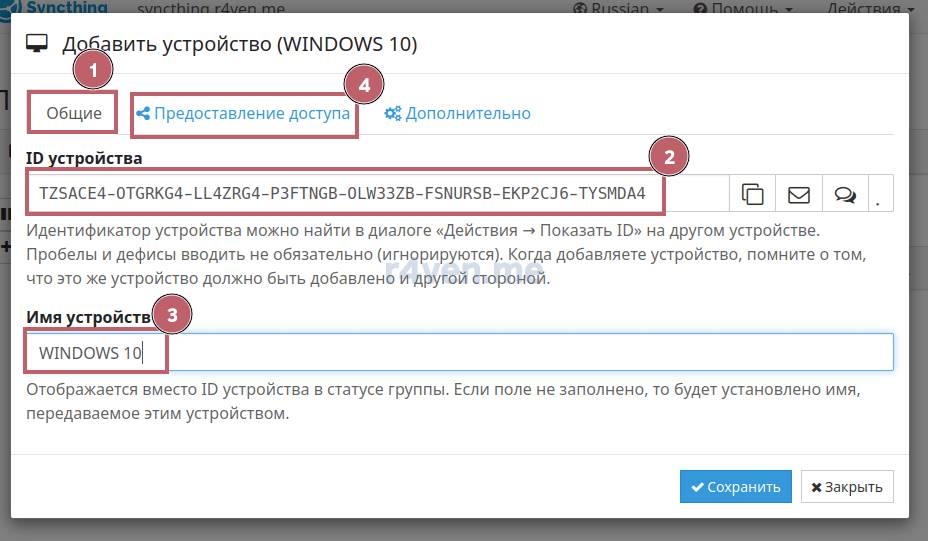
Paste the ID on the “General” tab and specify a device name if needed:
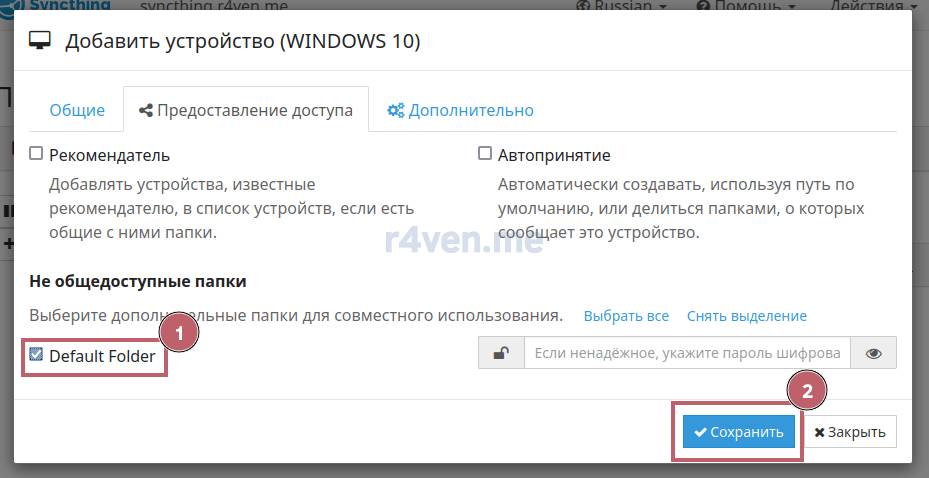
Then go to the “Sharing” tab and check the box to share the directory on the server:
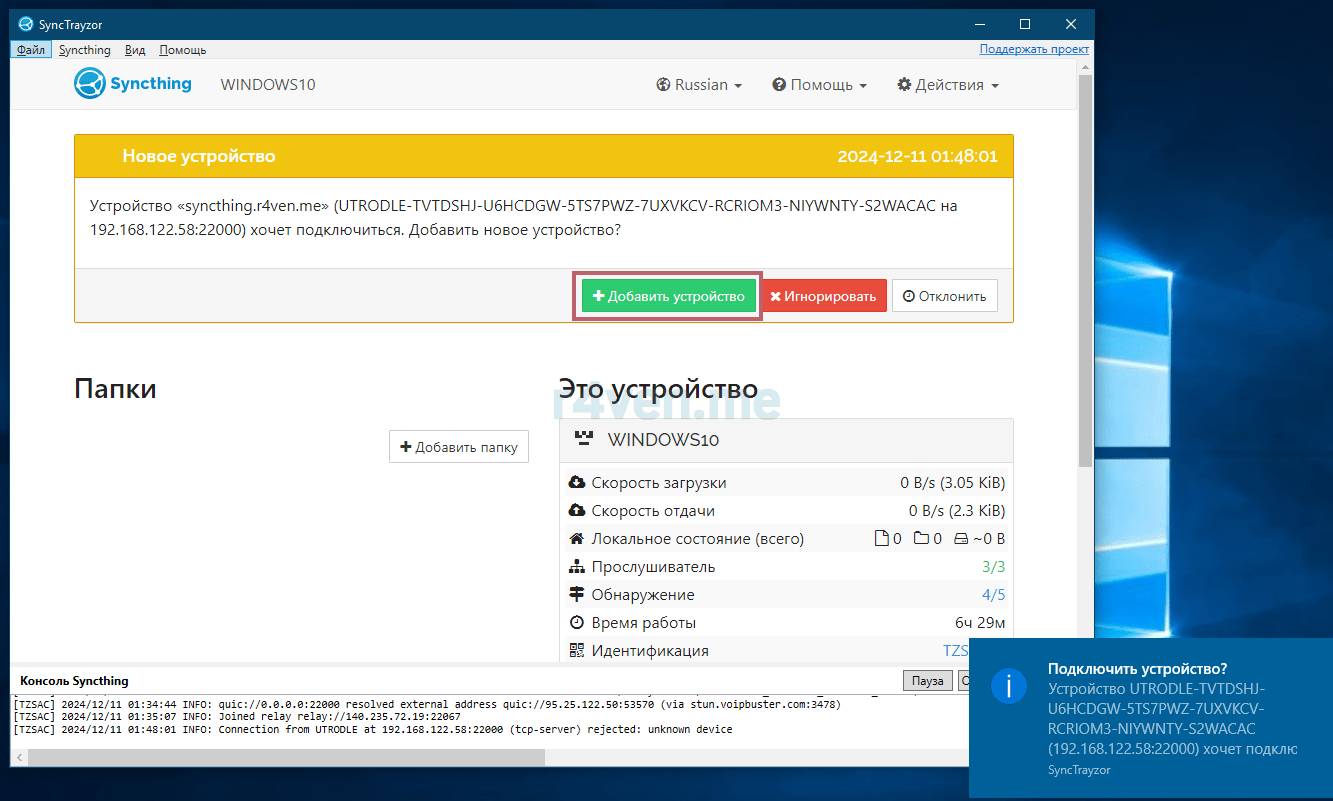
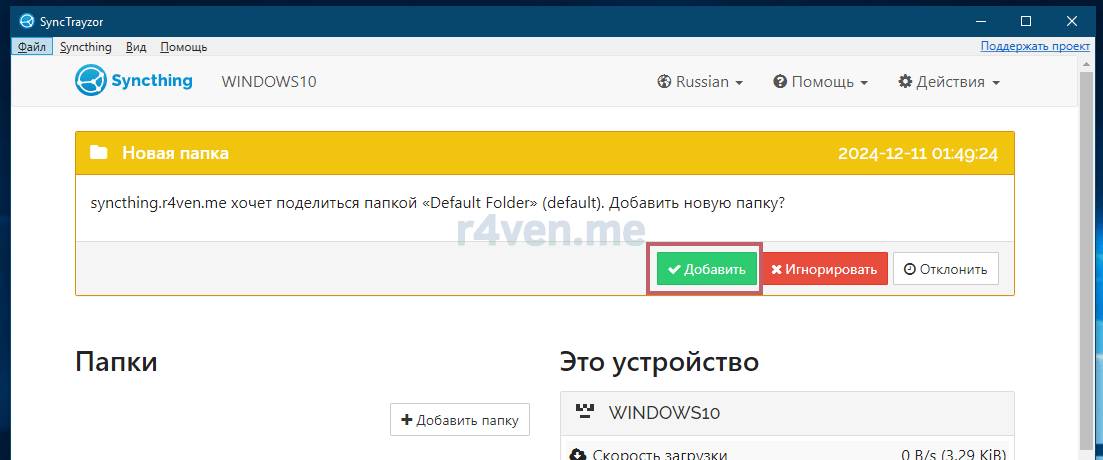
After clicking “Save”, after a while the client should receive two requests:
1. A request to add a device (the server):
2. A request to add a shared directory:
Here we specify the path to the local folder we’ll be syncing:
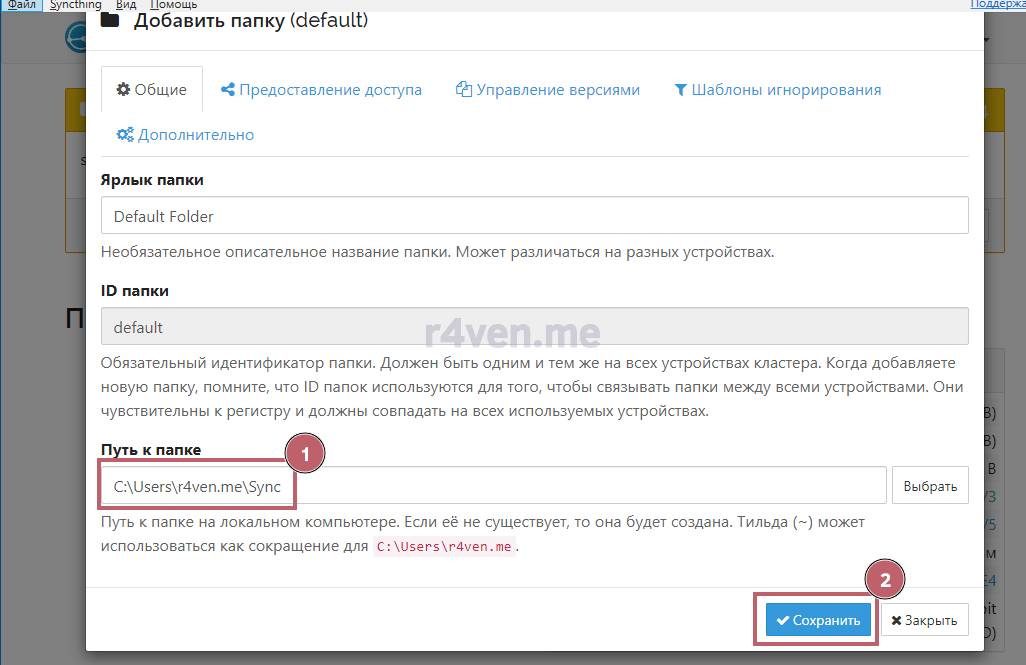
Be sure to wait for and accept both requests!
The second client is ready😌:
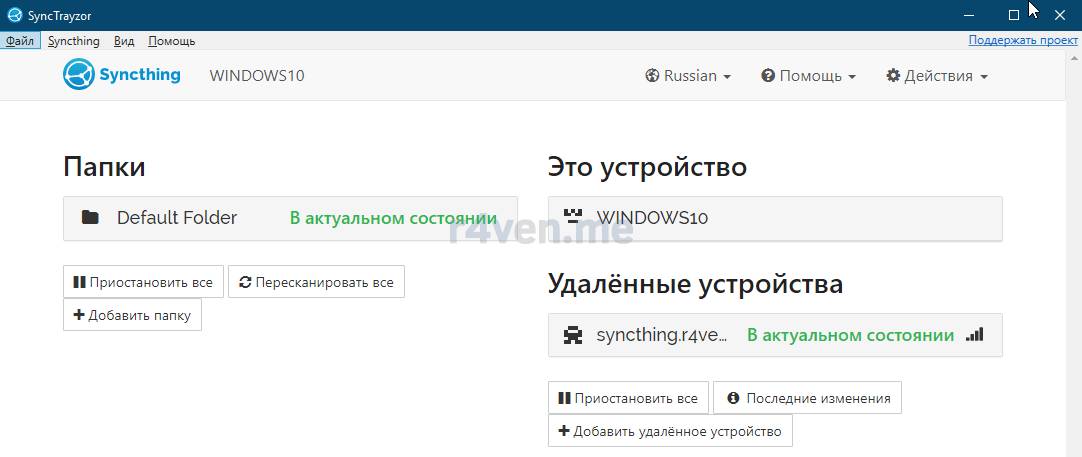
Windows 10 client
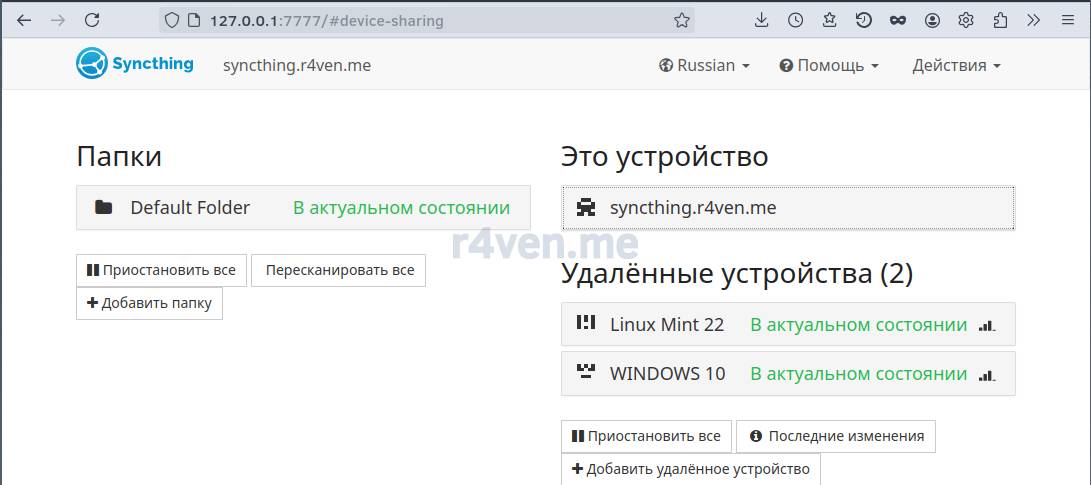
Syncthing server
Let’s create a few files and check for them on the server and on the Linux client:
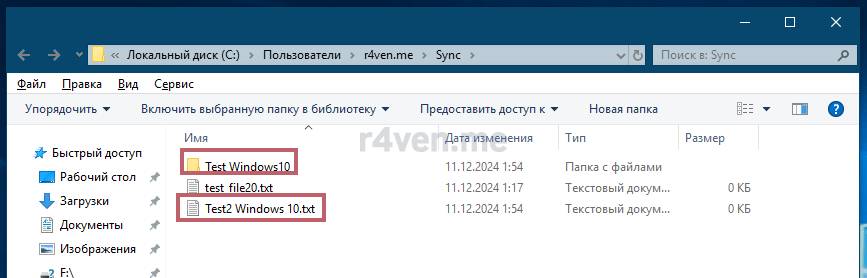
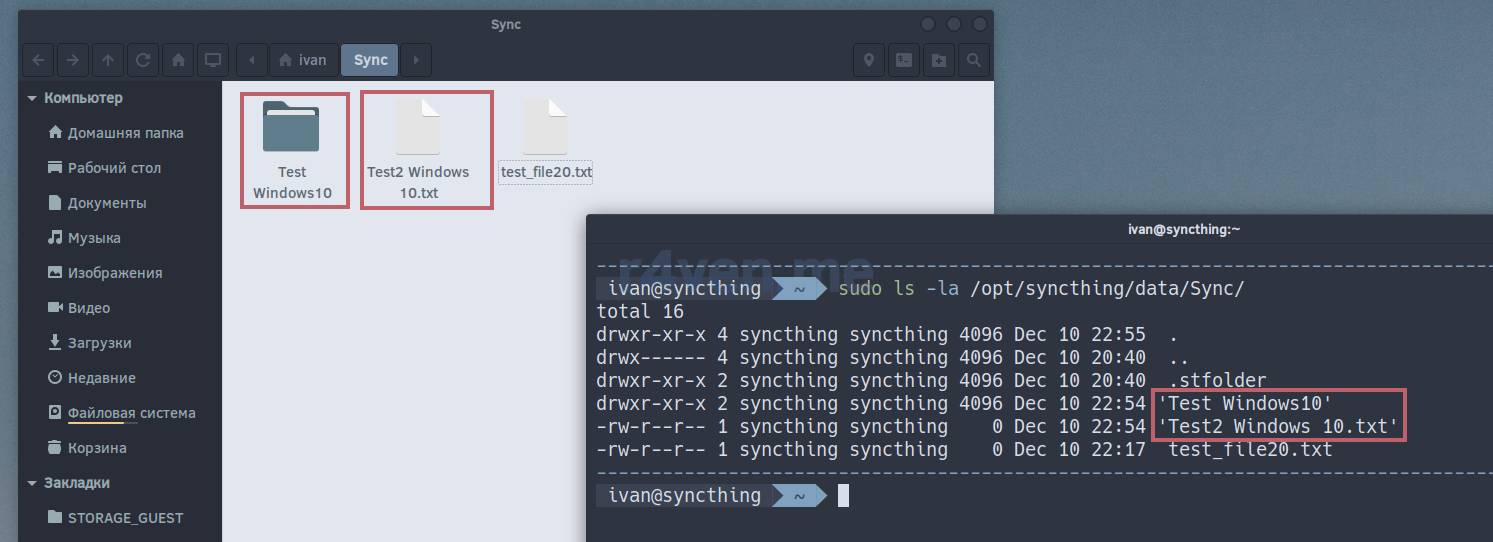
Great👍, everything works, let’s move on to the smartphone📱.
Android
Click the spoiler🏎
For Android there’s an app of the same name, Syncthing, but its development stopped this year😔 and the developers recommend using its extended fork: Syncthing-Fork. These apps can easily be found on Google Play and F-droid. Or on the GitHub releases page.
Install it, launch it, and grant the app the necessary permissions:
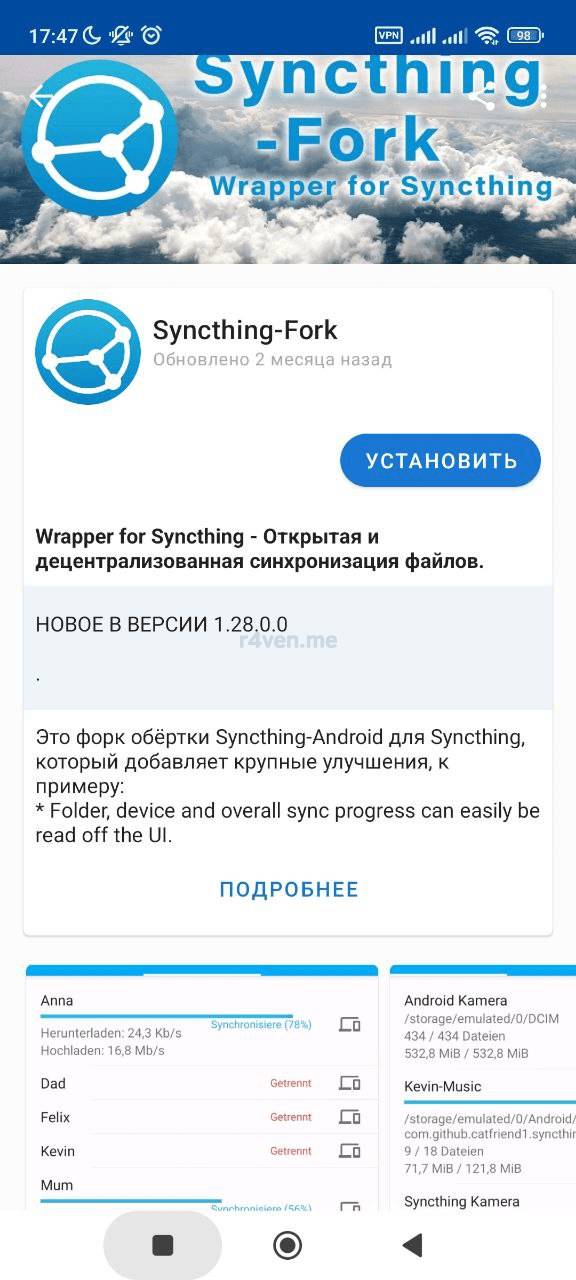
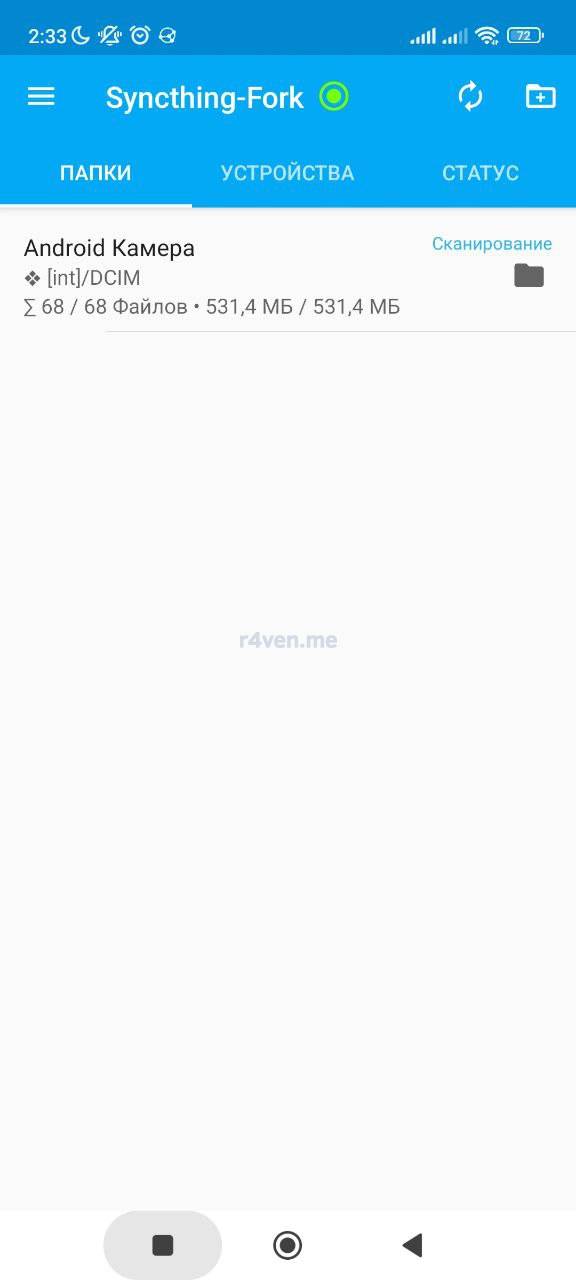
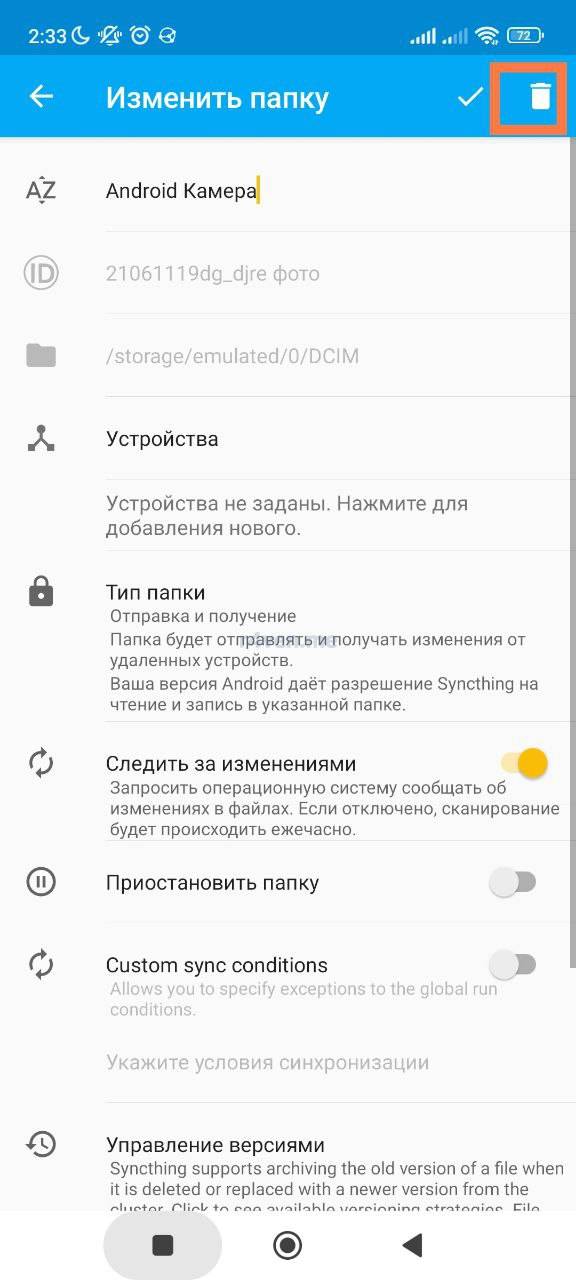
Immediately delete the default directory:
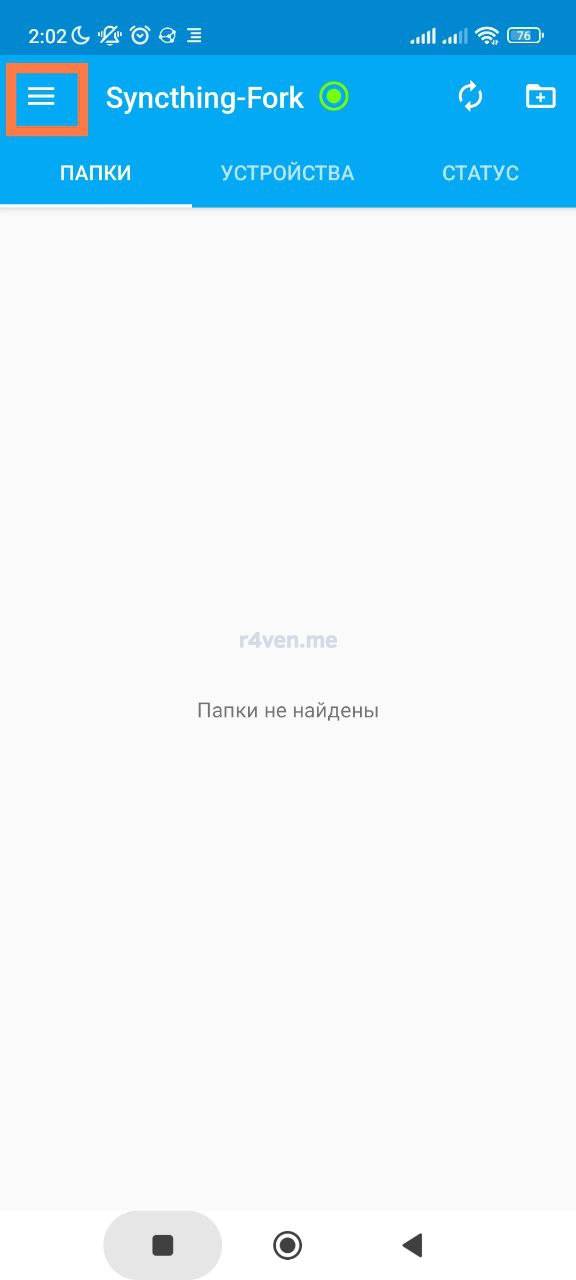
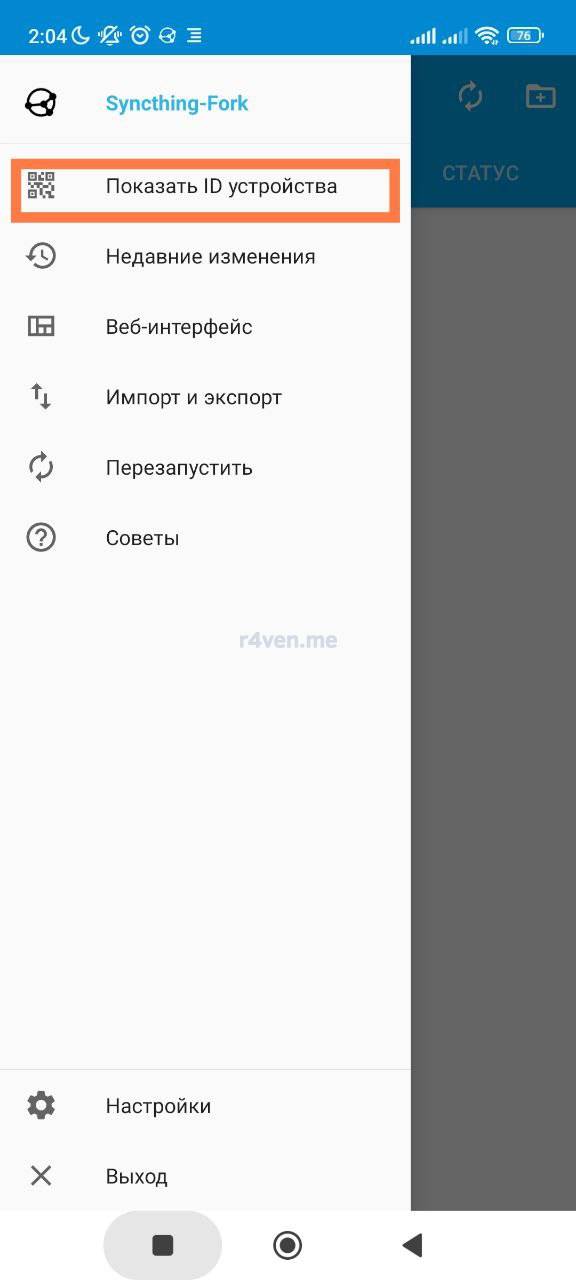
Then find and copy the client ID:
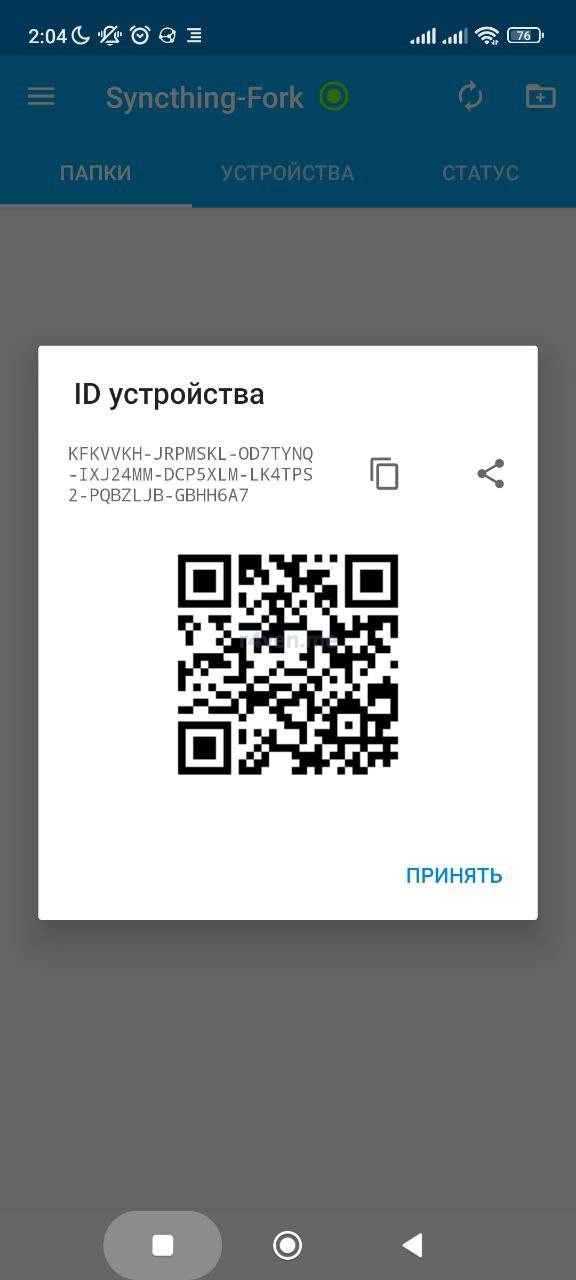
After that, go back to the server’s control panel and add a new device:
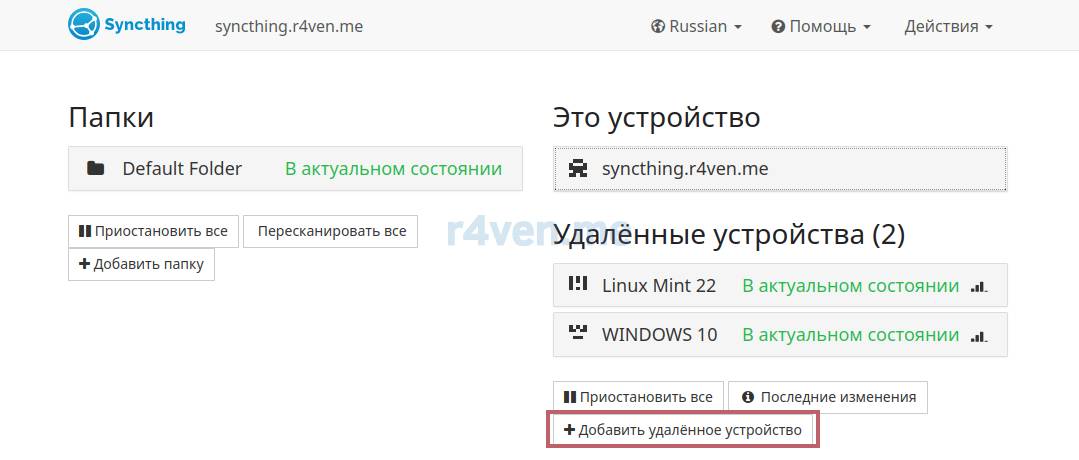
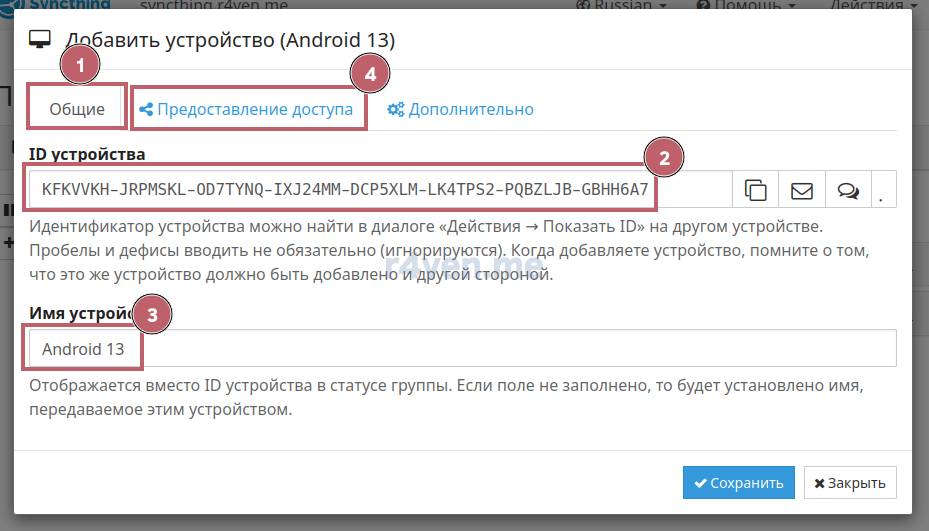
Paste the ID on the “General” tab and specify a device name if needed:
Then go to the “Sharing” tab and check the box to share the directory on the server:
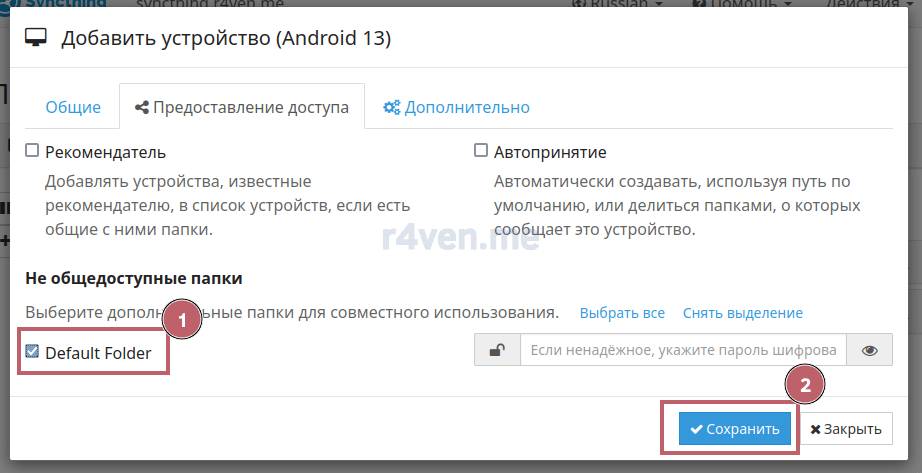
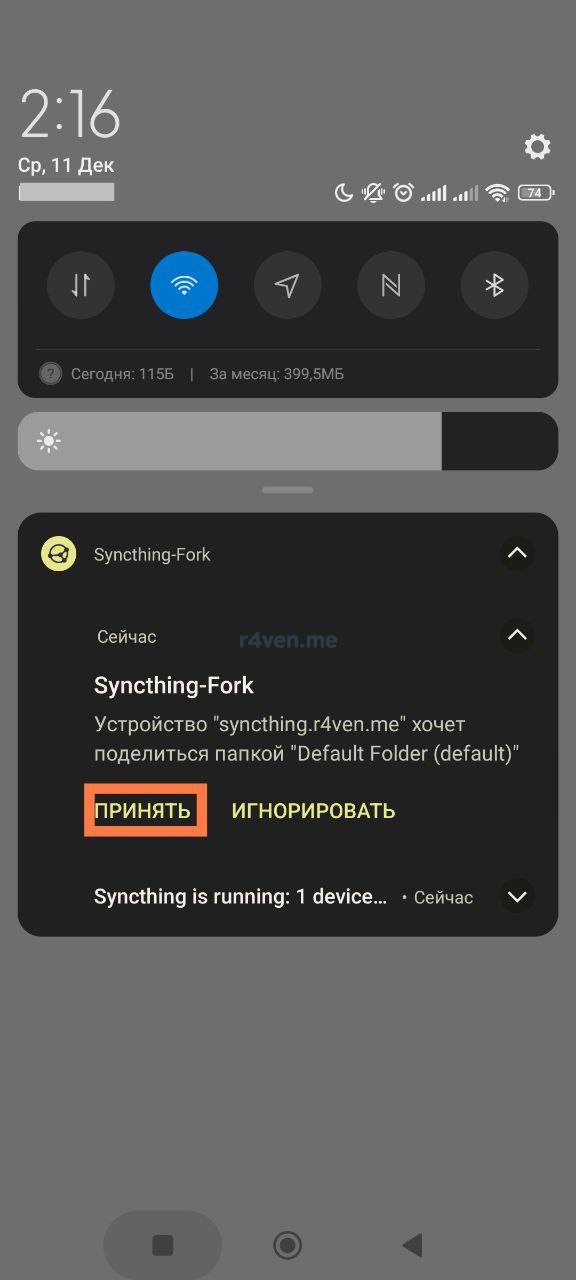
After clicking “Save”, after a while two requests should appear in the notification shade on the smartphone:
1. A request to add a device (the server):
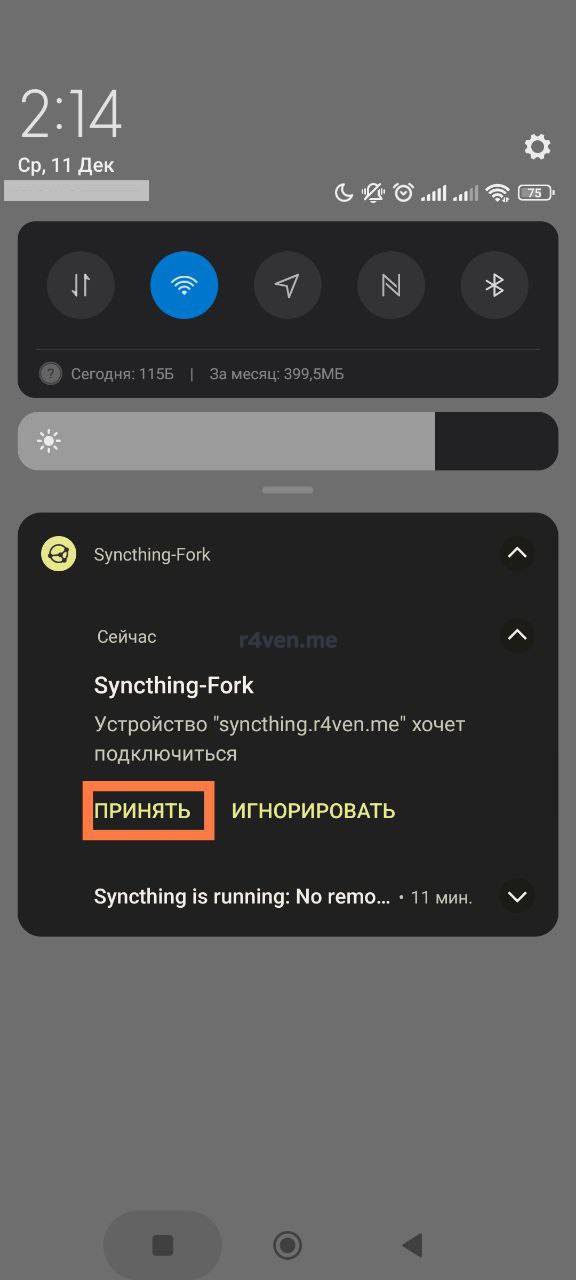
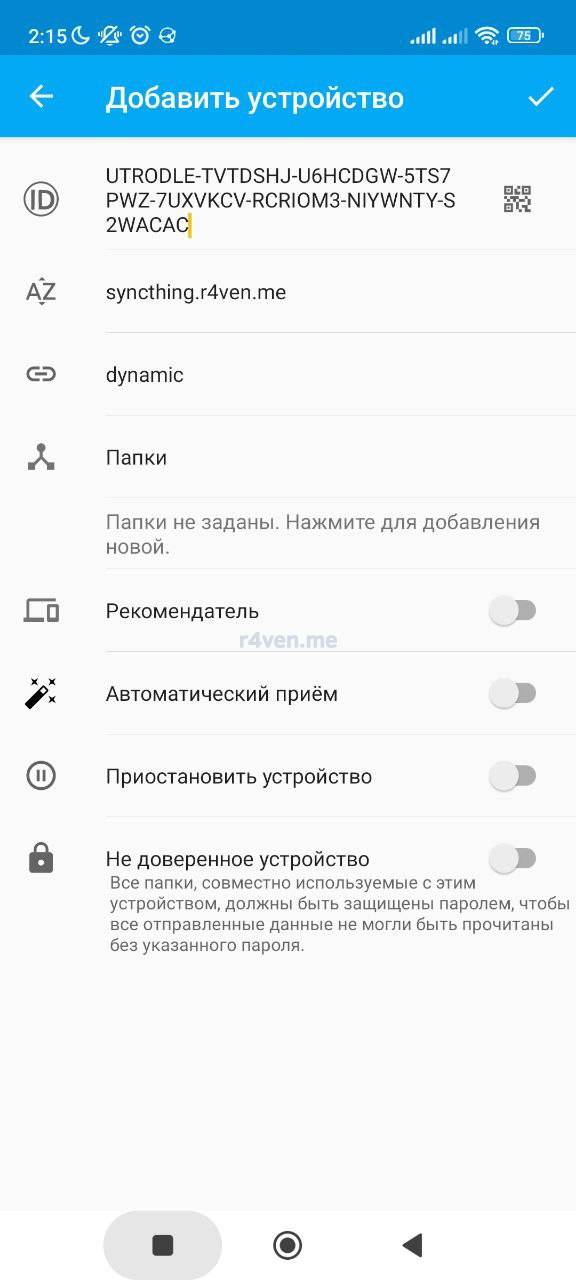
2. A request to add a shared directory:
Here we specify the path to the local folder we’ll be syncing:
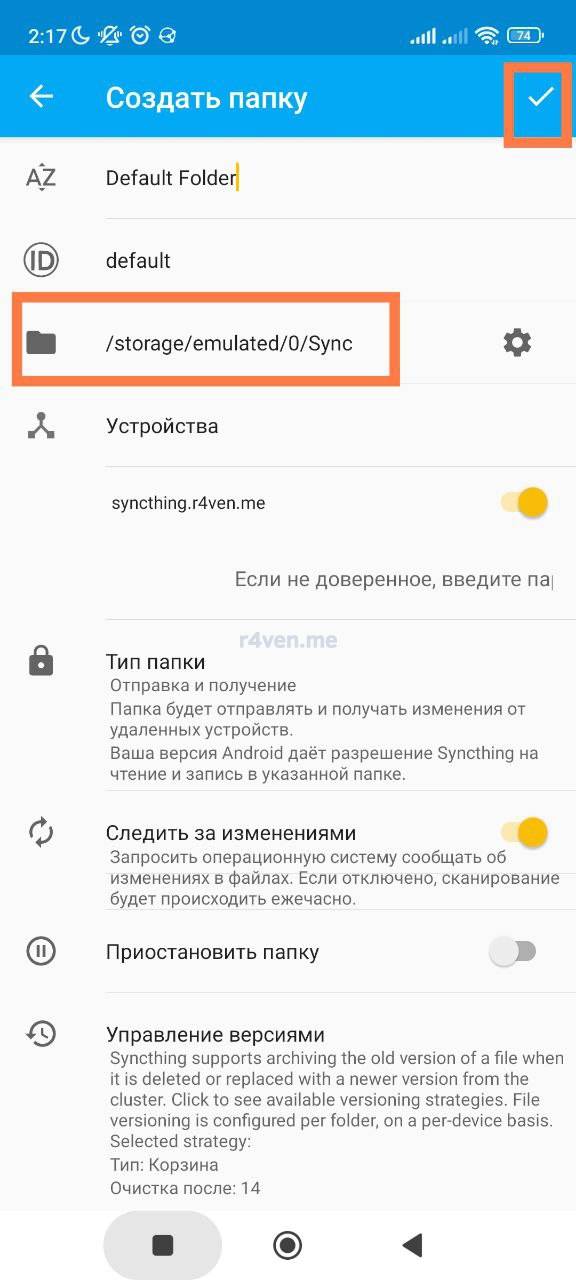
Be sure to wait for and accept both requests!
The third client is ready😌:
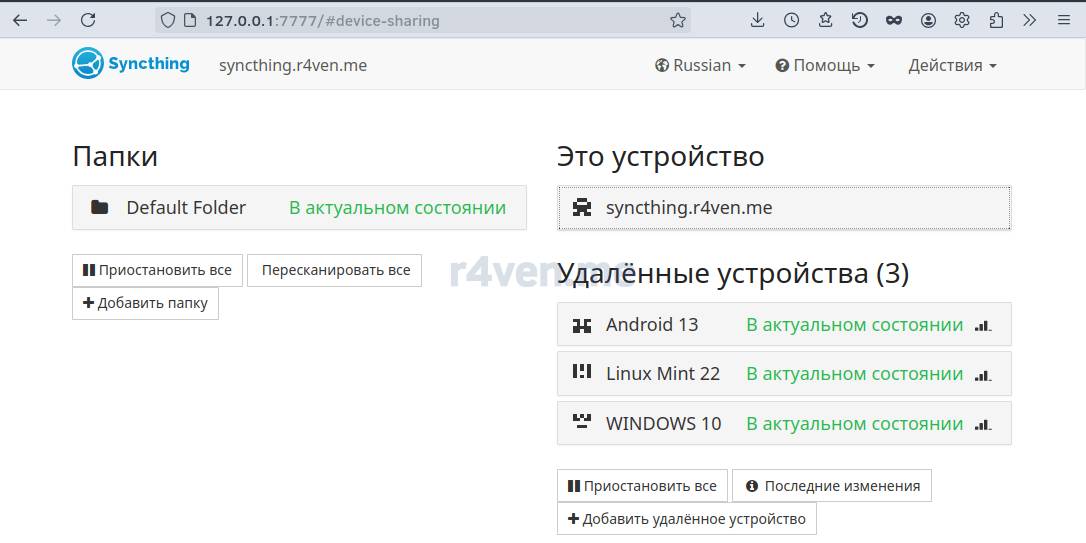
A small test. Let’s create a folder Testdroid!!! on the smartphone:
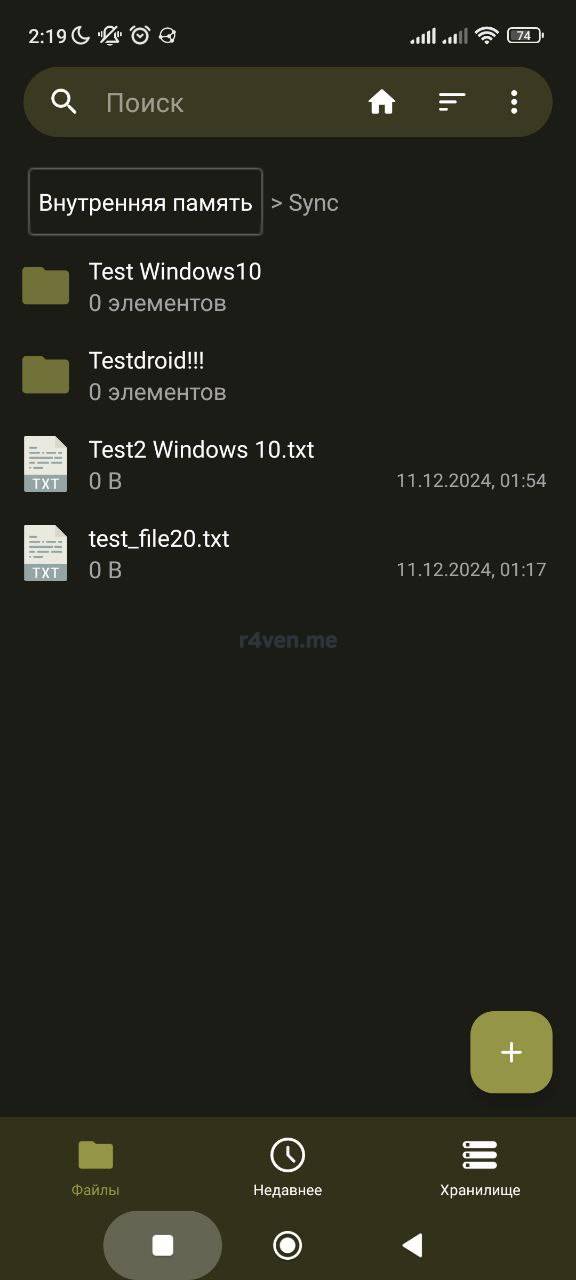
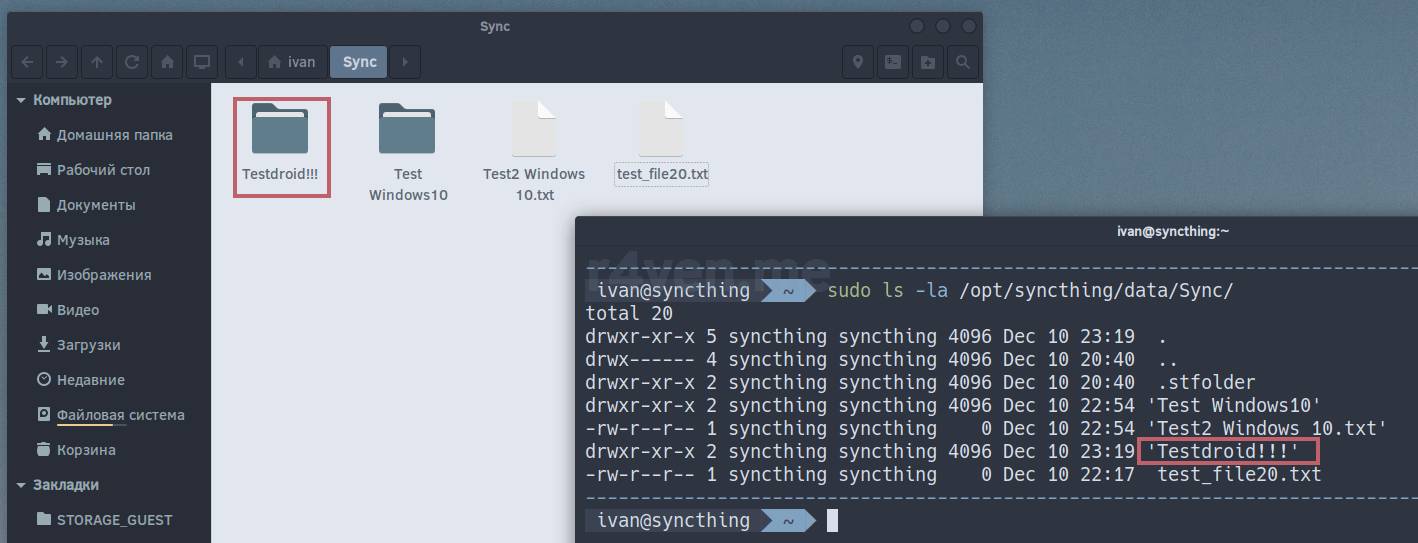
Now that’s beautiful😊.
Optional
Setting up Syncthing to work only within an internal network
If you’re deploying the Syncthing server within an internal network, for example a VPN, then specify the address of the VPN virtual interface as the IP address for accepting connections.
Server setup
To do this, edit the docker-compose.yml file:
sudo nvim /opt/syncthing/docker-compose.yml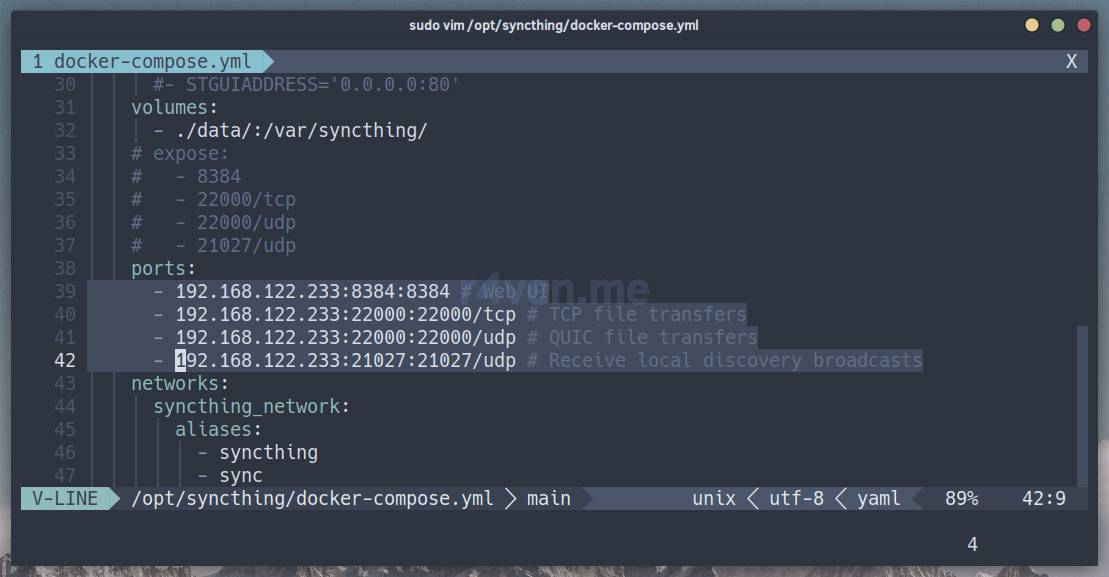
Replace 192.168.122.233 with your own address.
Liked my Neovim config?

You can easily create a similar one by following the article: Neovim — Installing and configuring a code editor with IDE features in just a few commands.
And restart the server:
sudo systemctl restart syncthingAfter that, go to the server settings in the web interface using the new address (for me it’s http://192.168.122.233:8384:
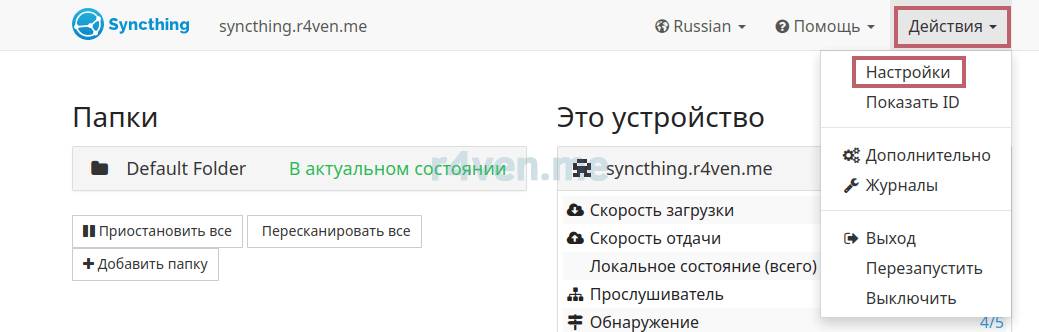
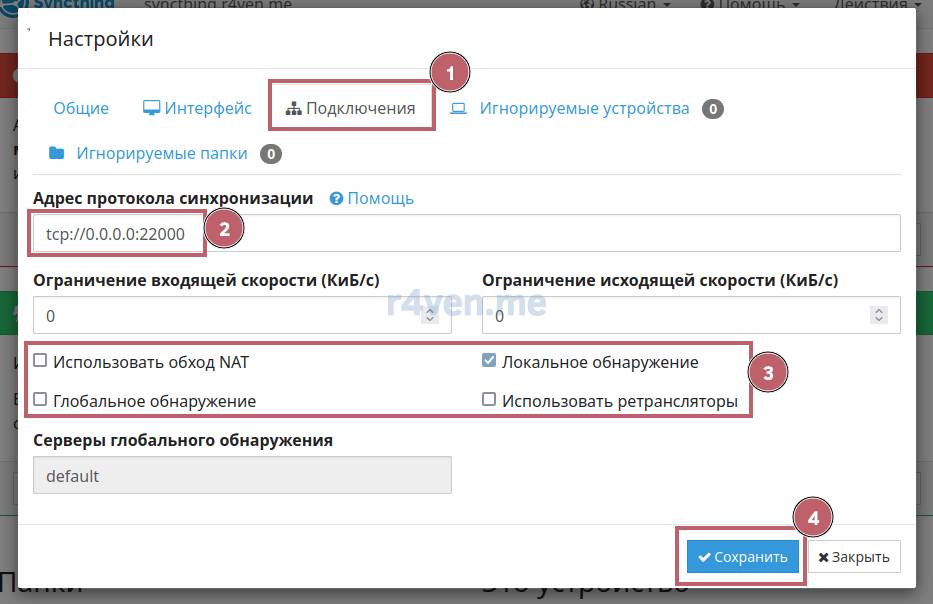
Next, go to the “Connections” tab. In the “Sync Protocol Listen Addresses” field, the default value is default, which includes a whole list of addresses, including the public relay servers of the Syncthing project:
tcp://0.0.0.0:22000, quic://0.0.0.0:22000 and dynamic+https://relays.syncthing.net/endpointChange it to a single value:
tcp://0.0.0.0:22000Also on this tab, disable the unnecessary options, except for local discovery:
Now the server will only accept connections on the container’s address, in my example that’s 192.168.122.233:22000, and won’t use the public servers.
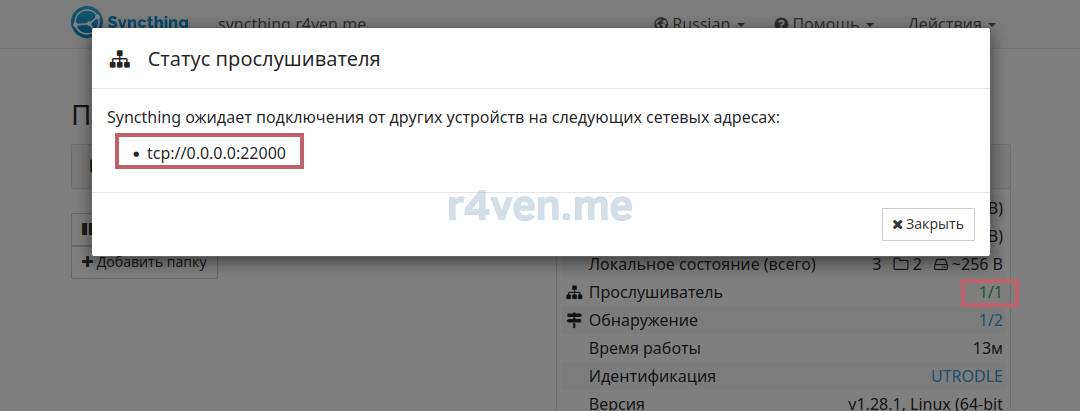
Why did we specify 0.0.0.0 above instead of 192.168.122.233? Because 0.0.0.0 in this case is the address (i.e., all addresses) for listening inside the container itself; we previously set up access to the container via 192.168.122.233. So going forward, this is the exact address that needs to be specified on the clients🤯.
Client setup
Now on the client, explicitly specify the address for connecting to the server. In the case of Linux Mint, this is done like this:
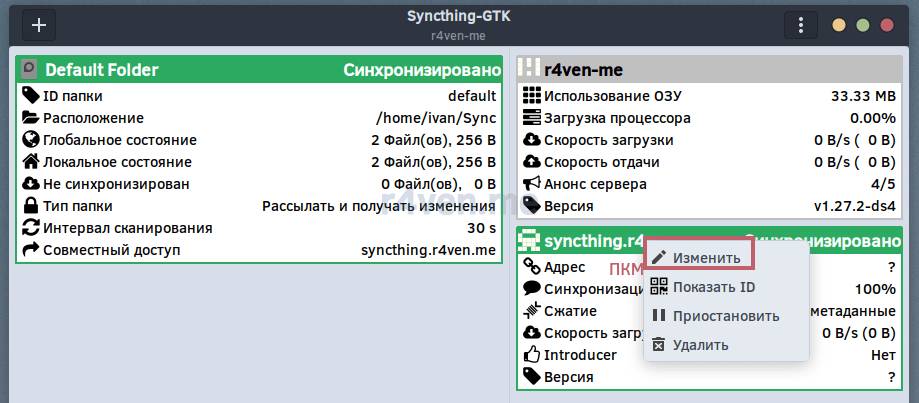
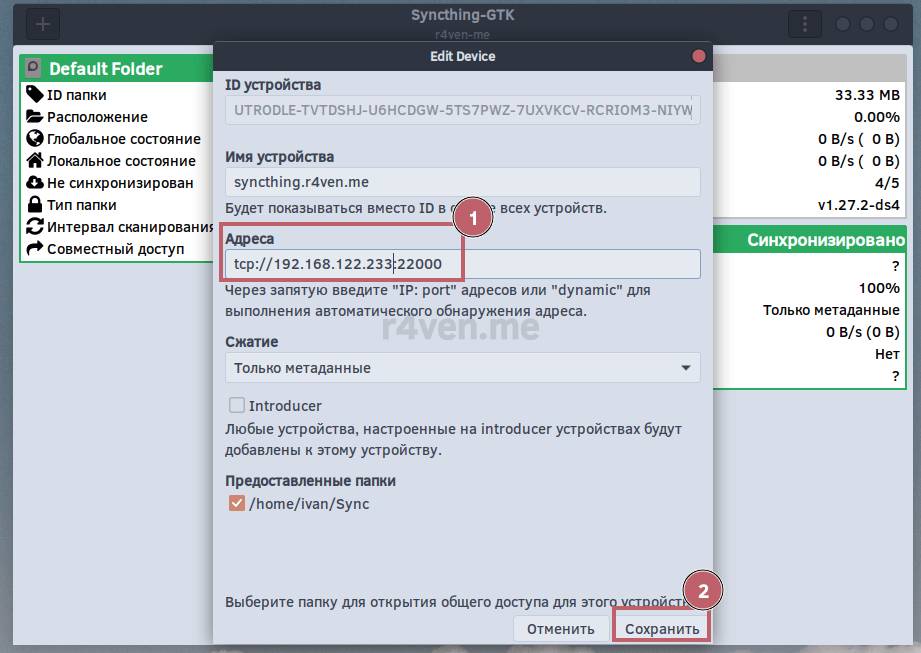
Done.
Change the settings on the other clients in the same way🫠.
Setting up direct client connections via public Syncthing relay servers
Earlier we described a way to centralize file synchronization using our own server, which is always online.
But the Syncthing service also provides the ability to transfer files directly, from one device to another, using the public relay servers of the Syncthing project as intermediaries.
The connection is set up similarly to the server case, just without the server😁.
Here’s a rough algorithm:
- Copy the Android client ID;
- Open Syncthing on Windows;
- Click “Add Device”, enter the ID from Android there, and select the directory to synchronize;
- After a while, two requests will appear in the notification shade on the Android client:
- Add new device;
- Add the shared folder from this device.
Since device connections happen through public relays, synchronization will happen whenever both devices are simply connected to the internet from anywhere. In certain cases, this solution can be useful😉.
Conclusion
To sum up: we got a functional and easily portable file synchronization system project, running inside a docker container, with autostart configured via systemd. We also went through the client connection process for different platforms😎.
I’ve been actively using this service for several years now within my VPN network. It’s very convenient for storing various files this way, especially the encrypted password database file KeePass, which I can read/edit on any device without fear of losing anything.
Sources used
- Project files from the article on GitHub
- Official Syncthing project website
- Syncthing source code on GitHub
- Syncthing repository on hub.docker.com
- Official documentation (EN)
- Article about Syncthing on Habr
👨💻And…
Don’t forget about our Telegram channel 📱 and chat
Or maybe you want to become a co-author? Then click here🔗
💬 All the best ✌️
That should be it. If not, check the logs 🙂
