In this article, we will look at installing and configuring the Arkeep backup system using Docker Compose.
🖐️Hey!
Subscribe to our Telegram channel @r4ven_me📱, so you don’t miss new posts on the website 😉. If you have questions or just want to chat about the topic, feel free to join the Raven chat at @r4ven_me_chat🧐.
Preface

Arkeep is an open source centralized backup system built on top of such excellent tools as Restic and Rclone.
There are many different backup tools that use these utilities. But none of them are “fully centralized”. This is quite a relevant problem in the open source world.
And as programmer philosophy says: if the tool you need does not exist, write it yourself. Which is exactly what the Arkeep developer did. Screenshot from Reddit:

Arkeep has an agent-server architecture. That is, you configure the Arkeep server, then install arkeep-agent on the hosts you need and connect them to the server. After that, you can manage backup configuration for these hosts. As storage, you can use anything that Restic and Rclone can work with.
Backup scheme with Arkeep
In this article, we will look at configuring backups for Linux hosts running Debian 13 with Arkeep (Restic) to an S3 object storage based on RustFS.
We will organize access to all resources through the Angie reverse proxy server. We will connect to Web GUI panels over HTTPS, so we will configure automatic TLS certificate issuance from Let’s Encrypt.
Below is a diagram of the future infrastructure:
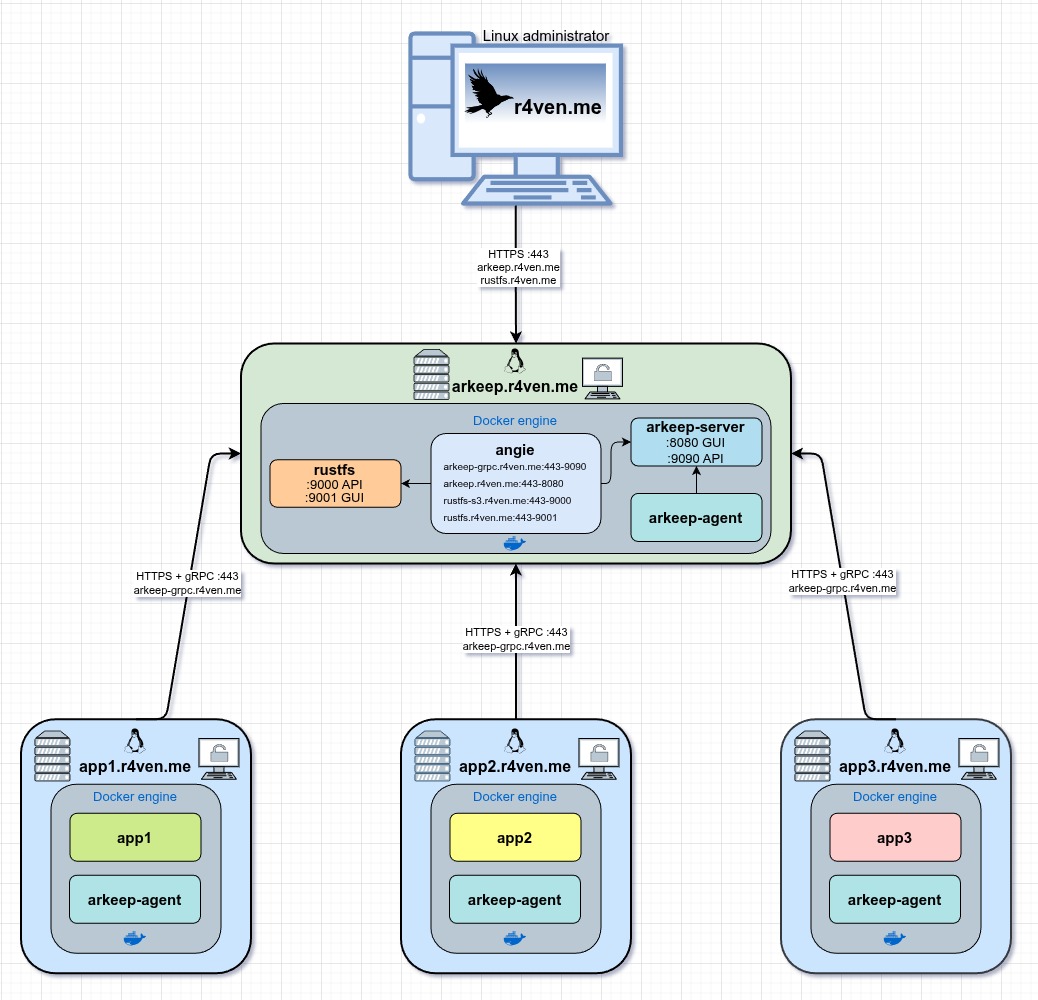
There is one important thing to understand here:
- Web GUI works over HTTP/HTTPS;
- agents connect separately over gRPC.
We will configure interaction between agents and the Arkeep server through gRPC proxying using the grpc_proxy directive. Agent connections to the proxy server will use HTTPS, while from Angie to the Arkeep server it will already be plain HTTP+gRPC.
Input data
Software used in the article:
| Software | Version |
|---|---|
| Debian | 13 |
| Docker Engine | 28 |
| Angie | 1.9.1 |
| Arkeep | 0.4.5 |
| RustFS | 1.0.0-beta.8 |
Domain scheme:
arkeep.r4ven.me- Web GUI of the Arkeep server;arkeep-grpc.r4ven.me- gRPC endpoint for Arkeep agents;rustfs.r4ven.me- Web GUI of the S3 storage;rustfs-s3.r4ven.me- S3 endpoint for storing backups.
Infrastructure preparation
Installing the Arkeep backup server
Connect to the arkeep.r4ven.me server using SSH and switch to the root account using sudo:
ssh ivan@arkeep.r4ven.me

sudo -iCreate a shared Docker network:
docker network create --opt com.docker.network.bridge.name=br-arkeep --opt com.docker.network.enable_ipv6=false --driver bridge --subnet 172.20.20.0/24 --gateway 172.20.20.1 arkeep_netCreate the Arkeep project directory:
install -m 700 -d /etc/compose

mkdir -vp /etc/compose/arkeep && cd /etc/compose/arkeepNow create a compose file, for example, using the vim editor:
vim ./compose.yamlFill it in:
---
# https://github.com/arkeep-io/arkeep/tree/main/deploy/docker

networks:
  arkeep_net:
    external: true

volumes:
  arkeep_server:
    name: arkeep_server
  arkeep_agent:
    name: arkeep_agent

services:
  arkeep_server:
    image: ghcr.io/arkeep-io/arkeep-server:v0.4.5
    container_name: arkeep-server
    restart: unless-stopped
    stop_grace_period: 1m
    cpus: 1
    mem_limit: 1G
    hostname: arkeep-server
    env_file: ./.env
    healthcheck:
      test: ["CMD", "wget", "--quiet", "--tries=1", "--spider", "http://localhost:8080/health/ready"]
      interval: 30s
      timeout: 10s
      retries: 3
      start_period: 10s
    expose:
      - "8080"   # REST API + GUI
      - "9090"   # gRPC (agents)
    volumes:
      - arkeep_server:/var/lib/arkeep/
      - /etc/timezone:/etc/timezone:ro
      - /etc/localtime:/etc/localtime:ro
    networks:
      - arkeep_net

  arkeep_agent:
    image: ghcr.io/arkeep-io/arkeep-agent:v0.4.5
    depends_on:
      arkeep_server:
        condition: service_healthy
    container_name: arkeep-agent
    restart: unless-stopped
    stop_grace_period: 1m
    cpus: 1
    mem_limit: 1G
    hostname: arkeep-agent
    environment:
      TZ: "${TZ:-Europe/Moscow}"
      ARKEEP_SERVER_ADDR: "arkeep-server:9090"
      ARKEEP_AGENT_SECRET: "${ARKEEP_AGENT_SECRET}"
      ARKEEP_STATE_DIR: "/var/lib/arkeep-agent"
      ARKEEP_LOG_LEVEL: "${ARKEEP_LOG_LEVEL:-info}"
      ARKEEP_GRPC_INSECURE: "${ARKEEP_GRPC_INSECURE:-false}"
    volumes:
      - arkeep_agent:/var/lib/arkeep-agent/
      - /:/hostfs/:ro # :ro for backup-only; change to :rw to also restore to local paths
      - /var/run/docker.sock:/var/run/docker.sock:ro
      - /var/lib/docker/volumes/:/var/lib/docker/volumes/:ro
      - /etc/timezone:/etc/timezone:ro
      - /etc/localtime:/etc/localtime:ro
    networks:
- arkeep_netIt is worth separately mentioning mounting the root of the host filesystem: /:/hostfs/:ro. Mounting in read-only mode (ro) allows backing up any point in the system. If you also want to be able to restore files to their original directories, in that case you need to mount in rw mode (just remove ro). And since the Arkeep agent in our case will run as the root user, this implies full agent access to the system files. Keep that in mind. Let’s continue.
Create the env file:
vim ./.envFill it in:
# https://github.com/arkeep-io/arkeep/tree/main/deploy/docker

TZ=Europe/Moscow
ARKEEP_SECRET_KEY=
ARKEEP_AGENT_SECRET=
ARKEEP_DATA_DIR=/var/lib/arkeep/data
ARKEEP_DB_DRIVER=sqlite
ARKEEP_DB_DSN=/var/lib/arkeep/arkeep.db
ARKEEP_LOG_LEVEL=info
ARKEEP_SERVER_ADDR=arkeep-grpc.r4ven.me:443
ARKEEP_SERVER_HTTP_ADDR=https://arkeep.r4ven.me
ARKEEP_GRPC_INSECURE=true
ARKEEP_TELEMETRY=trueParameter description:
TZ- container timezone;ARKEEP_SECRET_KEY- JWT token signing key;ARKEEP_AGENT_SECRET- shared secret for the server and agents;ARKEEP_DATA_DIR- data directory inside the container;ARKEEP_DB_DRIVER- database type, in our case Sqlite, but Postgres can also be used;ARKEEP_DB_DSN- path to the database file;ARKEEP_LOG_LEVEL- logging level;ARKEEP_SERVER_ADDR- server address for agent connections over gRPC (must be withouthttp/https);ARKEEP_SERVER_HTTP_ADDR- external HTTPS address of the Web GUI;ARKEEP_GRPC_INSECURE=true- TLS mode is disabled, because Angie will handle TLS termination;ARKEEP_TELEMETRY- enable/disable sending anonymous statistics, more on that near the end of the article.
☝️ ARKEEP_AGENT_SECRET must match on the server and all agents.
Generate secrets of the recommended length:
sed -iE "s/^ARKEEP_SECRET_KEY=.*/ARKEEP_SECRET_KEY=$(openssl rand -hex 32)/" ./.env

sed -iE "s/^ARKEEP_AGENT_SECRET=.*/ARKEEP_AGENT_SECRET=$(openssl rand -hex 24)/" ./.env☝️ As already mentioned, DNS records must be created for the addresses defined in the ARKEEP_SERVER_ADDR and ARKEEP_SERVER_HTTP_ADDR parameters to issue certificates.
Start the stack:
docker compose up -d && docker compose logs -f💡 To exit log viewing mode, press Ctrl+c.
Check:
docker compose ps

docker compose volumesIf everything is fine, we will see roughly this output:

Let’s configure autostart with Systemd right away:
cat > ./arkeep.service << EOF
[Unit]
Description=Arkeep service
Requires=docker.service
After=docker.service

[Service]
Restart=always
RestartSec=5
User=root
Group=root
WorkingDirectory=$(realpath ./)
ExecStart=/usr/bin/docker compose up --remove-orphans
ExecStop=/usr/bin/docker compose down

[Install]
WantedBy=multi-user.target
EOFchmod 600 ./arkeep.service
ln -s $(realpath ./arkeep.service) /etc/systemd/system
systemctl daemon-reload
systemctl enable --now arkeep
systemctl status arkeep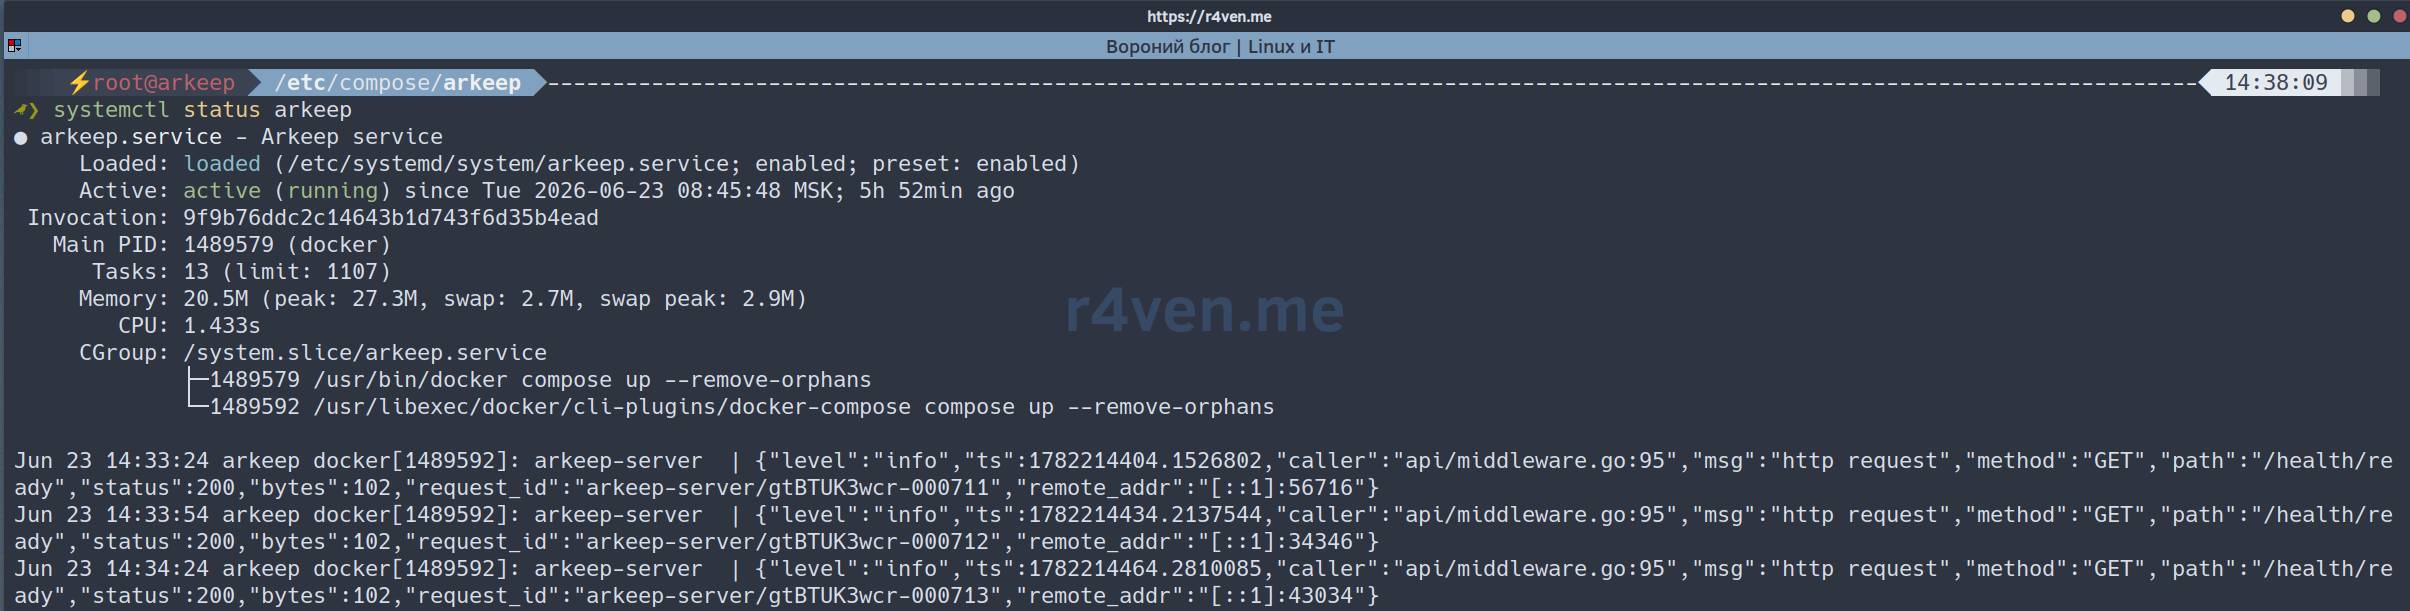
Now the arkeep service can be managed with the systemctl utility:
systemctl stop arkeep
systemctl start arkeep
systemctl restart arkeep
systemctl status arkeepInstalling the RustFS S3 storage
RustFS is an S3-compatible storage, whose installation, configuration, and usage we covered in the previous article.
Create the project directory:
mkdir -vp /etc/compose/rustfs && cd /etc/compose/rustfsNow create the compose file:
vim ./compose.yamlFill it in:
---
# https://github.com/rustfs/rustfs

networks:
  arkeep_net:
    external: true

volumes:
  rustfs:
    name: rustfs

services:
  rustfs:
    image: rustfs/rustfs:1.0.0-beta.8
    container_name: rustfs
    restart: unless-stopped
    stop_grace_period: 30s
    cpus: 1
    mem_limit: 1G
    hostname: rustfs
    env_file: ./.env
    healthcheck:
      test:
        ["CMD", "sh", "-c", "curl -f http://127.0.0.1:9000/health && curl -f http://127.0.0.1:9001/rustfs/console/health"]
      interval: 30s
      timeout: 10s
      retries: 3
      start_period: 40s
    expose:
      - "9000" # S3 API port
      - "9001" # Console port
    volumes:
      - rustfs:/data/
      - /etc/timezone:/etc/timezone:ro
      - /etc/localtime:/etc/localtime:ro
    networks:
- arkeep_netCreate the env file:
vim ./.envFill it in:
# https://docs.rustfs.com/installation/docker/#complete-parameter-configuration-example

TZ=Europe/Moscow
# RUSTFS_VOLUMES=/data/rustfs{0..3} # Define 4 storage volumes
RUSTFS_ADDRESS=0.0.0.0:9000
RUSTFS_CONSOLE_ENABLE=true
RUSTFS_CONSOLE_ADDRESS=0.0.0.0:9001
RUSTFS_CORS_ALLOWED_ORIGINS=https://rustfs.r4ven.me
RUSTFS_CONSOLE_CORS_ALLOWED_ORIGINS=https://rustfs.r4ven.me
RUSTFS_ACCESS_KEY=
RUSTFS_SECRET_KEY=
RUSTFS_OBS_LOGGER_LEVEL=infoWhere:
TZ- container timezone;RUSTFS_ADDRESS- S3 API address and port;RUSTFS_CONSOLE_ENABLE- enable the web console;RUSTFS_CONSOLE_ADDRESS- web console address and port;RUSTFS_CORS_ALLOWED_ORIGINS- allowed origins (CORS) for the S3 API;RUSTFS_CONSOLE_CORS_ALLOWED_ORIGINS- allowed origins (CORS) for the web console;RUSTFS_ACCESS_KEY- S3 Access Key (login);RUSTFS_SECRET_KEY- S3 Secret Key (password);RUSTFS_OBS_LOGGER_LEVEL- logging level (error,warn,info,debug,trace).
☝️ RUSTFS_ACCESS_KEY and RUSTFS_SECRET_KEY will be used as the login and password for authentication in the RustFS web console.
☝️ As already mentioned, DNS records must be created for the required addresses to issue certificates, in my example these are rustfs.r4ven.me and rustfs-s3.r4ven.me.
Set the “login” (replace it with your own) and generate the “password”:
sed -iE "s/^RUSTFS_ACCESS_KEY=.*/RUSTFS_ACCESS_KEY=ivan/" ./.env

sed -iE "s/^RUSTFS_SECRET_KEY=.*/RUSTFS_SECRET_KEY=$(openssl rand -hex 32)/" ./.envStart the stack:
docker compose up -d && docker compose logs -f💡 To exit log viewing mode, press Ctrl+c.
Check:
docker compose ps

docker compose volumesIf everything is fine, we will see roughly this output:

Let’s configure autostart with Systemd right away:
cat > ./rustfs.service << EOF
[Unit]
Description=RustFS S3 service
Requires=docker.service
After=docker.service

[Service]
Restart=always
RestartSec=5
User=root
Group=root
WorkingDirectory=$(realpath ./)
ExecStart=/usr/bin/docker compose up --remove-orphans
ExecStop=/usr/bin/docker compose down

[Install]
WantedBy=multi-user.target
EOFchmod 600 ./rustfs.service
ln -s $(realpath ./rustfs.service) /etc/systemd/system
systemctl daemon-reload
systemctl enable --now rustfs
systemctl status rustfs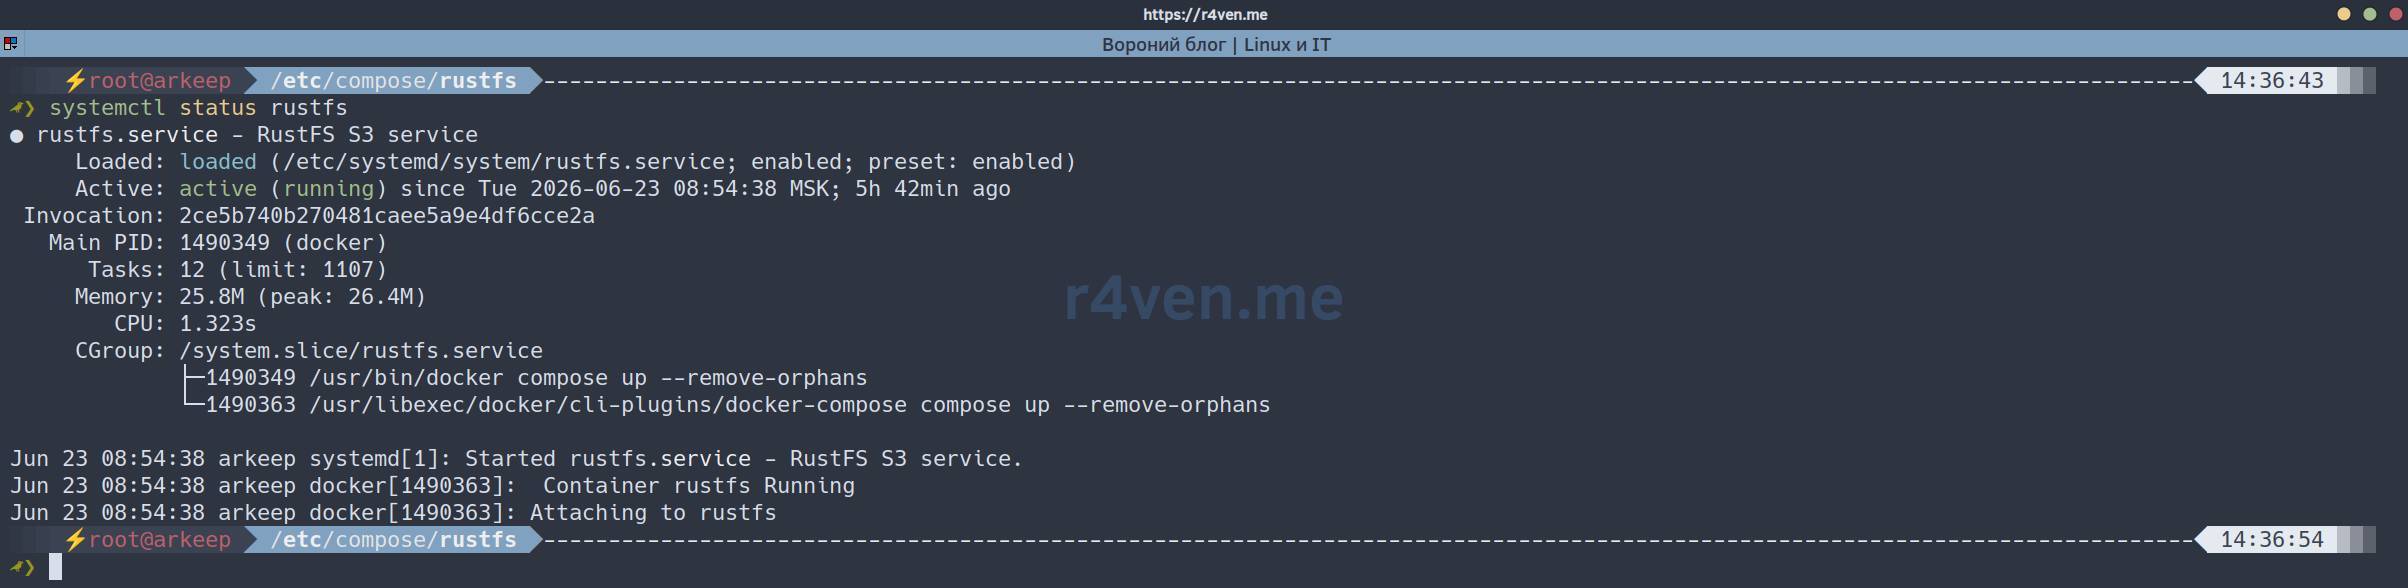
Now the rustfs service can be managed with the systemctl utility:
systemctl stop rustfs
systemctl start rustfs
systemctl restart rustfs
systemctl status rustfsInstalling the Angie reverse proxy server
Angie is a fork of the well-known Nginx (only better!) by our compatriots who previously worked on Nginx.
Create the project directory:
mkdir -vp /etc/compose/angie && cd /etc/compose/angieCreate the Docker service description file:
vim ./compose.yamlFill it in:
---
# https://angie.software/angie/docs/installation/docker/

networks:
  arkeep_net:
    external: true

services:
  angie:
    image: docker.angie.software/angie:1.9.1-alpine
    container_name: angie
    restart: unless-stopped
    stop_grace_period: 1m
    cpus: 1
    mem_limit: 1G
    hostname: angie
    environment:
      TZ: Europe/Moscow
    volumes:
      - ./config/angie.conf:/etc/angie/angie.conf:ro
      - ./config/http.d/:/etc/angie/http.d/:ro
      - ./certs/:/var/lib/angie/acme/
      - /etc/timezone:/etc/timezone:ro
      - /etc/localtime:/etc/localtime:ro
    ports:
      - "80:80/tcp"
      - "443:443/tcp"
      - "443:443/udp"
    networks:
- arkeep_netCreate the config:
mkdir -vp ./config

vim ./config/angie.confFill it in:
user angie;
worker_processes auto;
worker_rlimit_nofile 65536;

error_log /var/log/angie/error.log notice;
pid /run/angie/angie.pid;

events {
    worker_connections 65536;
}

http {
    map $http_upgrade $connection_upgrade {
        default upgrade;
        ''      close;
    }

    include /etc/angie/mime.types;
    default_type application/octet-stream;

    log_format main '$remote_addr - $remote_user [$time_local] "$request" '
                    '$status $body_bytes_sent "$http_referer" '
                    '"$http_user_agent" "$http_x_forwarded_for"';

    log_format extended '$remote_addr - $remote_user [$time_local] "$request" '
                        '$status $body_bytes_sent "$http_referer" rt="$request_time" '
                        '"$http_user_agent" "$http_x_forwarded_for" '
                        'h="$host" sn="$server_name" ru="$request_uri" u="$uri" '
                        'ucs="$upstream_cache_status" ua="$upstream_addr" us="$upstream_status" '
                        'uct="$upstream_connect_time" urt="$upstream_response_time"';

    access_log /var/log/angie/access.log main;

    sendfile on;
    tcp_nopush on;
    tcp_nodelay on;

    keepalive_timeout 20;
    keepalive_requests 1000;

    server_tokens off;

    # DNS resolver for ACME.
    resolver 8.8.8.8 8.8.4.4 ipv6=off valid=300s;

    acme_client le https://acme-v02.api.letsencrypt.org/directory
        email=kar-kar@r4ven.me
        key_type=ecdsa
        renew_before_expiry=30d
        # renew_on_load=on
    ;

    ssl_session_cache shared:SSL:10m;
    ssl_session_timeout 1d;
    ssl_session_tickets off;

    upstream arkeep_server {
        server arkeep-server:9090;
    }

    upstream arkeep_console {
        server arkeep-server:8080;
    }

    upstream rustfs_server {
        server rustfs:9000;
    }

    upstream rustfs_console {
        server rustfs:9001;
    }

    server {
        listen 80;

        server_name
            arkeep-grpc.r4ven.me
            arkeep.r4ven.me
            rustfs-s3.r4ven.me
            rustfs.r4ven.me
        ;

        location /.well-known/acme-challenge/ {
            root /usr/share/angie/html/;
        }

        location / {
            return 301 https://$host$request_uri;
        }
    }

    server {
        listen 443 ssl;

        http2 on;
        http3 on;

        server_name arkeep-grpc.r4ven.me;

        acme le;

        ssl_certificate $acme_cert_le;
        ssl_certificate_key $acme_cert_key_le;

        ssl_protocols TLSv1.2 TLSv1.3;
        ssl_prefer_server_ciphers on;

        location / {
            grpc_pass grpc://arkeep_server;

            grpc_set_header Host $host;
            grpc_set_header X-Real-IP $remote_addr;
            grpc_set_header X-Forwarded-For $proxy_add_x_forwarded_for;

            grpc_connect_timeout 10s;
            grpc_send_timeout 1h;
            grpc_read_timeout 1h;

            grpc_socket_keepalive on;
        }
    }

    server {
        listen 443 ssl;

        http2 on;
        http3 on;

        server_name arkeep.r4ven.me;

        acme le;

        ssl_certificate $acme_cert_le;
        ssl_certificate_key $acme_cert_key_le;

        ssl_protocols TLSv1.2 TLSv1.3;
        ssl_prefer_server_ciphers on;

        client_max_body_size 0;

        location / {
            proxy_pass http://arkeep_console;

            proxy_http_version 1.1;
            proxy_request_buffering off;
            proxy_buffering off;

            proxy_set_header Host $host;
            proxy_set_header X-Real-IP $remote_addr;
            proxy_set_header X-Forwarded-For $proxy_add_x_forwarded_for;
            proxy_set_header X-Forwarded-Proto $scheme;
            proxy_set_header X-Forwarded-Host $host;
            proxy_set_header X-Forwarded-Port 443;
            proxy_set_header X-Forwarded-Ssl on;

            proxy_set_header Upgrade $http_upgrade;
            proxy_set_header Connection $connection_upgrade;

            proxy_connect_timeout 10s;
            proxy_send_timeout 1h;
            proxy_read_timeout 1h;
        }
    }

    server {
        listen 443 ssl;

        http2 on;
        http3 on;

        server_name rustfs-s3.r4ven.me;

        acme le;

        ssl_certificate $acme_cert_le;
        ssl_certificate_key $acme_cert_key_le;

        ssl_protocols TLSv1.2 TLSv1.3;
        ssl_prefer_server_ciphers on;

        client_max_body_size 0;

        location / {
            proxy_pass http://rustfs_server;

            proxy_http_version 1.1;
            proxy_request_buffering off;
            proxy_buffering off;
            proxy_cache off;
            proxy_max_temp_file_size 0;

            proxy_set_header Host $host;
            proxy_set_header X-Real-IP $remote_addr;
            proxy_set_header X-Forwarded-For $proxy_add_x_forwarded_for;
            proxy_set_header X-Forwarded-Proto $scheme;
            proxy_set_header X-Forwarded-Host $host;
            proxy_set_header X-Forwarded-Port 443;
            proxy_set_header X-Forwarded-Ssl on;

            proxy_connect_timeout 10s;
            proxy_send_timeout 1h;
            proxy_read_timeout 1h;
        }
    }

    server {
        listen 443 ssl;

        http2 on;
        http3 on;

        server_name rustfs.r4ven.me;

        acme le;

        ssl_certificate $acme_cert_le;
        ssl_certificate_key $acme_cert_key_le;

        ssl_protocols TLSv1.2 TLSv1.3;
        ssl_prefer_server_ciphers on;

        location / {
            proxy_pass http://rustfs_console;

            proxy_http_version 1.1;

            proxy_set_header Host $host;
            proxy_set_header X-Real-IP $remote_addr;
            proxy_set_header X-Forwarded-For $proxy_add_x_forwarded_for;
            proxy_set_header X-Forwarded-Proto $scheme;

            proxy_set_header Upgrade $http_upgrade;
            proxy_set_header Connection $connection_upgrade;
        }
    }

    include /etc/angie/http.d/*.conf;
}☝️ Be sure to replace email=kar-kar@r4ven.me in the acme settings and the server_name values for each virtual host.
Start the stack:
docker compose up -d && docker compose logs -fCheck Angie and all other services:
docker compose ps

docker psIf everything is fine, we will see roughly this output:

Let’s configure autostart with Systemd right away:
cat > ./angie.service << EOF
[Unit]
Description=Angie proxy service
Requires=docker.service
After=docker.service

[Service]
Restart=always
RestartSec=5
User=root
Group=root
WorkingDirectory=$(realpath ./)
ExecStart=/usr/bin/docker compose up --remove-orphans
ExecStop=/usr/bin/docker compose down

[Install]
WantedBy=multi-user.target
EOFchmod 600 ./angie.service
ln -s $(realpath ./angie.service) /etc/systemd/system
systemctl daemon-reload
systemctl enable --now angie
systemctl status angie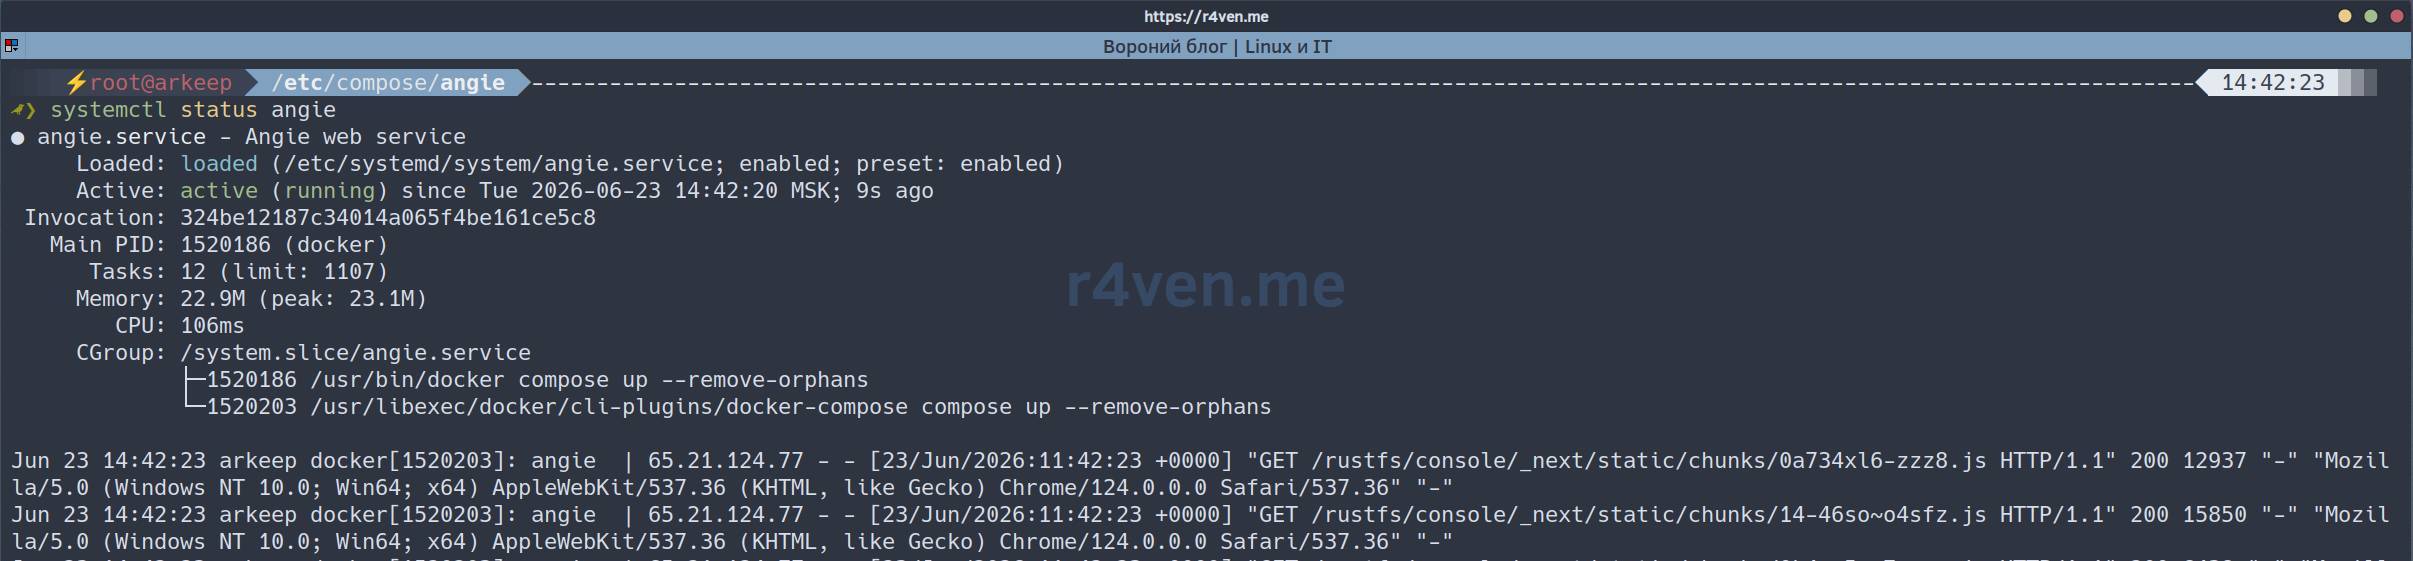
Now the angie service can be managed with the systemctl utility:
systemctl stop angie
systemctl start angie
systemctl restart angie
systemctl status angie❗️ Caution
Immediately after successfully starting Angie, be sure to perform the next step if, as in this example, the Arkeep control panel will be accessible from the internet.
The first thing after starting the reverse proxy is to create an admin account in Arkeep:
Open a web browser, go to the address specified for the GUI panel, and set the administrator login credentials:
📝 Pay attention to the valid HTTPS connection.
https://arkeep.r4ven.me/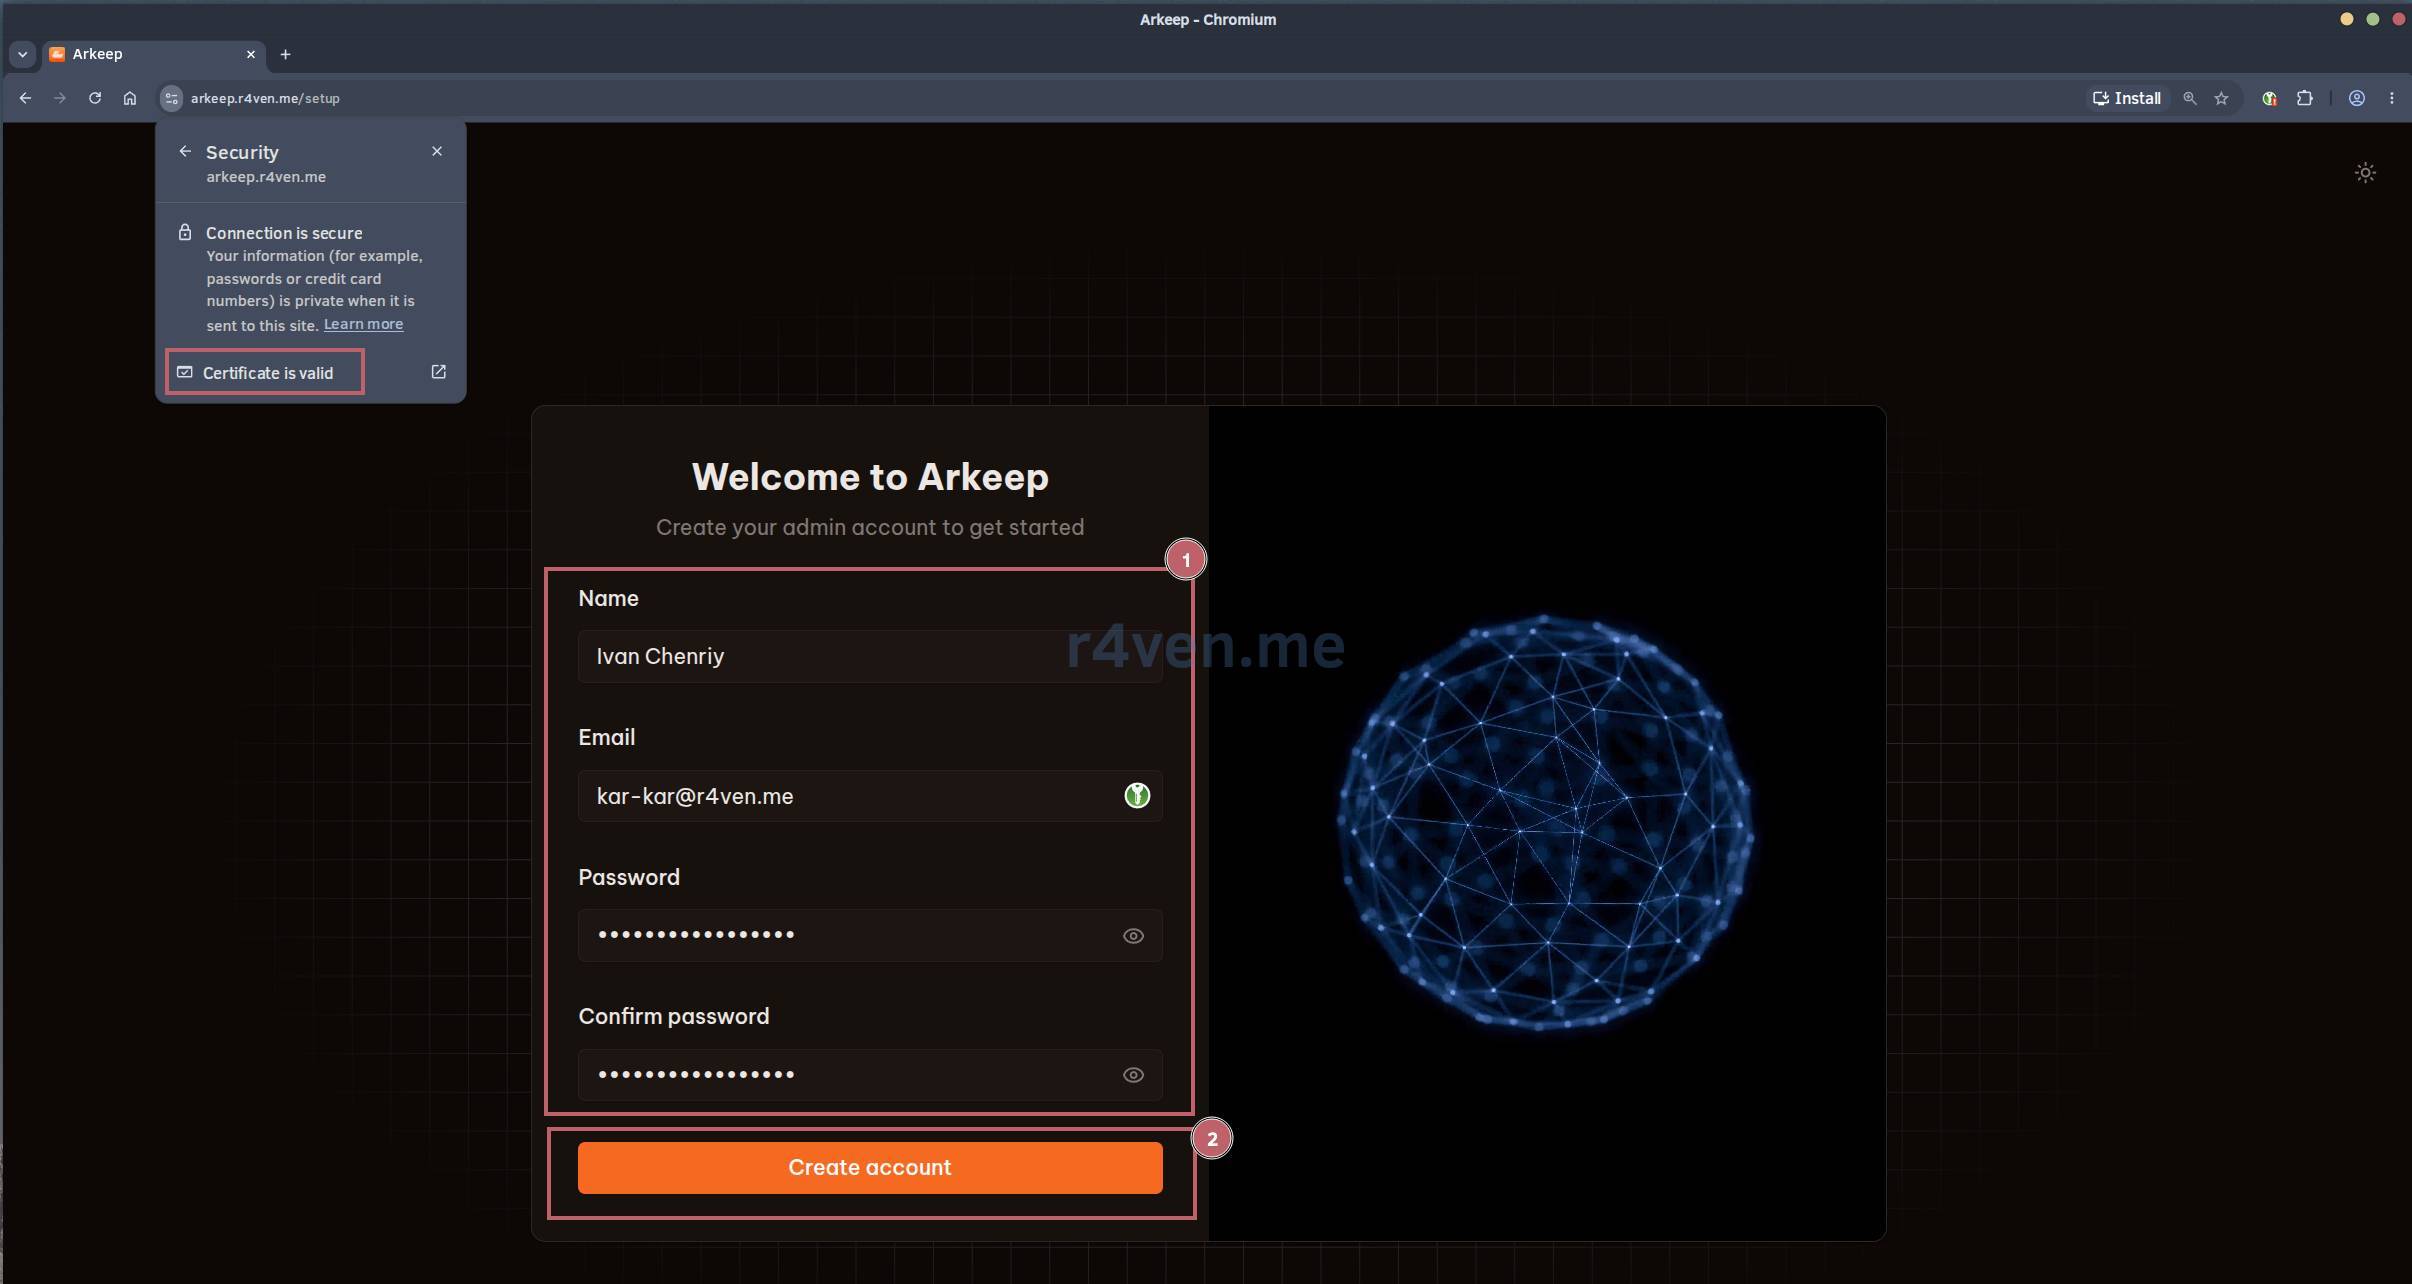
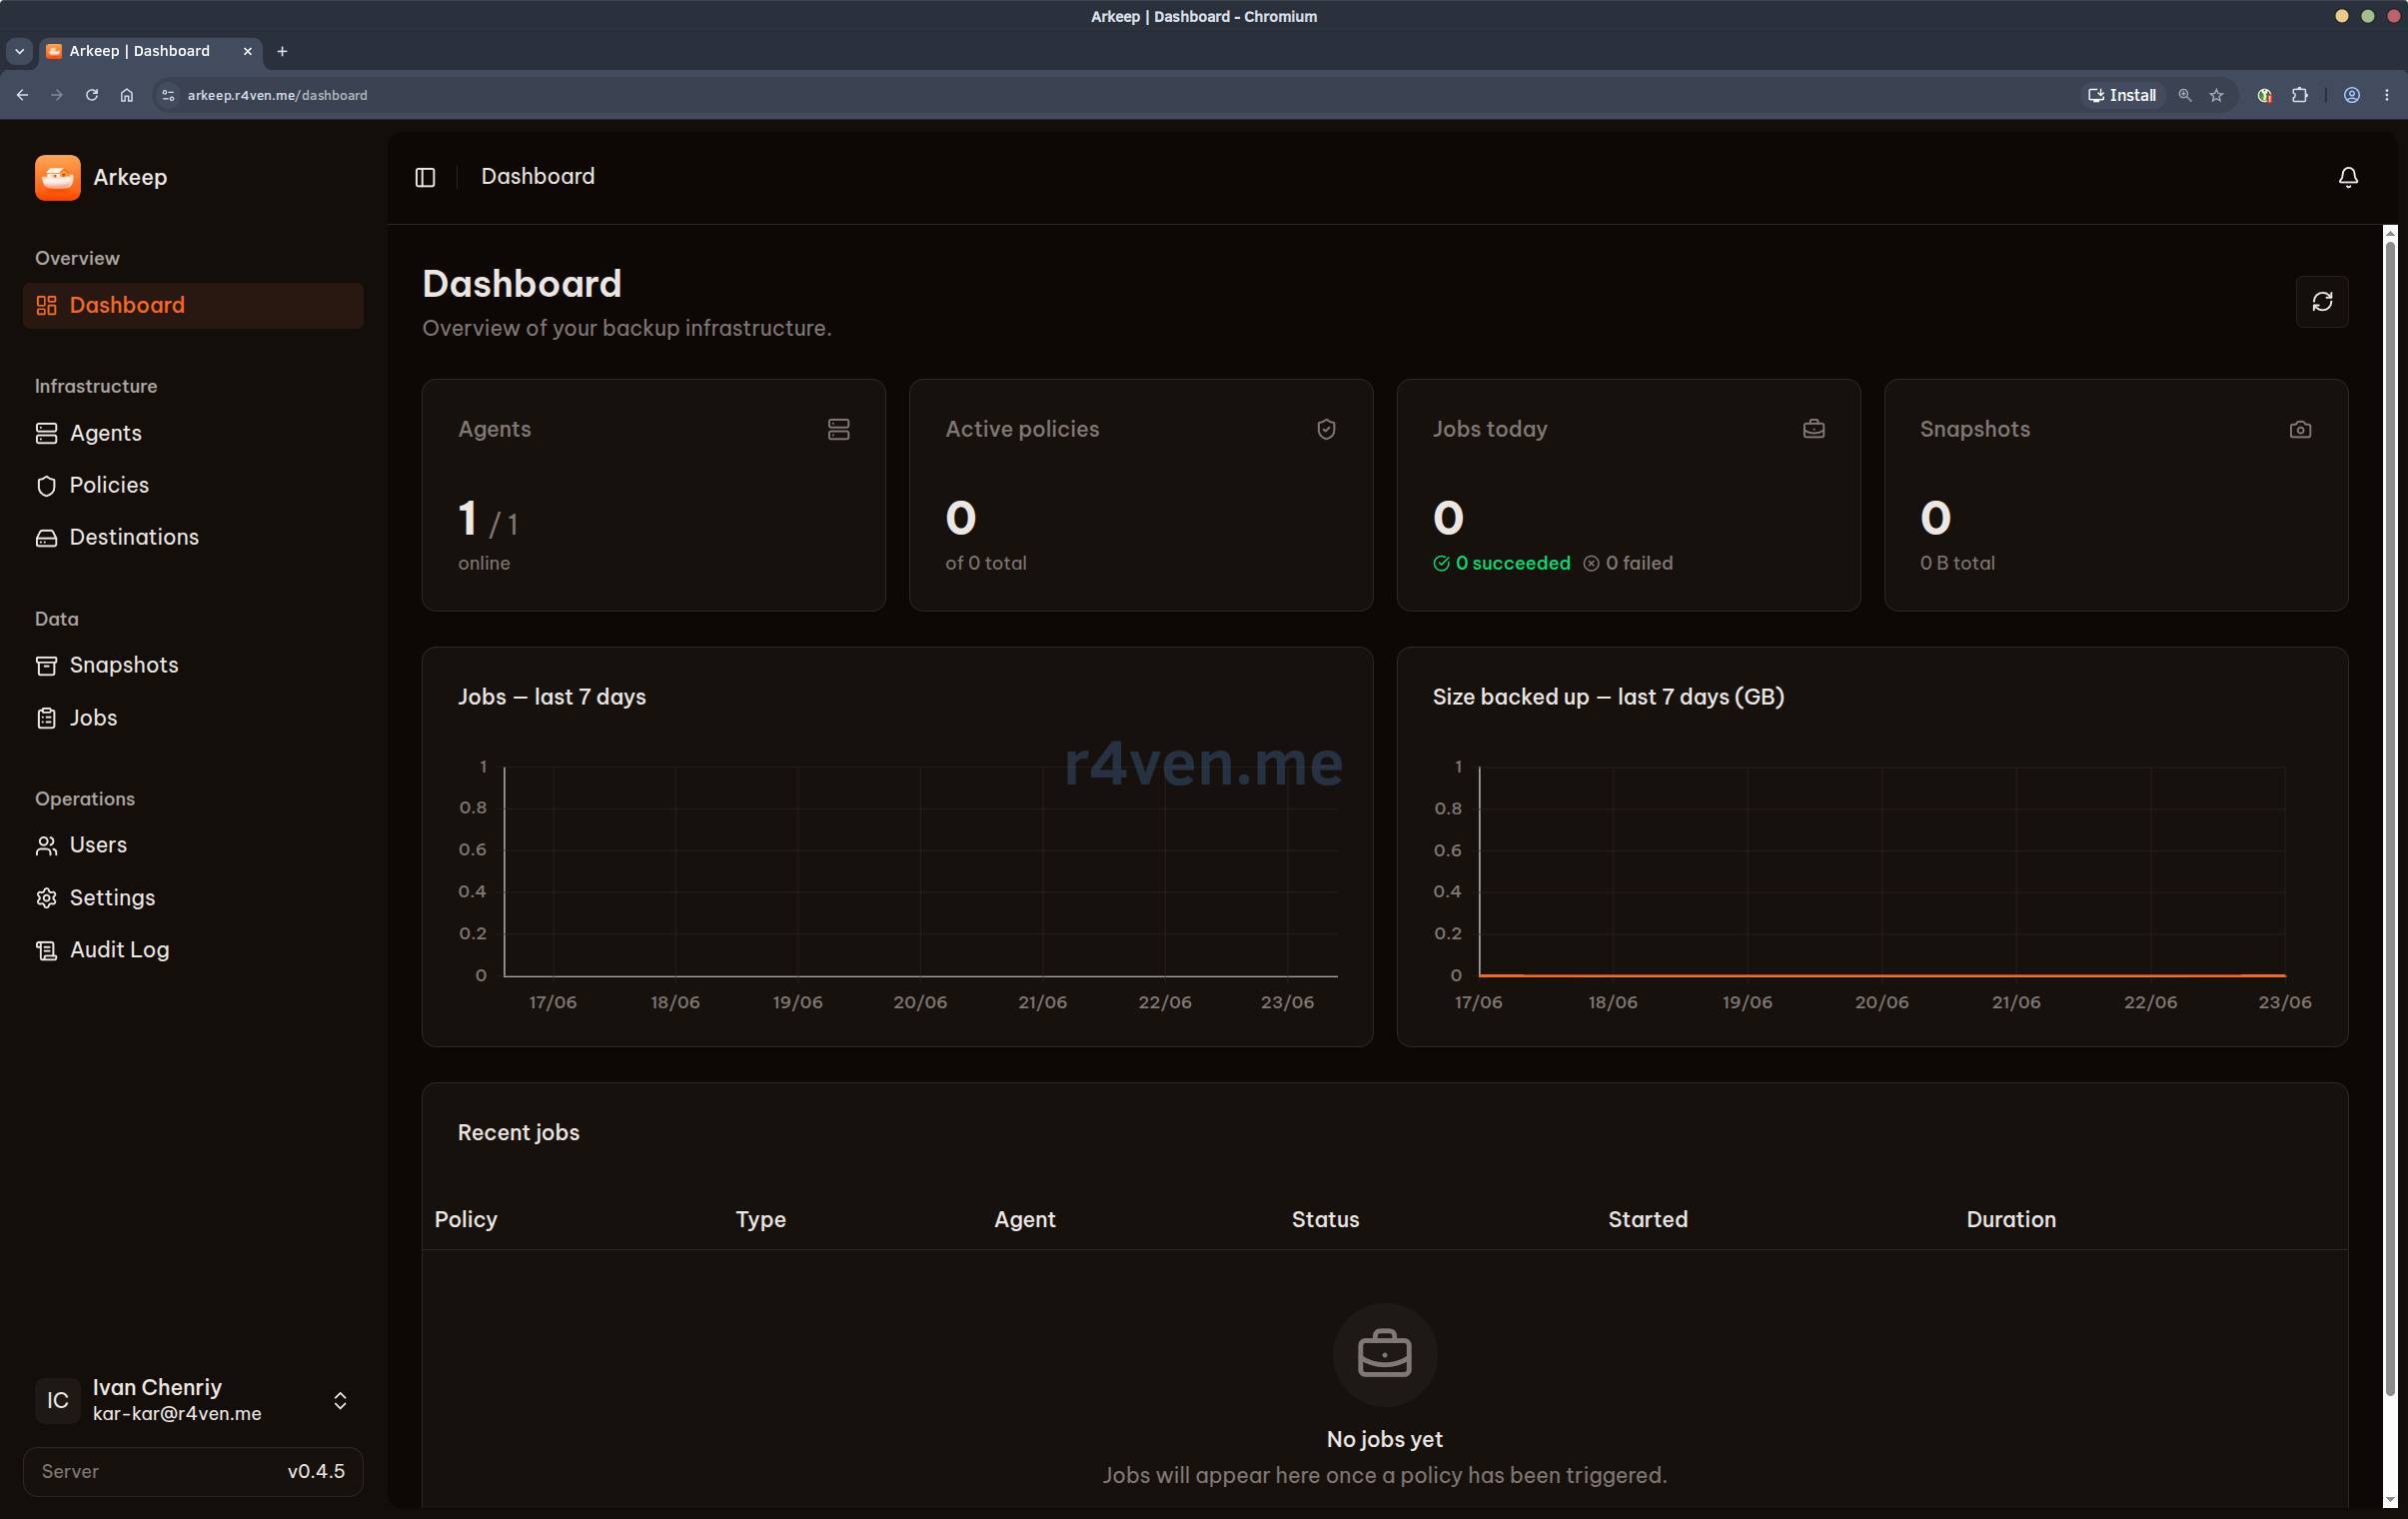
After logging in, we will get to the Arkeep dashboard:
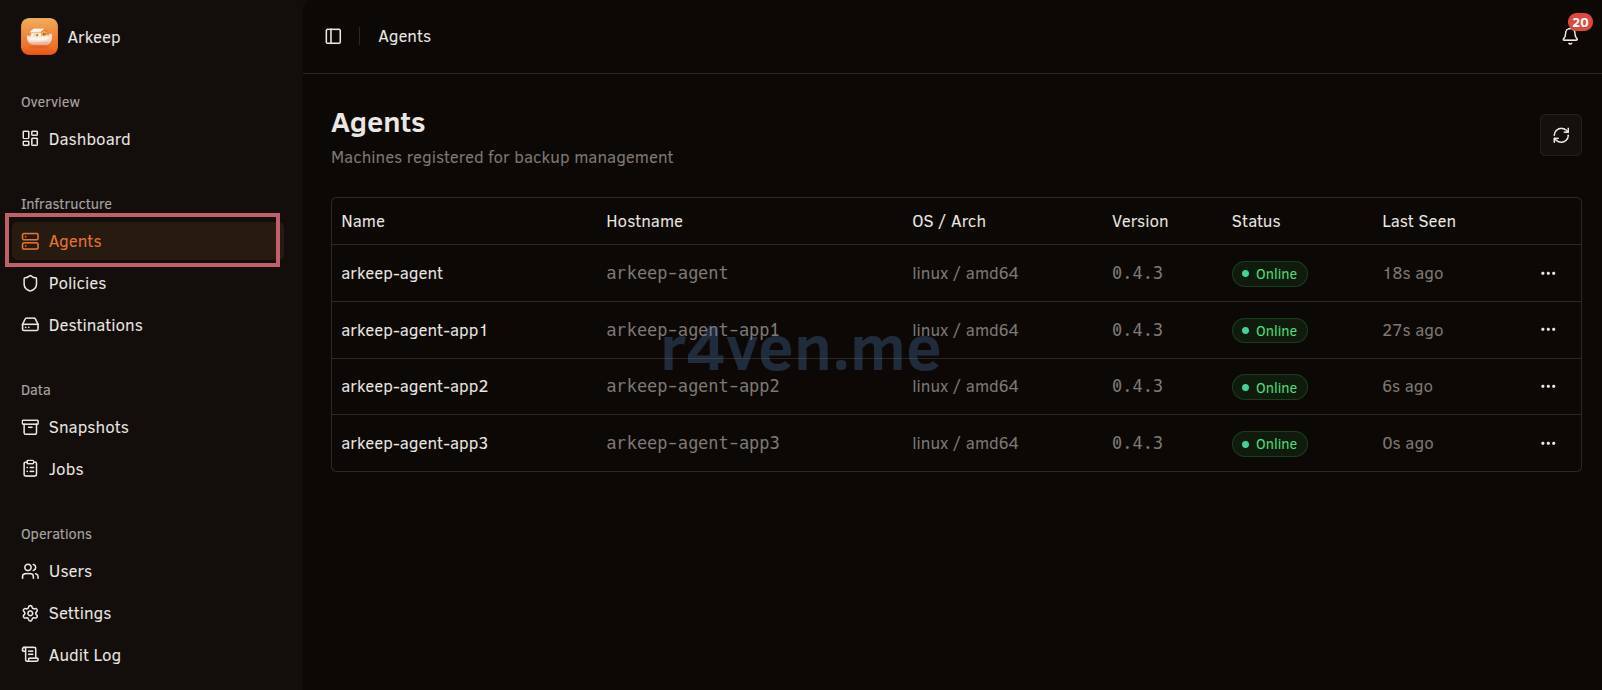
In the “Agents” section, we should see our local agent, which starts together with the server:

Installing and configuring Arkeep agents on app servers
Now move to the hosts that need to be backed up:
app1.r4ven.meapp2.r4ven.meapp3.r4ven.me
Create the directory:
install -m 700 -d /etc/compose

mkdir -vp /etc/compose/arkeep_agent && cd /etc/compose/arkeep_agentCreate the agent compose file:
vim ./compose.yamlFill it in:
---
# https://github.com/arkeep-io/arkeep/tree/main/deploy/docker

volumes:
  arkeep_agent:
    name: arkeep_agent

services:
  arkeep_agent:
    image: ghcr.io/arkeep-io/arkeep-agent:v0.4.5
    container_name: arkeep-agent-app1
    restart: unless-stopped
    stop_grace_period: 1m
    cpus: 1
    mem_limit: 1G
    hostname: arkeep-agent-app1
    env_file: ./.env
    volumes:
      - arkeep_agent:/var/lib/arkeep-agent/
      - /:/hostfs/:ro # :ro for backup-only; change to :rw to also restore to local paths
      - /var/run/docker.sock:/var/run/docker.sock:ro
      - /var/lib/docker/volumes/:/var/lib/docker/volumes/:ro
      - /etc/timezone:/etc/timezone:ro
- /etc/localtime:/etc/localtime:roHere it is worth separately explaining the /hostfs bind mount: this is how the agent gets access to the host filesystem for backup. The ro mode is sufficient only for creating backups. To restore files to their original location, access in rw mode is required.
Create the env file:
vim ./.envFill it in:
# https://github.com/arkeep-io/arkeep/tree/main/deploy/docker

TZ=Europe/Moscow
ARKEEP_SERVER_ADDR=arkeep-grpc.r4ven.me:443
ARKEEP_SERVER_HTTP_ADDR=https://arkeep.r4ven.me
ARKEEP_AGENT_SECRET=
ARKEEP_STATE_DIR=/var/lib/arkeep-agent
ARKEEP_LOG_LEVEL=info
ARKEEP_GRPC_INSECURE=falseParameter description:
TZ- container timezone;ARKEEP_SERVER_ADDR- server address for agent connections over gRPC (must be withouthttp/https);ARKEEP_SERVER_HTTP_ADDR- external HTTPS address of the Web GUI;ARKEEP_AGENT_SECRET- shared secret;ARKEEP_STATE_DIR- data directory inside the container;ARKEEP_LOG_LEVEL- logging level;ARKEEP_GRPC_INSECURE=false- TLS mode is enabled (TLS goes to Angie, and then further without encryption).
☝️ ARKEEP_AGENT_SECRET must match the value specified on the Arkeep server.
☝️ When using a reverse proxy in front of the Web interface, the ARKEEP_SERVER_HTTP_ADDR parameter is required.
Start the container:
docker compose up -d && docker compose logs -fIf the agent successfully connects to the server, we should see these two lines:
arkeep-agent-app1  | {"level":"info","ts":1781279912.8271096,"logger":"connection","caller":"connection/manager.go:427","msg":"registered with server","agent_id":"019ebc8e-7375-7ec1-b345-9d309cc983e8","agent_name":"arkeep-agent-app1"}
arkeep-agent-app1 | {"level":"info","ts":1781279912.827225,"logger":"connection","caller":"connection/manager.go:527","msg":"job stream open","agent_id":"019ebc8e-7375-7ec1-b345-9d309cc983e8"}And a new agent will appear in the Arkeep management console:
Let’s configure agent autostart with Systemd right away:
cat > ./arkeep-agent.service << EOF
[Unit]
Description=Arkeep agent service
Requires=docker.service
After=docker.service

[Service]
Restart=always
RestartSec=5
User=root
Group=root
WorkingDirectory=$(realpath ./)
ExecStart=/usr/bin/docker compose up --remove-orphans
ExecStop=/usr/bin/docker compose down

[Install]
WantedBy=multi-user.target
EOFchmod 600 ./arkeep-agent.service
ln -s $(realpath ./arkeep-agent.service) /etc/systemd/system
systemctl daemon-reload
systemctl enable --now arkeep-agent
systemctl status arkeep-agent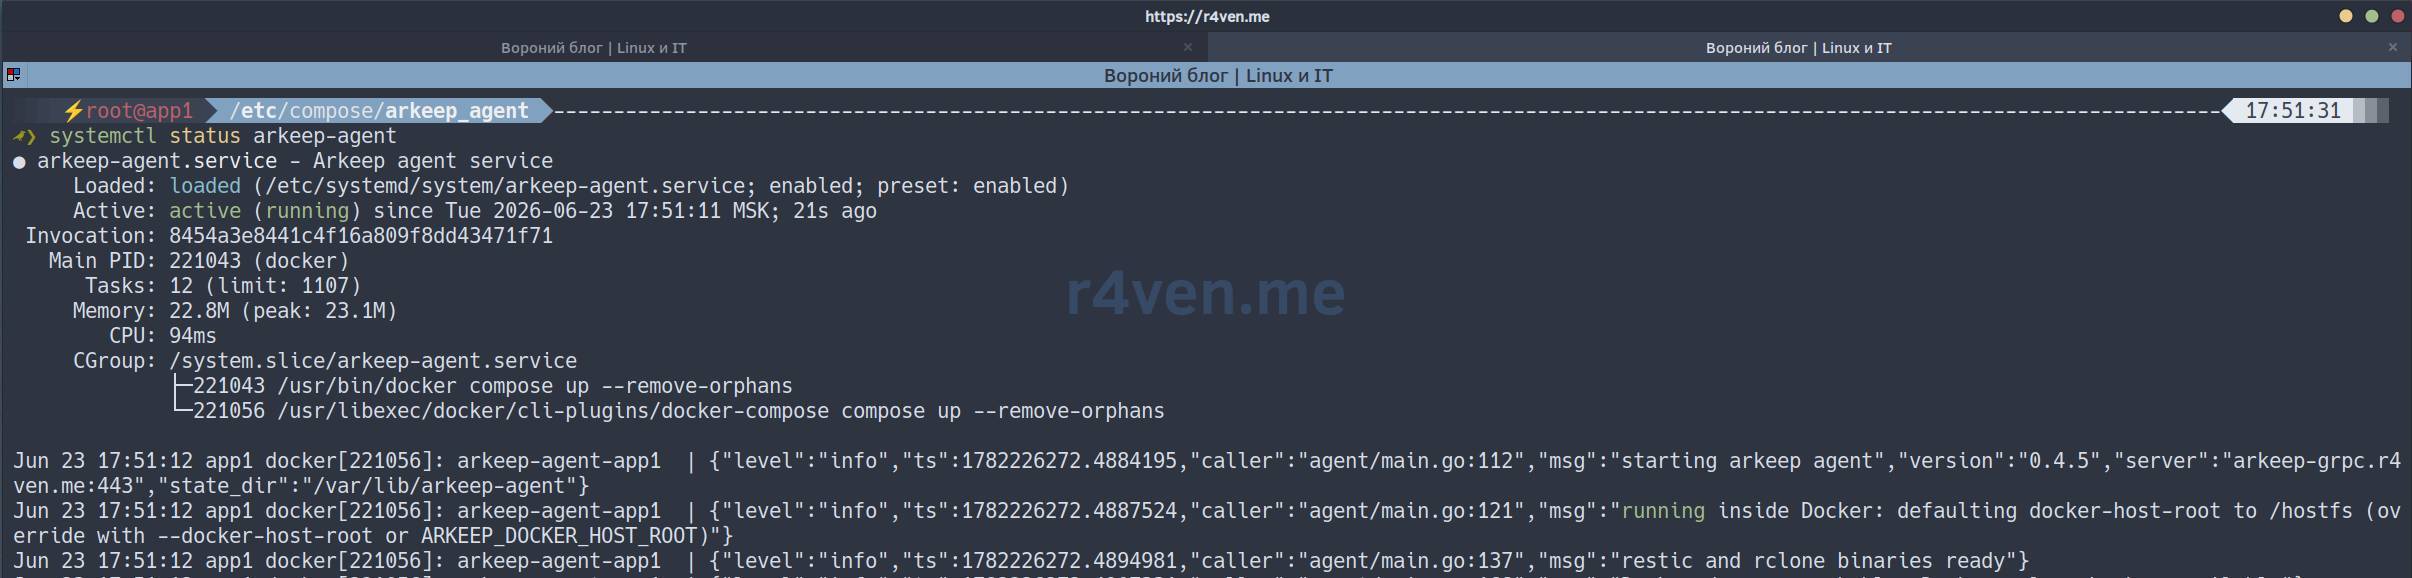
Now the arkeep-agent service can also be managed with the systemctl utility:
systemctl stop arkeep-agent
systemctl start arkeep-agent
systemctl restart arkeep-agent
systemctl status arkeep-agentConfiguring RustFS
To prepare and configure the S3 storage, please read my separate article:
For further configuration, we will need the following data:
endpoint- S3 storage address, in our case it isrustfs-s3.r4ven.me;bucket- bucket where we will store backups;access_key_idandsecret_access_key- secrets for accessing the bucket with thereadwritepolicy.
Configuring Arkeep
First, configure the remote storage where we will put backups.
Configuring Destination - S3
Go to the “Destinations” section:
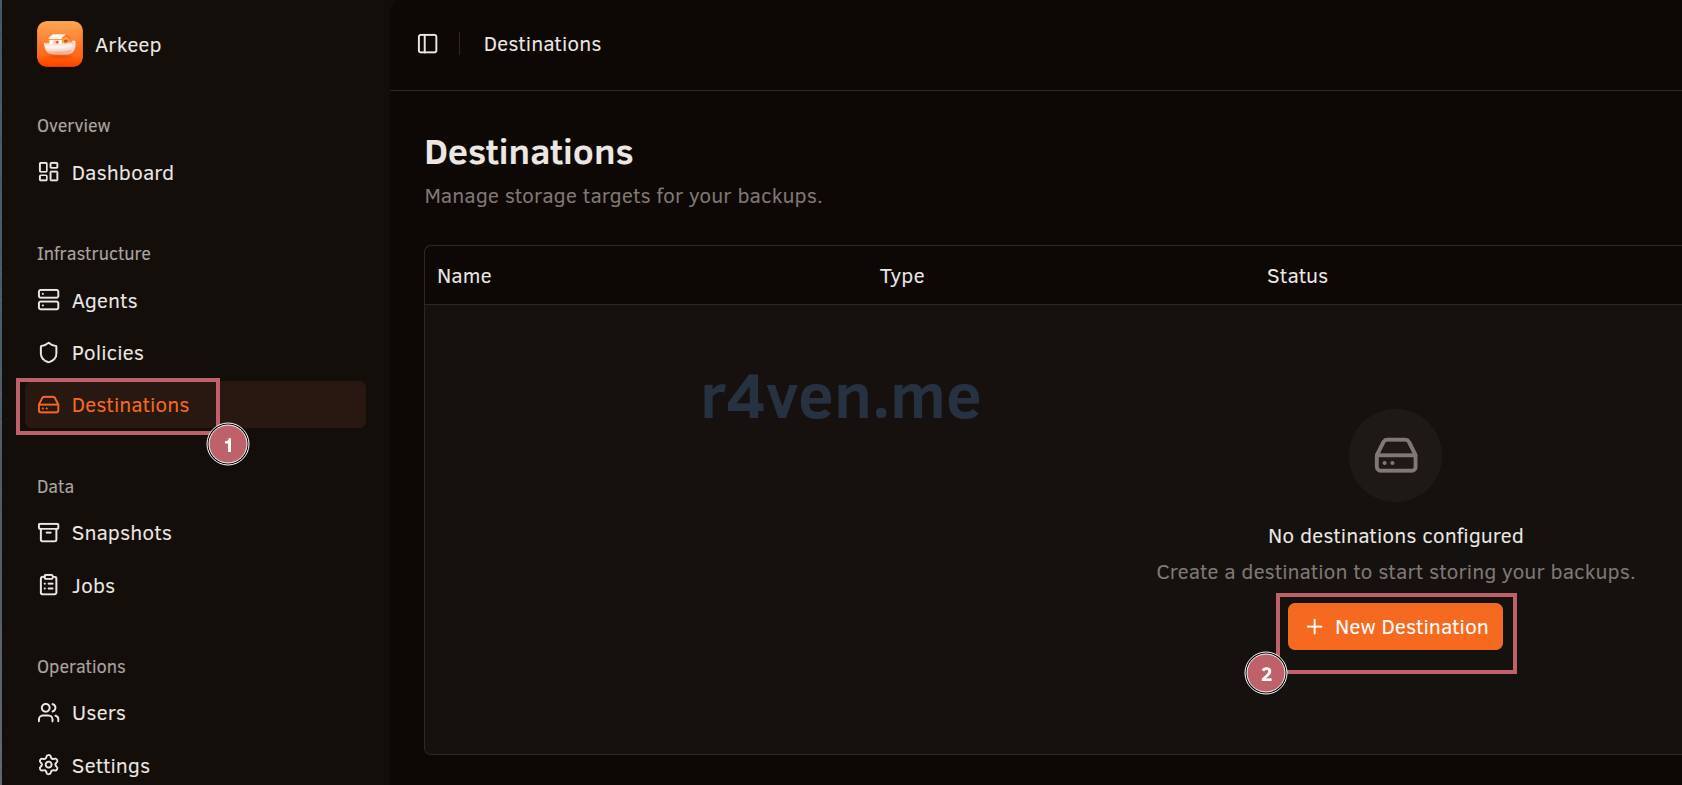
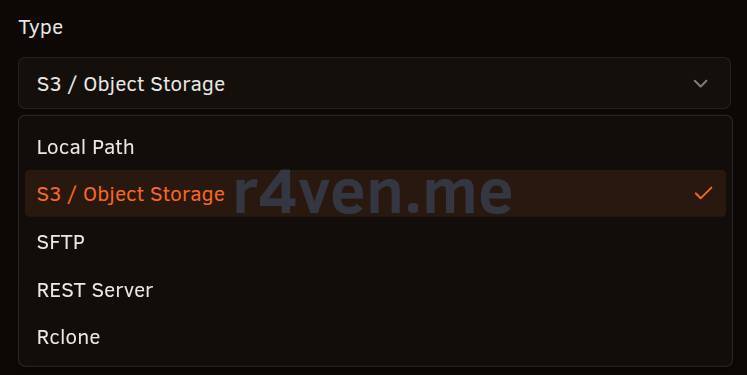
Click “New Destination”, in the “Type” parameter specify the desired storage type, in our case it is “S3/Object Storage”, the bucket name, and set the connection credentials:

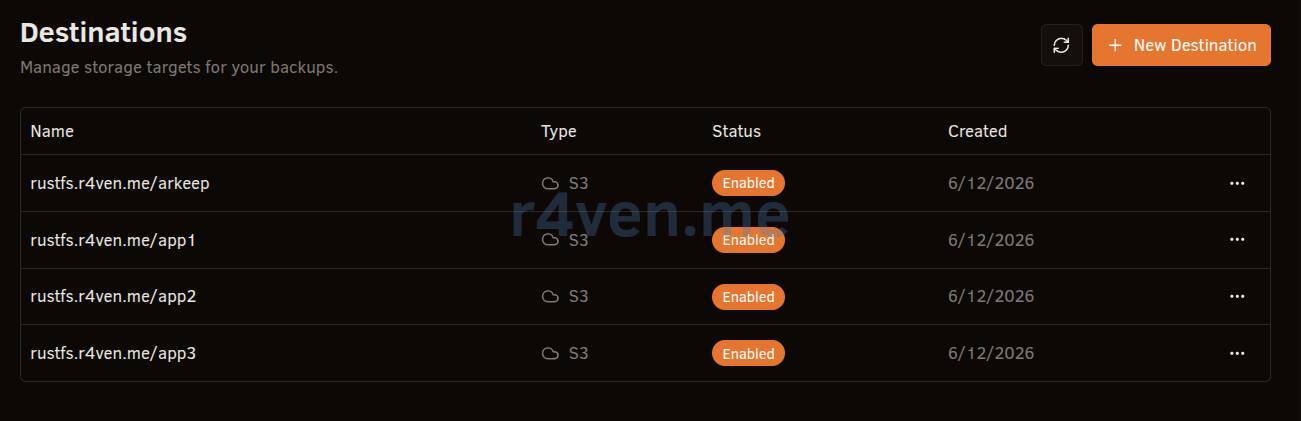
The new storage will appear in the list:
A few words about other Destination types
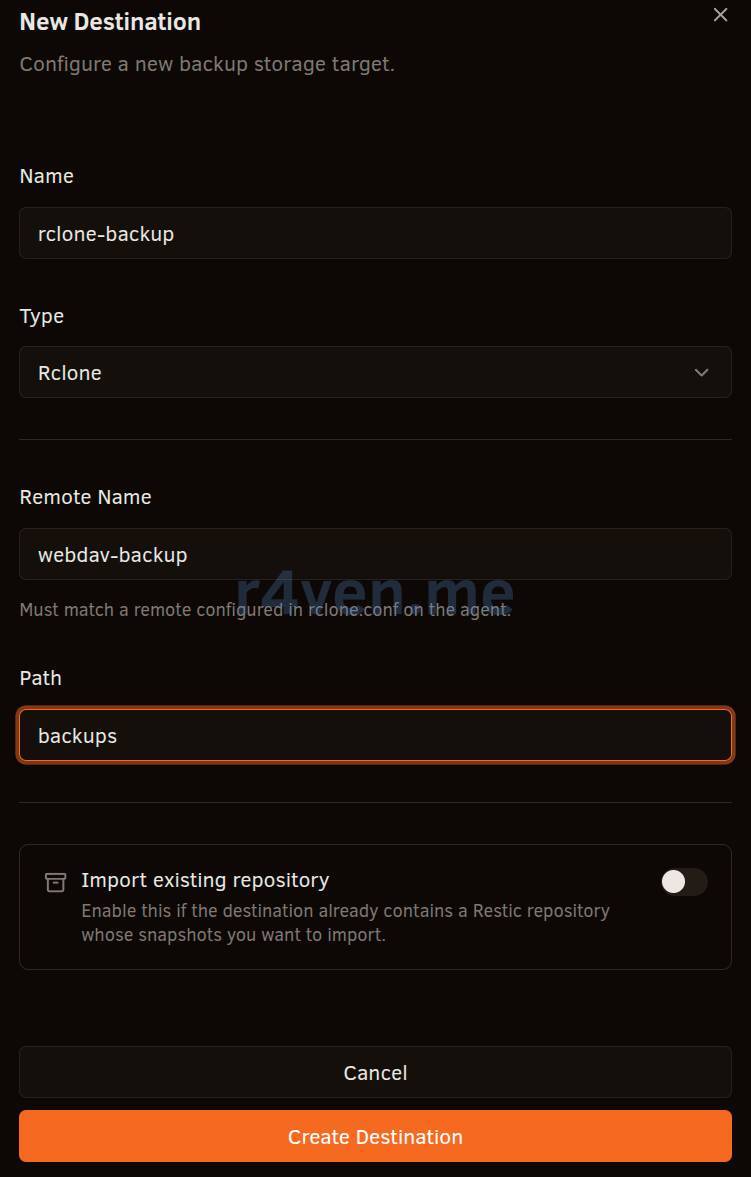
Besides S3, backups can be stored in a local directory, in a directory accessible via SFTP, on a REST Server, or in any other remote storage whose access can be configured with Rclone (and that is 40+ providers):
To use rclone in the case of arkep-agent running in Docker, you need to install rclone additionally and mount a config with the required remote storage to it. Example for WebDav:
cat > ./rclone.conf << EOF
[webdav-backup]
type = webdav
url = https://cloud.example.com/remote.php/dav/files/USER
vendor = nextcloud
user = USER
pass = OBSCURED_PASSWORD
EOFAnd the compose file will look like this:
---

services:
  arkeep_agent:
    image: ghcr.io/arkeep-io/arkeep-agent:v0.4.5
    container_name: arkeep-agent-rclone
    restart: unless-stopped
    hostname: arkeep-agent-rclone
    env_file: ./.env
    command: sh -c 'apk add rclone; exec arkeep-agent'
    volumes:
      - ./data/:/var/lib/arkeep-agent/
      - /:/hostfs/:rw
      - /var/run/docker.sock:/var/run/docker.sock:ro
      - /var/lib/docker/volumes/:/var/lib/docker/volumes/:ro
- ./rclone.conf:/root/.config/rclone/rclone.conf:roIn the “Destination” settings in the Arkeep panel, you will need to specify the backup type - “Rclone” and, optionally, the storage directory path:
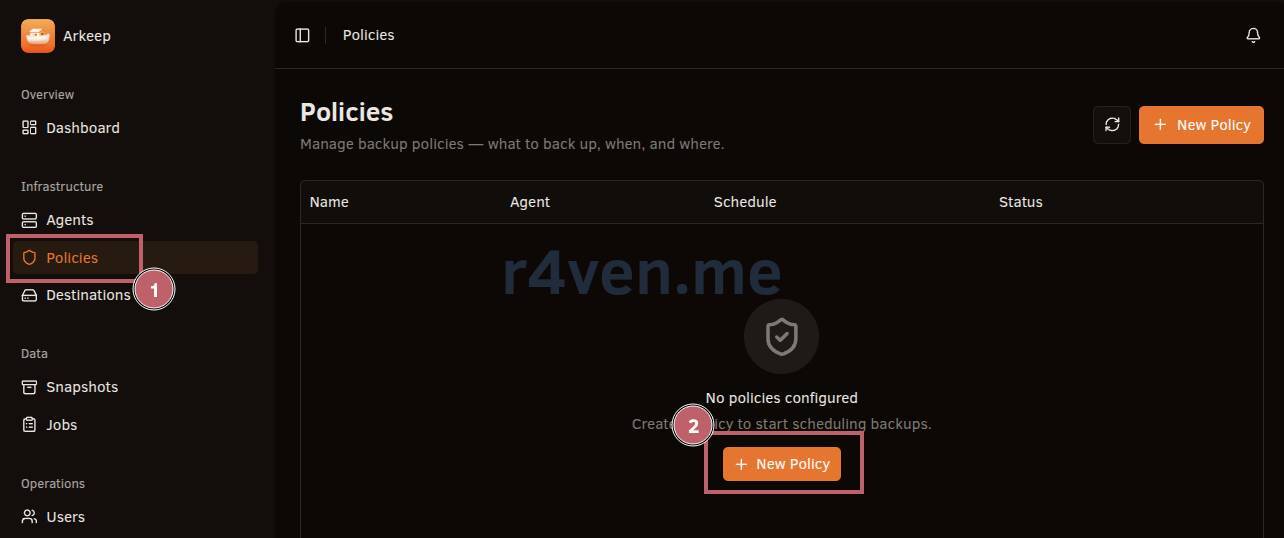
Adding a Policy
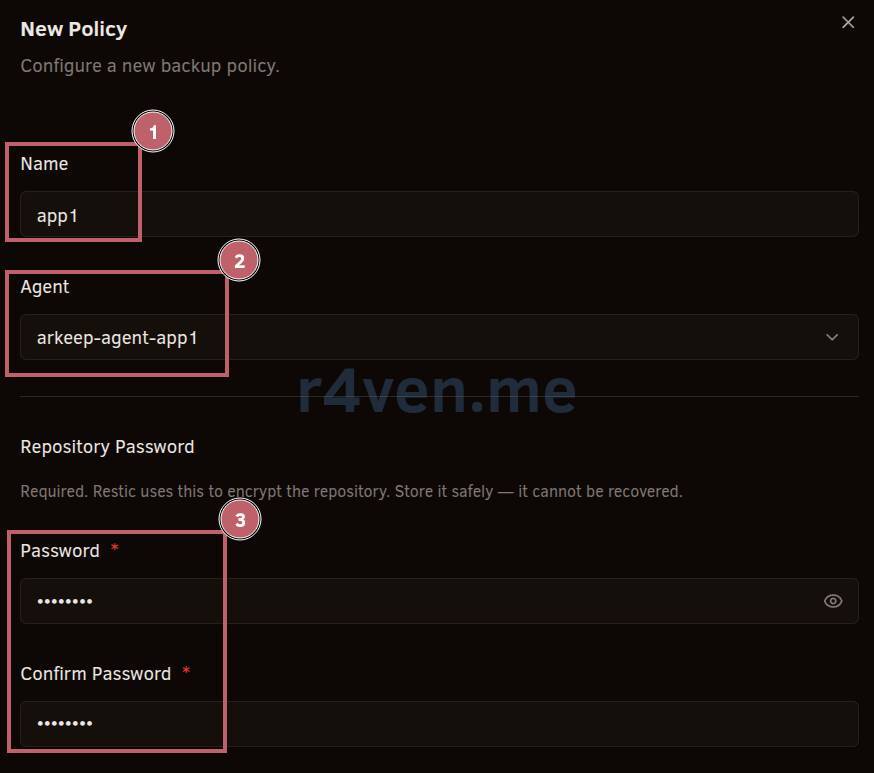
Next, configure a policy, or more precisely a backup job. Go to “Policies” and click “New Policy”:
Here, specify all required parameters: job name, agent, and password for encrypting files in the remote storage:
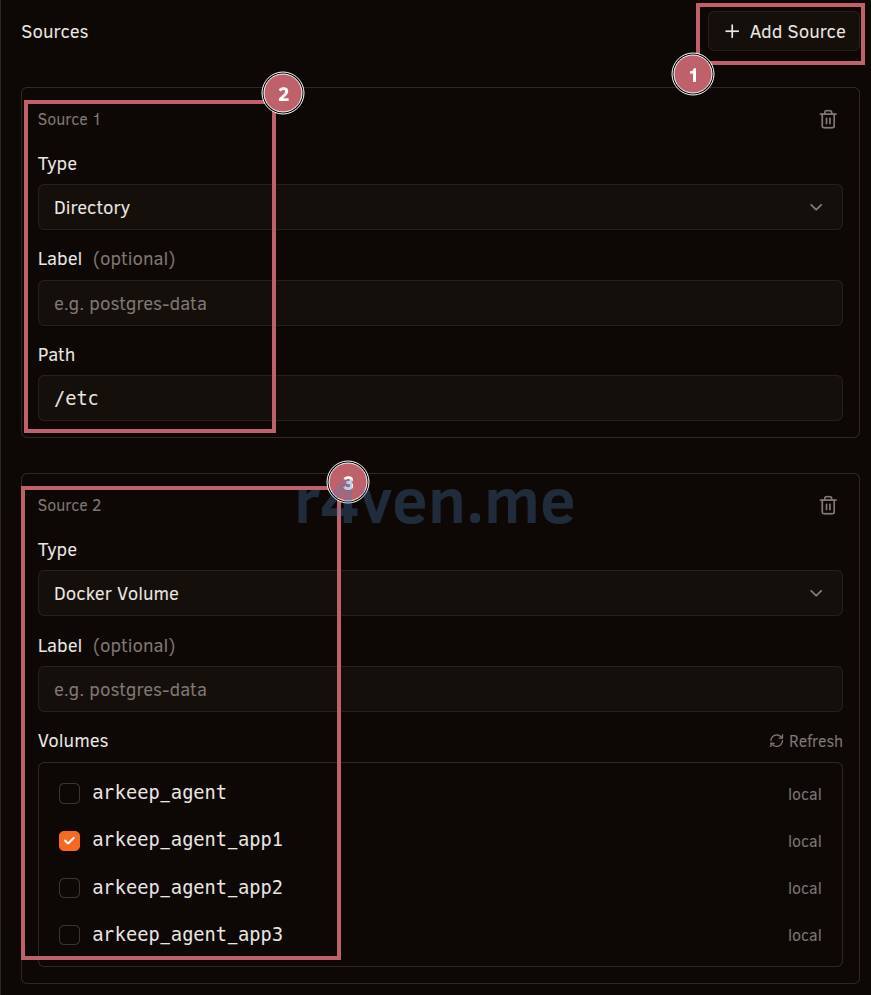
Next, specify the backup sources: in our example, we will back up the /etc directory and the Docker volume of the Arkeep agent on the app1.r4ven.me host:
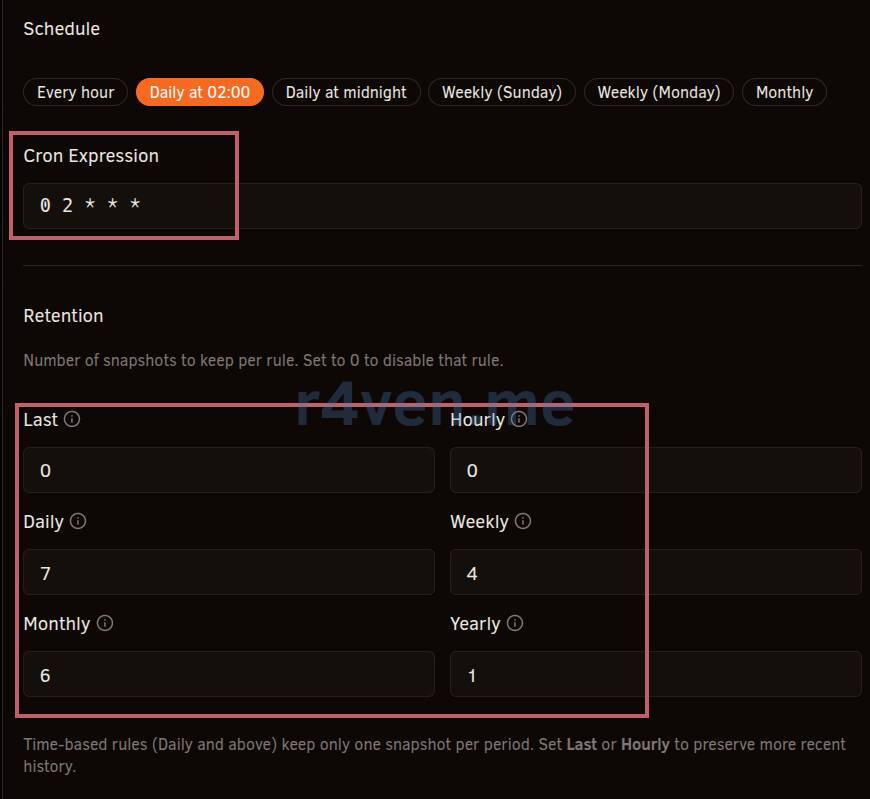
Next, configure the job execution schedule in crontab format, as well as the retention time and the number of backups:
💡 Tip
If you do not understand the Crontab format well, I recommend this excellent interactive site for calculating execution time.
At the very end, select the remote storage (our S3) and set exclusions if needed:
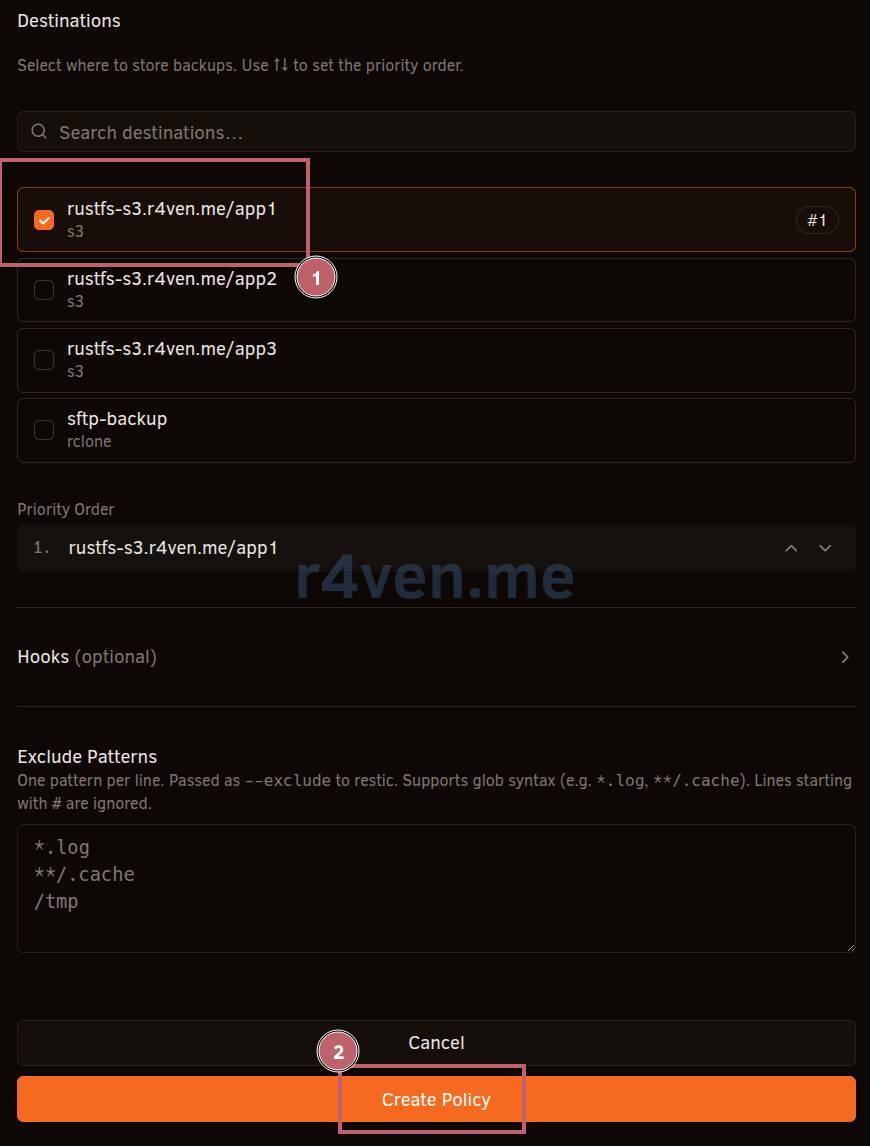
Starting a backup

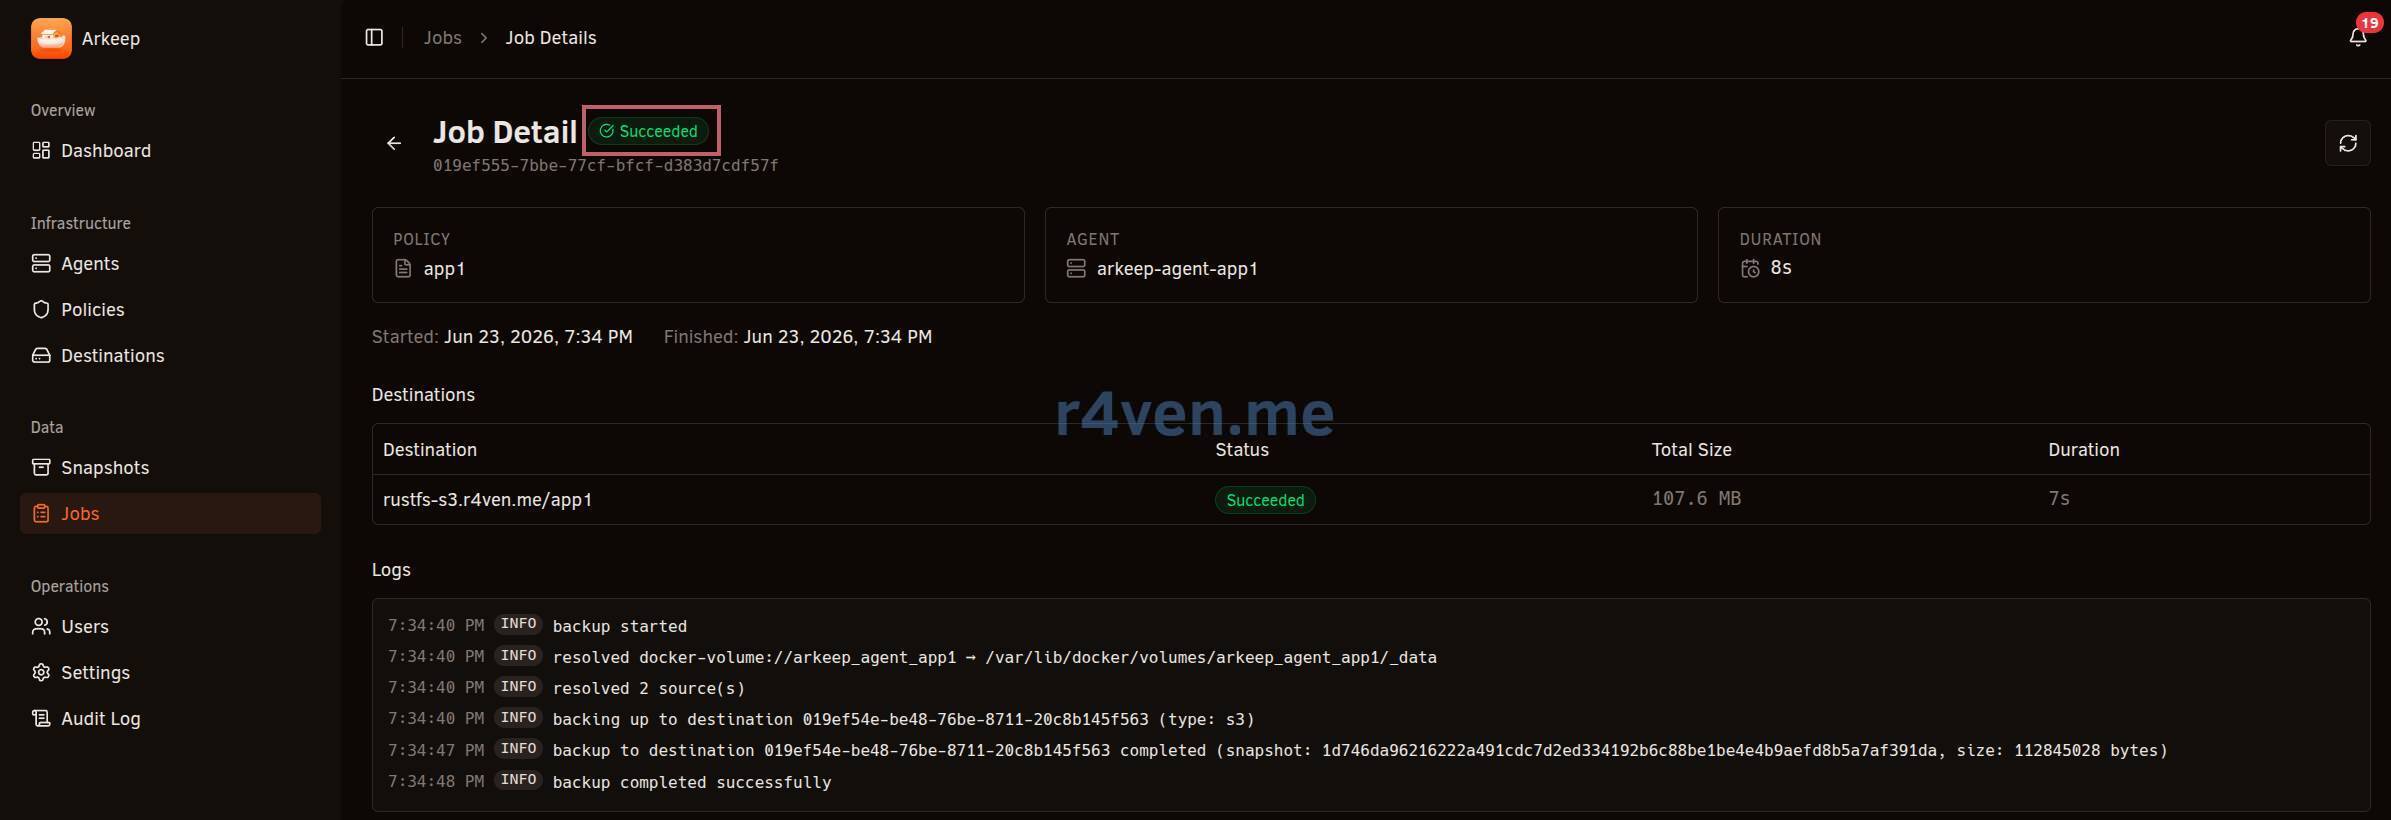
To check functionality, try running the backup job we created manually:

Success:
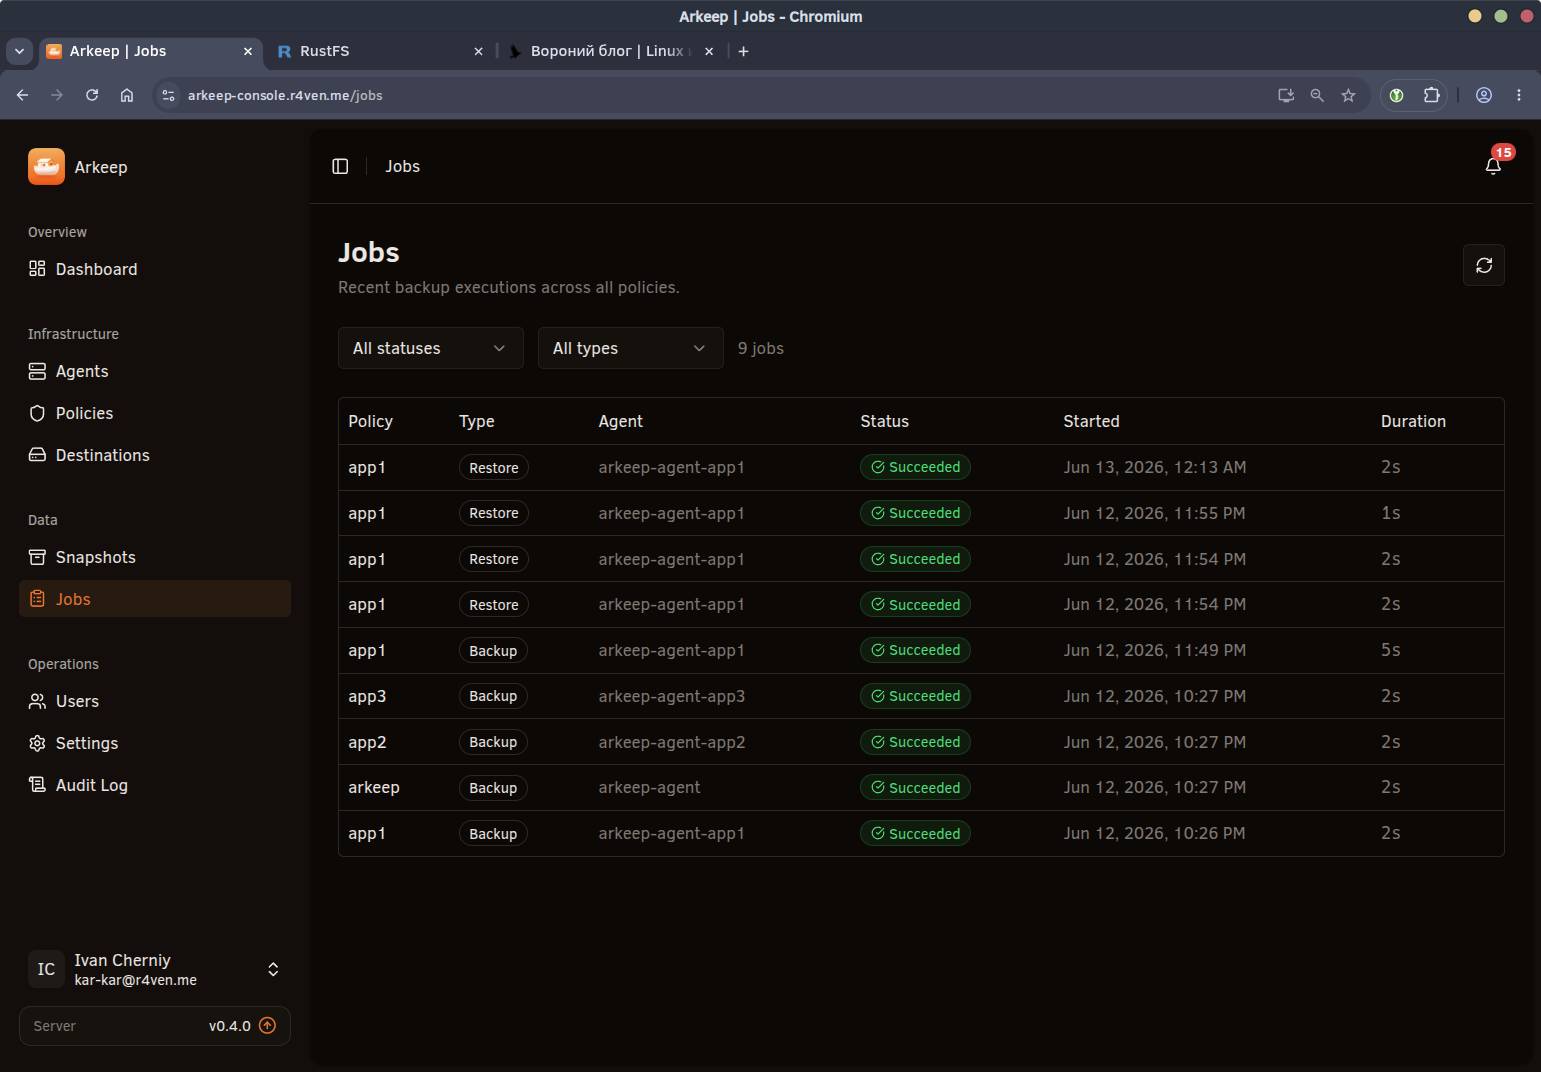
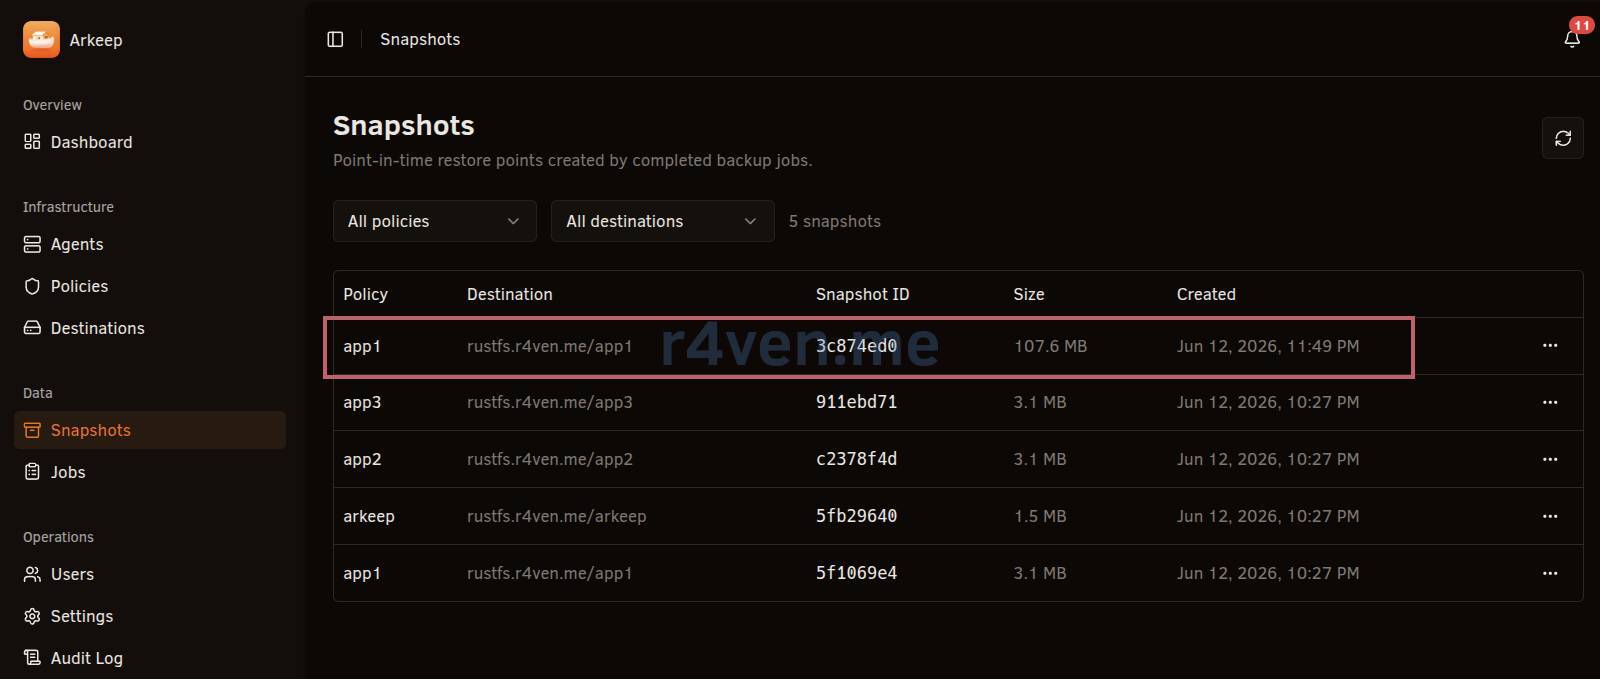
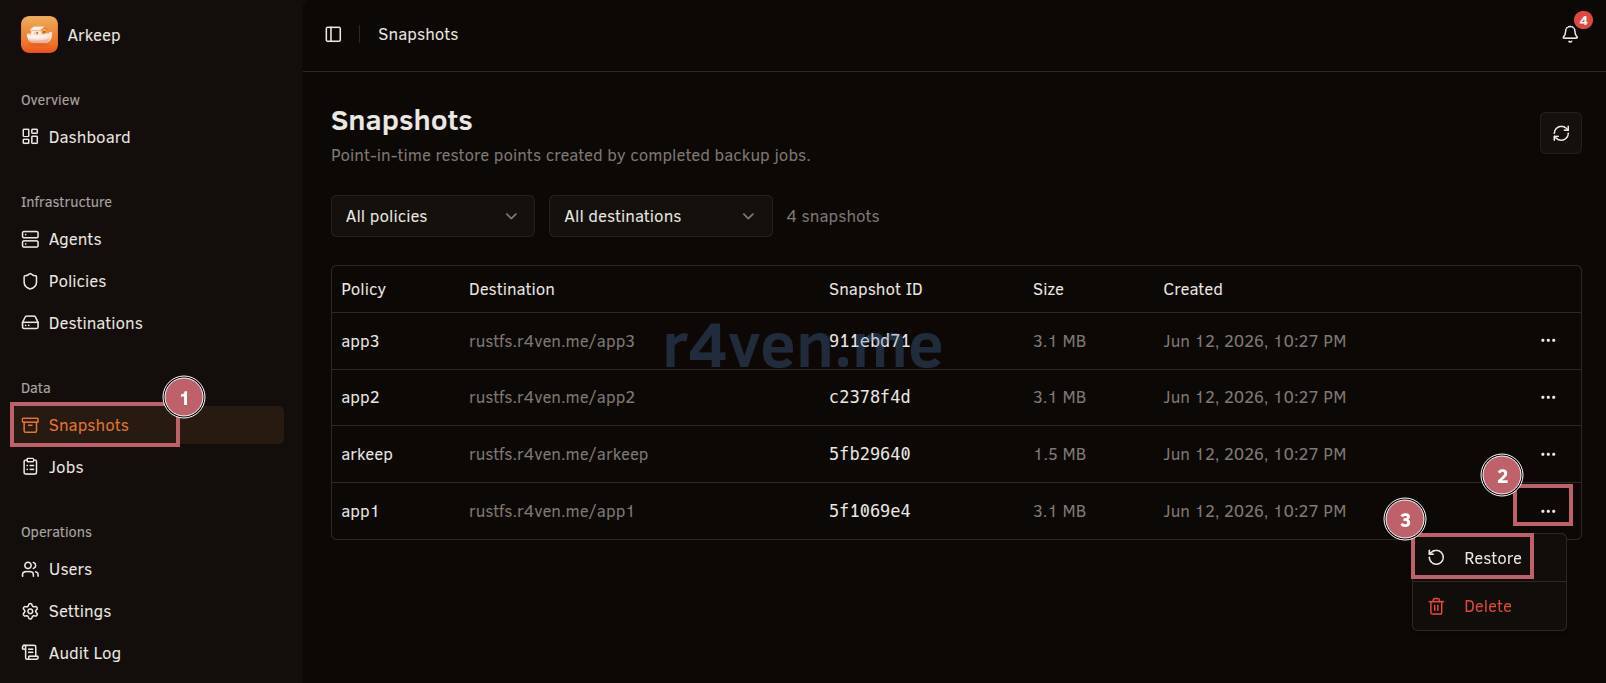
A new backup will appear in the “Snapshots” section:
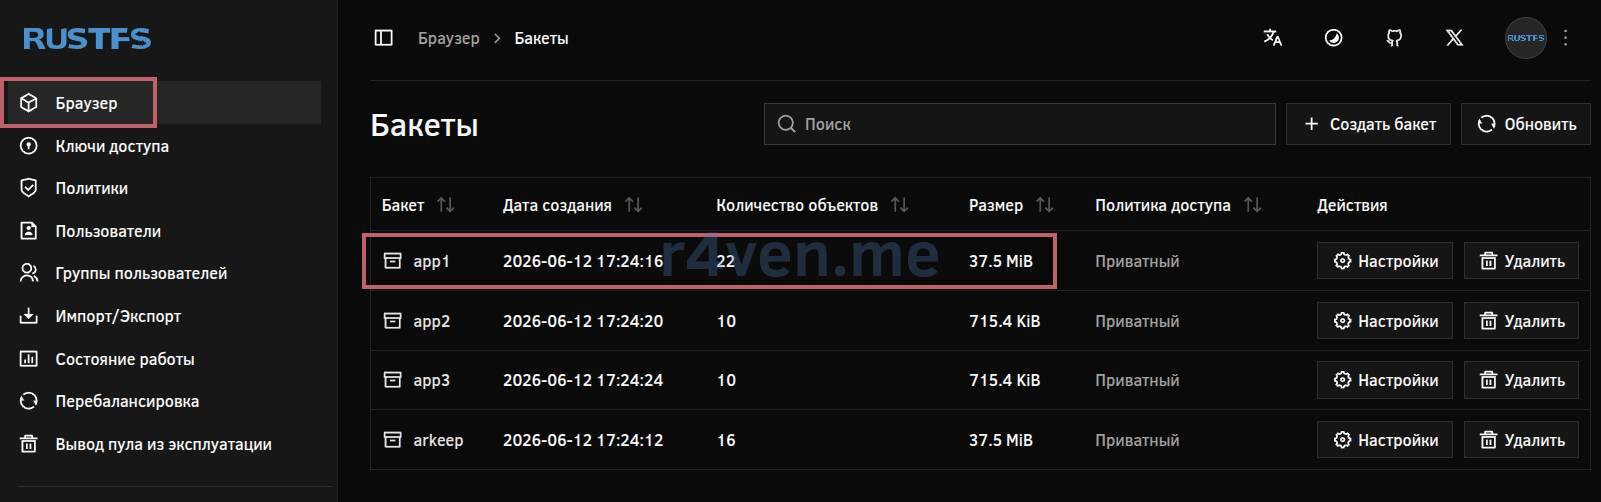
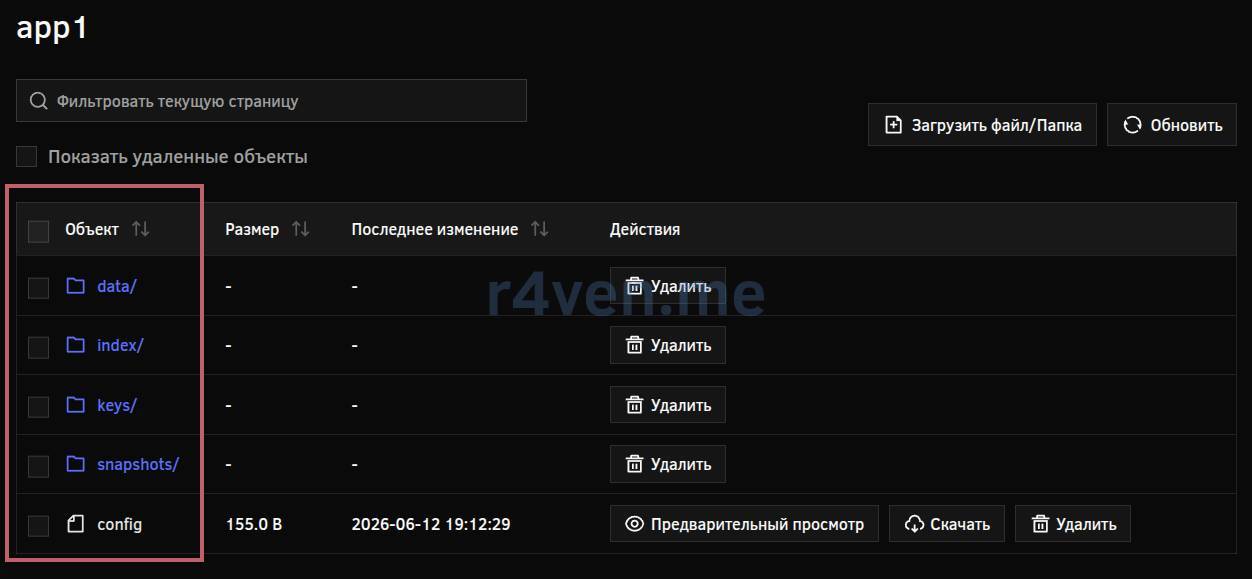
In our S3 rustfs.r4ven.me, you will be able to see the Restic repository files:
Restoring from backup
As mentioned earlier, by default the host filesystem is mounted in read-only mode.
In compose.yaml, this place is marked like this: :ro for backup-only; change to :rw to also restore to local paths.
volumes:
- /:/hostfs:roTo allow the agent to write to the host filesystem, change the parameter above to:
volumes:
- /:/hostfs:rwAnd restart the agent:
systemctl restart arkeep-agentOr mount a separate directory with write access.
Go to the “Snapshots” section, select the suitable one, then the three dots and “Restore”:
Here we have two restore modes to choose from:
- Custom path
- Original path
Let’s look at each of them.
Custom path
In this option, we also have a choice: restore everything to the specified directory - we explicitly set our own path in the host filesystem (without hostfs) where we will restore files from the backup, or restore individual files - here you can select individual files/directories and restore only them.
- Restore everything to the specified directory
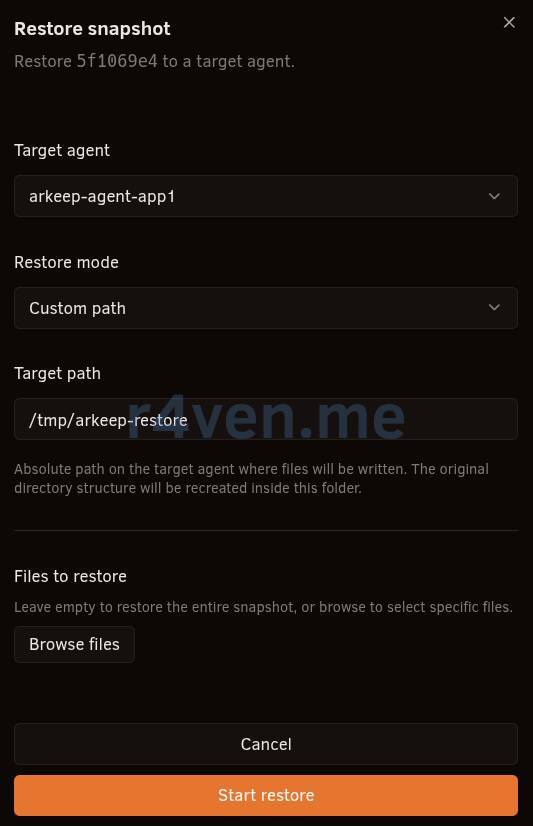
- Restore individual files
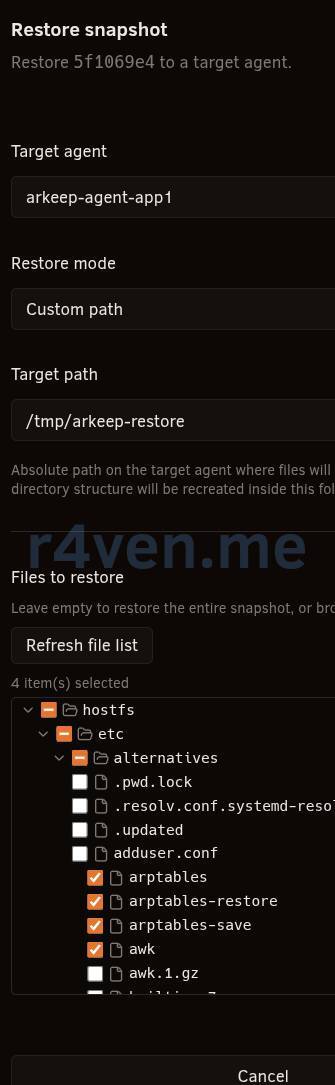
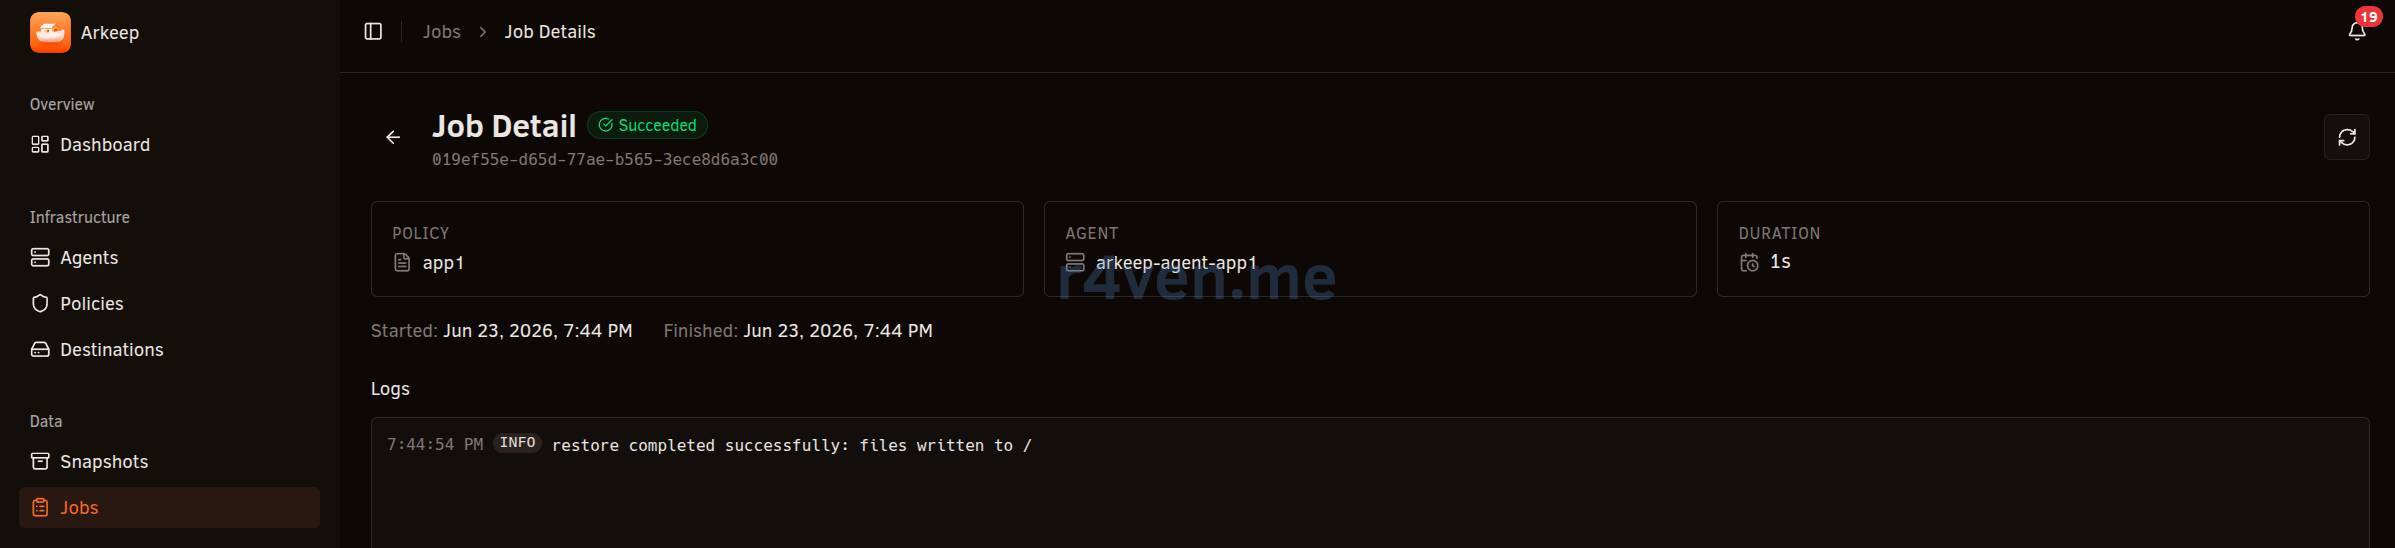
To start the restore, click “Start restore”. On success, we will see:
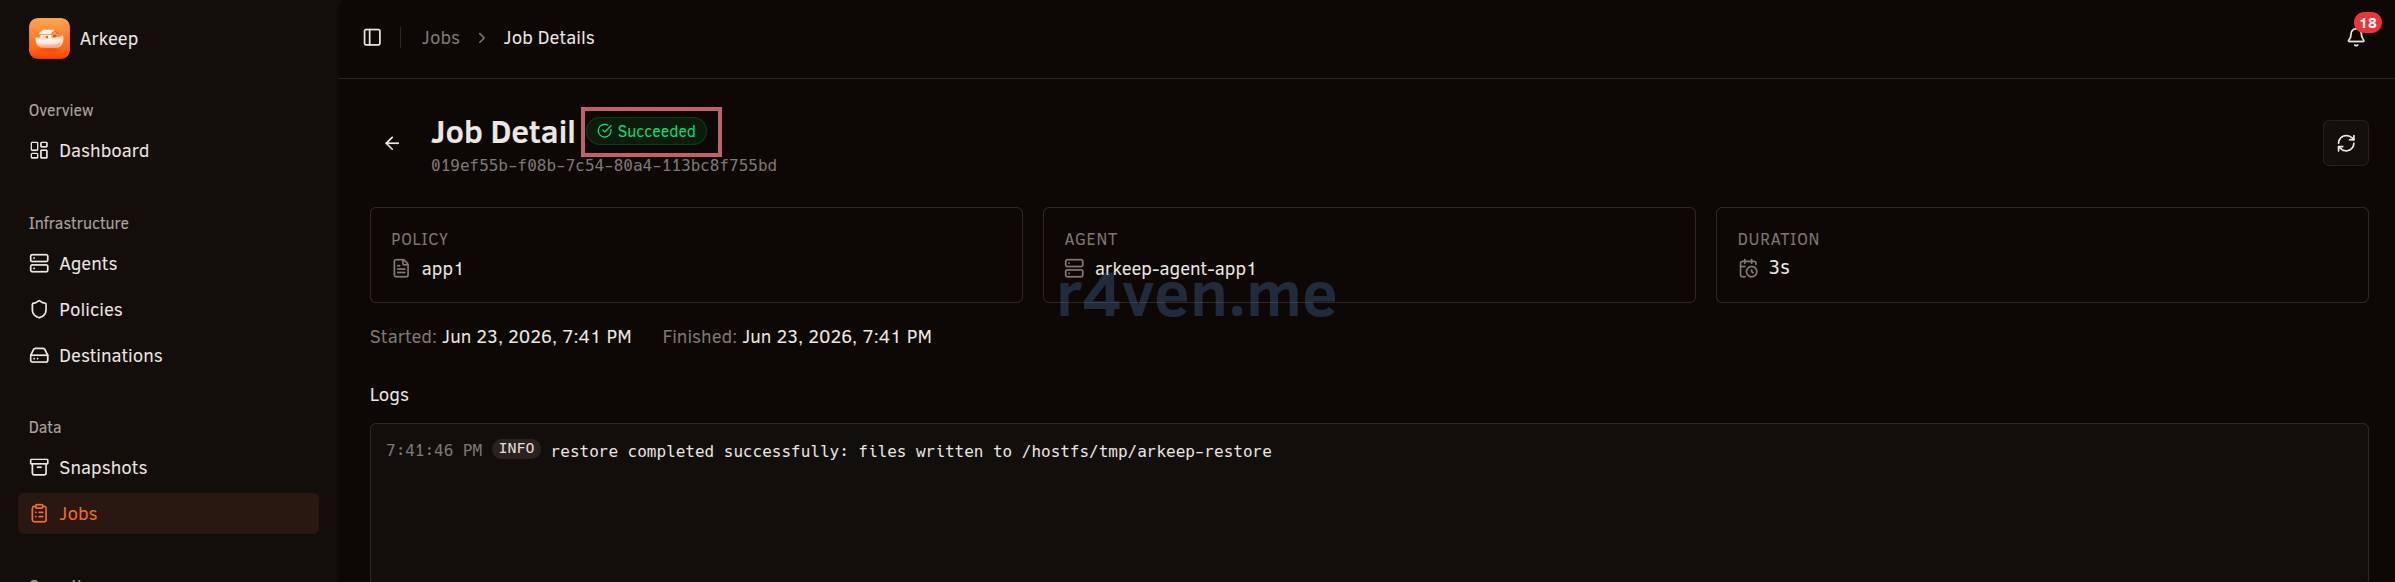
Check in the host filesystem:
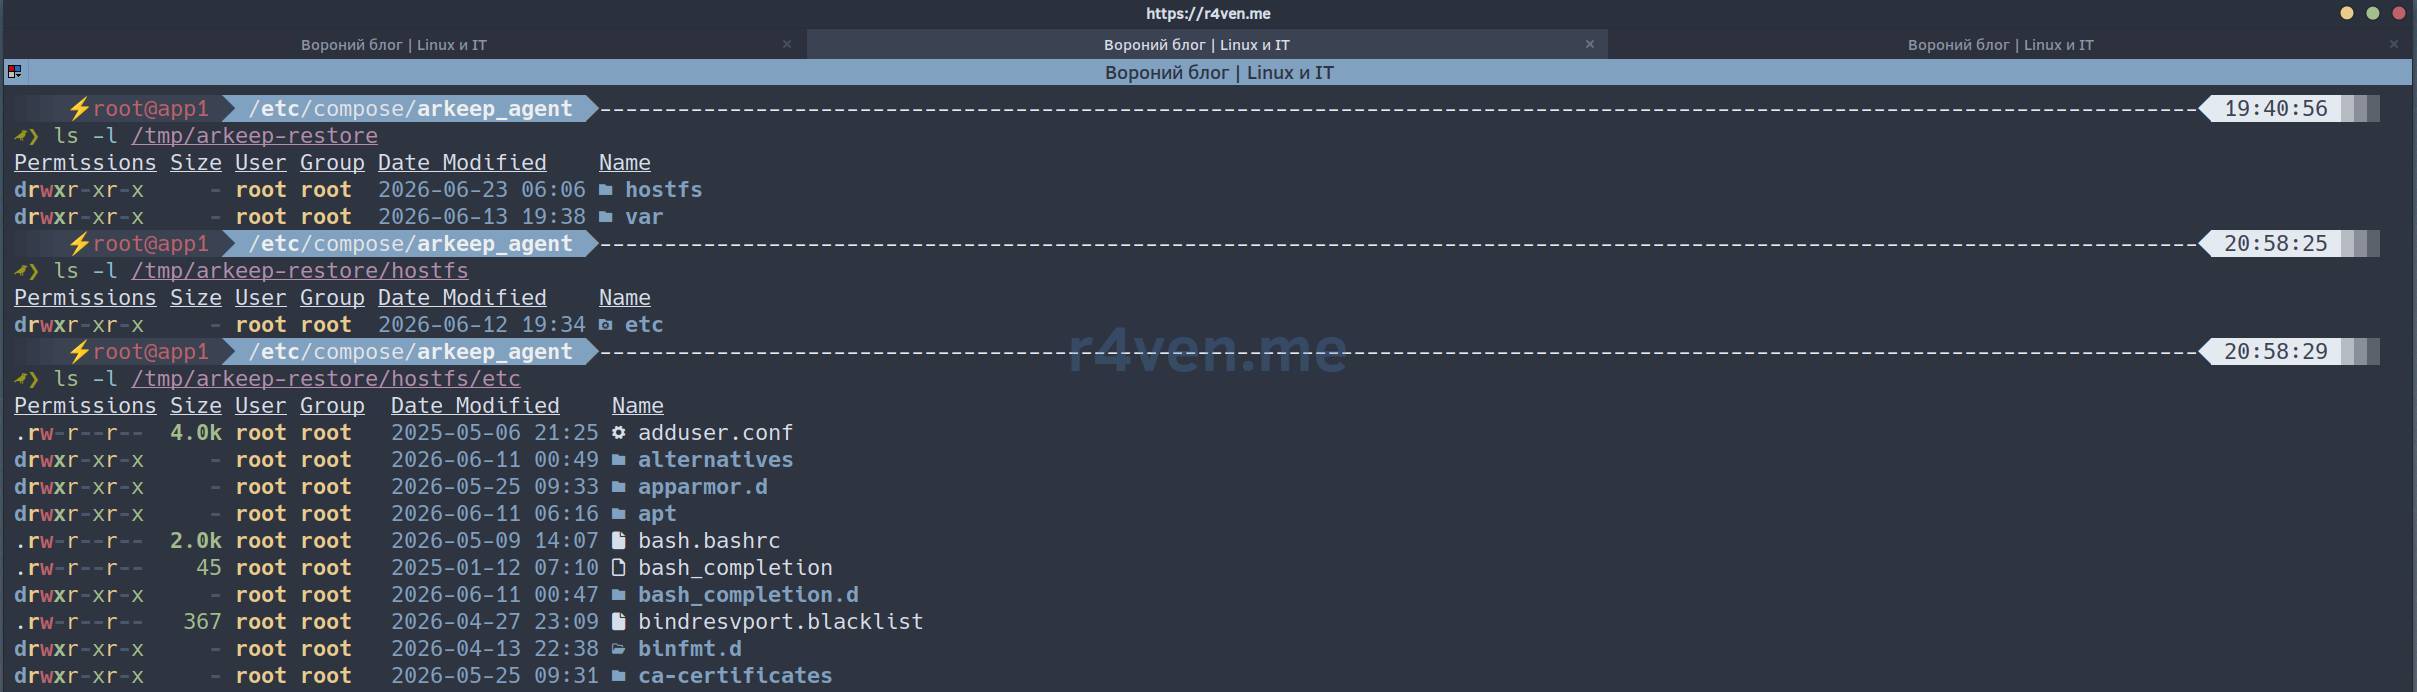
Excellent!
Original path
When using the “Original path” restore mode, files from the backup will be restored to the original path where they were located at backup time. This procedure may “overwrite” files changed after the backup. Which is what we are warned about:
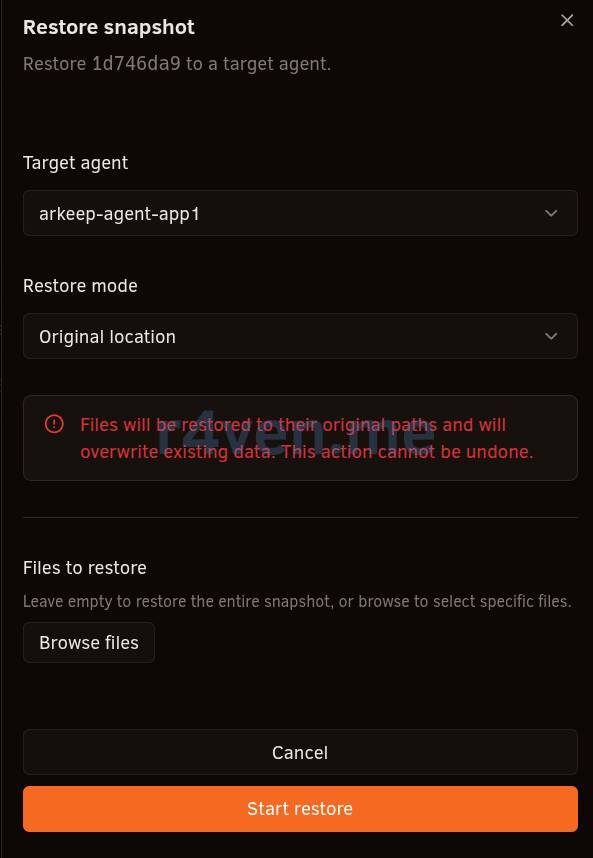
Start the restore and… success:
Possible problems
While studying Arkeep, I encountered some problems/errors. I will list them here, maybe it will be useful for someone.
- read only filesystem
Most often, you may encounter exactly this error:
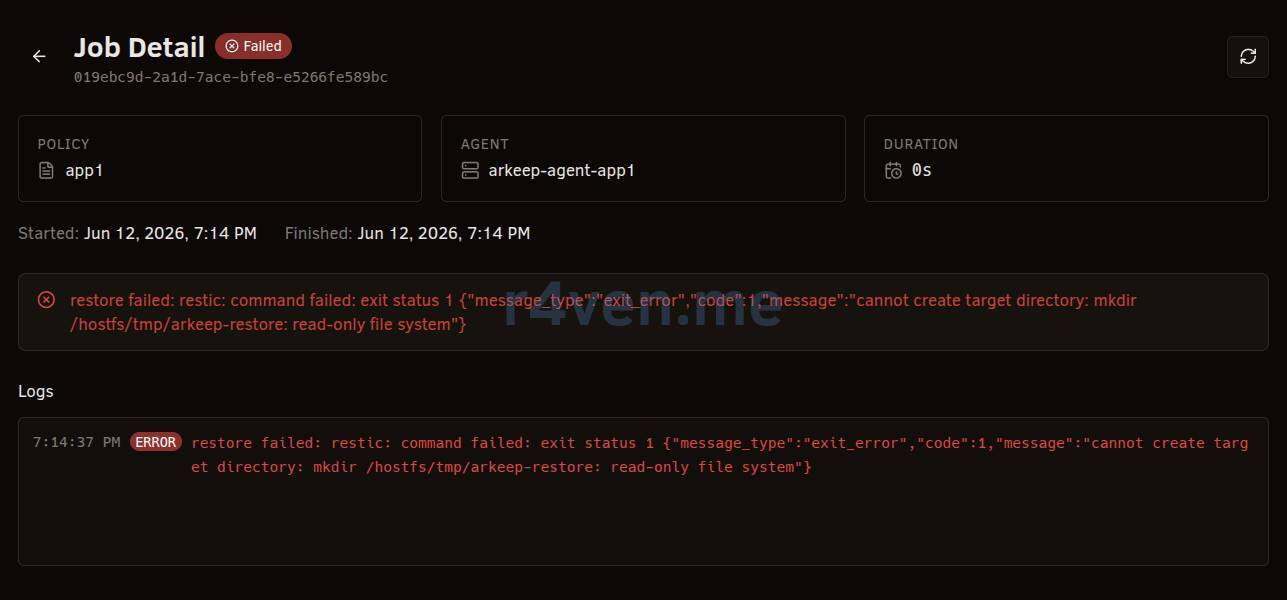
As stated in the message, the destination directory is not writable. I talked about this point earlier, at the beginning of the restore from backup step.
- enrollment failed
When connecting agents:
arkeep-agent-app1 | {... "msg":"enrollment failed — check --server-http-addr and --agent-secret","error":"enroll: server returned 405 Method Not Allowed" ...}The message enrollment failed — server returned 405 Method Not Allowed appears because the agent tries to perform automatic client certificate issuance (enrollment) through the HTTP API, but the server has ARKEEP_GRPC_INSECURE=true enabled, where this mechanism is not used.
The error can be ignored if after it the agent successfully connects to the server over gRPC, which is confirmed by the registered with server and job stream open messages. At the same time, the connection between the agent and the server remains protected by the Angie TLS certificate on port 443, and unencrypted traffic exists only inside the server’s local Docker network.
- failed to verify certificate
tls: failed to verify certificate:
x509: certificate signed by unknown authorityThe usual causes are:
ARKEEP_SERVER_HTTP_ADDRis not specified;the agent connects to the wrong hostname;
a self-signed reverse proxy certificate is used;
TLS was enabled/disabled only on one side.
certificate is valid for arkeep-grpc
x509: certificate is valid for arkeep-grpc, not arkeep.r4ven.meUsually it happens if:
- a container was previously started with a different hostname;
- old certificates remained;
- the public server address changed.
In this case, the easiest way is to stop the server, delete the Docker volume directory with data (if you have just deployed it), and start the container again.
The certificates will be reissued automatically.
A few words about voluntary telemetry
By default, Arkeep collects anonymous telemetry. This can be disabled, but first read the developer’s quote:
https://github.com/arkeep-io/arkeep#telemetry
Arkeep sends anonymous usage statistics once per day to help prioritize development. No personal data, backup contents, credentials, or hostnames are ever transmitted.
What is sent: a stable random instance ID, Arkeep version, OS, number of connected agents, and number of active policies.
Aggregate stats are public at: https://telemetry.arkeep.io/stats
To opt out: set
ARKEEP_TELEMETRY=falseor pass--telemetry=false.
Afterword
Overall, Arkeep seems to me like a very convenient and useful backup tool with great potential. I hope the project becomes popular and the developer has motivation to develop and improve it. The idea of using Restic and Rclone is simple and brilliant 👍.
It seems to me that the project has undeservedly few stars and forks. If you liked the tool and you have a GitHub account, please give the Arkeep repository a star ⭐.
Before writing this article, I ran my own tests on version 0.4.3. At the restore stage, I noticed one bug: when selecting the restore mode, the field was empty 🤷♂️. There was also a nuance with an incorrect “error” type message in the agent log.
As a result, I created two issues in the Arkeep repository, and the developer responded to them quite quickly, fixing the bug in the next update (at the time of writing, version 0.4.5) and moving the message to the “info” section, for which many thanks to him 🤝.
If anyone is interested in the details, here are the links:
Thanks for reading. And I will repeat once again: admins are divided into two types: those who make backups, and those who will definitely make them. All the best!