
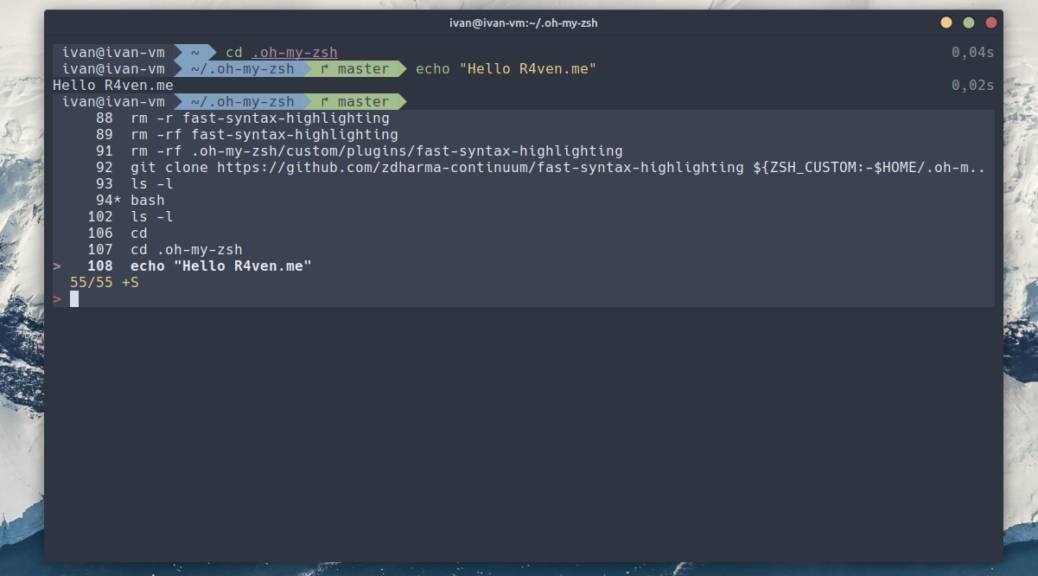
Today I’ll tell you and show you how to install and configure a great interactive command shell — Zsh. With proper configuration, this shell greatly simplifies life working in the command line and makes the process even enjoyable)
🖐️Hey!
Subscribe to our Telegram channel @r4ven_me📱, so you don’t miss new posts on the website 😉. If you have questions or just want to chat about the topic, feel free to join the Raven chat at @r4ven_me_chat🧐.
TLDR
# install Z-Shell and helper utilities
sudo apt update && sudo apt install -y zsh fzf git curl

# check that everything installed correctly on our system
whereis {zsh,fzf,git,curl}

# install Oh-My-Zsh - answer yes
sh -c "$(curl -fsSL https://raw.githubusercontent.com/ohmyzsh/ohmyzsh/master/tools/install.sh)"

# install the zsh-autosuggestions plugin
git clone https://github.com/zsh-users/zsh-autosuggestions ${ZSH_CUSTOM:-$HOME/.oh-my-zsh/custom}/plugins/zsh-autosuggestions

# install the fast-syntax-highlighting plugin
git clone https://github.com/zdharma-continuum/fast-syntax-highlighting ${ZSH_CUSTOM:-$HOME/.oh-my-zsh/custom}/plugins/fast-syntax-highlighting

# install the cmdtime plugin
git clone https://github.com/tom-auger/cmdtime ${ZSH_CUSTOM:-$HOME/.oh-my-zsh/custom}/plugins/cmdtime

# change the theme to agnoster
sed -i 's/^ZSH_THEME=.*/ZSH_THEME="agnoster"/' ~/.zshrc

# disable Oh-My-Zsh auto-updates
sed -i "s/^#.*omz:update.*disabled/zstyle ':omz:update' mode disabled/" ~/.zshrc

# enable the installed plugins
sed -i 's/^plugins=\(.*\)/plugins=\(git zsh-autosuggestions fast-syntax-highlighting fzf cmdtime\)/' ~/.zshrc
# set colors for the fzf plugin (this is all one command)
echo "export FZF_DEFAULT_OPTS=$FZF_DEFAULT_OPTS'
--color=fg:#e5e9f0,bg:#3b4252,hl:#81a1c1
--color=fg+:#e5e9f0,bg+:#3b4252,hl+:#81a1c1
--color=info:#eacb8a,prompt:#bf6069,pointer:#b48dac
--color=marker:#a3be8b,spinner:#b48dac,header:#a3be8b'\n\n\
$(cat ~/.zshrc)" > ~/.zshrc

# apply the changes made
source ~/.zshrc

# for a minimalist prompt
echo "prompt_context() [ ]" >> ~/.zshrc && source ~/.zshrc

## configuring Oh-My-Zsh for the root user

# copy our user's files into the root user's directory
sudo cp -r {~/.oh-my-zsh,~/.zshrc} /root/

# change root's default shell
sudo chsh -s /usr/bin/zsh

# switch to root to check
sudo -sPreface
Zsh (Z-Shell) is an extended command shell for Unix-like operating systems, providing additional functions and capabilities compared to a more standard shell such as Bash. Zsh supports autocompletion, extended output formatting, powerful configuration, and other advanced features to improve productivity and convenience when working with the command line.
⚠️ Warning
Please keep in mind that Zsh and Bash are two different command shells. They have significant differences both in terms of syntax and functionality. If we’re talking about simple use of standard and system utilities, you’re unlikely to notice a difference between them. But if we’re talking about using the shell’s internal mechanisms, which are usually used in scripts, then be prepared for the fact that they may require adaptation when moving between these shells.
My recommendation: use Zsh for everyday command-line work, and write all automation scripts in Bash. The truth, as usual, is somewhere in between)
If you’ve read my previous posts, you probably know that I carry out all command-line manipulations in the Linux Mint distribution environment, currently version 21, Cinnamon edition. This article’s material is no exception.
Just in case, here are a few materials on this topic:
- Initial setup of Linux Mint 20/21
- Customizing Linux Mint 20/21 + Nord theme
- Upgrading Linux Mint 20 to Linux Mint 21.1
Installing Z-Shell and helper utilities
Open a terminal and run the installation command:
sudo apt update && sudo apt install -y zsh fzf git curl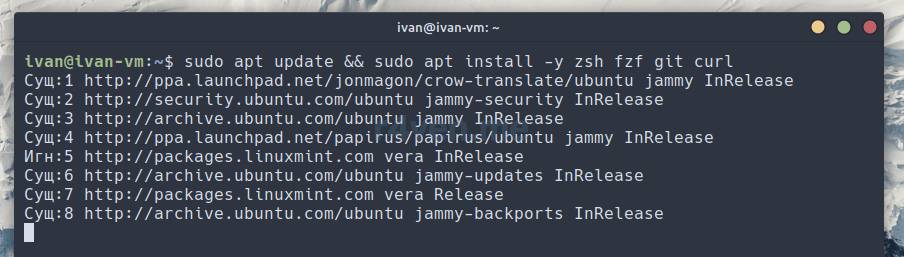
What we installed:
zsh— the shell itself;fzf— a “fuzzy” search utility (optional);git— a version control system;curl— a utility for interacting with web services.
After the command finishes, let’s check that everything installed correctly on our system:
whereis {zsh,fzf,git,curl}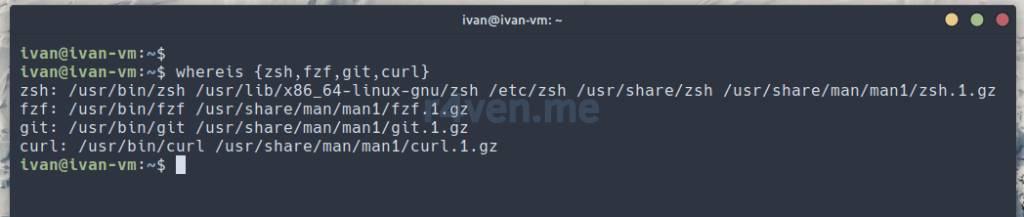
Using curly brace
{ }syntax in the Linux command line, you can specify a list of values. In this case, thewhereiscommand processes them one by one and outputs the result to standard output.
Installing a powerline font for a GUI session
For icons to render correctly in your terminal during a graphical session, you need to use a special monospace icon powerline font🤯, for example from the Nerd Fonts project.
My readers know that I prefer the Hack font ☝️. Here’s a simple example of how to install it:
📝 Note
Please note that sudo rights are required to execute these commands. Alternatively, install fonts only for the current user in the ~/.local/share/fonts directory.
# create font directory
sudo mkdir /usr/share/fonts/Hack

# download font archive
curl -fsSLO \
    $(curl -s https://api.github.com/repos/ryanoasis/nerd-fonts/releases/latest \
    | grep browser_download_url \
    | grep 'Hack.zip' \
    | cut -d  '"' -f 4)

# unpack archive, copy fonts to system
sudo unzip ./Hack.zip -d /usr/share/fonts/Hack/ && rm -f ./Hack.zip📝 Note
The curl command uses a command-line substitution mechanism. That is, the main download command: curl -fsSLO is passed an argument, which is the result of executing another command within the $(command) construct, performed beforehand. As a result, the main command will receive a direct URL to the zip file of the latest Hack font release from GitHub. The command is universal.
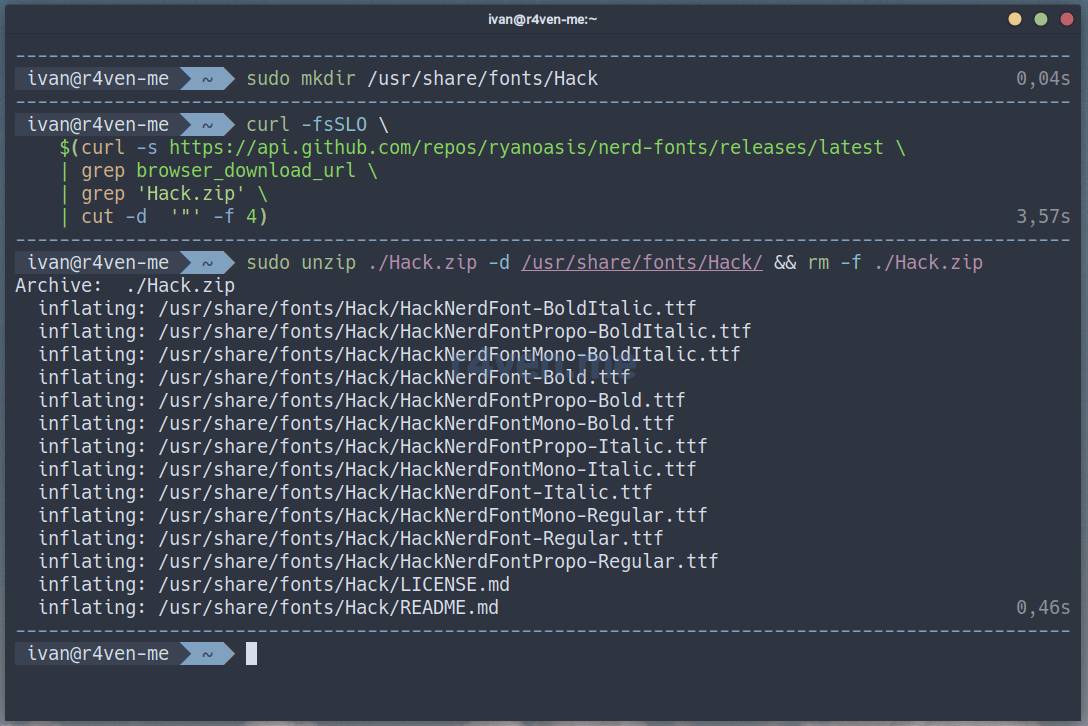
After installing the font, activate it in your terminal settings🛠.
In Gnome-terminal, this is done as follows:
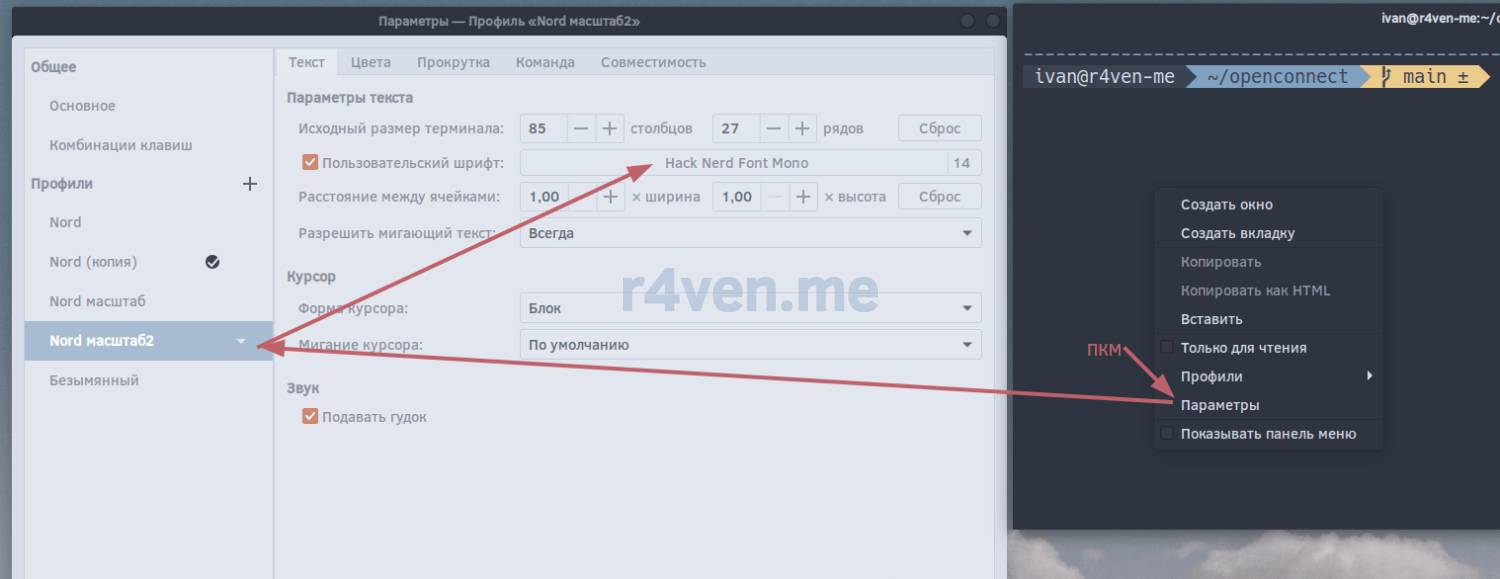
Everything’s in place, let’s move on.
Installing and configuring the Oh-My-Zsh framework
Let’s install Oh-My-Zsh, install two additional plugins, and perform the initial shell setup.
Installing Oh-My-Zsh on Linux Mint 21
So, Oh-My-Zsh is an open source project, representing a framework and set of extensions for the Zsh shell.
Why would we even need Oh-My-Zsh if we just installed Zsh? The thing is, low-level shell configuration is a rather complex process, comparable to writing software in a certain programming language. But since many people who use the Linux command line are not programmers, yet still want to leverage the shell’s potential, the developers of the Oh-My-Zsh project kindly provided the community with this opportunity.
All settings, with simple syntax, are set in a single configuration file ~/.zshrc, and the framework itself does the rest. We’ll see this below.
This framework is installed using a script, invoked with the command specified on the project’s official website: https://ohmyz.sh/
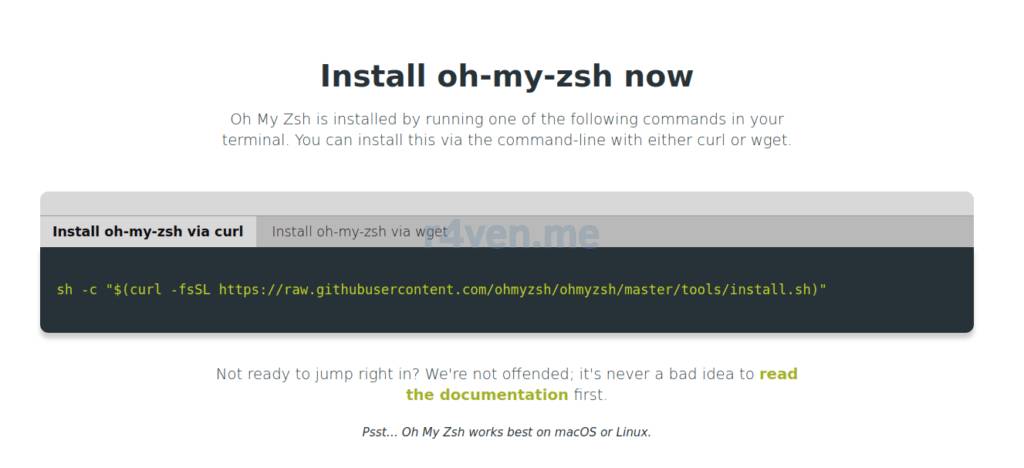
The command uses the curl utility, which we installed earlier. Run in the terminal:
sh -c "$(curl -fsSL https://raw.githubusercontent.com/ohmyzsh/ohmyzsh/master/tools/install.sh)"To view the contents of the script file, just go to: https://raw.githubusercontent.com/ohmyzsh/ohmyzsh/master/tools/install.sh
While running, you’ll be asked whether you want to change your current shell to Zsh:
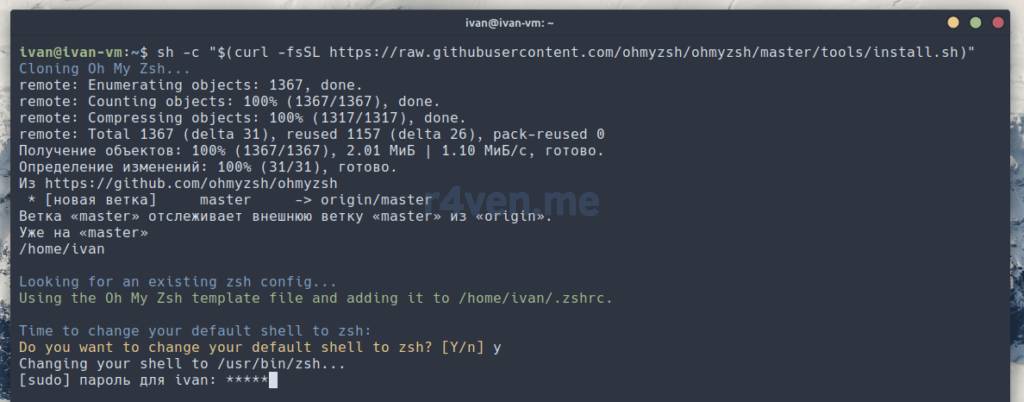
Enter y then Enter, followed by your user password and Enter again.
You’ll notice that the command line prompt has changed:

After installation, a shell configuration file .zshrc and a folder with the framework’s files .oh-my-zsh will appear in the user’s home directory:
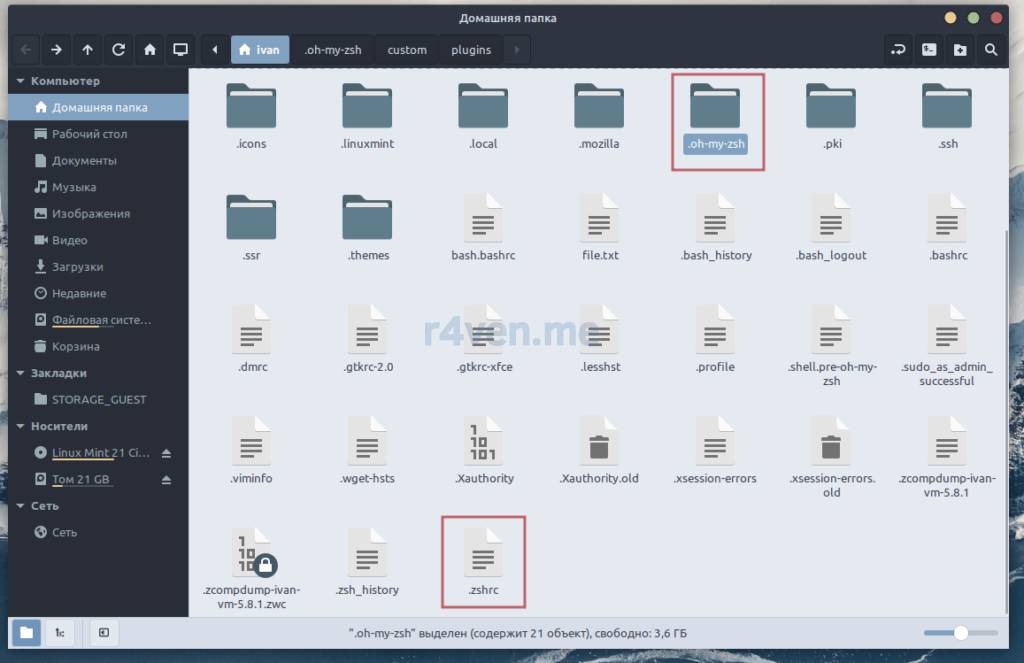
Both files are hidden
Installing plugins for dynamic highlighting, autosuggestions, and command timing
By default, Oh-My-Zsh already has many plugins. You can view their list in the ~/.oh-my-zsh/plugins directory. Let’s additionally install 3 more custom plugins for: fast dynamic syntax highlighting, smart command autosuggestions, and displaying the time spent executing a command.
Installation is done by cloning the repositories containing the plugin files using the git utility into the ~/.oh-my-zsh/custom/plugins folder. Run these 3 commands one by one in the terminal:
git clone https://github.com/zsh-users/zsh-autosuggestions ${ZSH_CUSTOM:-$HOME/.oh-my-zsh/custom}/plugins/zsh-autosuggestions

git clone https://github.com/zdharma-continuum/fast-syntax-highlighting ${ZSH_CUSTOM:-$HOME/.oh-my-zsh/custom}/plugins/fast-syntax-highlighting

git clone https://github.com/tom-auger/cmdtime ${ZSH_CUSTOM:-$HOME/.oh-my-zsh/custom}/plugins/cmdtime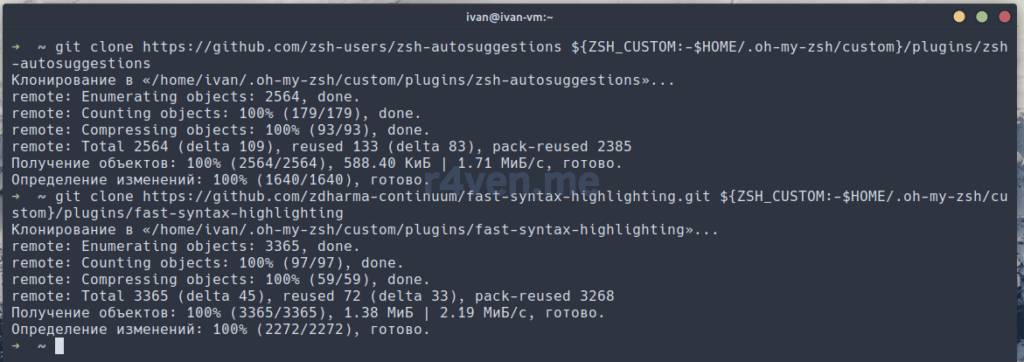
Editing the .zshrc configuration file
Now let’s configure our Zsh a bit. Open the configuration file ~/.zshrc for editing with any editor convenient for you. For example, xed:
xed ~/.zshrcFor convenience, enable syntax highlighting display for this file:
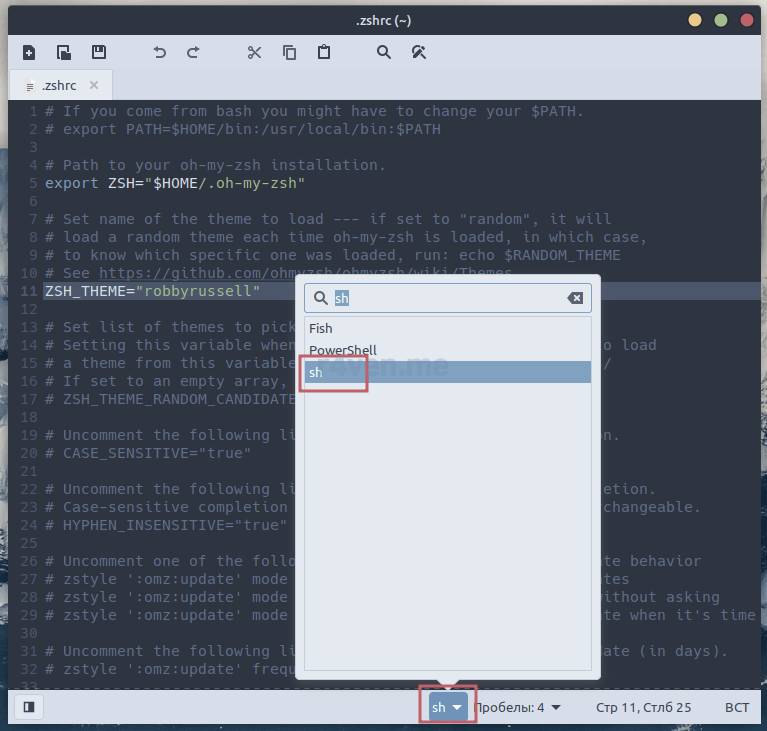
For variety, I’ll edit the file in vim:
vim ~/.zshrcBy the way, I recently made an introductory article about vim (: VIM — Console Editor: An Introduction
In the file, edit the lines indicated below.
- Change the theme:
# Change from:
ZSH_THEME="robbyrussell"

# to:
ZSH_THEME="agnoster"
You can view the list of available themes in the
~/.config/oh-my-zsh/themesdirectory.You can view a preview of each theme in the official GitHub repository of the developers: https://github.com/ohmyzsh/ohmyzsh/wiki/Themes
- Disable Oh-My-Zsh auto-updates:
# Uncomment the line:
zstyle ':omz:update' mode disabled
- Specify the list of plugins:
# Find the plugins parameter and set it to:
plugins=(git zsh-autosuggestions fast-syntax-highlighting fzf cmdtime)
Save the contents and apply the changes made with a special command:
source ~/.zshrcOur shell’s prompt has changed:
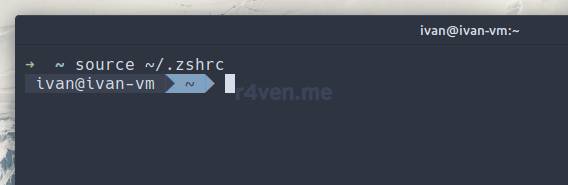
To fully apply the changed shell settings, I recommend logging back into your user account on your desktop.
If you want to get a separator bar, like here for example:
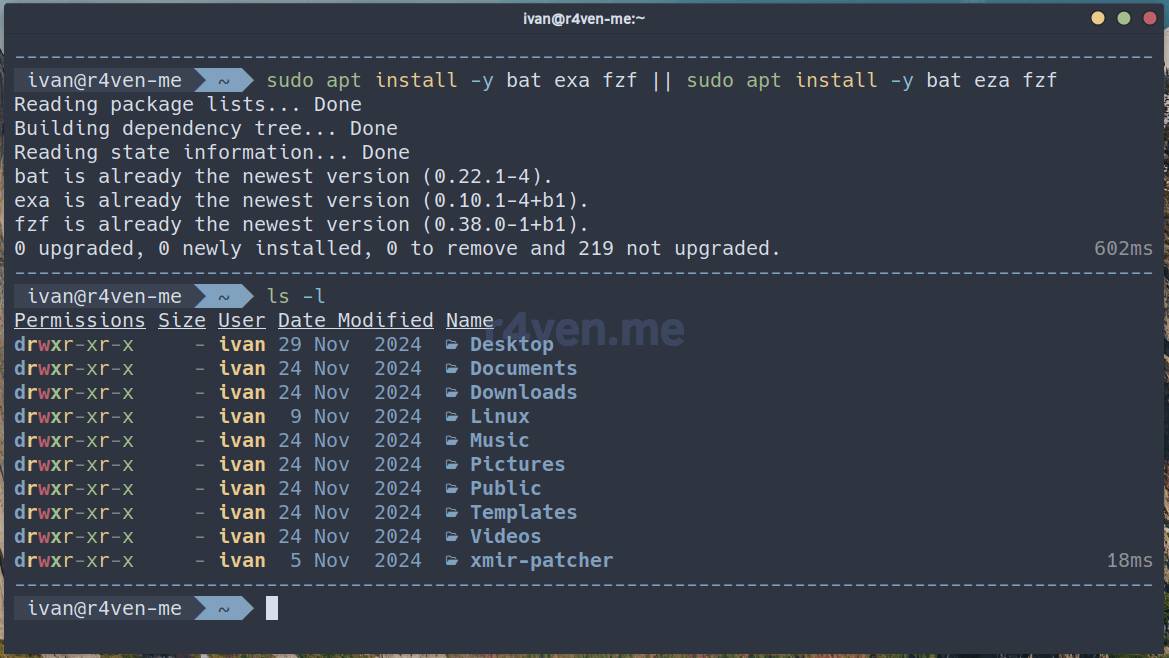
Then click the spoiler)
Install the modified agnoster theme file from my GitHub:
curl -fsSL https://raw.githubusercontent.com/r4ven-me/dots/main/.config/oh-my-zsh/custom/themes/agnoster-r4ven.zsh-theme \
-o $ZSH/custom/themes/agnoster-r4ven.zsh-themeThen in .zshrc you need to change the value of the ZSH_THEME variable to:
ZSH_THEME="agnoster-r4ven"I took the bar’s code from the neighboring theme af-magic, adapting it a bit🙃
This specific block/function is responsible for it:
function afmagic_dashes {
  # check either virtualenv or condaenv variables
  local python_env_dir="${VIRTUAL_ENV:-$CONDA_DEFAULT_ENV}"
  local python_env="${python_env_dir##*/}"

  # if there is a python virtual environment and it is displayed in
  # the prompt, account for it when returning the number of dashes
  if [[ -n "$python_env" && "$PROMPT" = *\(${python_env}\)* ]]; then
    echo $(( COLUMNS - ${#python_env} - 3 ))
  else
    echo $COLUMNS
  fi
}And inside the build_prompt function, add the line echo "${FG[004]}${(l.$(afmagic_dashes)..-.)}%{$reset_color%}", so it looks like this:
build_prompt() {
  RETVAL=$?
  echo "${FG[004]}${(l.$(afmagic_dashes)..-.)}%{$reset_color%}"
  prompt_status
  prompt_virtualenv
  prompt_aws
  prompt_context
  prompt_dir
  prompt_git
  prompt_bzr
  prompt_hg
  prompt_end
}Demonstration of Zsh + Oh-My-Zsh in action
For demonstration, let’s run the command:
ls -l Документы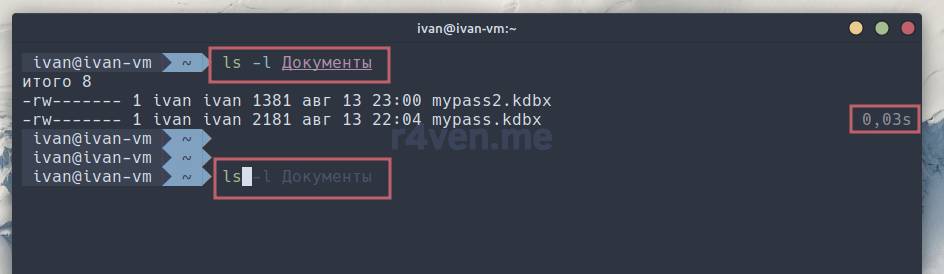
Here you can see:
- The whole command has syntax highlighting (the fast-syntax-highlighting plugin);
- After the command finishes, the time spent executing it is displayed on the right (the cmdtime plugin);
- When you start typing a command that was already entered before, the shell suggests a hint in a dim color (the zsh-autosuggestions plugin). Pressing the right arrow key will complete the command. The shell takes the data for completion from the history file:
~/.zsh_history.
A separate feature of Zsh is the completion mechanism when pressing the Tab key. For example, enter the command ls, then a space, and press Tab several times:
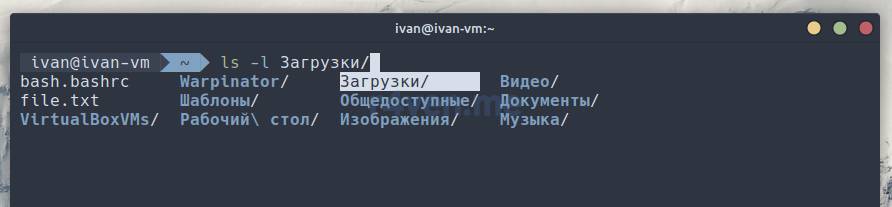
The shell lets you switch between the possible options, and when the one you need is highlighted, pressing Enter inserts it into the command line. Isn’t that lovely)
Also, by default, Zsh visually displays the result of the previous command’s execution:
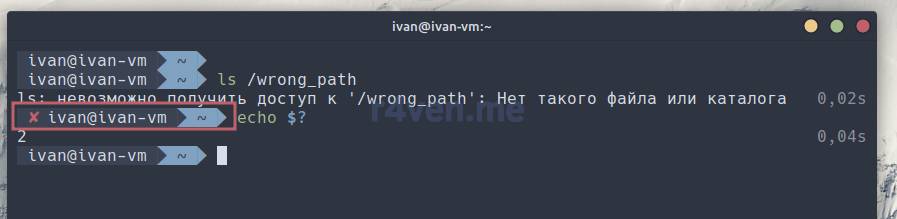
A red cross indicates an error
Also enabled out of the box is the git plugin. If you use a version control system, this plugin will incredibly simplify your life)
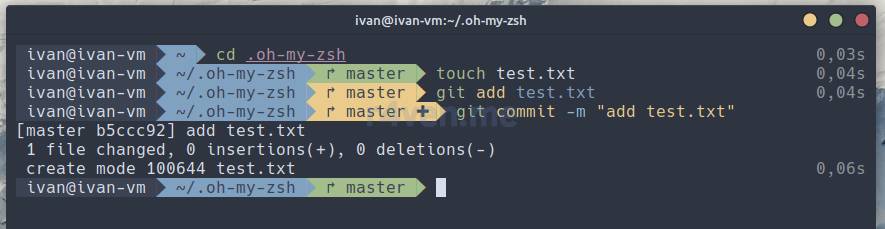
About the fzf utility and its plugin for Oh-My-Zsh
FZF (Fuzzy Finder, “fuzzy” homie finder) is a powerful command-line tool that provides the ability to quickly and intuitively search for files, directories, and other items in the terminal.
If you type the command of the same name in the terminal, “fuzzy” search mode for the current directory is activated:
fzf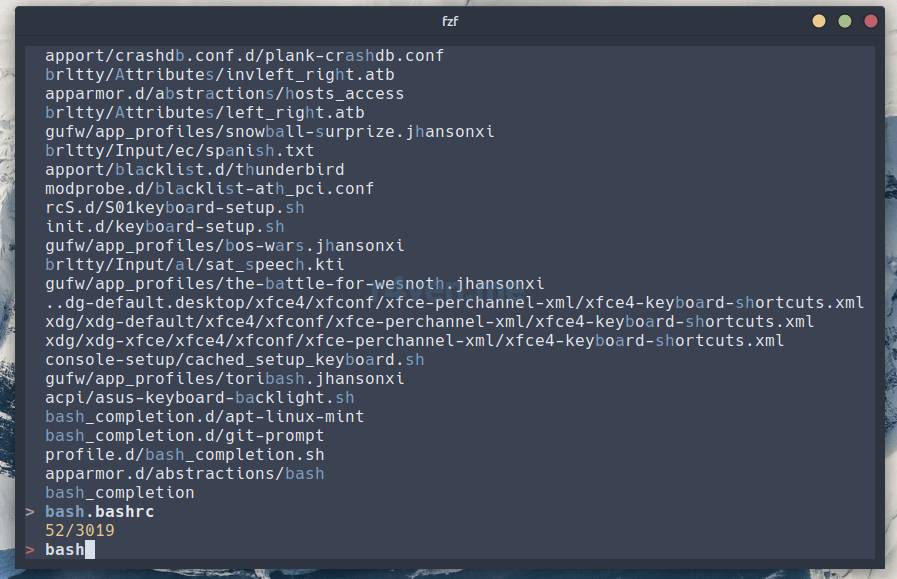
The fzf plugin for Oh-My-Zsh is used for quick searching through command history.
By default, Oh-My-Zsh doesn’t pick up the terminal’s color scheme to display colors in fzf. So they need to be set manually as a variable in the ~/.zshrc configuration file. Here’s an example for the Nord color scheme:
export FZF_DEFAULT_OPTS=$FZF_DEFAULT_OPTS'
    --color=fg:#e5e9f0,bg:#3b4252,hl:#81a1c1
    --color=fg+:#e5e9f0,bg+:#3b4252,hl+:#81a1c1
    --color=info:#eacb8a,prompt:#bf6069,pointer:#b48dac
--color=marker:#a3be8b,spinner:#b48dac,header:#a3be8b'Add the lines above at the beginning of the file:
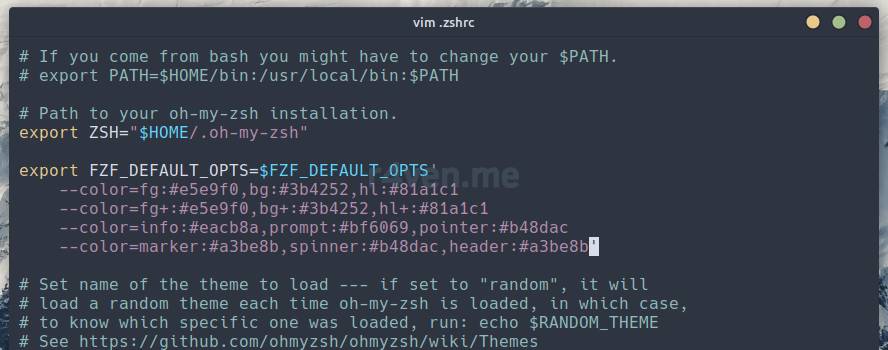
Save and exit. Now, while working in the terminal, press Ctrl + r to activate the shell’s built-in interactive command history search function:
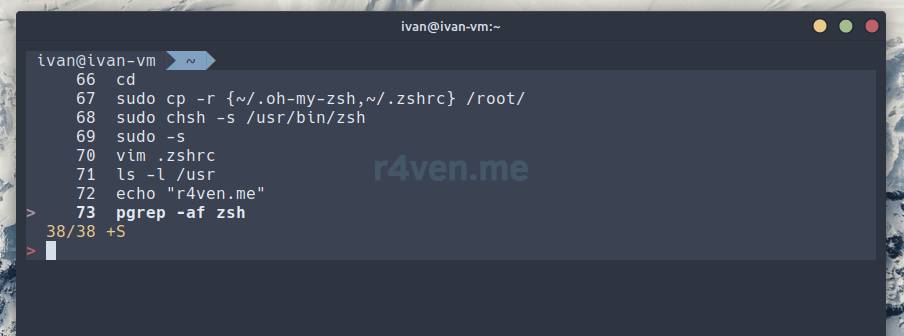
Enter the key you’re searching for, or move the cursor using the arrow keys on the keyboard:
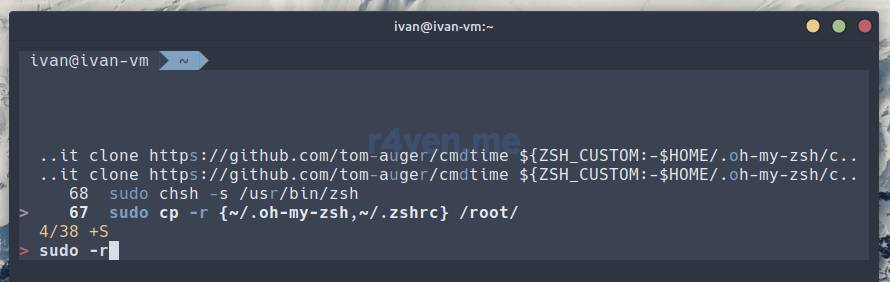
When you press Enter, the command under the cursor will be inserted into the command line. To exit search mode, press the Esc key.
Manually updating Oh-My-Zsh
Earlier we disabled the framework’s automatic update check (because it annoys me). If needed, the update process can be started manually with this command:
omz update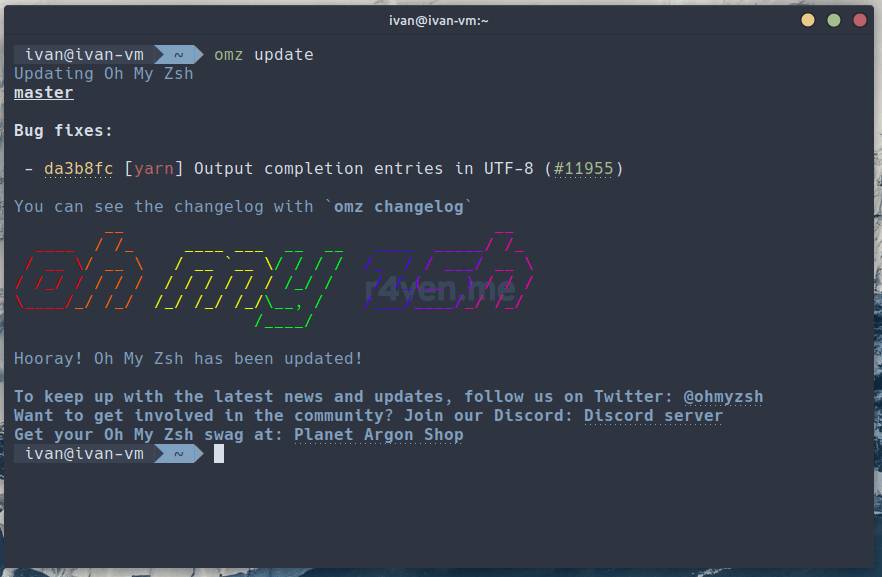
A minimalist shell prompt
When using a minimalist prompt, you may run into problems using
scpandsftpon this host. Keep this in mind. I ran into this nuance myself. Details here.
If you crave minimalism and feel that constantly seeing your username and computer name is visual noise, add this line to the end of the ~/.zshrc file:
prompt_context() [ ]
It’s crucial that it’s at the end of the file! Otherwise you’ll get an error) Save, close. Apply the changes:
source ~/.zshrc
Nothing extra~, just a neurosis~.
Changing the shell from bash to zsh for the root user
To get a similarly configured shell for the root user as well, run these commands:
# copy our user's files into the root user's directory
sudo cp -r {~/.oh-my-zsh,~/.zshrc} /root/

# change root's default shell
sudo chsh -s /usr/bin/zsh

# switch to root to check
sudo -sThe
chshutility in Linux allows a user to change the default shell. Since we ran this command as the root superuser via sudo, we thereby changed its shell.
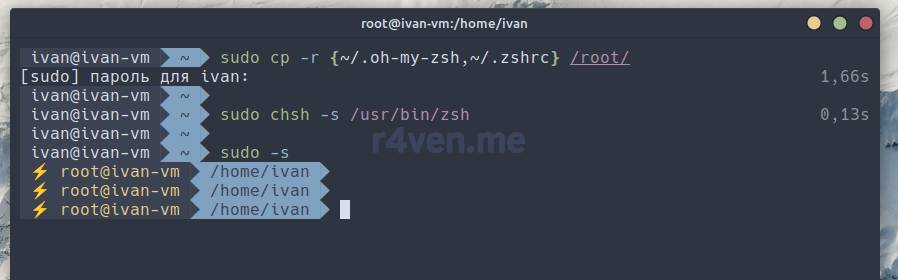
As you can see, when working as root, the shell visually informs us of this with a lightning bolt symbol.
I should warn you that using a shell like this with extensions, and especially with automatic updates enabled, for the root user is considered unsafe.
For use on a home computer, I don’t see anything wrong with it. But, for example, on production servers, it’s probably worth refraining from this idea)
Afterword
To finish, a small comparison of the visual experience of working with Bash and Zsh:
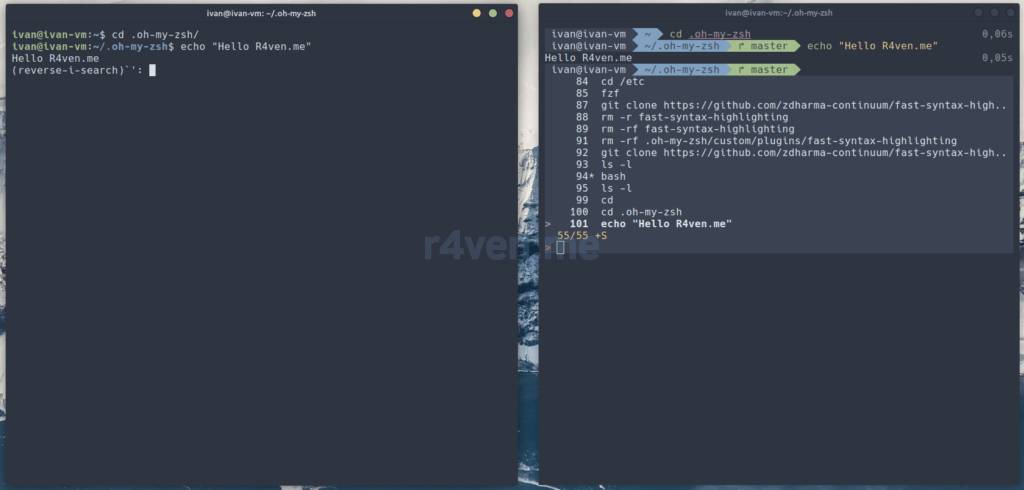
Bash on the left, zsh on the right
The same actions were performed in both. Here you can clearly see that Zsh provides more interactivity than Bash. But I still love Bash, just so you know) It’s just that Zsh is convenient for interacting with the terminal on a daily basis.
I also recommend studying the article: Fine-tuning .zshrc when using oh-my-zsh.
Thanks for your time. Good luck!
Useful sources
- Official Zsh project website
- Official Oh-My-Zsh project website
- zsh-autosuggestions plugin on GitHub
- fast-syntax-highlighting plugin on GitHub
- cmdtime plugin on GitHub
👨💻And…
Don’t forget about our Telegram channel 📱 and chat
Or maybe you want to become a co-author? Then click here🔗
💬 All the best ✌️
That should be it. If not, check the logs 🙂

Comments