In this note I’ll talk about an application for keeping and structuring notes — Obsidian. We’ll install and configure it, connect several plugins: for quickly saving pages from the browser and Telegram posts. We’ll also set up cloud sync, so notes are available on all your devices.
🖐️Hey!
Subscribe to our Telegram channel @r4ven_me📱, so you don’t miss new posts on the website 😉. If you have questions or just want to chat about the topic, feel free to join the Raven chat at @r4ven_me_chat🧐.
Preface
Let me say right away that this article won’t have any grandiose speeches about becoming a cyborg-reptilian and turning Obsidian into your second/third/tenth brain using the Zettelkasten system🤷♂️. There’s plenty of that kind of material out there already. In this note I’ll simply talk about my experience setting up and using Obsidian as a convenient tool for keeping my knowledge base, with access to it from different devices, whether a laptop💻 or a smartphone📱.
⚠️ Warning
⚠️ Before we begin, it’s important to note that Obsidian is proprietary software, which means there’s no way to know exactly how the program processes data. At the same time, most Obsidian extensions (plugins) are created by the community and are open source projects, whose source code is hosted on GitHub.
I’ll admit honestly, this app is an exception to my usual rules. I try to use open software, but unfortunately in the world of “note-taking apps” (including open source ones), there’s a large selection, yet at the same time nothing to really choose from. Obsidian is the only tool that satisfied all my wishes for this role. The closest open-source alternative is the Joplin project. But it has a few flaws that are critical for me. Still, I used it for a long time and can generally recommend it👍. But let’s move on to the hero of today’s article📝.
Introduction
Obsidian is a cross-platform application for keeping Markdown notes on PC and mobile devices. Available on Linux, Windows, Mac, Android, and iOS.
Markdown is a lightweight markup language that lets you write “raw” text and instantly see the rendered result (similar to HTML, but simpler).
💡A good example of Markdown (md) usage is the README.md file, which you’ve probably seen in various places.
Since the goal of this article is to share my experience using Obsidian, I won’t teach you Markdown syntax, but will just leave a link to a good cheat sheet from the official GitHub documentation.
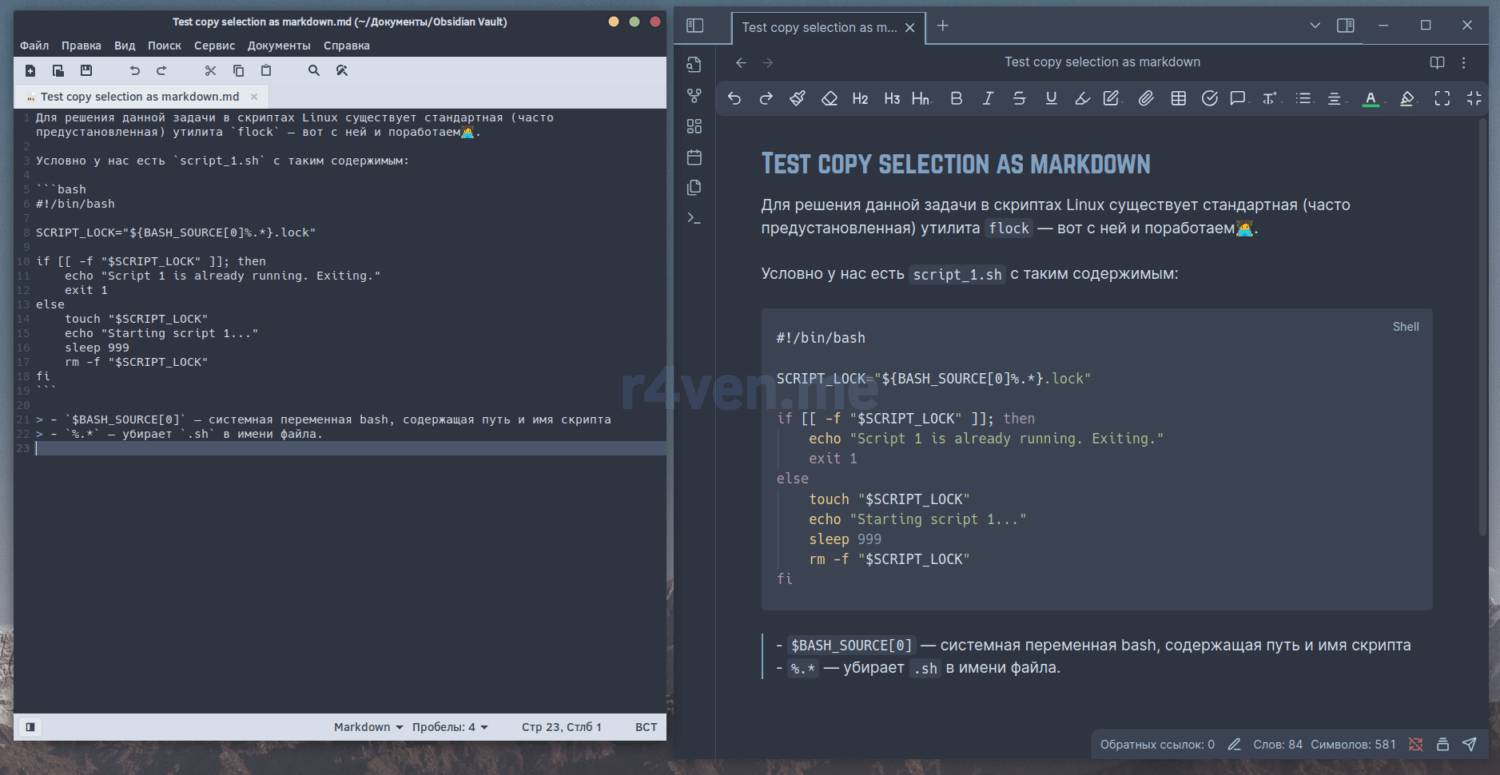
The image below shows an example of “raw” text and its rendering in Obsidian:
💡Obsidian works with plain text files located on your disk.
What sets Obsidian apart from many alternatives is real-time Markdown rendering. That is, you write raw Markdown text and it’s immediately visualized.
Now that we’ve established the app’s purpose, let’s move on to installation🛠️.
Installing Obsidian
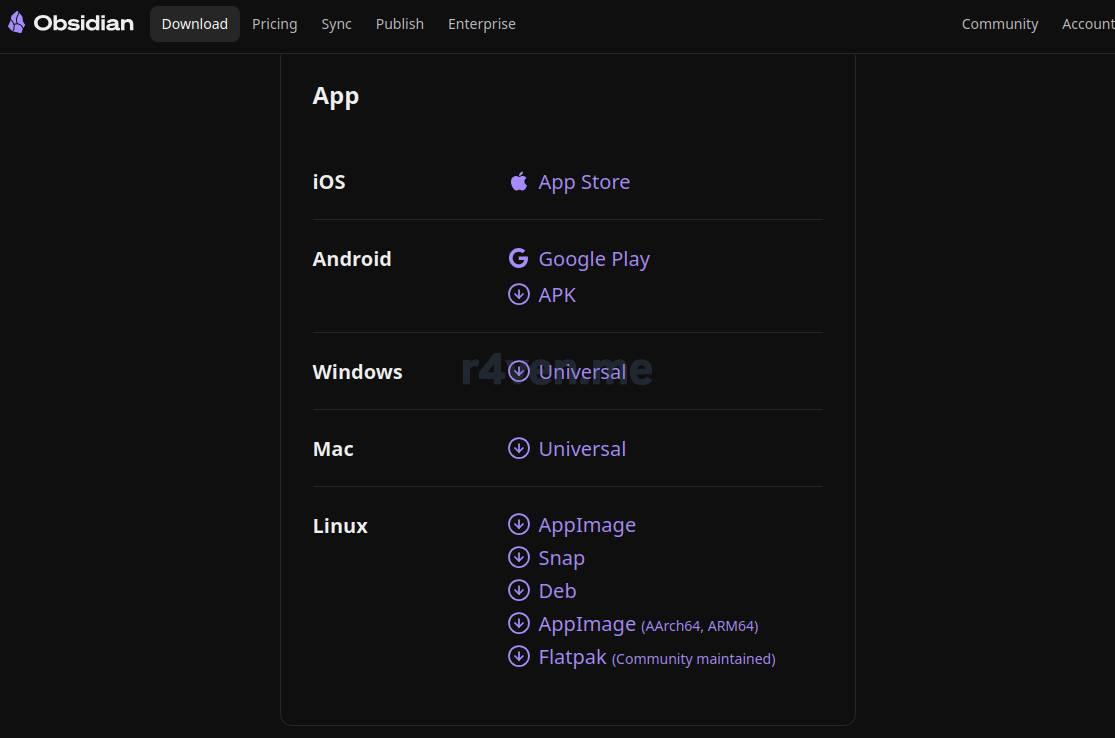
As I mentioned earlier, Obsidian is available for different platforms. To download the installer, go to the download page of the official website: https://obsidian.md/download and choose the appropriate option:
💡Installer files are also available on the releases page of the project’s GitHub repository.
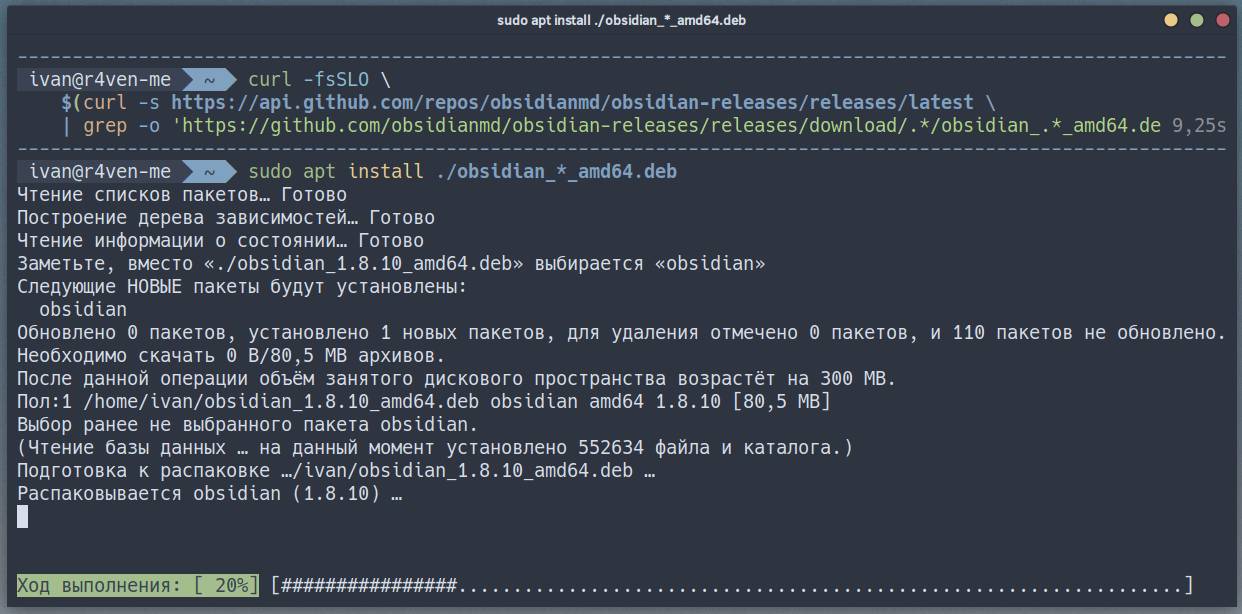
In my example, I’ll show how to install Obsidian from a .deb package using the terminal on Linux Mint 22:
⚠️Note that sudo privileges are required to run these commands.
BASH
# download the deb packagecurl -fsSLO \
$(curl -s https://api.github.com/repos/obsidianmd/obsidian-releases/releases/latest \
| grep -o 'https://github.com/obsidianmd/obsidian-releases/releases/download/.*/obsidian_.*_amd64.deb')# install the deb packagesudo apt install ./obsidian_*_amd64.deb
# remove the installer filerm -vf ./obsidian_*_amd64.deb
Click to expand and view more
💡The curl command uses command-line substitution. That is, the main download command: curl -fsSLO is passed an argument that is the result of running another command inside a $(command) construct, which executes first. As a result, the main command gets a direct URL to the .deb file of the latest Obsidian release from GitHub. The command is universal.
First launch
After installing the program, launch it from the application menu:
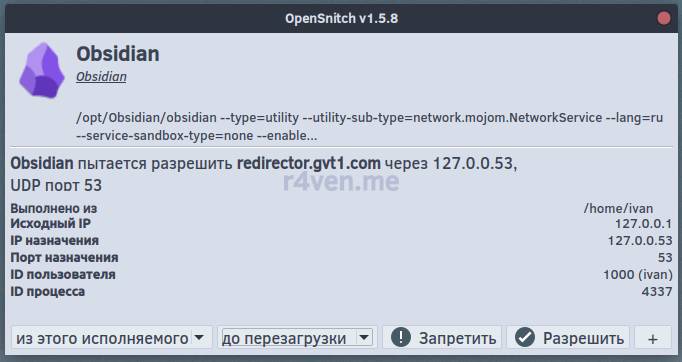
⚠️Since Obsidian is closed-source software, I recommend paying more attention to its behavior, for example by monitoring network activity with OpenSnitch:
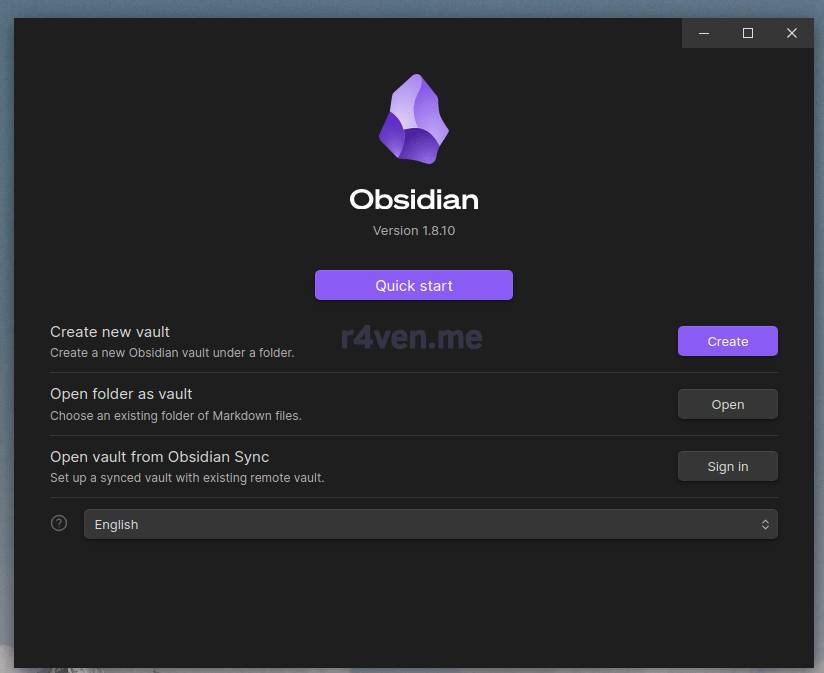
In the startup window, you’ll be offered one of the following options:
Quick Start — create a vault at the path ~/Документы/Obsidian Vault with example notes;
Create new vault — manually choose a name for the vault and the folder it will be located in;
Open folder as vault — specify an already existing folder;
Sync — paid proprietary cloud sync (not of interest to us);
💡In Obsidian, the term vault means an ordinary folder that stores all the files: notes, attachments, program and plugin settings.
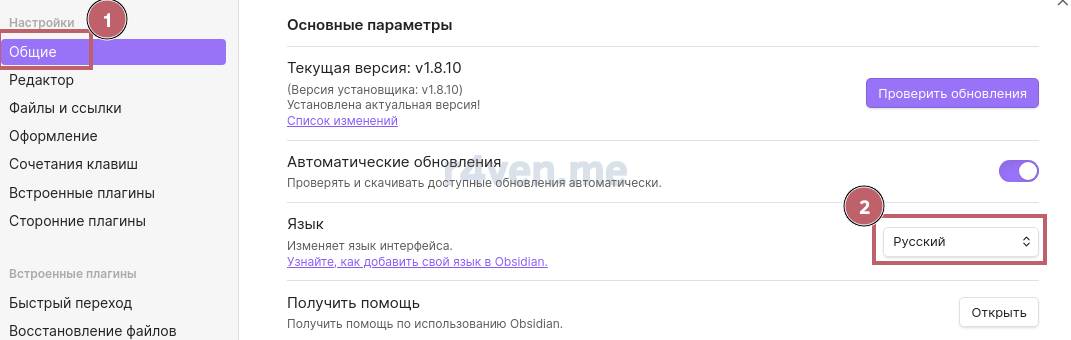
You can also choose the interface language at this stage — Russian is available. You can also do this in the program settings (click the gear icon ⚙️ in the bottom-left corner):
You need to restart the app for the changes to apply.
💡You can explore the Obsidian configuration process in more detail in the official documentation, also available in Russian: https://publish.obsidian.md/help-ru/.
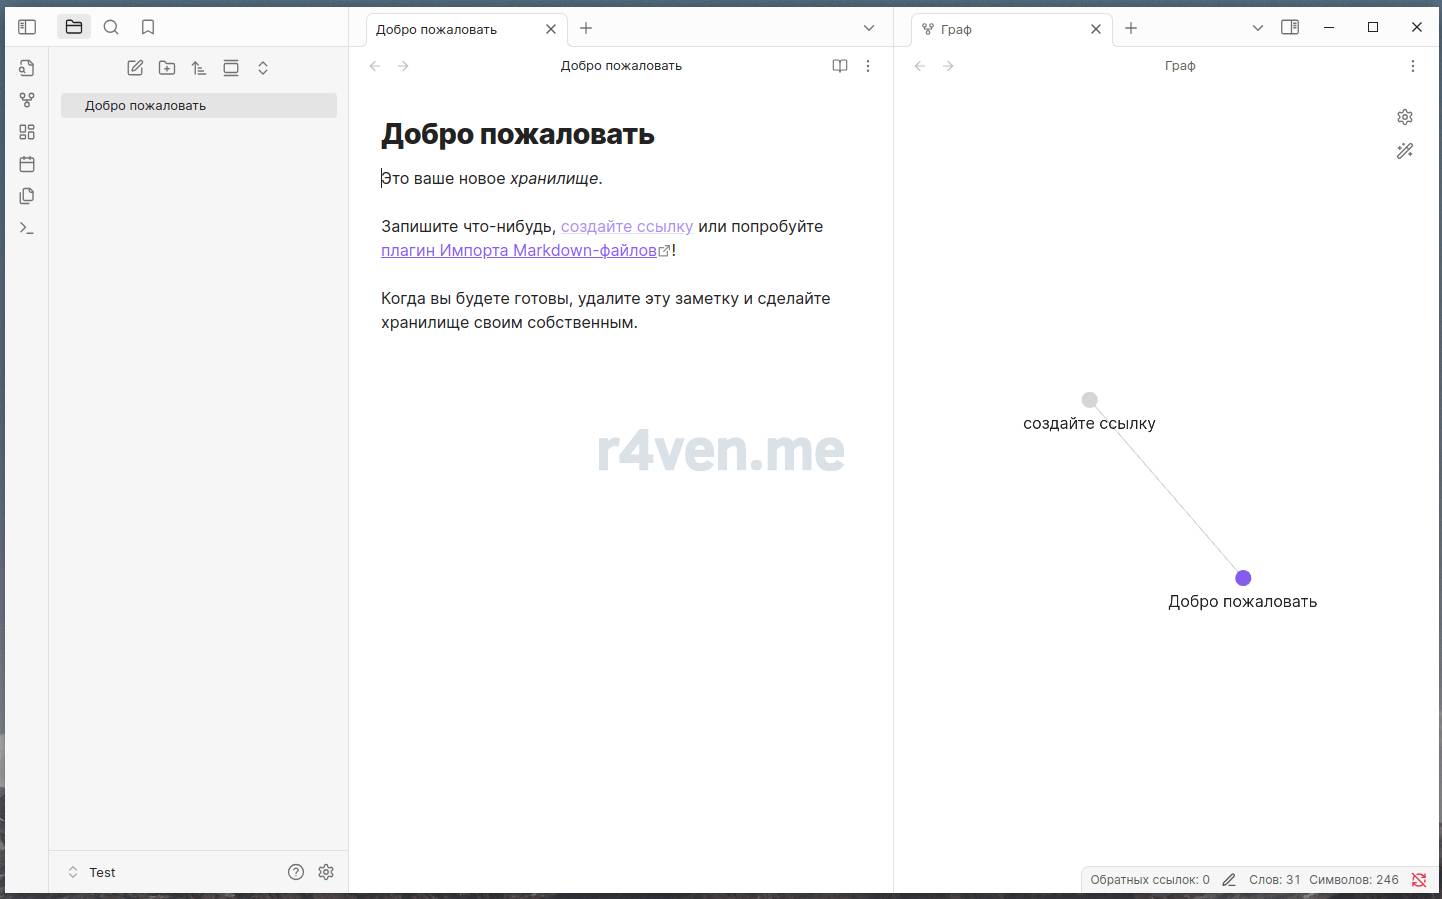
So, here’s the main Obsidian window: on the left is a tree panel with directories and notes, on the right is the note editing/viewing area. The program supports working with tabs, as well as opening several notes side by side in different panes, each of which can have its own tabs:
Next I’ll show my own approach to configuring and using Obsidian. Let’s start with the directory for media files.
Specifying a directory for storing attachments
By default, Obsidian places note attachments (images, documents, etc.) next to the note itself. This is inconvenient for me, because it visually clutters up the vault and interferes with navigating the note tree. To avoid this, I create a special directory where all attachments are automatically placed.
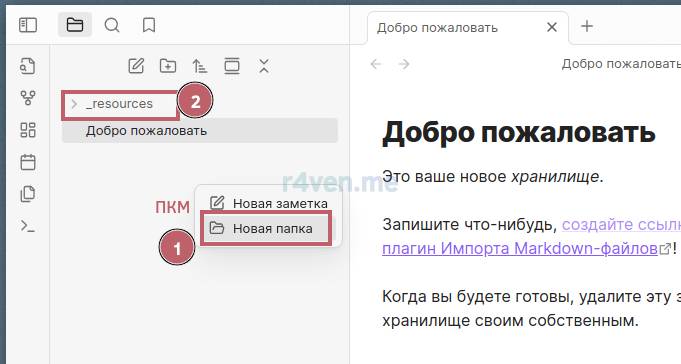
To configure this behavior, create a folder in the root, for example named _resources:
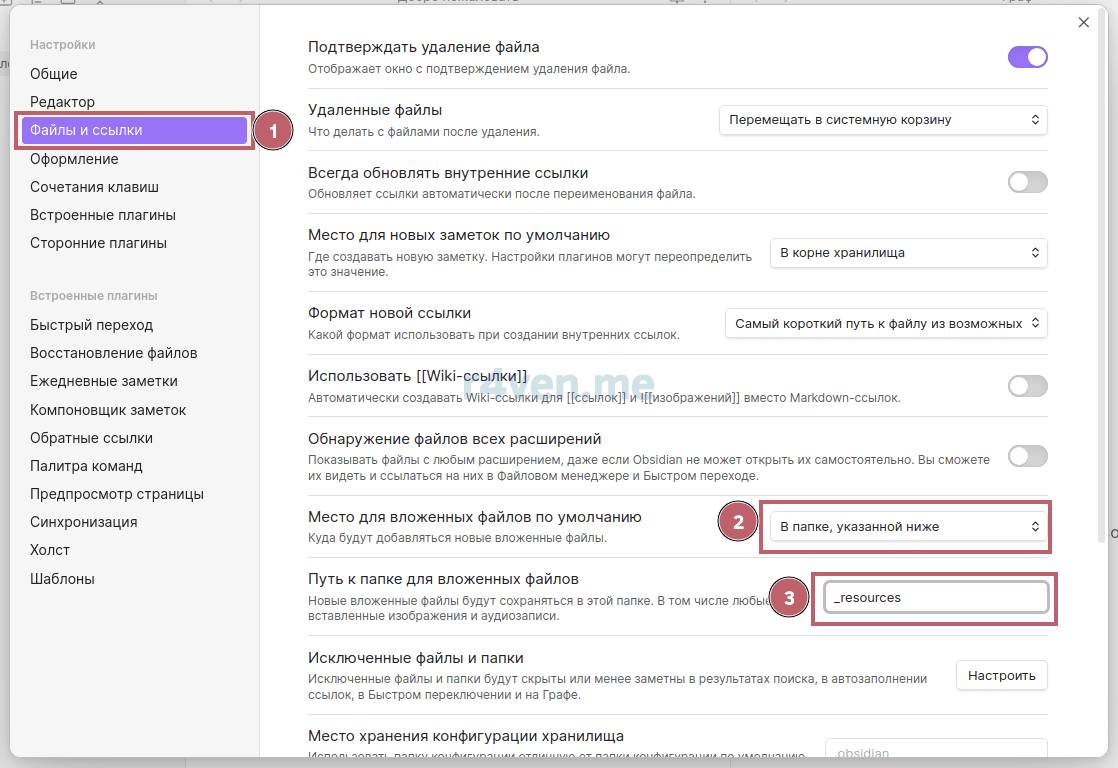
Then go to the program settings, in the Files and links section, and specify this directory as the storage location for attached files:
Now all attachments will be neatly stored in _resources without creating visual clutter while working🧑💻.
Appearance — the Nordic theme
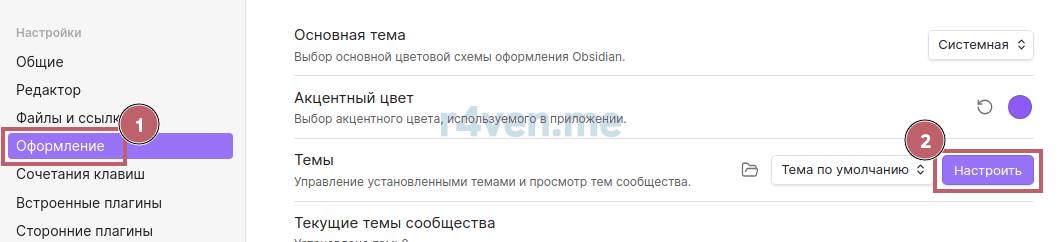
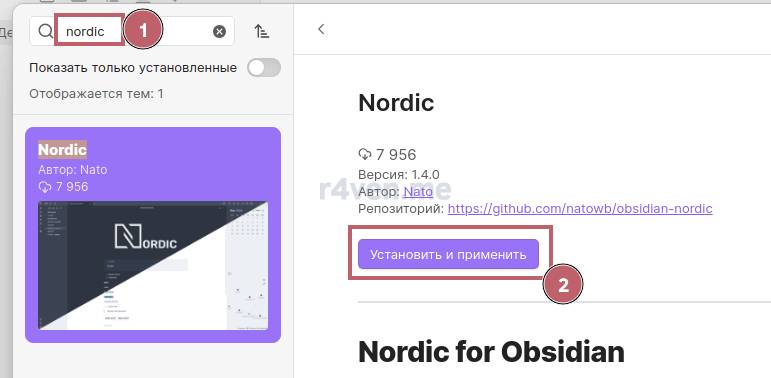
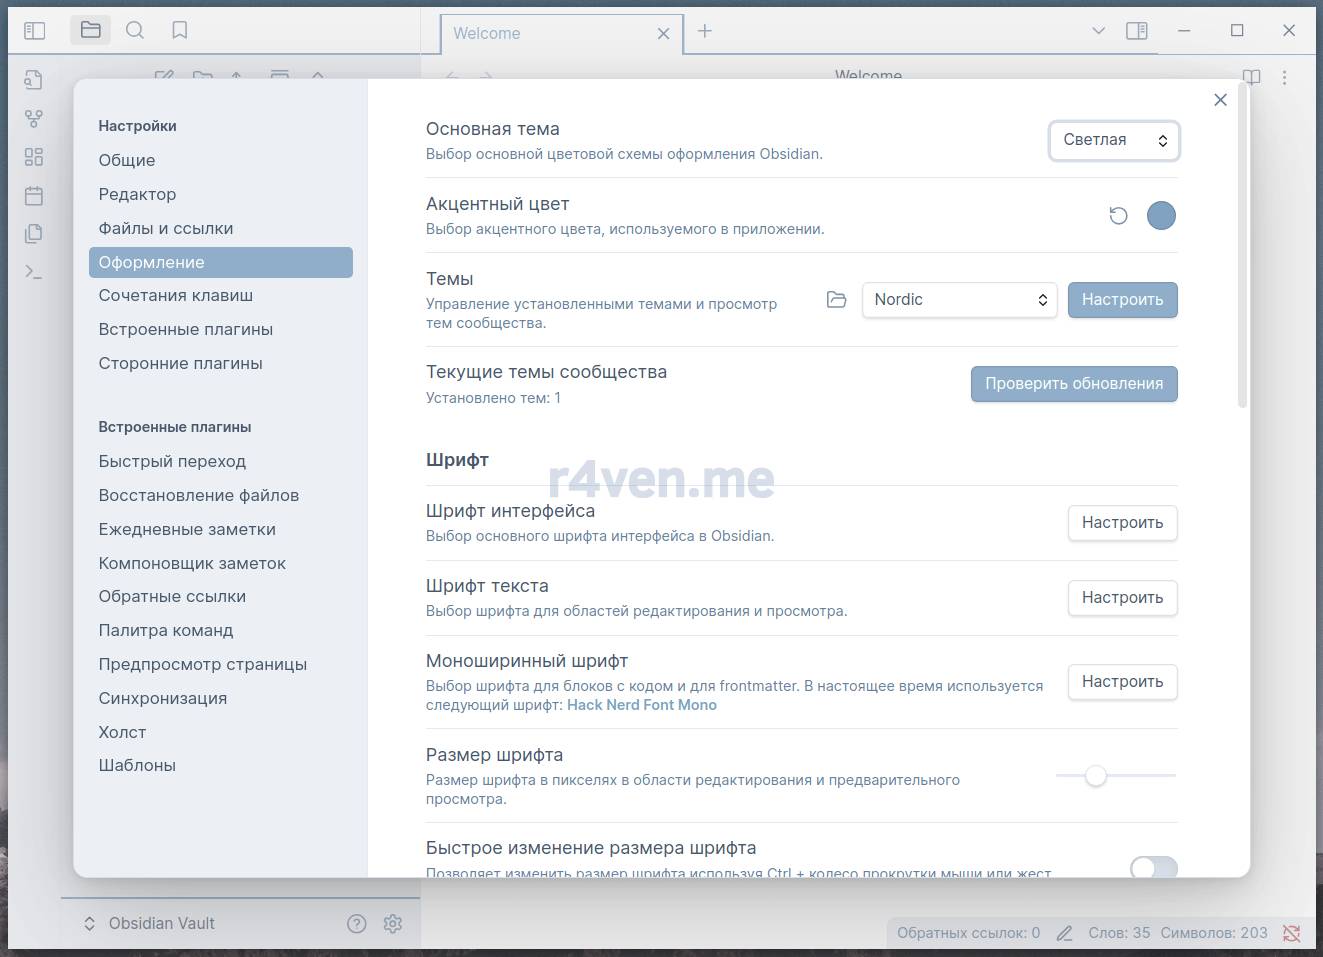
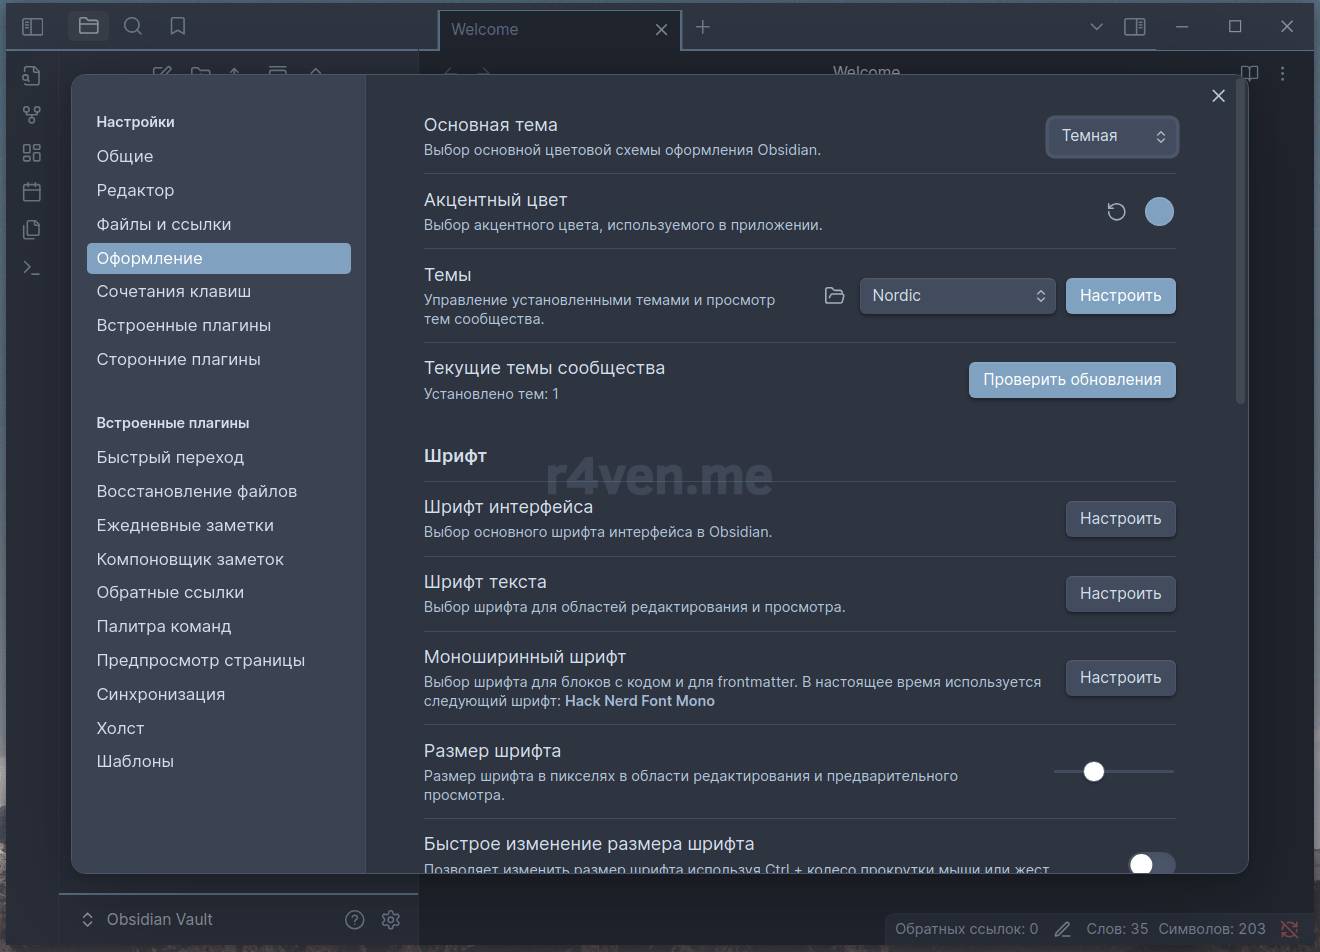
Obsidian supports a large list of interface themes. Let me show how to install my favorite theme. In the settings, go to Appearance — Themes — Manage. In the search, type Nordic, then click Install and Apply:
The theme supports both light and dark variants.
Light☀️:
And dark🌑:
In the Appearance section you can also configure fonts, scaling, window frame appearance, and other options🛠️.
Plugins
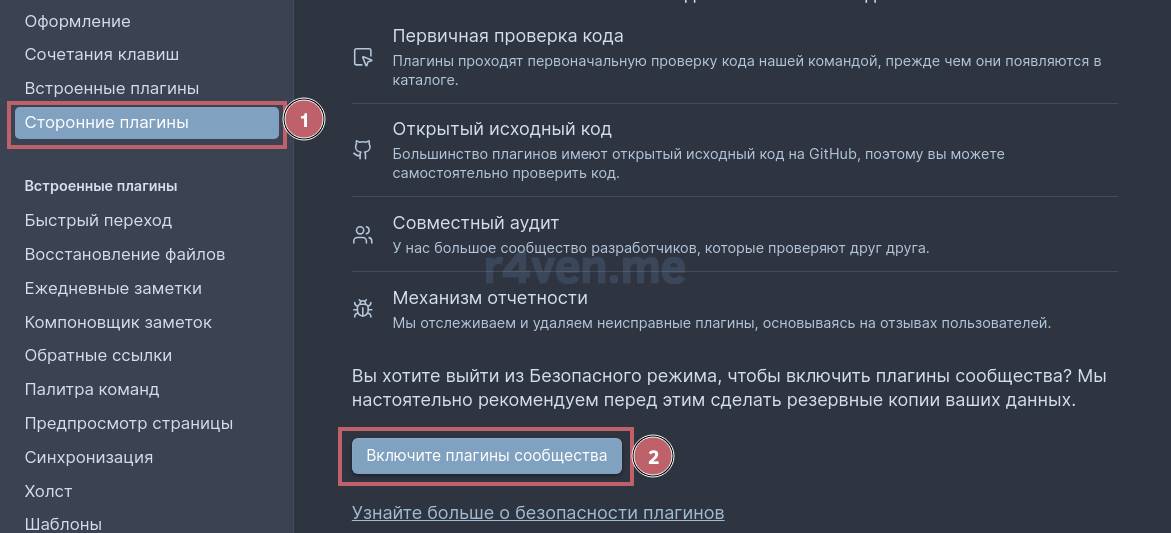
Community plugins are the reason I chose this program for maintaining my personal knowledge base. Before installing third-party plugins, you need to enable this functionality: Settings — Community plugins — Turn on:
⚠️Please understand that using third-party plugins may carry certain risks. Remember: you perform all actions at your own risk. Try not to overload the program with too many plugins.
Next, click Browse:
Editing toolbar — a toolbar
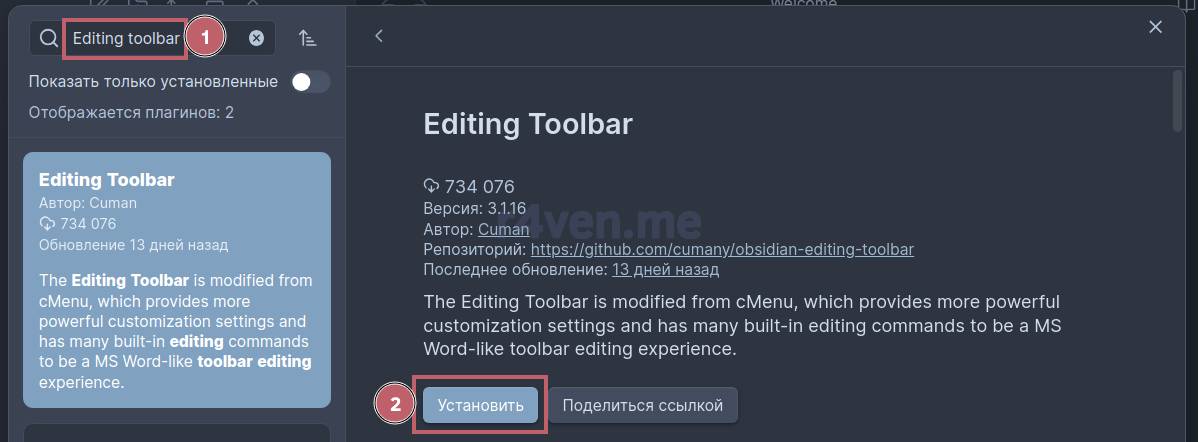
In the search bar, type Editing toolbar and click Install:
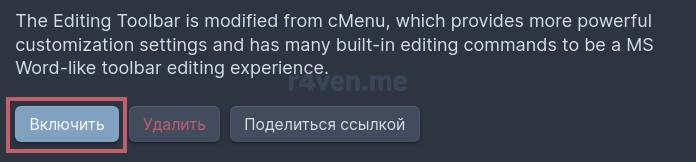
Then Enable:
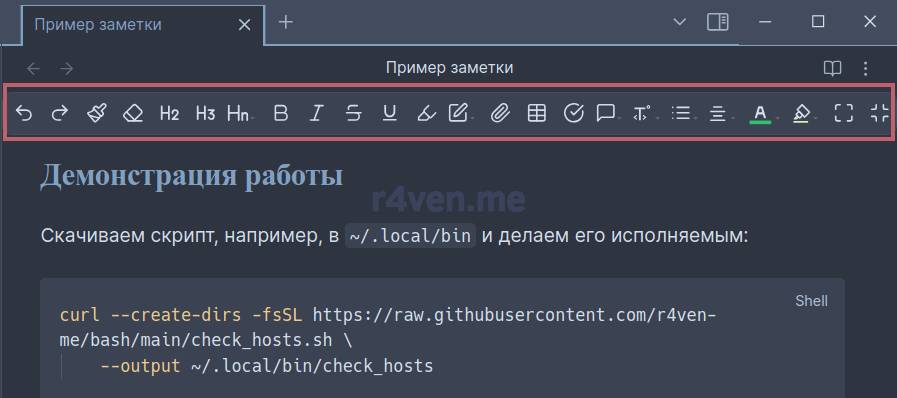
Now, when editing a note, a toolbar will appear at the top of the window for quick and convenient formatting, similar to word processors:
This toolbar significantly eases the text formatting process, especially for beginners🧑🎓.
Tray — system tray
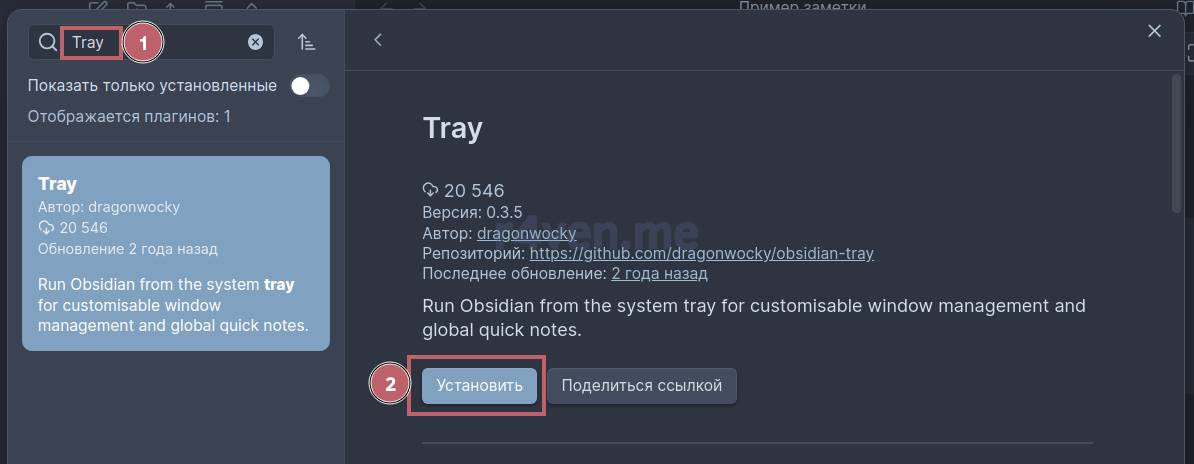
By default, Obsidian has no system tray functionality. So, similarly, let’s search for a plugin:
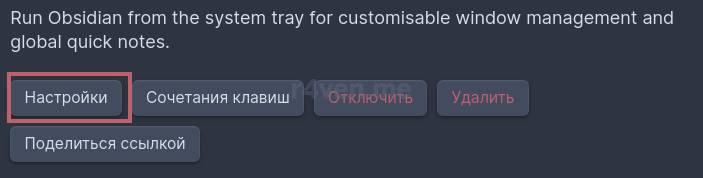
Install it and go to Settings:
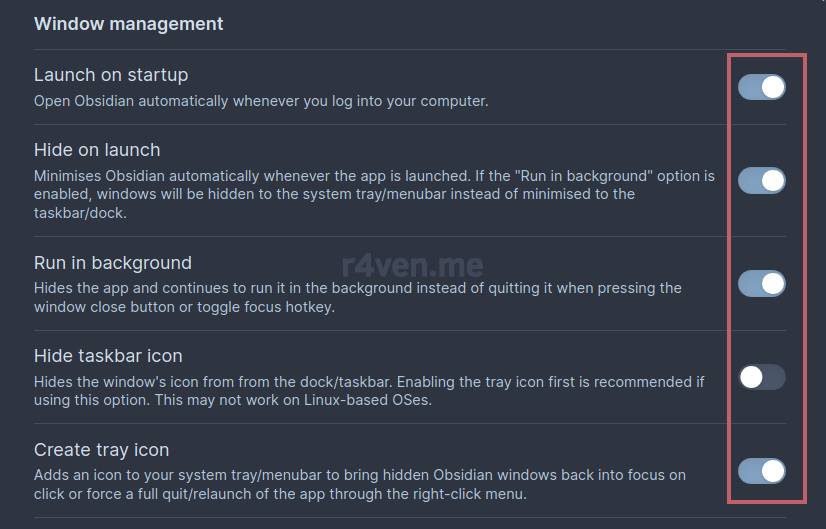
I usually enable the following settings:
Launch Obsidian on system startup;
Minimize the app after launch;
Run the app in the background, i.e. minimize to tray on close;
And of course, show the tray icon.
In this section you can also set a custom tray icon, which for some reason doesn’t display correctly for me on Linux🤷♂️, so I usually leave that option alone.
After enabling the plugin, an Obsidian icon will appear in the system tray:
💡If Obsidian autostart on login doesn’t work for you, you can create a special .desktop file in the ~/.config/autostart directory yourself with this terminal command:
BASH
cat << EOF > ~/.config/autostart/obsidian.desktop
[Desktop Entry]
Type=Application
Name=Obsidian
Comment=Launch Obsidian on system startup
Exec=obsidian
Terminal=false
X-GNOME-Autostart-enabled=true
X-GNOME-Autostart-Delay=15
EOF
Click to expand and view more
Remotely save — cloud storage sync
This whole note-taking endeavor wouldn’t make sense if there were no way to sync my base between different devices🖥️💻📱.
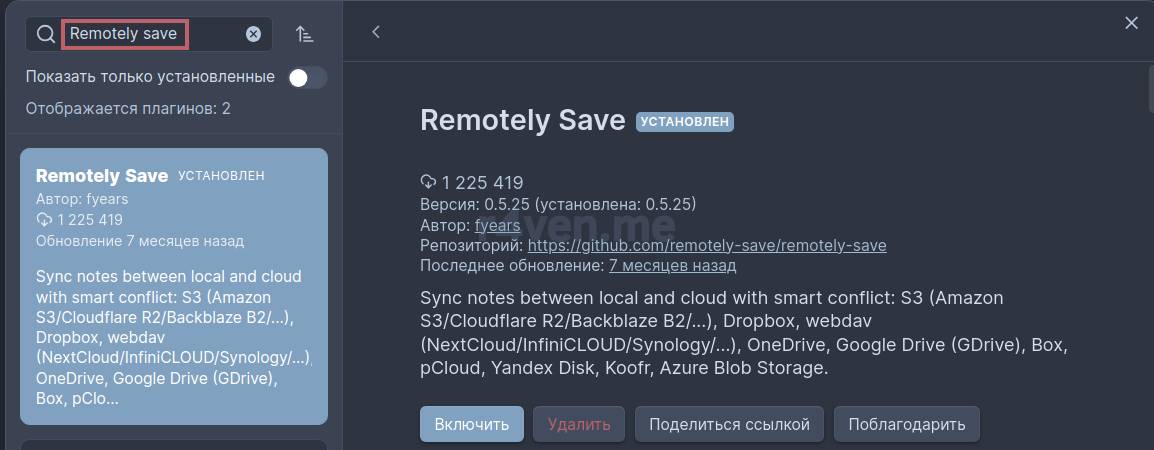
The Remotely save plugin lets you set up sync with cloud storage (Google Drive, Yandex Disk, Nextcloud, etc.), both public and self-hosted. I’ll show an example of setting up sync with Yandex Disk over the WebDav protocol.
Let’s install the plugin itself:
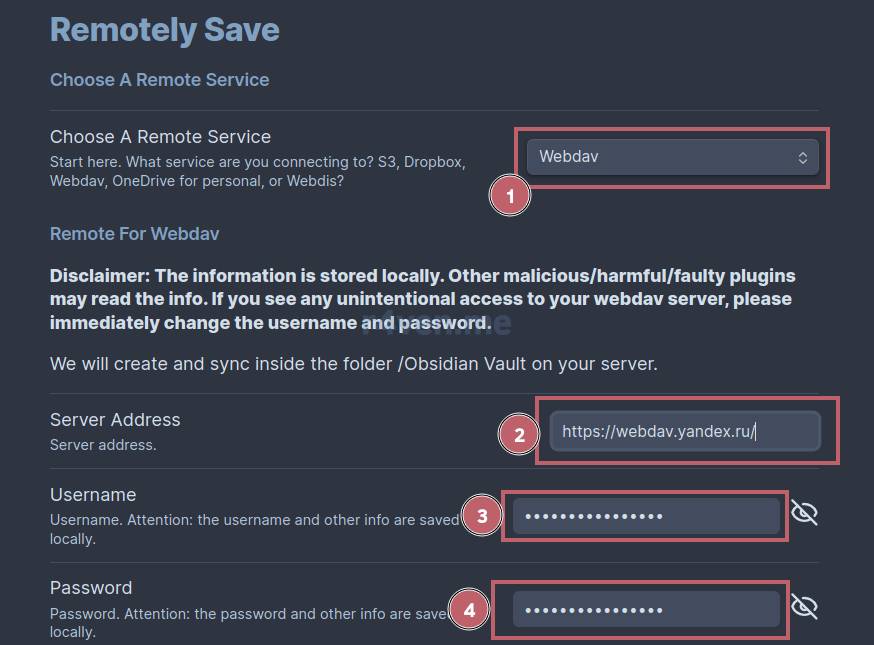
Go to the settings and specify the following parameters:
Application password with access to files via WebDav — see below for how to get one
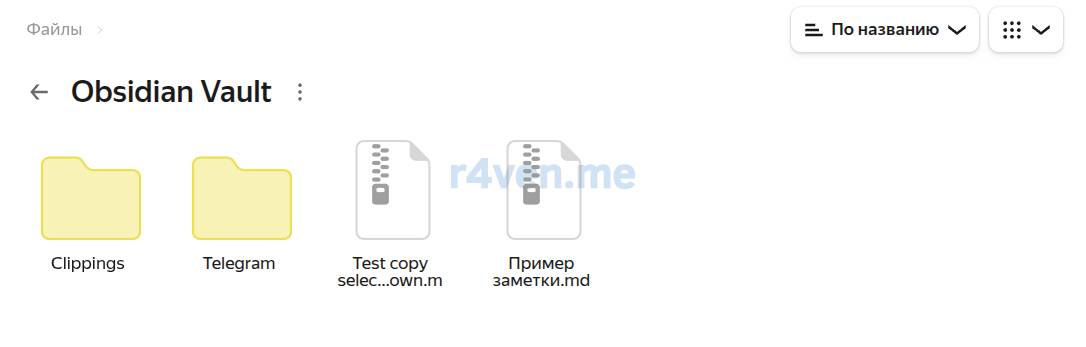
If needed, in the Change The Remote Base Directory parameter you can explicitly specify the remote directory where notes will be stored. By default this is Obsidian Vault in the root of the disk:
By default, automatic sync on an interval is disabled in the plugin. Let’s enable it here:
💡In the plugin settings you can also set up note encryption. Useful if you store sensitive information in them.
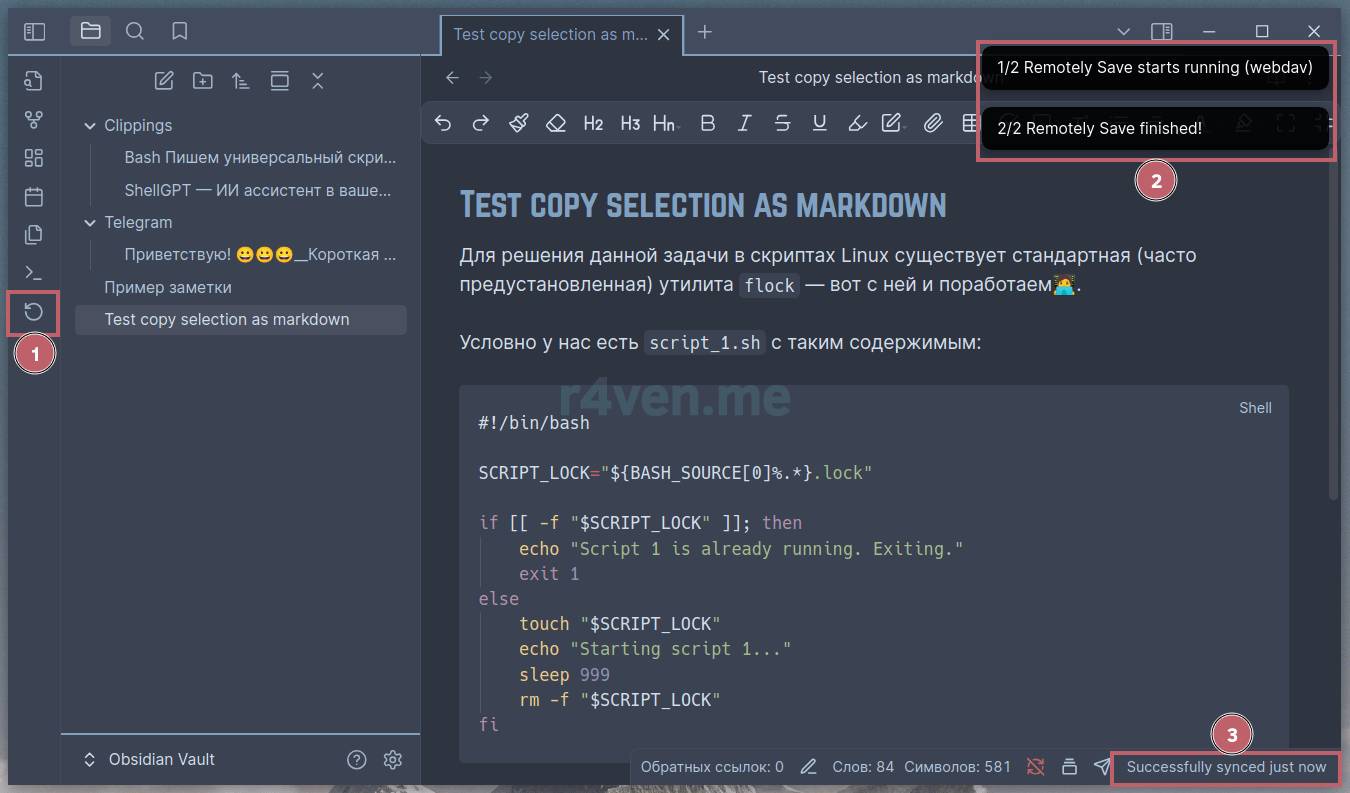
To test the connection, run a manual sync by clicking the special button on the left sidebar:
As a result, you should see your notes in the cloud:
An alternative and, for me, preferred way to sync files, including Obsidian notes, is filesystem-level sync using the Syncthing program. But this topic is beyond the scope of this article, so for those interested I’ll just leave a link to my detailed guide: Setting up a Syncthing file sync server in docker.
Telegram sync — sync with Telegram
Oh, this is an insanely convenient plugin for me🔥. I usually save everything to “Saved Messages” in Telegram, thereby turning that place into a “dumpster.” With the Telegram sync plugin, you can easily send the posts and messages you need from Telegram straight into Obsidian via a chat with your bot.
The interaction scheme looks like this:
select a post/message in Telegram;
open the context menu;
click Forward;
select the chat with your bot;
the post/message is automatically forwarded to Obsidian into a pre-specified section.
☝️Notes sent to Obsidian are automatically formatted in Markdown.
⚠️It’s worth noting that this sync only works while Obsidian is running on your PC and connected to the internet. If Obsidian loses connection with the bot, messages forwarded more than 24 hours ago won’t make it into Obsidian.
As you’ve probably guessed, to implement this scheme you’ll need your bot’s token on Telegram and the Telegram ID of the account (or the ID of any chat where your bot will be present).
Under the spoiler is a short guide on how to get the necessary data:
Click on the spoiler
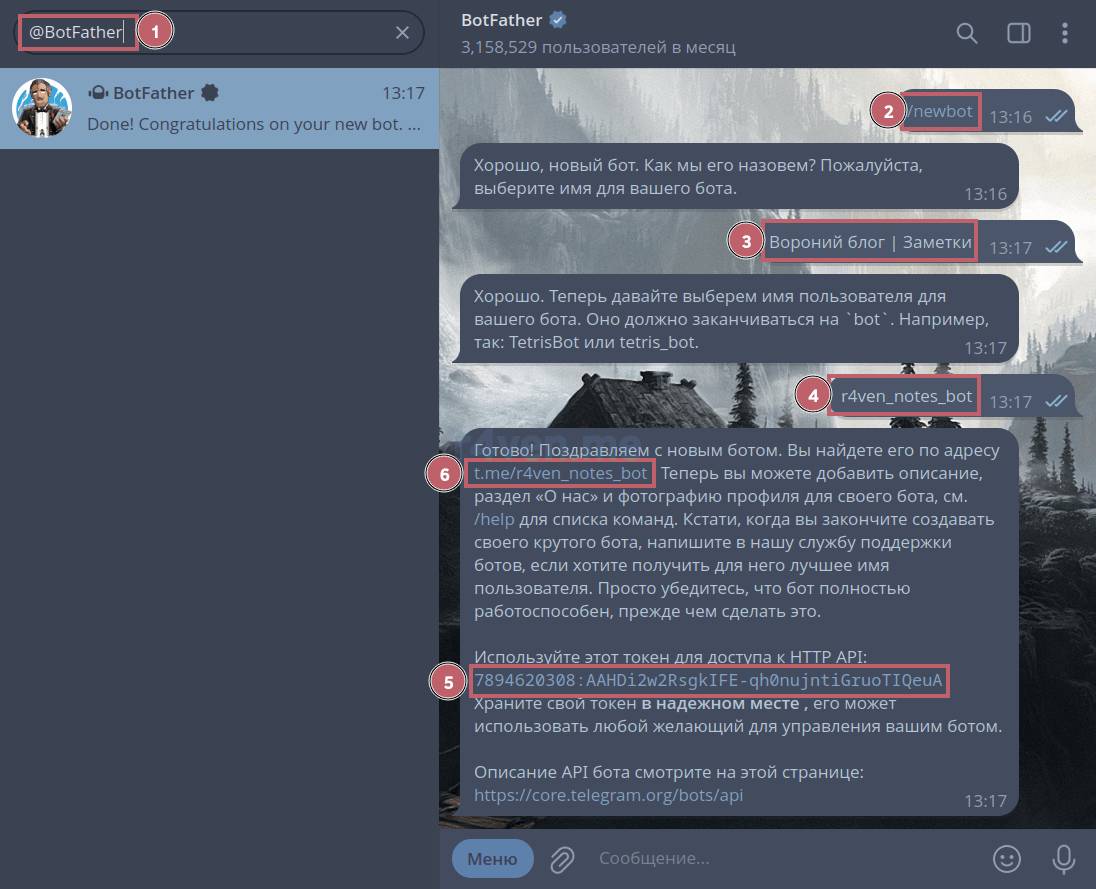
To create a new Telegram bot and get a Telegram ID, follow these steps.
1) In Telegram search, find the bot for creating other bots @BotFather and do as shown in the screenshot:
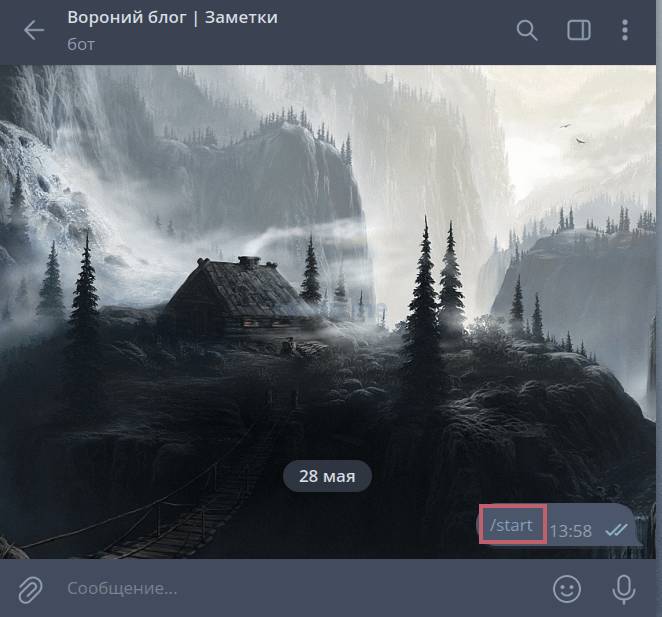
2) Clicking the bot’s address takes you to a chat with it, where you need to click “Start”:
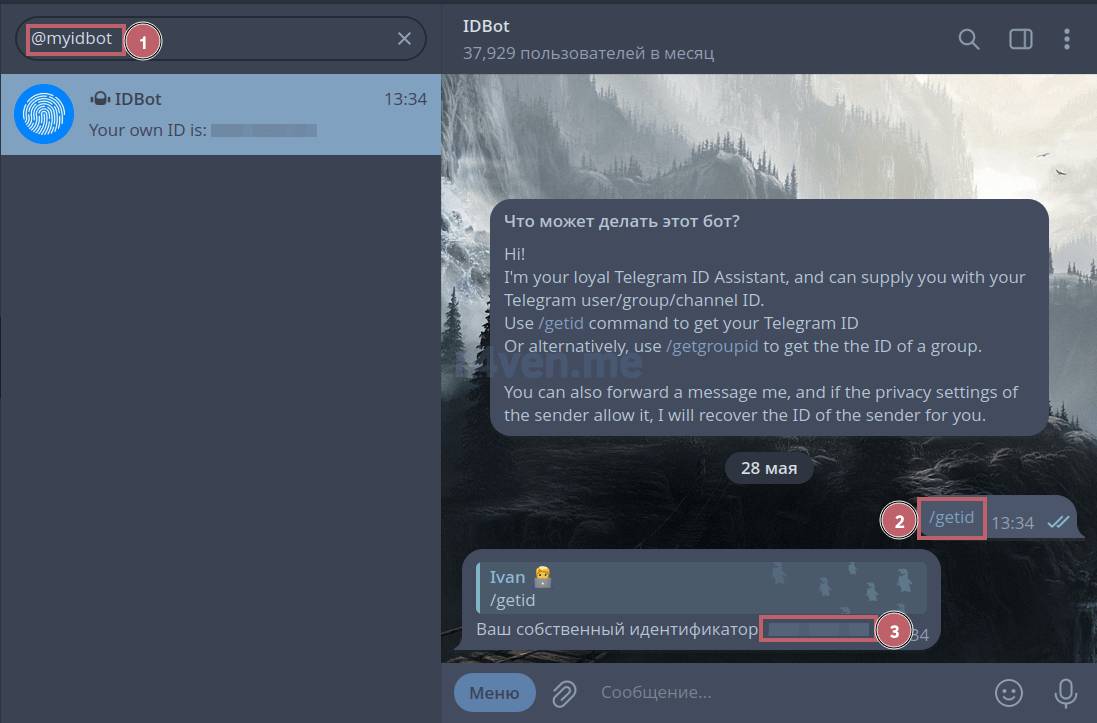
3) Now let’s search Telegram for @myidbot, which we use to find out our Telegram ID:
Example Telegram ID:
BASH
1234567890
Click to expand and view more
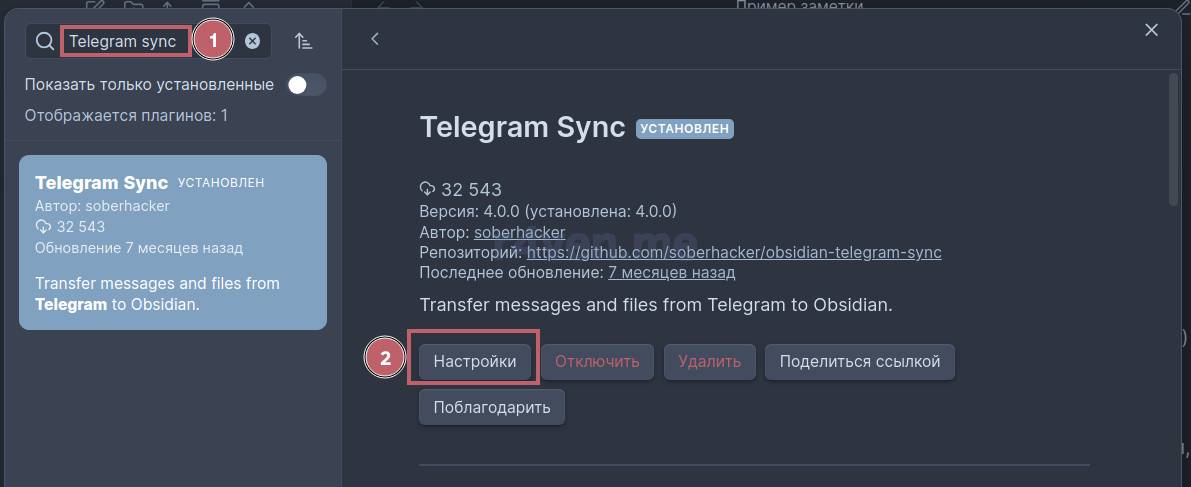
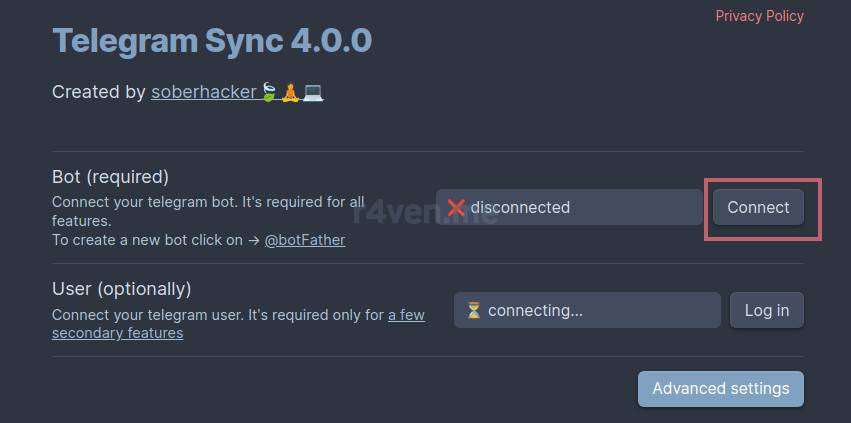
So now we have the bot token and Telegram ID. Now, using the familiar approach, let’s find and install the Telegram Sync plugin, then go to the plugin’s Settings:
Here we go to the bot settings:
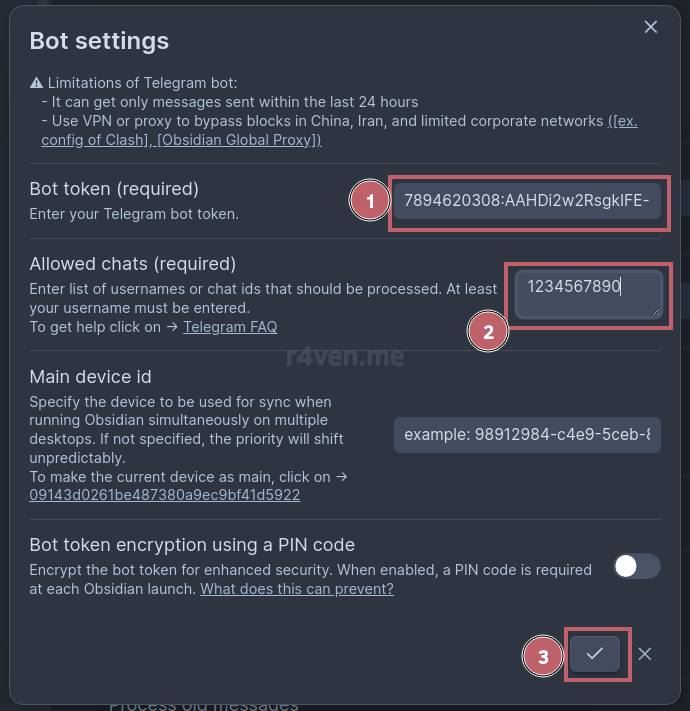
And specify the bot token and the ID of your account (or the needed chat). Don’t forget to confirm:
Within a few seconds, Obsidian should connect to your bot. A successful connection looks like this:
I also configure two more parameters in the Telegram Sync settings:
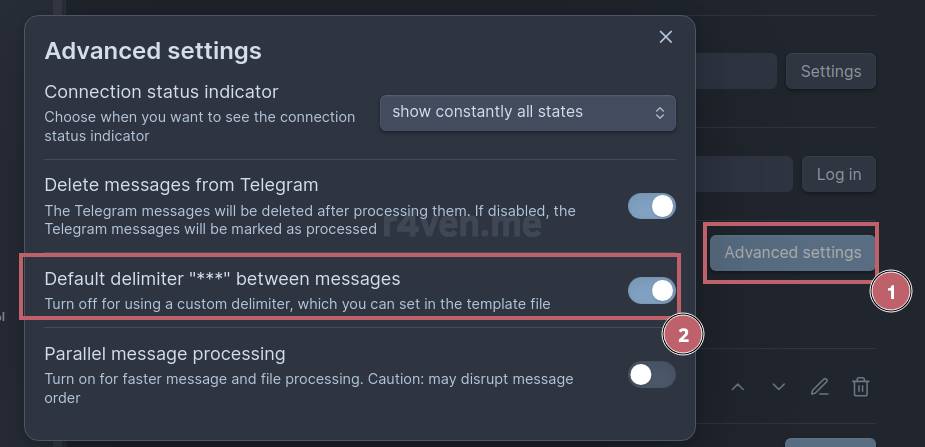
1) In Advanced settings, I enable the option to delete the forwarded message after it’s saved to Obsidian (to avoid cluttering the chat):
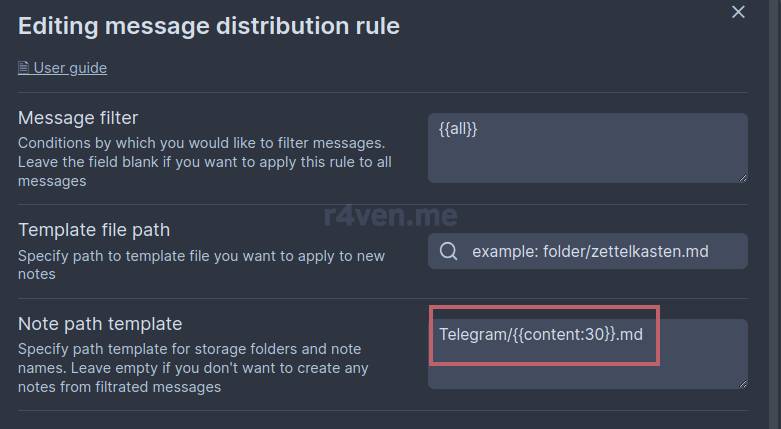
2) In the Message distribution rules section, I change the note name template and path, parameter: Template file path:
Essentially, I just remove the date from the note name template:
BASH
Telegram/{{content:30}}.md
Click to expand and view more
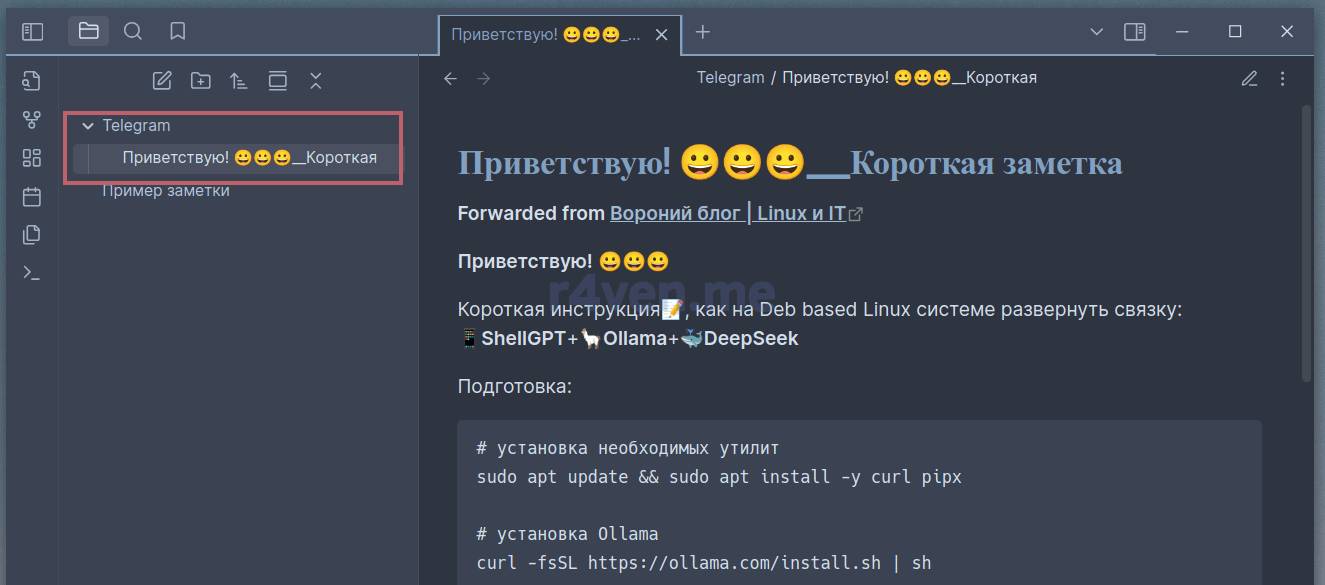
To test it, forward any message to the chat with your bot:
By default, a Telegram section is created in Obsidian, where forwarded notes are placed:
That’s it for plugins, let’s move on to browser extensions🌐.
Browser extensions
I recommend 2 extensions:
Web Clipper — the official extension from the developers, which lets you save website pages straight into Obsidian in Markdown format;
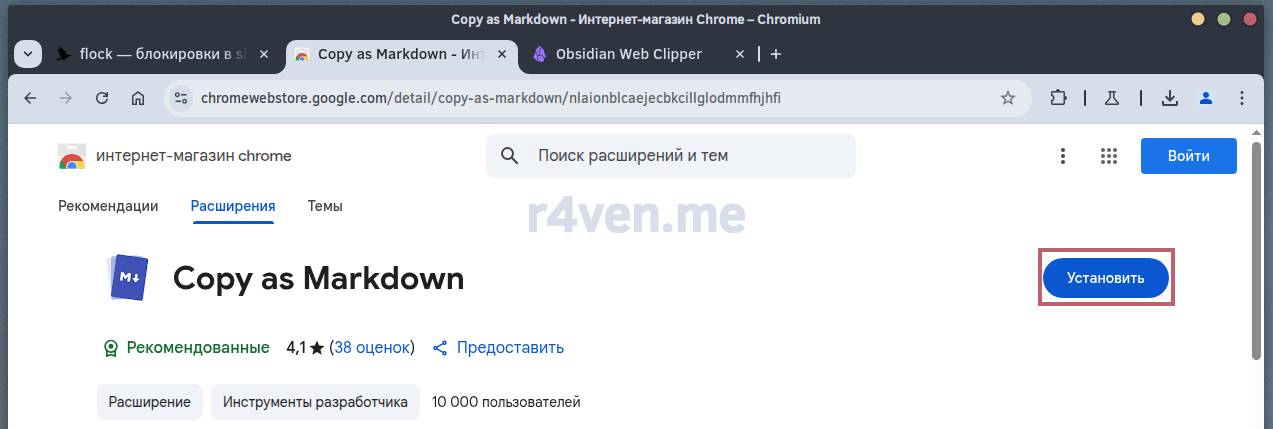
Copy as Markdown — a universal extension that lets you copy a selected fragment of a page to the clipboard, formatting it as Markdown.
Both extensions are very useful, but in my own practice I use the second one more, since I don’t often need to save things from the browser, and not always into Obsidian.
But let’s take things in order.
Obsidian Web Clipper
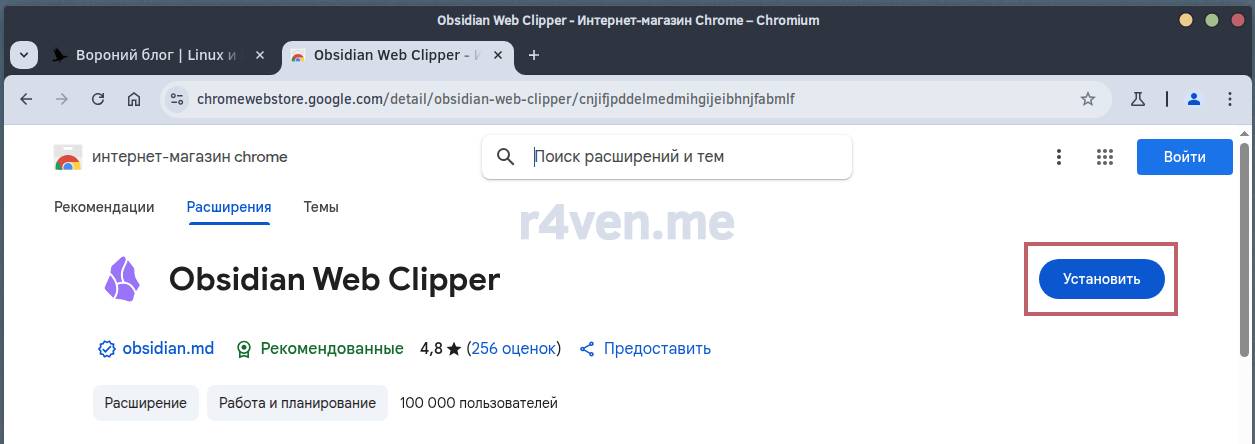
Go to the downloads page of Obsidian, scroll all the way to the bottom, and follow the link to the extension store for your browser. I’ll show this using Chromium as an example. Click Install:
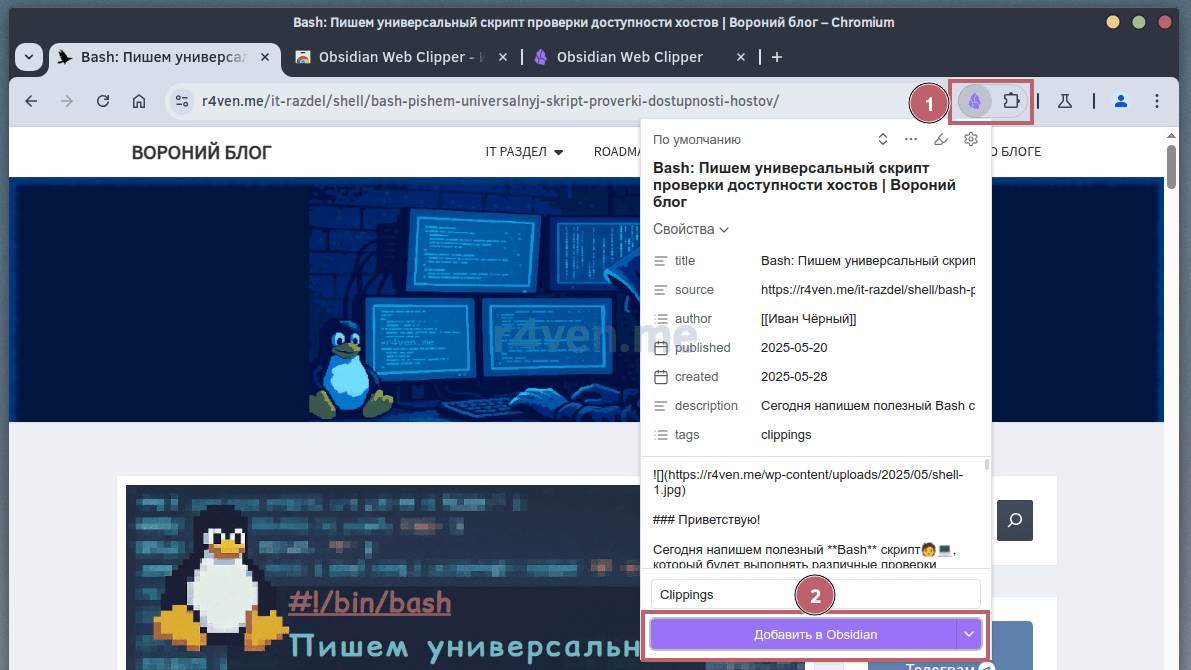
Now just go to any page on the internet you want, then click the extension’s button and then Add to Obsidian:
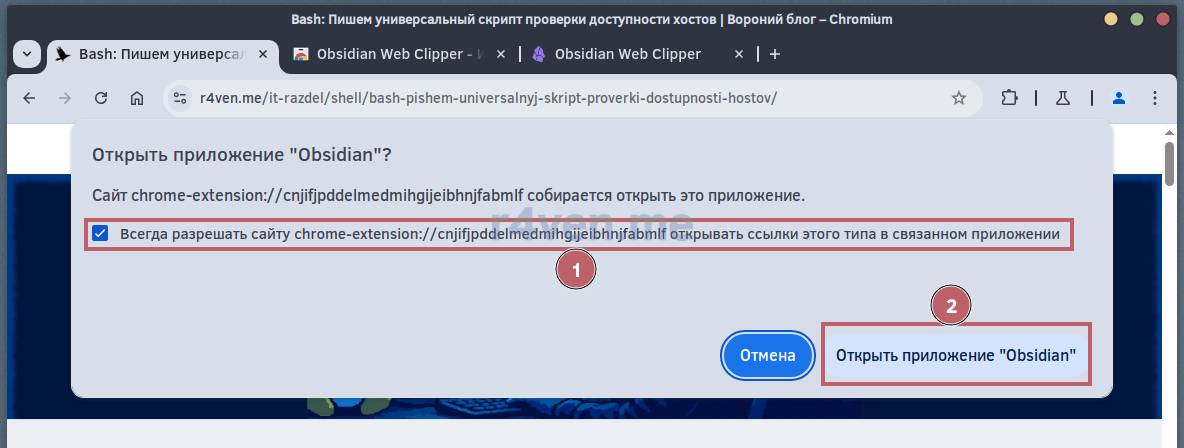
The first time you use it, the browser will show a notification. Check the box so you don’t see it every time, and then click Open “Obsidian” app:
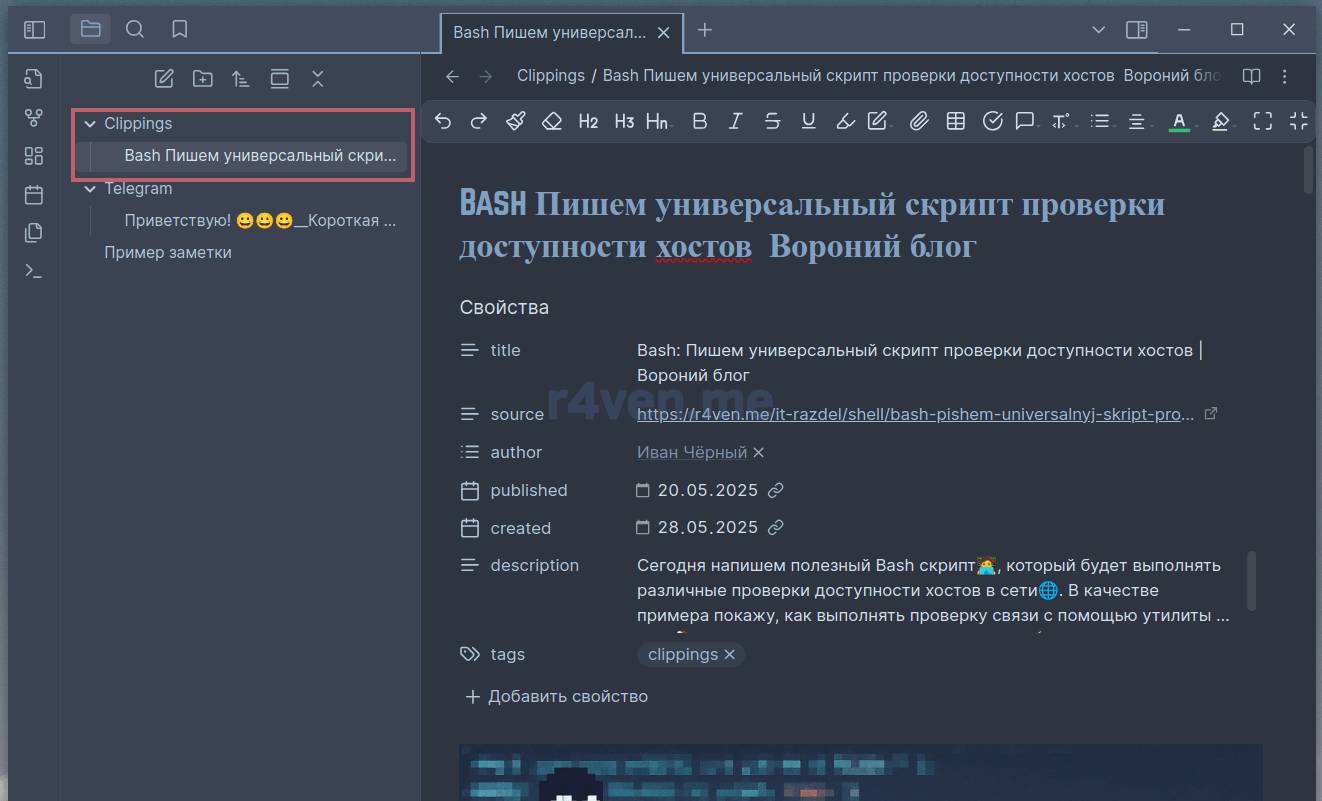
The saved note will open in Markdown format, displaying some metadata (this can be disabled in the extension settings):
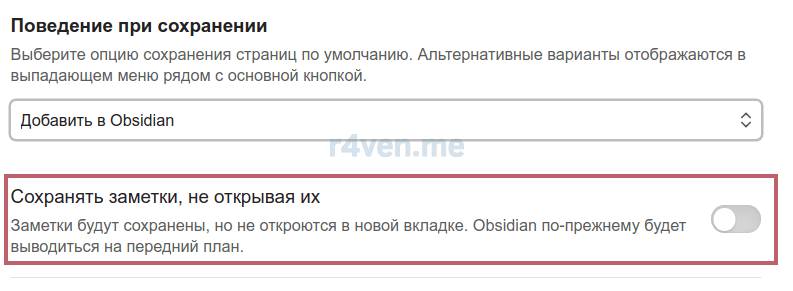
If you don’t want Obsidian to open every time you add a note, and just want it saved in the background, go into the plugin options and set this checkbox:
And restart the browser.
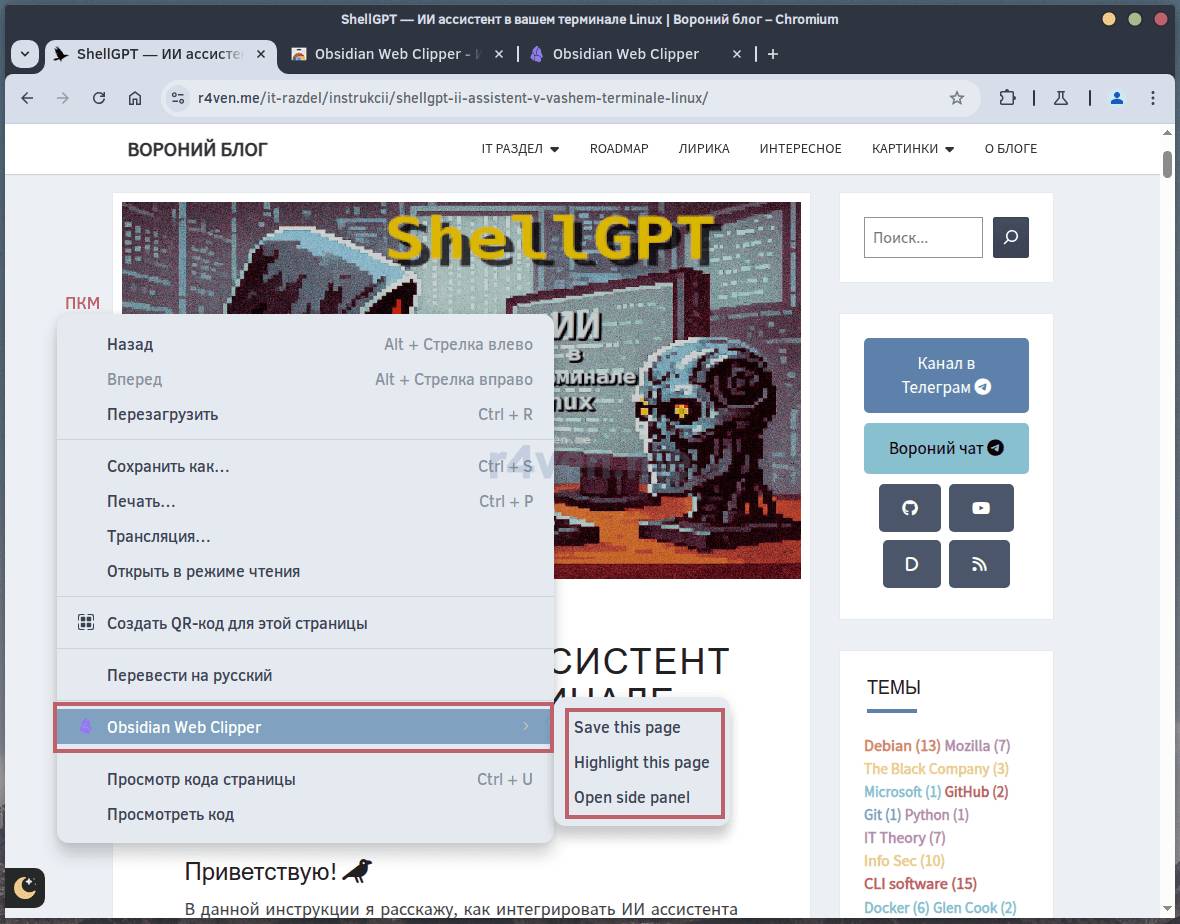
You can also save notes via the context menu:
If you don’t need to save the whole page, just select the fragment you need, right-click, and likewise choose Save this page.
Copy as Markdown
Here it’s much the same: go to the extension’s page and install it:
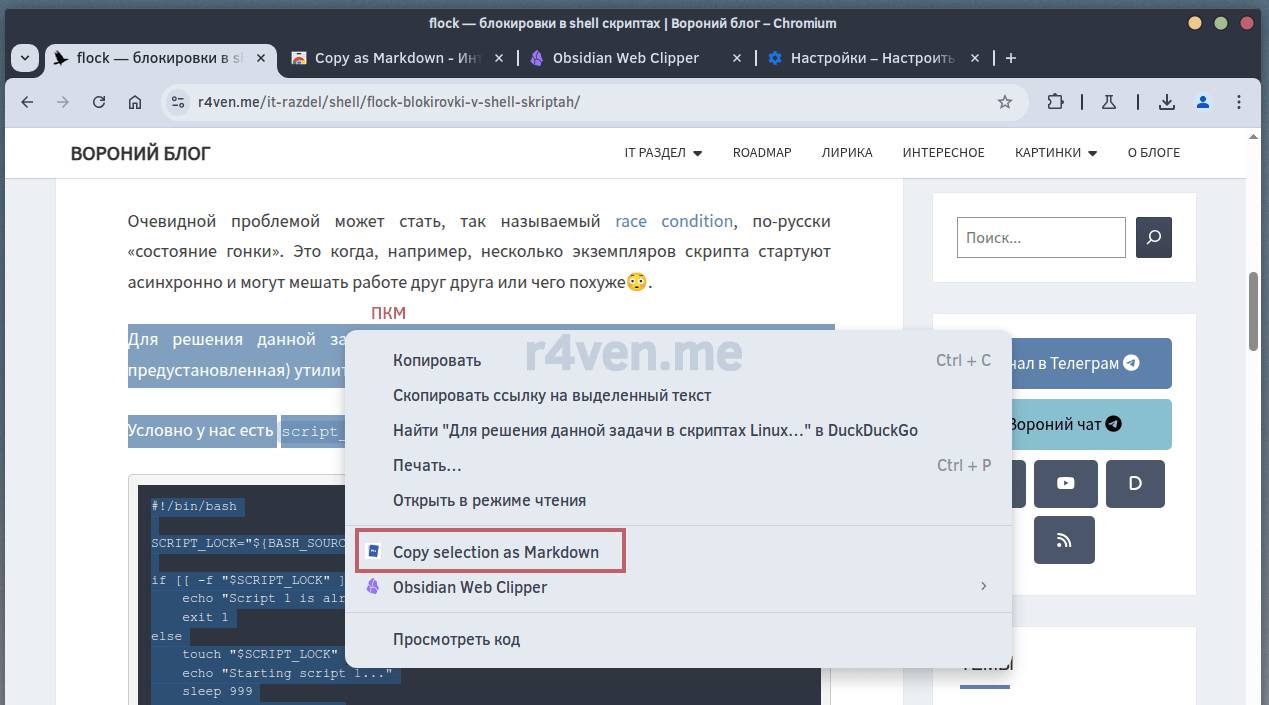
Now, when you select text on a page, the right-click context menu will have a Copy selection as Markdown button:
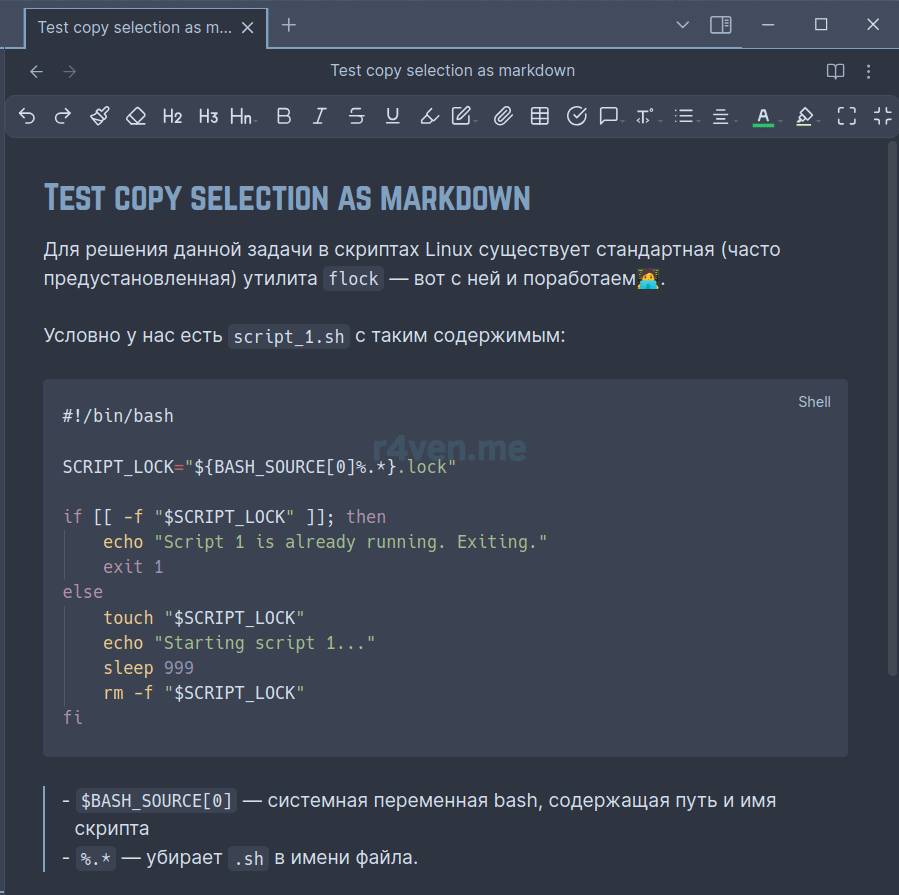
Now open the note you need in Obsidian and simply paste with Ctrl+v:
Convenient? You bet.
Afterword
I hope my article turned out useful for you.
I searched for a long time for a suitable tool to maintain my knowledge base. Most often these are notes on IT topics. Convenience, appearance, stability, and broad functionality matter a lot to me. I tried out many different open source solutions. Each had its pros, but something was always missing: either sync worked poorly, or the settings were limited, or there just wasn’t a smartphone port of the program.
I was looking for a universal solution. And Obsidian turned out to be a rare exception, despite being proprietary. It works equally well on PC and on smartphone. Fairly flexible settings + a huge number of community plugins. It’s not a “magic wand,” but at the moment it’s the most convenient solution I’ve tried.
As additional material, I recommend watching a couple videos about Obsidian:













Comments