

This time we’ll talk about remote connections using the secure SSH protocol, in particular its open implementation OpenSSH.
🖐️Hey!
Subscribe to our Telegram channel @r4ven_me📱, so you don’t miss new posts on the website 😉. If you have questions or just want to chat about the topic, feel free to join the Raven chat at @r4ven_me_chat🧐.
A bit of theory…
About the SSH Protocol and Its OpenSSH Implementation
SSH (Secure Shell) is a network protocol for securely connecting remotely to computers and transferring data over the internet. It helps protect transmitted information from unauthorized access.
OpenSSH is a set of open-source programs designed to implement the SSH protocol. OpenSSH is one of the most popular such implementations. This project was created as part of another project, the Unix-like OS OpenBSD.
SSH is used in various situations where you need to work with a computer remotely. For example, system administrators can use SSH to manage servers without needing to be physically near them. This allows running commands, copying files, and configuring the system remotely.
The SSH protocol appeared in 1995 and has two versions: SSH-1 and SSH-2. The first version had security flaws, so it didn’t become widely adopted. The second one, however, is considered more secure and is recognized by the community. This article will focus on it.
SSH is an application-layer protocol (layer 7) in the standard OSI (Open Systems Interconnection) model. It runs on top of TCP to provide secure remote communication between client and server. By default, TCP port 22 is used, but it can easily be changed in configuration files.
When establishing a connection via the SSH protocol, the following happens:
- Establishing a TCP connection: the client and server establish a connection using TCP (Transmission Control Protocol). TCP ensures reliable data transfer by splitting it into packets and confirming delivery.
- Initiating the SSH protocol: after the TCP connection is established, the client and server start the SSH protocol. The client sends a connection request to the server and initiates the authentication process.
- Authentication: the authentication process in SSH can include various methods, such as password authentication or the use of keys. The client and server exchange data to verify the client’s identity.
- Setting up a secure channel: after successful authentication, the client and server establish a secure channel that encrypts the data transmitted between them. Encryption ensures the confidentiality and integrity of the transmitted data.
- Client-server interaction: after the secure channel is established, the client and server can interact with each other. The client can send commands or requests to the server, and the server can respond to them or transmit the requested data.
Composition of the OpenSSH Package
Here’s a brief and complete description of the main utilities and commands from the OpenSSH package (click on the spoiler to view details):
sshd: Handles incoming SSH connections to the server.
sshd (SSH Daemon) is a server program that runs on the remote machine and handles incoming connections over the SSH protocol. It’s responsible for user authentication, managing SSH sessions, and handling requests for remote command execution.
ssh: Establishes a secure remote connection to a server.
The ssh command is used to establish a secure SSH connection to a remote server. It lets you work with a remote computer as if you were right next to it.
ssh-keygen: Generates and manages SSH keys.
The ssh-keygen utility helps create and manage SSH keys, which are used for authentication when connecting via SSH. It allows generating key pairs (public and private) and performing operations on keys, such as creation, import, export, deletion, etc.
ssh-copy-id: Copies an SSH public key to a remote server for password-free authentication.
The ssh-copy-id command is used to copy an SSH public key to a remote server, to enable authentication without entering a password when connecting.
ssh-agent: Stores SSH private keys and provides them as needed for automatic authentication.
ssh-agent is a program that stores your SSH private key and provides it as needed when connecting via SSH. It helps automatically perform authentication when you try to connect to a remote server. It’s often used if the private key is encrypted with a password.
ssh-add: Adds an SSH private key to ssh-agent for automatic authentication.
The ssh-add utility adds an SSH private key to ssh-agent, the program that manages SSH authentication keys. Once the key is added to ssh-agent, you won’t need to enter a password every time you connect via SSH to decrypt the private key.
scp: Copies files between a computer and a remote server over SSH.
The scp (Secure Copy) utility provides a way to securely copy files between a local computer and a remote server via SSH. It allows transferring files and even directories from the command line.
sftp-server: Handles file transfer requests over the SFTP protocol.
sftp-server is the server-side part of SFTP, which handles file transfer requests between the client (local computer) and the server via SSH. It ensures secure transfer of files and directories between the computer and the server.
sftp: Transfers files between a computer and a server via the interactive SFTP protocol.
sftp (SSH File Transfer Protocol) is an interactive file transfer protocol that allows managing files on a remote server via SSH. It provides a convenient interface for uploading, downloading, renaming, and deleting files on the remote machine.
ssh-keyscan: Scans remote hosts and retrieves their SSH public keys.
The ssh-keyscan utility allows scanning remote hosts and retrieving their SSH public keys. This is useful for verifying and storing the public keys of remote servers, in order to prevent spoofing and ensure a secure connection.
ssh-keysign: Used to sign the SSH host protocol.
The ssh-keysign utility is used to sign the SSH host protocol. It’s used in distributed authentication systems and ensures the security and integrity of the host protocol when connecting via SSH.
SSH Configuration Files in Linux
SSH configs in the Linux file system fall into two types: system-wide and user-level.
System-wide SSH configuration files:
/etc/ssh/sshd_config— SSH server settings. Defines parameters such as the listening port, access restrictions, authentication, and encryption;/etc/ssh/ssh_config— global SSH client settings. Defines parameters such as the server address, port, authentication, and encryption;/etc/ssh/ssh_known_hosts— stores the public keys of remote servers with which a connection was previously established;/etc/ssh/sshrc— contains commands and settings executed on every connection to a remote server;- SSH server private keys (
/etc/ssh/ssh_host_*_key) — contain the private SSH host keys used by the SSH server for authentication.
User-level SSH configuration files (stored in the home directory):
~/.ssh/config— user-level SSH client settings. Defines parameters for specific remote hosts or groups of hosts;~/.ssh/known_hosts— records of the public keys of remote servers with which a connection was established;~/.ssh/id_rsa,~/.ssh/id_dsa,~/.ssh/id_ecdsa,~/.ssh/id_ed25519— user authentication private keys;~/.ssh/id_*.pub— user authentication public keys;~/.ssh/authorized_keys— public keys allowed for authentication on remote servers.
Practice time!
Checking the Status of the sshd Service in Linux Mint 21
Linux Mint has the OpenSSH server and client working out of the box. The server is launched via the systemd unit ssh.service, pointed to by the symlink /etc/systemd/system/sshd.service:

Let’s check the status of the sshd service with a command and check that port 22 is open:
systemctl status sshd

sudo ss -tlnp | grep 22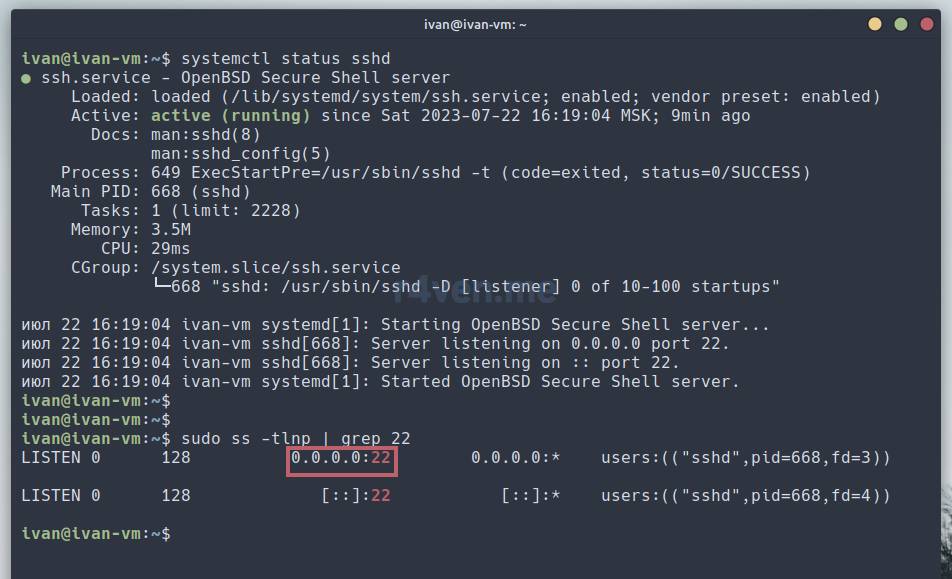
*sudo is needed for the second command to see the name of the process listening on the port
📝 Note
The ss (Socket Statistics) utility in Linux provides information about network connections, sockets, and other network structures. It’s a powerful tool for monitoring and analyzing network activity on a Linux system.
About the utility’s flags:
-t— show information about TCP connections;-l— list listening ports;-n— don’t use DNS resolution, output address and port information in numeric form;-p— shows the name of the process using the network connection (requiressudoto view).
If you’re curious what the systemd unit does, run in the terminal:
systemctl cat sshd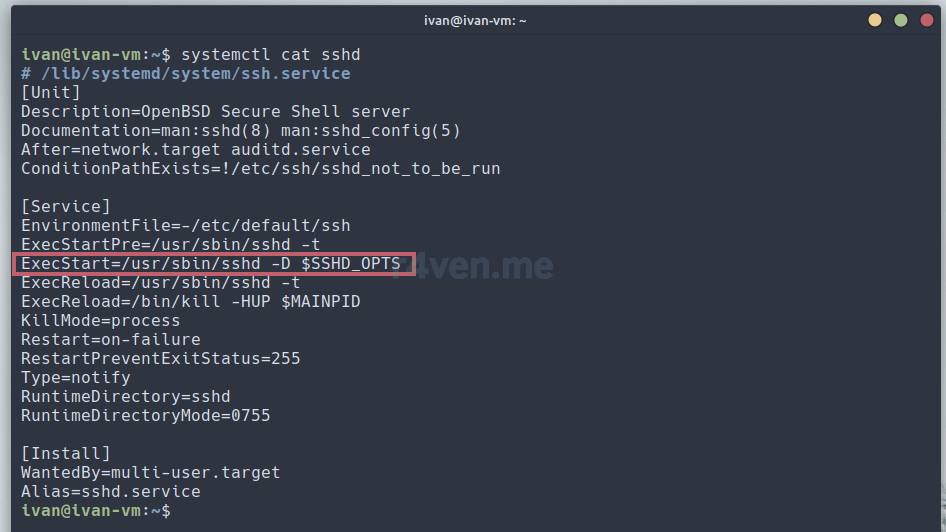
As we can see, the unit file launches the executable /usr/bin/sshd. The service file also includes various startup conditions.
If for some reason your service isn’t running, start it:
sudo systemctl start sshdIf the OpenSSH package isn’t installed, install it:
sudo apt install openssh-client openssh-serverConnecting via SSH to localhost
Let’s try connecting via SSH to ourselves, i.e. to localhost (127.0.0.1):
ssh localhost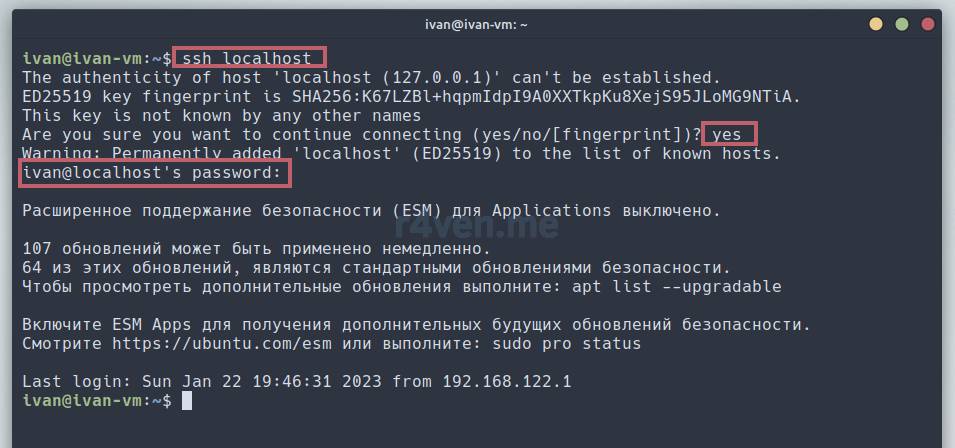
By default, if only the hostname is specified as an argument for SSH, the name of the current shell user and the standard port — 22 — will be used.
What happens on the first connection:
- SSH checks whether we’ve connected to this host before, and if not, warns us about it and asks us to type
yesto confirm; - Then the program will add the remote host’s public key to the file we already know about,
~/.ssh/known_hosts; - Then the program will ask us for the user’s password for authorization. In this case, it’s our local password.
If no SSH connections have been made before, then after confirming the connection host’s fingerprint, a known_hosts file with this fingerprint will be created automatically:

After connecting, nothing visibly changed in the console. But that’s because we connected to ourselves. When connecting to another machine, we would see a different command-line prompt.
To verify that we’re connected via SSH, run:
w

tty

pgrep -af ssh

echo $SSH_CONNECTION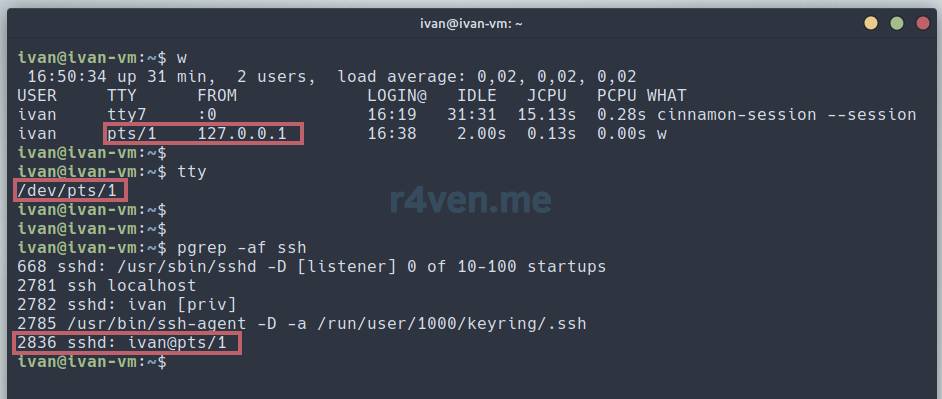
- The
wcommand — displays the list of logged-in users, including those connected viassh; - The
ttycommand — displays the name of the terminal device of the current session that’s connected to standard input; - The
pgrep -af sshcommand — displays the list of processes filtered by name; - The
echo $SSH_CONNECTIONcommand contains connection information: the source IP and PORT, and the remote host’s IP and PORT.
As we can see, after connecting via ssh, the system allocated a pseudo-terminal (pts) for us to work in the shell. Using the commands above, we verified that we’re working in the console through an SSH connection.
You can exit an SSH session the same way as in a regular terminal session: rebooting the computer with the exit command or Ctrl+d:

Connecting to a Virtual Machine (VirtualBox) Debian 12 via SSH
In previous posts we installed the VirtualBox hypervisor on Linux Mint 21 and created a virtual machine with Debian 12 on board.
Today, as an example, we’ll set up a connection via SSH to our virtual server.
By default, in VirtualBox all virtual machines get network settings via DHCP, and network access via NAT. That is, VirtualBox runs an internal router of sorts, with its own internal network, which gets internet access through the host (your computer) system. It follows that there’s no direct access from the host system into the guest (the Debian VM).
There are two solutions here: the first — set up forwarding of a network port from the host to the guest; the second — connect the VM to the host’s network via a bridged network, so the guest gets network settings from your main router. But since the second option isn’t always secure, we’ll simply forward a network port and keep our VM isolated.
Port Forwarding in VirtualBox
Launch VirtualBox and, with the VM powered off, go to its settings, in the Network section —> Advanced —> Port Forwarding:

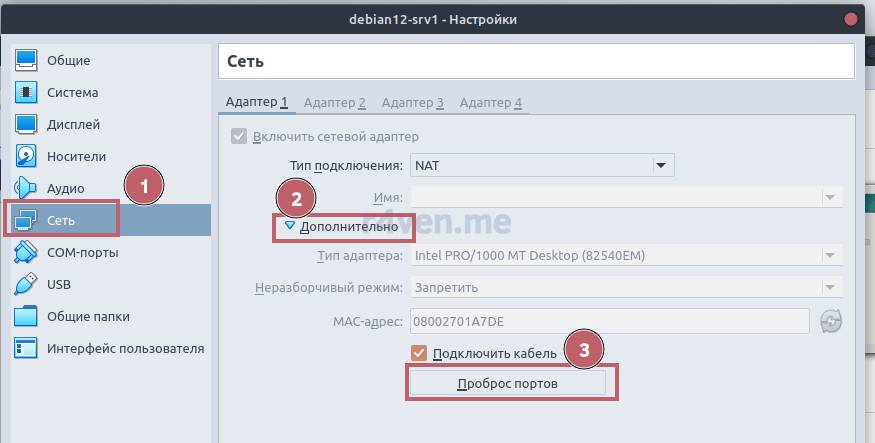
In the window that opens, click the green plus on the right, and a new forwarding rule row will appear. Here we specify an arbitrary host port (preferably not a standard one), in our case that’s 2222, and the port on the guest OS, the standard SSH server port — 22:
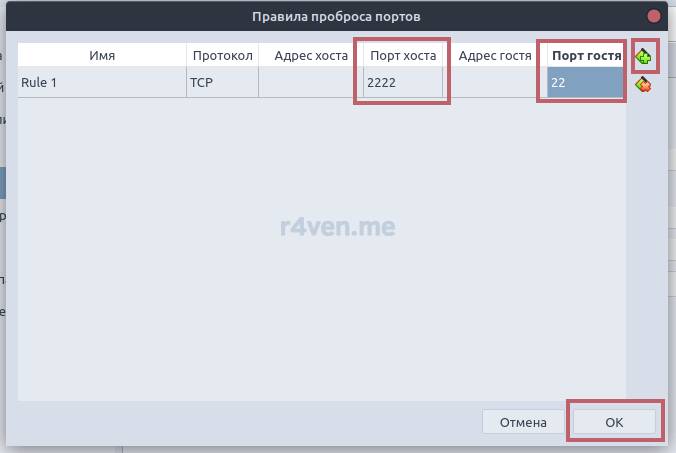
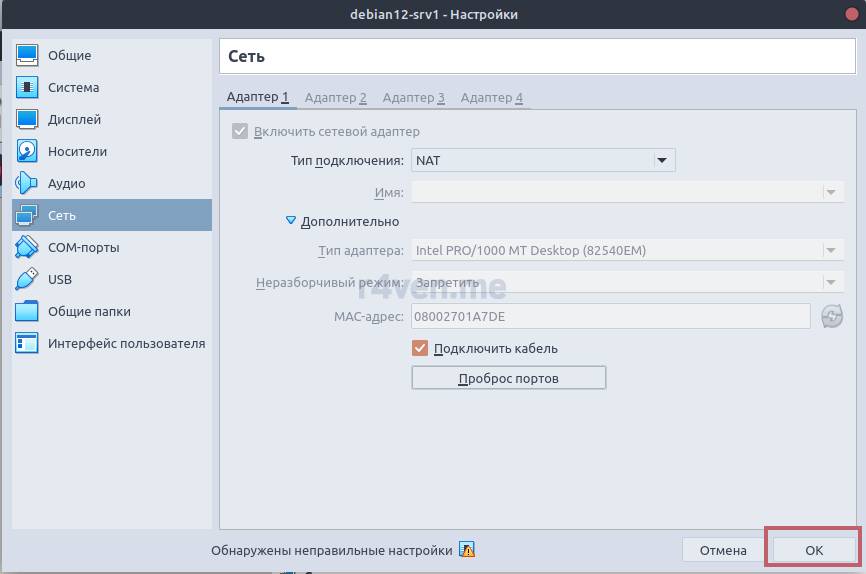
Then click OK twice.
Here’s the gist. We just performed a “forward” of a port (2222) from our host OS to the standard port that the SSH service listens on (22) on the virtual machine. That is, requests to port 2222 of our local computer will be redirected to port 22 of our virtual machine.
You can check availability like this:
nc -zv 127.0.0.1 2222

sudo ss -tlnp | grep 2222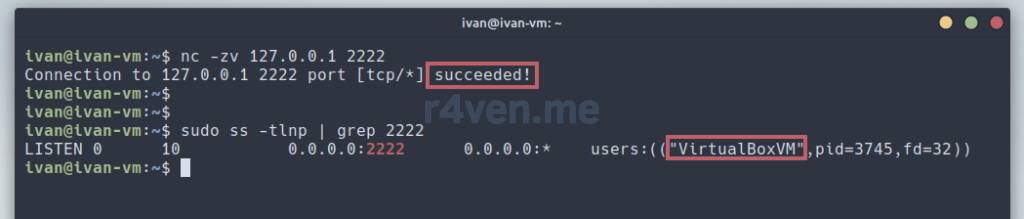
📝 Note
nc (netcat) is a command-line utility in Linux that allows establishing network connections and exchanging data over TCP or UDP protocols.
About the flags:
-zis used to scan ports on a remote host without establishing an actual connection;-v(verbose) is used to enable verbose output mode.
We can see the port is occupied by the VirtualBoxVM process.
Connecting via SSH to the VM Using a Linux Terminal
Now that we’ve configured everything, let’s try connecting to the VM via SSH through the terminal in Linux Mint:
ssh ivan@127.0.0.1 -p 2222Where:
ivan— the name of the remote user we’re connecting to the server as;@— the separator character;127.0.0.1— the loopback address of our local OS (also known as localhost);-p 2222— the-pflag is used to specify a port other than the standard one.
*Instead of the loopback address, the target host’s IP address is usually used. It can be either private (gray) or public (white). The main thing is that there’s network connectivity to it.
Since we haven’t connected to this host (the VM) before, SSH asks us to confirm that we trust this host, and that the digital fingerprint of this server needs to be added to known_hosts. We type yes and press Enter:
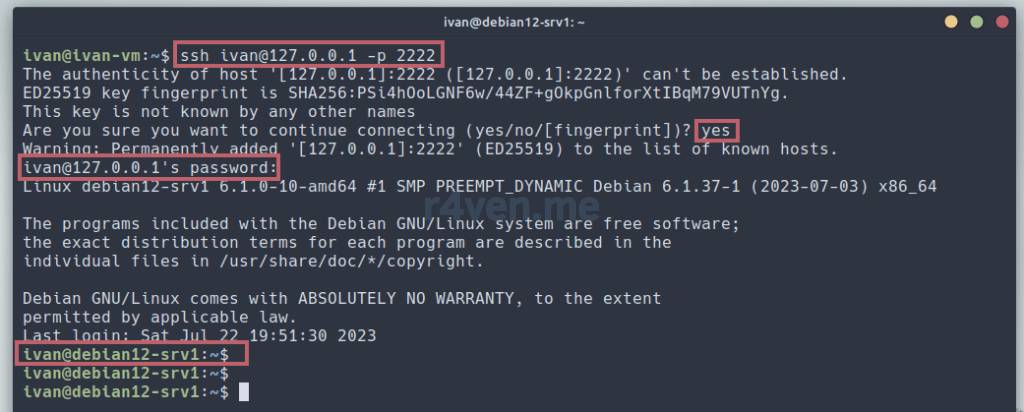
As we can see, the command-line prompt looks somewhat different from the one on our local computer (a different hostname). Let’s run a connection check, as we did before:
w

whoami

hostnamectl

cat /etc/os-release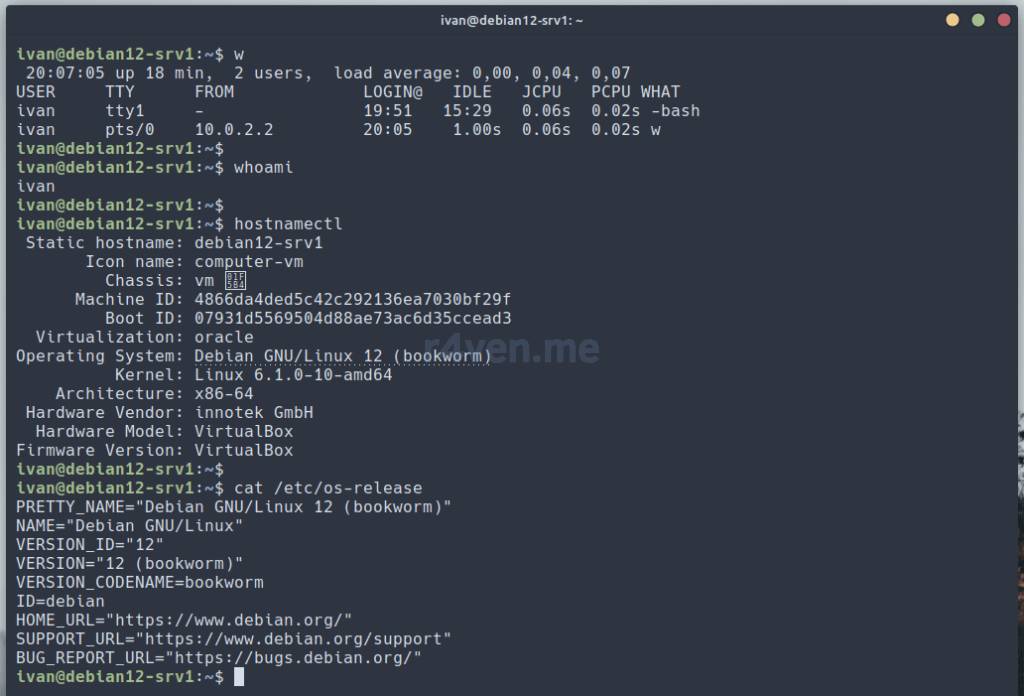
So now we’re connected over a secure channel to our virtual machine running Debian 12. Now we can do everything with it that we can do with a local computer, using the Linux command line.
This type of connection to remote servers with Unix-like systems is the most common. In the same way, you can connect to various virtual servers in the cloud or physical servers located anywhere in the world and accessible, for example, over the internet.
Setting Up Authorization Based on Cryptographic Keys
One of the “key” features of SSH is setting up authorization via asymmetric cryptographic keys.
In this example, we’ll create a pair of such keys and set up a connection to the VM using them, for password-free authorization.
The ssh-keygen utility is used to create keys. If run without parameters, it will generate a private and public key pair using the RSA algorithm — the most widely used one today, though already outdated.
ssh-keygenThen we’ll be asked to specify the location of the future files. We don’t specify anything, press Enter, and the files will have the standard location and name. Then we’ll be asked to create a password to encrypt the generated keys. This is necessary so the keys aren’t stored unencrypted. But since we want to connect to the remote host without a password, we’ll have to forgo this security measure. We also press Enter twice:
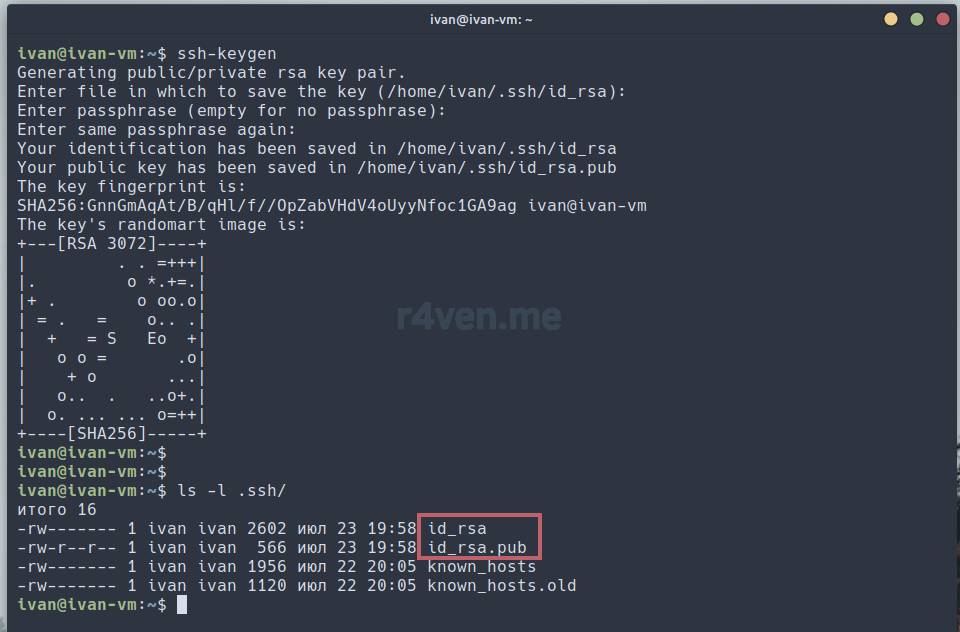
Two new files will appear in the ~/.ssh directory:
id_rsa— the private keyid_rsa.pub— the public key
Note that these keys work as a pair. The public key is imported onto remote systems, and the private key is used to actually connect to the remote host.
Let’s import our public key onto the remote system using the ssh-copy-id utility:
ssh-copy-id -p 2222 ivan@127.0.0.1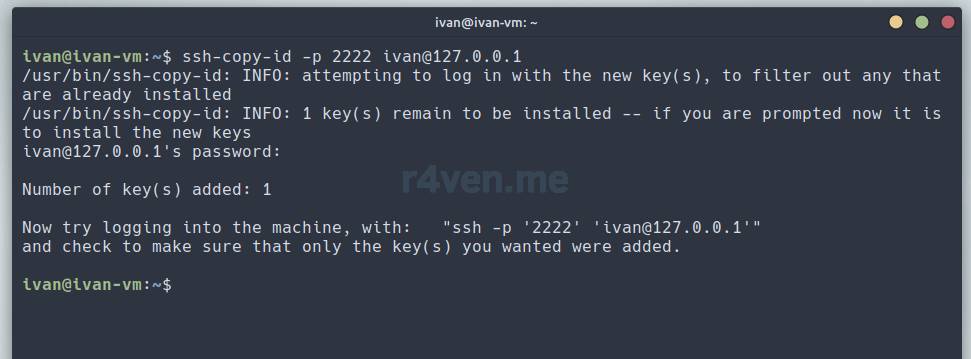
After completing password authorization, our key was successfully added to the remote system. Now, as requested, let’s try connecting to our VM without a password. Let’s try:
ssh ivan@127.0.0.1 -p 2222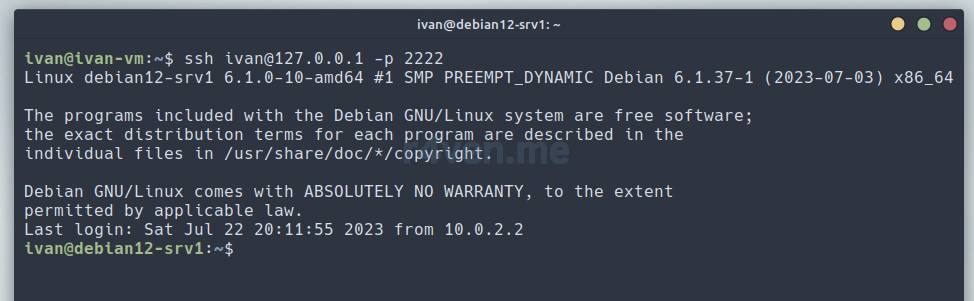
As we can see, authorization went through without asking for a password.
I’ll cover finer tuning of the SSH server and client in separate posts. The article is already getting quite long as it is)
List of Popular SSH GUI Clients for Linux/Windows
To wrap up, here’s a list of popular GUI implementations of SSH clients for Linux, and, well, Windows too, since you often have to connect to Linux servers from it)
For Linux:
- Any Linux terminal);
- Gnome connection manager (open source);
- Asbru Connection Manager (open source).
For Windows:
- Windows terminal (requires a native ssh client, open source);
- PuTTY (open source);
- MTPuTTY (freeware);
- Xshell (closed source).
Cross-platform (electron):
Conclusions
Today we learned what the secure shell SSH is and its popular implementation OpenSSH. We studied a bit of theory, learned which utilities are part of the OpenSSH package, and which configuration files exist. We also practiced connecting via the SSH protocol to a local machine, to a virtual machine, and set up a connection using RSA keys.
In future posts we’ll cover fine-tuning the client and the server separately. Don’t miss it)
Thanks for reading. All the best!
Useful Sources
- SSH Protocol — Wikipedia
- Official OpenSSH project website
- OpenSSH — Wikipedia
- Installing VirtualBox on Linux Mint 21 — Raven’s blog
- Installing a Debian 12 Server in VirtualBox — Raven’s blog
- VirtualBox on Windows — Raven’s blog
👨💻And…
Don’t forget about our Telegram channel 📱 and chat
Or maybe you want to become a co-author? Then click here🔗
💬 All the best ✌️
That should be it. If not, check the logs 🙂

Comments