
Today we will deploy our own VPN based on an OpenConnect server (ocserv) running over HTTPS and compatible with Cisco AnyConnect. We’ll package all of this into a docker container for ease of use and easy portability.
This server is planned to be used as the main connecting element, with the help of which we will configure network interaction between future projects and services. The server installation itself takes just a few commands. It’s going to be interesting 😉
🖐️Hey!
Subscribe to our Telegram channel @r4ven_me📱, so you don’t miss new posts on the website 😉. If you have questions or just want to chat about the topic, feel free to join the Raven chat at @r4ven_me_chat🧐.
Ocserv v1.4
In the OpenConnect repo (https://github.com/r4ven-me/openconnect) on GitHub, a user asked to update Ocserv to version 1.4.
There are no ready-made deb builds of this version yet, so we build it manually 👨💻.
If you’re interested, you can find the image build sources here: https://github.com/r4ven-me/openconnect/tree/main/src/server/v1.4
📔 How to run the build in a container
git clone https://github.com/r4ven-me/openconnect

cd ./openconnect/src/server/v1.4

docker compose upTo use the ready-made image, specify the corresponding tag from Docker hub: https://hub.docker.com/layers/r4venme/openconnect/v1.4
image: r4venme/openconnect:v1.4I can’t vouch for my maintainer skills, so of course I give no guarantees whatsoever 😉.
I updated one of my instances, so far so good, both from a smartphone and from a PC 😒.
Please don’t be intimidated by the “length” of this post. The article describes a lot of details, but the deployment procedure itself is very simple and takes just a few commands (check out the TLDR). Configuring the clients takes more time than that.
#############################################################
## if using a domain to obtain SSL certificates            ##
## uncomment the certbot service and the depends_on         ##
## parameter for the openconnect service + specify your     ##
## own values instead of *example* in the docker-compose.yml##
## file                                                      ##
#############################################################

### installing and configuring the server using the ready-made image ###

# create the project directory
mkdir /opt/openconnect && cd /opt/openconnect

# copy the docker-compose.yml file
curl -sSLO https://raw.githubusercontent.com/r4ven-me/openconnect/main/docker-compose.yml

# start the OpenConnect server
docker compose up -d && docker compose logs -f

# create a user with id "exampleuser" and name "Example User"
# the .p12 certificate file will be created in ./data/secrets
docker exec -it openconnect ocuser exampleuser 'Example User'

# configure autostart with systemd
docker compose down
curl -fLo /etc/systemd/system/openconnect.service https://raw.githubusercontent.com/r4ven-me/openconnect/main/src/server/v1.3-sid/openconnect.service
systemctl daemon-reload
systemctl enable --now openconnect

### example of client connection using the openconnect utility ###

# without a domain
sudo openconnect -c /home/exampleuser/exampleuser.p12 12.345.67.89:43443 <<< $(echo "examplepassword"$'\n'yes$'\n')

# with a domain
sudo openconnect -c /home/exampleuser/exampleuser.p12 example.com:43443 <<< $(echo "examplepassword"$'\n')❗️ Caution
Please note that the information provided in this article is intended solely for educational purposes. Any actions based on this information are taken at your own risk and responsibility.
Introduction
A few words about what the point of all this is.
In the corporate world there is a product called Cisco AnyConnect, which is a proprietary software for organizing virtual private networks (VPN), developed by Cisco.
As often happens in the IT industry, when there is significant demand for a product with closed source code, an “open” implementation of it appears. The most popular example of this phenomenon is Linux.
As you might have guessed, the OpenConnect we’re looking at today is an open source implementation of software for organizing a VPN service compatible with Cisco AnyConnect.
Here’s what Wikipedia says about OpenConnect:
OpenConnect is a free and open-source cross-platform multi-protocol virtual private network (VPN) client software which implement secure point-to-point connections.
Wikipedia
The OpenConnect project also includes a server called ocserv (OpenConnect server), thereby providing a full-fledged client-server VPN solution.
The main advantages of this solution:
- Cross-platform: clients for Linux, Windows, MacOS, Android, iOS, HarmonyOS;
- Flexible configuration, including per-user settings;
- SSL/TLS-based connection encryption;
- Simple to configure and use;
- Multiple authorization methods + two-factor authentication and much more.
Preliminary preparation
For convenience and ease of use, we will deploy the OpenConnect server in a docker container by building an image and running it with docker-compose. A prerequisite is a configured Linux server with docker engine installed and running on it. Also required is having root privileges (for my example) or the user being a member of the docker group if you’re doing the installation your own way.
If any of these items is missing, the following articles might be useful to you:
- Installing a Debian 12 server
- Initial setup of a Linux server using Debian as an example
- Installing Docker engine on a Linux server running Debian
The article on installing docker also has links to useful materials that explain, in accessible language, what it is, what it’s for, and what it consists of. If you have not worked with this containerization technology before, I strongly recommend reading them.
Since ocserv works over HTTPS with SSL encryption, a recommended (but not mandatory) condition is having a valid domain name. Specifically, an A-type DNS record pointing to your server’s external IP address. Such a record is added in the DNS settings of your domain provider. In my example, the address used is: vpn.r4ven.me. When configuring OpenConnect, the DNS address is needed to obtain free official SSL certificates from the Let’s Encrypt project.
If you don’t have a domain, then when configuring the server, specify its IP address instead of a DNS name. With this configuration, VPN clients will show a notification about connecting to an unverified source when connecting. There’s nothing wrong with this, it’s just inconvenient, and honestly, a bit annoying)
Project diagram
For visual reinforcement, below is a diagram of the future OpenConnect VPN server project:
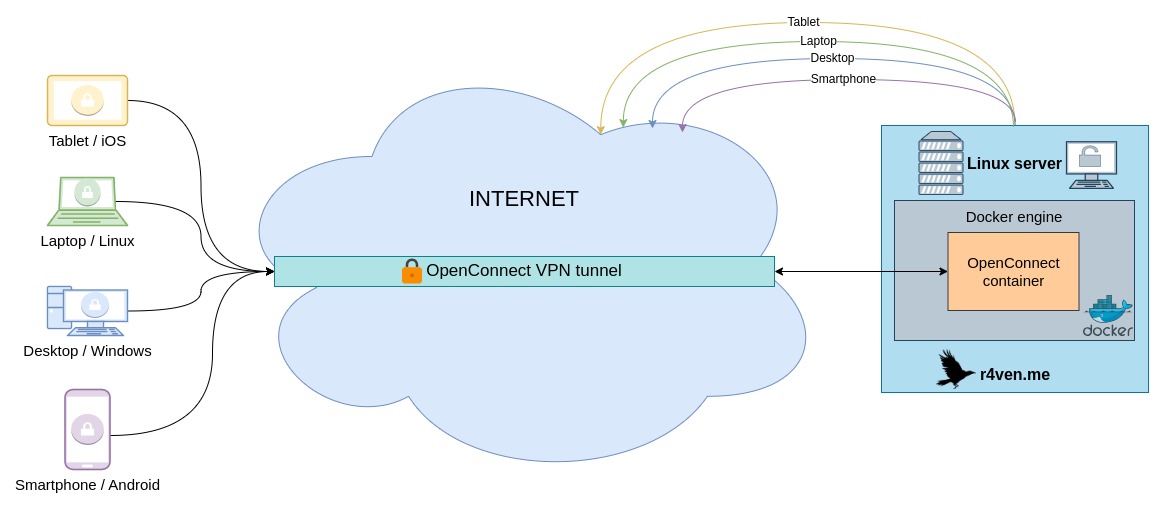
With this picture in mind, let’s proceed to installation and configuration.
Deploying the OpenConnect VPN server in docker
| Actions in the article were performed in the following distribution environment: | Debian 12 |
| The docker image with ocserv is based on: | Debian sid |
| Ocserv version inside the container: | 1.3 |
Background information
To quickly and conveniently set up your own VPN server, I prepared a small project using docker, docker-compose and bash.
The entire process of configuring the OpenConnect server inside the container has been automated.
Here’s a brief description of the project:
- Building a docker image based on Debian sid;
- Installing the ocserv server and helper utilities into the image;
- Copying the bash script
oscerv.shinto the image; - On first start, the script creates the necessary files and folders, including the main config
ocserv.conf, connect/disconnect scripts, and certificate files; - All of this is saved to a docker volume mounted into the
./datafolder; - The server files can easily be moved to other systems/platforms where docker runs (just transfer the
/opt/openconnectfolder); - The server config files can be customized to your needs;
- On container start, the
oscserv.shscript checks for the presence of files in the./datadirectory — if they exist, the server just starts; if not, the files are created again and the server starts afterward; - All necessary values for the configs and certificates are taken from environment variables defined in the
.envfile (if not specified, default values will be used);
Alright, enough padding, now let’s get on with installing and configuring our server.
Updating the system
First, it’s recommended to update your system to the latest state:
sudo -s

apt update && apt upgrade -y
Cloning the repository with the project’s source files
To clone the git repository we’ll need the command line utility from the package of the version control system of the same name — git. If this isn’t installed on your system, run:
apt install git
Now let’s clone the repository with the prepared files from my GitHub, then copy the v1.3-sid directory to /opt/openconnect and go into it:
git clone https://github.com/r4ven-me/openconnect /tmp/openconnect

cp -rv /tmp/openconnect/src/server/v1.3-sid /opt/openconnect && rm -rf /tmp/openconnect

cd /opt/openconnect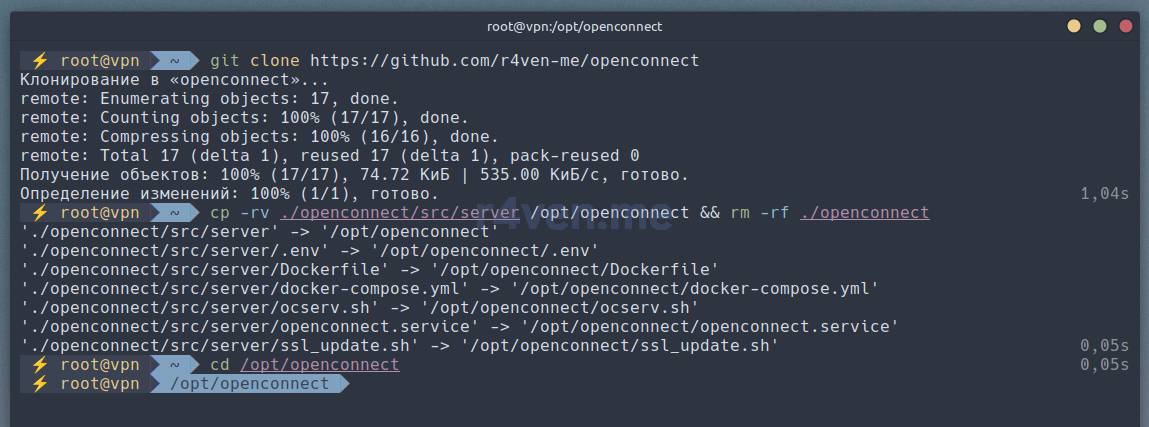
The
/opt(optional) directory is intended for installing “additional” software that isn’t standard for this OS.
The project files have the following structure:
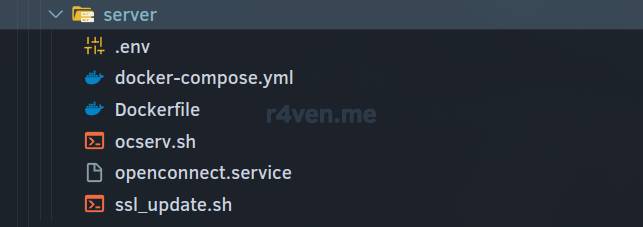
Where:
.env — file with variables:
 1TZ="Europe/Moscow"
 2SRV_PORT="43443"
 3SRV_CN="example.com"
 4SRV_CA="Example CA"
 5USER_EMAIL="mail@example.com"
 6#OTP_ENABLE="true"
 7#OTP_SEND_BY_EMAIL="true"
 8#MSMTP_HOST="smtp.example.com"
 9#MSMTP_PORT="465"
10#MSMTP_USER="mail@example.com"
11#MSMTP_PASSWORD="SuPeRsEcReTpAsSwOrD"
12#MSMTP_FROM="mail@example.com"
13#OTP_SEND_BY_TELEGRAM="true"
14#TG_TOKEN="1234567890:QWERTYuio-PA1DFGHJ2_KlzxcVBNmqWEr3t"docker-compose.yml — file describing the openconnect and certbot (Let’s Encrypt) services (containers):
 1---
 2
 3networks:
 4
 5  vpn:
 6    ipam:
 7      driver: default
 8      config:
 9        - subnet: 172.22.22.0/24
10          gateway: 172.22.22.1
11
12services:
13
14  certbot:
15    image: certbot/certbot
16    container_name: certbot
17    hostname: certbot
18    env_file:
19      - .env
20    volumes:
21      - ./data/ssl:/etc/letsencrypt
22    ports:
23      - 80:80
24    command: certonly --non-interactive --keep-until-expiring --standalone --preferred-challenges http --agree-tos --email ${USER_EMAIL} -d ${SRV_CN}
25
26  openconnect:
27    depends_on:
28      certbot:
29        condition: service_completed_successfully
30    build: .
31    image: openconnect
32    #image: r4venme/openconnect:v1.3-sid
33    container_name: openconnect
34    restart: unless-stopped
35    deploy:
36      resources:
37        limits:
38          cpus: '0.50'
39          memory: 200M
40    cap_add:
41      - NET_ADMIN
42    hostname: openconnect
43    env_file:
44      - .env
45    volumes:
46      - ./data:/etc/ocserv
47      #- /etc/passwd:/etc/passwd:ro
48      #- /etc/group:/etc/group:ro
49      #- /etc/shadow:/etc/shadow:ro
50    devices:
51      - /dev/net/tun:/dev/net/tun
52    ports:
53      - ${SRV_PORT}:443/tcp
54    networks:
55      vpn:
56 ipv4_address: 172.22.22.22Dockerfile — file describing the docker image build for the openconnect server:
 1FROM debian:sid
 2
 3LABEL maintainer="Ivan Cherniy <kar-kar@r4ven.me>"
 4
 5ENV OCSERV_DIR="/etc/ocserv"
 6ENV CERTS_DIR="${OCSERV_DIR}/certs"
 7ENV SSL_DIR="${OCSERV_DIR}/ssl"
 8ENV SECRETS_DIR="${OCSERV_DIR}/secrets"
 9ENV SCRIPTS_DIR="${OCSERV_DIR}/scripts"
10ENV PATH="${SCRIPTS_DIR}:${PATH}"
11ENV SRV_CN="example.com"
12ENV SRV_CA="Example CA"
13ENV OTP_ENABLE="false"
14ENV OTP_SEND_BY_EMAIL="false"
15ENV OTP_SEND_BY_TELEGRAM="false"
16ENV MSMTP_HOST="smtp.example.com"
17ENV MSMTP_PORT="465"
18ENV MSMTP_USER="mail@example.com"
19ENV MSMTP_PASSWORD="PaSsw0rD"
20ENV MSMTP_FROM="mail@example.com"
21ENV TG_TOKEN="1234567890:QWERTYuio-PA1DFGHJ2_KlzxcVBNmqWEr3t"
22
23WORKDIR $OCSERV_DIR
24
25ARG DEBIAN_FRONTEND=noninteractive
26
27RUN apt update && \
28    apt install --yes --no-install-recommends \
29        tini \
30        ocserv \
31        gnutls-bin \
32        iptables \
33        iproute2 \
34        iputils-ping \
35        less \
36        ca-certificates \
37        xxd \
38        libpam-oath \
39        oathtool \
40        qrencode \
41        curl \
42        jq \
43        msmtp && \
44    apt autoremove --yes && \
45    apt clean --yes && \
46    rm -rf /var/lib/{apt,dpkg,cache,log}/*
47
48COPY ./ocserv.sh /
49
50ENTRYPOINT ["/ocserv.sh"]
51
52CMD ["/usr/bin/tini", "--", "/usr/sbin/ocserv", "--config", "/etc/ocserv/ocserv.conf", "--foreground"]
53
54HEALTHCHECK --interval=5m --timeout=3s \
55 CMD curl -k https://localhost:443/ || exit 1ocserv.sh — bash script that runs when the container starts, performing the initial configuration and initialization of the ocserv process:
  1#!/bin/bash
  2
  3# Some protection
  4set -Eeuo pipefail
  5
  6# Define default server vars if they are not set
  7SRV_CN="${SRV_CN:=example.com}"
  8SRV_CA="${SRV_CA:=Example CA}"
  9OTP_ENABLE="${OTP_ENABLE:=false}"
 10OTP_SEND_BY_EMAIL="${OTP_SEND_BY_EMAIL:=false}"
 11OTP_SEND_BY_TELEGRAM="${OTP_SEND_BY_TELEGRAM:=false}"
 12MSMTP_HOST="${MSMTP_HOST:=smtp.example.com}"
 13MSMTP_PORT="${MSMTP_PORT:=465}"
 14MSMTP_USER="${MSMTP_USER:=mail@example.com}"
 15MSMTP_PASSWORD="${MSMTP_PASSWORD:=PaSsw0rD}"
 16MSMTP_FROM="${MSMTP_FROM:=mail@example.com}"
 17TG_TOKEN="${TG_TOKEN:=1234567890:QWERTYuio-PA1DFGHJ2_KlzxcVBNmqWEr3t}"
 18
 19# Ocserv vars (do not modify)
 20OCSERV_DIR="/etc/ocserv"
 21CERTS_DIR="${OCSERV_DIR}/certs"
 22SSL_DIR="${OCSERV_DIR}/ssl"
 23SECRETS_DIR="${OCSERV_DIR}/secrets"
 24SCRIPTS_DIR="${OCSERV_DIR}/scripts"
 25
 26# Create certs dirs
 27for sub_dir in "${OCSERV_DIR}"/{"ssl/live/${SRV_CN}","certs","secrets","scripts"}; do
 28    if [[ ! -d "$sub_dir" ]]; then
 29        mkdir -p "$sub_dir"
 30    fi
 31done
 32
 33if [[ -r /usr/share/doc/ocserv/sample.config && ! -e "${OCSERV_DIR}"/sample.config ]]; then
 34    cp /usr/share/doc/ocserv/sample.config "${OCSERV_DIR}"/
 35fi
 36
 37# Create ocserv config file
 38if [[ ! -e "${OCSERV_DIR}"/ocserv.conf ]]; then
 39cat << _EOF_ > "${OCSERV_DIR}"/ocserv.conf
 40auth = "certificate"
 41#auth = "plain[passwd=${OCSERV_DIR}/ocpasswd]"
 42#auth = "plain[passwd=/etc/ocserv/ocpasswd,otp=/etc/ocserv/secrets/users.oath]"
 43#enable-auth = "certificate"
 44#enable-auth = "pam"
 45tcp-port = 443
 46socket-file = /run/ocserv-socket
 47server-cert = ${SSL_DIR}/live/${SRV_CN}/fullchain.pem
 48server-key = ${SSL_DIR}/live/${SRV_CN}/privkey.pem
 49ca-cert = ${CERTS_DIR}/ca-cert.pem
 50isolate-workers = true
 51max-clients = 20
 52max-same-clients = 2
 53rate-limit-ms = 200
 54server-stats-reset-time = 604800
 55keepalive = 10
 56dpd = 120
 57mobile-dpd = 1800
 58switch-to-tcp-timeout = 25
 59try-mtu-discovery = false
 60cert-user-oid = 0.9.2342.19200300.100.1.1
 61tls-priorities = "NORMAL:%SERVER_PRECEDENCE:%COMPAT:-VERS-SSL3.0:-VERS-TLS1.0:-VERS-TLS1.1:-VERS-TLS1.3"
 62auth-timeout = 1000
 63min-reauth-time = 300
 64max-ban-score = 100
 65ban-reset-time = 1200
 66cookie-timeout = 600
 67deny-roaming = false
 68rekey-time = 172800
 69rekey-method = ssl
 70connect-script = ${SCRIPTS_DIR}/connect
 71disconnect-script = ${SCRIPTS_DIR}/disconnect
 72use-occtl = true
 73pid-file = /run/ocserv.pid
 74log-level = 1
 75device = vpns
 76predictable-ips = true
 77default-domain = $SRV_CN
 78ipv4-network = 10.10.10.0
 79ipv4-netmask = 255.255.255.0
 80tunnel-all-dns = true
 81dns = 8.8.8.8
 82ping-leases = false
 83config-per-user = ${OCSERV_DIR}/config-per-user/
 84cisco-client-compat = true
 85dtls-legacy = true
 86client-bypass-protocol = false
 87crl = /etc/ocserv/certs/crl.pem
 88#camouflage = true
 89#camouflage_secret = "secretword"
 90#camouflage_realm = "Welcome to admin panel"
 91_EOF_
 92fi
 93
 94# Create template for CA SSL cert
 95if [[ ! -e "${CERTS_DIR}"/ca.tmpl ]]; then
 96cat << _EOF_ > "${CERTS_DIR}"/ca.tmpl
 97organization = $SRV_CN
 98cn = $SRV_CA
 99serial = 001
100expiration_days = -1
101ca
102signing_key
103cert_signing_key
104crl_signing_key
105_EOF_
106fi
107
108# Create template for users SSL certs
109if [[ ! -e "${CERTS_DIR}"/users.cfg ]]; then
110cat << _EOF_ > "${CERTS_DIR}"/users.cfg
111organization = $SRV_CN
112cn = Example User
113uid = exampleuser
114expiration_days = -1
115tls_www_client
116signing_key
117encryption_key
118_EOF_
119fi
120
121# Create template for server self-signed SSL cert
122if [[ ! -e "${SSL_DIR}"/server.tmpl ]]; then
123cat << _EOF_ > "${SSL_DIR}"/server.tmpl
124cn = $SRV_CA
125dns_name = $SRV_CN
126organization = $SRV_CN
127expiration_days = -1
128signing_key
129encryption_key #only if the generated key is an RSA one
130tls_www_server
131_EOF_
132fi
133
134# Generate empty revoke file
135if [[ ! -e "${CERTS_DIR}"/crl.tmpl ]]; then
136cat << _EOF_ > "${CERTS_DIR}"/crl.tmpl
137crl_next_update = 365
138crl_number = 1
139_EOF_
140fi
141
142# Create connect script which runs for every user connection
143if [[ ! -e "${SCRIPTS_DIR}"/connect ]]; then
144cat << _EOF_ > "${SCRIPTS_DIR}"/connect && chmod +x "${SCRIPTS_DIR}"/connect
145#!/bin/bash
146
147set -Eeuo pipefail
148
149echo "\$(date) User \${USERNAME} Connected - Server: \${IP_REAL_LOCAL} VPN IP: \${IP_REMOTE}  Remote IP: \${IP_REAL} Device:\${DEVICE}"
150echo "Running iptables MASQUERADE for User \${USERNAME} connected with VPN IP \${IP_REMOTE}"
151iptables -t nat -A POSTROUTING -s "\${IP_REMOTE}"/32 -o eth0 -j MASQUERADE
152_EOF_
153fi
154
155# Create disconnect script which runs for every user disconnection
156if [[ ! -e "${SCRIPTS_DIR}"/disconnect ]]; then
157cat << _EOF_ > "${SCRIPTS_DIR}"/disconnect && chmod +x "${SCRIPTS_DIR}"/disconnect
158#!/bin/bash
159
160set -Eeuo pipefail
161
162echo "\$(date) User \${USERNAME} Disconnected - Bytes In: \${STATS_BYTES_IN} Bytes Out: \${STATS_BYTES_OUT} Duration:\${STATS_DURATION}"
163iptables -t nat -D POSTROUTING -s "\${IP_REMOTE}"/32 -o eth0 -j MASQUERADE
164_EOF_
165fi
166
167# Create script to create new users
168if [[ ! -e "${SCRIPTS_DIR}"/ocuser ]]; then
169cat << _EOF_ > "${SCRIPTS_DIR}"/ocuser && chmod +x "${SCRIPTS_DIR}"/ocuser
170#!/bin/bash
171
172set -Eeuo pipefail
173
174# Check and set script params
175if [[ \$# -eq 2 ]]; then
176    USER_UID="\$1"
177    USER_CN="\$2"
178elif [[ \$# -eq 3 ]]; then
179	if [[ "\$1" == "-A" ]]; then
180    		USER_UID="\$2"
181    		USER_CN="\$3"
182	else
183		echo "Use -A key as a first param to generate cert for IOS devices" >&2
184        exit 1
185	fi
186else
187    echo "Please run script with two params: username and 'Common Username'" >&2
188    echo "Example: ocuser john 'John Doe'" >&2
189    echo "For IOS or HarmonyOS devices add -A key as first param in command" >&2
190    echo "Example: ocuser -A steve 'Steve Jobs'" >&2
191    exit 1
192fi
193
194# Modify user cert template and generate user key, cert and protected .p12 file
195sed -i -e "s/^organization.*/organization = \$SRV_CN/" -e "s/^cn.*/cn = \$USER_CN/" -e "s/^uid.*/uid = \$USER_UID/g" "\${CERTS_DIR}"/users.cfg
196echo "\$(tr -cd "[:alnum:]" < /dev/urandom | head -c 60)" | ocpasswd -c "\${OCSERV_DIR}"/ocpasswd "\$USER_UID"
197certtool --generate-privkey --outfile "\${CERTS_DIR}"/"\${USER_UID}"-privkey.pem
198certtool --generate-certificate --load-privkey "\${CERTS_DIR}"/"\${USER_UID}"-privkey.pem --load-ca-certificate "\${CERTS_DIR}"/ca-cert.pem --load-ca-privkey "\${CERTS_DIR}"/ca-key.pem --template "\${CERTS_DIR}"/users.cfg --outfile "\${CERTS_DIR}"/"\${USER_UID}"-cert.pem
199if [[ "\$1" == "-A" ]]; then
200	sleep 1 && certtool --to-p12 --load-certificate "\${CERTS_DIR}"/"\${USER_UID}"-cert.pem --load-privkey "\${CERTS_DIR}"/"\${USER_UID}"-privkey.pem --pkcs-cipher 3des-pkcs12 --hash SHA1 --outder --outfile "\${SECRETS_DIR}"/"\${USER_UID}".p12
201else
202	sleep 1 && certtool --load-certificate "\${CERTS_DIR}"/"\${USER_UID}"-cert.pem --load-privkey "\${CERTS_DIR}"/"\${USER_UID}"-privkey.pem --pkcs-cipher aes-256 --to-p12 --outder --outfile "\${SECRETS_DIR}"/"\${USER_UID}".p12
203fi
204_EOF_
205fi
206
207# Add revoke script
208if [[ ! -e "${SCRIPTS_DIR}"/ocrevoke ]]; then
209cat << _EOF_ > "${SCRIPTS_DIR}"/ocrevoke && chmod +x "${SCRIPTS_DIR}"/ocrevoke
210#!/bin/bash
211
212set -Eeuo pipefail
213
214if [[ ! -e "\${CERTS_DIR}"/crl.tmpl ]]; then
215cat << __EOF__ > "\${CERTS_DIR}"/crl.tmpl
216crl_next_update = 365
217crl_number = 1
218__EOF__
219fi
220
221if [[ \$# -eq 1 ]]; then
222    if [[ "\$1" == "HELP" ]]; then
223        echo "Usage:
224        CMD to revoke cert of some user: ocrevoke <exist_user>
225        CMD to apply current revoked.pem: ocrevoke RELOAD
226        CMD to reset all revokes: ocrevoke RESET
227        CMD to print this help: ocrevoke HELP"
228    elif [[ "\$1" == "RESET" ]]; then
229        certtool --generate-crl --load-ca-privkey "\${CERTS_DIR}"/ca-key.pem --load-ca-certificate "\${CERTS_DIR}"/ca-cert.pem --template "\${CERTS_DIR}"/crl.tmpl --outfile "\${CERTS_DIR}"/crl.pem
230        occtl reload
231    elif [[ "\$1" == "RELOAD" ]]; then
232        certtool --generate-crl --load-ca-privkey "\${CERTS_DIR}"/ca-key.pem --load-ca-certificate "\${CERTS_DIR}"/ca-cert.pem --load-certificate "\${CERTS_DIR}"/revoked.pem --template "\${CERTS_DIR}"/crl.tmpl --outfile "\${CERTS_DIR}"/crl.pem
233    else
234        USER_UID="\$1"
235        cat "\${CERTS_DIR}"/"\${USER_UID}"-cert.pem >> "\${CERTS_DIR}"/revoked.pem
236        certtool --generate-crl --load-ca-privkey "\${CERTS_DIR}"/ca-key.pem --load-ca-certificate "\${CERTS_DIR}"/ca-cert.pem --load-certificate "\${CERTS_DIR}"/revoked.pem --template "\${CERTS_DIR}"/crl.tmpl --outfile "\${CERTS_DIR}"/crl.pem
237        occtl reload
238    fi
239else
240    echo "Usage:
241    CMD to revoke cert of some user: ocrevoke <exist_user>
242    CMD to apply current revoked.pem: ocrevoke RELOAD
243    CMD to reset all revokes: ocrevoke RESET
244    CMD to print this help: ocrevoke HELP"
245fi
246_EOF_
247fi
248
249# Add ocuser2fa script
250if [[ "$OTP_ENABLE" == "true" && ! -e "${SCRIPTS_DIR}"/ocuser2fa ]]; then
251cat << _EOF_ > "${SCRIPTS_DIR}"/ocuser2fa && chmod +x "${SCRIPTS_DIR}"/ocuser2fa
252#!/bin/bash
253
254set -Eeuo pipefail
255
256if [[ \$# -eq 1 ]]; then
257    USER_ID="\$1"
258    OTP_SECRET="\$(head -c 16 /dev/urandom | xxd -c 256 -ps)"
259    OTP_SECRET_BASE32="\$(echo 0x"\${OTP_SECRET}" | xxd -r -c 256 | base32)"
260    OTP_SECRET_QR="otpauth://totp/\$USER_ID?secret=\$OTP_SECRET_BASE32&issuer=$SRV_CA&algorithm=SHA1&digits=6&period=30"
261
262    if [[ ! -e "\${SECRETS_DIR}"/users.oath ]] || ! grep -qP "(?<!\\S)\${USER_ID}(?!\\S)" "\${SECRETS_DIR}"/users.oath; then
263        echo "HOTP/T30 \$USER_ID - \$OTP_SECRET" >> "\${SECRETS_DIR}"/users.oath
264        echo "OTP secret for \$USER_ID: \$OTP_SECRET"
265        echo "OTP secret in base32: \$OTP_SECRET_BASE32"
266        echo "OTP secret in QR code:"
267        qrencode -t ANSIUTF8 "\$OTP_SECRET_QR"
268        qrencode "\$OTP_SECRET_QR" -s 10 -o "\${SECRETS_DIR}"/otp_"\${USER_ID}".png
269        echo "TOTP secret in png image saved at: \${SECRETS_DIR}/otp_\${USER_ID}.png"
270
271        send_qr_by_email() {
272            EMAIL_REGEX="^[a-zA-Z0-9._-]+@[a-zA-Z0-9.-]+\\.[a-zA-Z]{2,}$"
273
274            if [[ \$USER_ID =~ \$EMAIL_REGEX ]]; then
275                cat << EOF | msmtp --file="\${SCRIPTS_DIR}"/msmtprc "\$USER_ID"
276Subject: TOTP QR code for OpenConnect auth
277MIME-Version: 1.0
278Content-Type: multipart/mixed; boundary="boundary"
279
280--boundary
281Content-Type: text/plain
282
283TOTP secret for OpenConnect (base32):
284\$OTP_SECRET_BASE32
285
286--boundary
287Content-Type: image/png; name="file.png"
288Content-Transfer-Encoding: base64
289Content-Disposition: attachment; filename="file.png"
290
291\$(base64 "\${SECRETS_DIR}"/otp_"\${USER_ID}".png)
292--boundary--
293EOF
294                echo "[\$(date '+%F %T')] - TOTP secret and QR code successfully sent to \$USER_ID via Email" | tee -a "\${OCSERV_DIR}"/pam.log
295            else
296                return 0
297            fi
298        }
299
300        if [[ "\$OTP_SEND_BY_EMAIL" == "true" ]]; then send_qr_by_email; fi
301
302        send_qr_by_telegram() {
303            TG_REGEX="^[a-zA-Z][a-zA-Z0-9_]{4,31}\$"
304
305            if [[ \$USER_ID =~ \$TG_REGEX ]]; then
306                TG_MESSAGE="TOTP secret for OpenConnect (base32):
307\$OTP_SECRET_BASE32"
308                TG_USER_FILE="\${SCRIPTS_DIR}/tg_users.txt"
309
310                if grep -qP "(?<!\\S)\${USER_ID}(?!\\S)" "\$TG_USER_FILE" 2> /dev/null; then
311                    TG_CHAT_ID=\$(grep -P "(?<!\\S)\${USER_ID}(?!\\S)" "\$TG_USER_FILE" | awk '{print \$1}')
312                else
313                    TG_RESPONSE="\$(curl -s "https://api.telegram.org/bot\$TG_TOKEN/getUpdates")"
314                    TG_CHAT_ID=\$(echo "\$TG_RESPONSE" | jq -r --arg USERNAME "\$USER_ID" '.result[] | select(.message.from.username == \$USERNAME) | .message.chat.id')
315
316                    if [[ -z "\$TG_CHAT_ID" ]]; then
317                        echo "[\$(date '+%F %T')] - User was not found or did not interact with the bot" >> "\${OCSERV_DIR}"/pam.log
318                        return 0
319                    fi
320                    echo "\$TG_CHAT_ID \$USER_ID" >> "\$TG_USER_FILE"
321                fi
322
323                curl -s -X POST "https://api.telegram.org/bot\$TG_TOKEN/sendPhoto" \\
324                    -H "Content-Type: multipart/form-data" \\
325                    -F "chat_id=\$TG_CHAT_ID" \\
326                    -F "photo=@\${SECRETS_DIR}/otp_\${USER_ID}.png" \\
327                    -F "caption=\$TG_MESSAGE" > /dev/null 2>> "\${OCSERV_DIR}"/pam.log
328
329                echo "[\$(date '+%F %T')] - TOTP secret and QR code successfully sent to \$USER_ID via Telegram" | tee -a "\${OCSERV_DIR}"/pam.log
330            fi
331        }
332
333        if [[ "\$OTP_SEND_BY_TELEGRAM" == "true" ]]; then send_qr_by_telegram; fi
334
335    else
336        echo "OTP token already exists for \$USER_ID in \${SECRETS_DIR}/users.oath"
337        exit 1
338    fi
339else
340    echo "Usage: \$(basename "\$0") <user_id>"
341    exit 1
342fi
343_EOF_
344fi
345
346if [[ "$OTP_ENABLE" == "true" && ! -e "${SCRIPTS_DIR}"/otp_sender ]]; then
347cat << _EOF_ > "${SCRIPTS_DIR}"/otp_sender && chmod +x "${SCRIPTS_DIR}"/otp_sender
348#!/bin/bash
349
350set -Eeuo pipefail
351
352OCSERV_DIR="$OCSERV_DIR"
353SECRETS_DIR="$SECRETS_DIR"
354SCRIPTS_DIR="$SCRIPTS_DIR"
355OTP_SEND_BY_EMAIL="$OTP_SEND_BY_EMAIL"
356OTP_SEND_BY_TELEGRAM="$OTP_SEND_BY_TELEGRAM"
357TG_TOKEN="$TG_TOKEN"
358
359echo "[\$(date '+%F %T')] - PAM user \$PAM_USER is trying to connect to ocserv" >> "\${OCSERV_DIR}"/pam.log
360
361otp_sender_by_email() {
362    EMAIL_REGEX="^[a-zA-Z0-9._-]+@[a-zA-Z0-9.-]+\\.[a-zA-Z]{2,}$"
363    if [[ \$PAM_USER =~ \$EMAIL_REGEX ]]; then true; else return 0; fi
364
365    if [[ -e "\${SECRETS_DIR}"/users.oath ]] && grep -qP "(?<!\\S)\${PAM_USER}(?!\\S)" "\${SECRETS_DIR}"/users.oath; then
366        OTP_TOKEN="\$(oathtool --totp=SHA1 --time-step-size=30 --digits=6 \$(grep -P "(?<!\\S)\${PAM_USER}(?!\\S)" \${SECRETS_DIR}/users.oath | awk '{print \$4}'))"
367
368        echo -e "Subject: TOTP token for OpenConnect\n\n\${OTP_TOKEN}" | msmtp --file="\${SCRIPTS_DIR}"/msmtprc "\$PAM_USER"
369        echo "[\$(date '+%F %T')] - TOTP token successfully sent to \$PAM_USER" >> "\${OCSERV_DIR}"/pam.log
370    fi
371}
372
373otp_sender_by_telegram() {
374    TG_REGEX="^[a-zA-Z][a-zA-Z0-9_]{4,31}\$"
375    if [[ \$PAM_USER =~ \$TG_REGEX ]]; then true; else return 0; fi
376
377    if grep -qP "(?<!\\S)\${PAM_USER}(?!\\S)" "\${SECRETS_DIR}"/users.oath 2> /dev/null; then
378        OTP_TOKEN="\$(oathtool --totp=SHA1 --time-step-size=30 --digits=6 \$(grep -P "(?<!\\S)\${PAM_USER}(?!\\S)" \${SECRETS_DIR}/users.oath | awk '{print \$4}'))"
379        TG_MESSAGE="TOTP token for OpenConnect: \$OTP_TOKEN"
380        TG_USER_FILE="\${SCRIPTS_DIR}/tg_users.txt"
381
382        if grep -qP "(?<!\\S)\$PAM_USER(?!\\S)" "\$TG_USER_FILE"; then
383            TG_CHAT_ID=\$(grep -P "(?<!\\S)\${PAM_USER}(?!\\S)" "\$TG_USER_FILE" | awk '{print \$1}')
384        else
385            TG_RESPONSE="\$(curl -s "https://api.telegram.org/bot\$TG_TOKEN/getUpdates")"
386            TG_CHAT_ID=\$(echo "\$TG_RESPONSE" | jq -r --arg USERNAME "\$PAM_USER" '.result[] | select(.message.from.username == \$USERNAME) | .message.chat.id')
387
388            if [[ -z "\$TG_CHAT_ID" ]]; then
389                echo "[\$(date '+%F %T')] - User was not found or did not interact with the bot" >> "\${OCSERV_DIR}"/pam.log
390                return 0
391            fi
392            echo "\$TG_CHAT_ID \$PAM_USER" >> "\$TG_USER_FILE"
393        fi
394
395        curl -s -X POST "https://api.telegram.org/bot\$TG_TOKEN/sendMessage" -d "chat_id=\$TG_CHAT_ID" -d "text=\$TG_MESSAGE" 2>> "\${OCSERV_DIR}"/pam.log
396        echo "[\$(date '+%F %T')] - TOTP token successfully sent to \$PAM_USER" >> "\${OCSERV_DIR}"/pam.log
397    fi
398}
399
400if [[ "\$OTP_SEND_BY_EMAIL" == "true" ]]; then otp_sender_by_email; fi &
401
402if [[ "\$OTP_SEND_BY_TELEGRAM" == "true" ]]; then otp_sender_by_telegram; fi &
403_EOF_
404elif [[ "$OTP_ENABLE" == "true" && -e "${SCRIPTS_DIR}"/otp_sender ]]; then
405    sed -i "s|OCSERV_DIR=.*|OCSERV_DIR=\"$OCSERV_DIR\"|" "${SCRIPTS_DIR}"/otp_sender
406    sed -i "s|SECRETS_DIR=.*|SECRETS_DIR=\"$SECRETS_DIR\"|" "${SCRIPTS_DIR}"/otp_sender
407    sed -i "s|SCRIPTS_DIR=.*|SCRIPTS_DIR=\"$SCRIPTS_DIR\"|" "${SCRIPTS_DIR}"/otp_sender
408    sed -i "s|OTP_SEND_BY_EMAIL=.*|OTP_SEND_BY_EMAIL=\"$OTP_SEND_BY_EMAIL\"|" "${SCRIPTS_DIR}"/otp_sender
409    sed -i "s|OTP_SEND_BY_TELEGRAM=.*|OTP_SEND_BY_TELEGRAM=\"$OTP_SEND_BY_TELEGRAM\"|" "${SCRIPTS_DIR}"/otp_sender
410    sed -i "s|TG_TOKEN=.*|TG_TOKEN=\"$TG_TOKEN\"|" "${SCRIPTS_DIR}"/otp_sender
411fi
412
413# Add msmtprc config
414if [[ "$OTP_ENABLE" == "true" && "$OTP_SEND_BY_EMAIL" == "true" && ! -e "${OCSERV_DIR}"/msmtprc ]]; then
415cat << _EOF_ > "${SCRIPTS_DIR}"/msmtprc && chmod 400 "${SCRIPTS_DIR}"/msmtprc
416account default
417host $MSMTP_HOST
418port $MSMTP_PORT
419auth on
420user $MSMTP_USER
421password $MSMTP_PASSWORD
422from $MSMTP_FROM
423tls on
424tls_starttls off
425logfile $OCSERV_DIR/pam.log
426_EOF_
427fi
428
429# Config OTP with PAM
430pam_otp() {
431    if [[ $OTP_ENABLE == "true" ]]; then
432        until [[ -e /etc/pam.d/ocserv ]]; do sleep 5; done
433        if grep -q 'otp_sender' /etc/pam.d/ocserv && grep -q 'users.oath' /etc/pam.d/ocserv; then return 0; fi
434        sleep 3
435        echo "auth optional pam_exec.so ${SCRIPTS_DIR}/otp_sender" >> /etc/pam.d/ocserv
436        echo "auth requisite pam_oath.so debug usersfile=${SECRETS_DIR}/users.oath window=20" >> /etc/pam.d/ocserv
437    fi
438}
439
440# Start ocserv service
441if [[ -e "${SSL_DIR}"/live/"${SRV_CN}"/privkey.pem && -e "${SSL_DIR}"/live/"${SRV_CN}"/fullchain.pem && -e "${CERTS_DIR}"/ca-key.pem && -e "${CERTS_DIR}"/ca-cert.pem ]]; then
442    pam_otp &
443    echo "Starting OpenConnect Server"
444    exec "$@" || { echo "Starting failed" >&2; exit 1; }
445else
446    # Server certificates generation
447    certtool --generate-privkey --outfile "${CERTS_DIR}"/ca-key.pem
448    certtool --generate-self-signed --load-privkey "${CERTS_DIR}"/ca-key.pem --template "${CERTS_DIR}"/ca.tmpl --outfile "${CERTS_DIR}"/ca-cert.pem
449    certtool --generate-crl --load-ca-privkey "${CERTS_DIR}"/ca-key.pem --load-ca-certificate "${CERTS_DIR}"/ca-cert.pem --template "${CERTS_DIR}"/crl.tmpl --outfile "${CERTS_DIR}"/crl.pem
450    if [[ ! -e "${SSL_DIR}"/live/"${SRV_CN}"/privkey.pem && ! -e "${SSL_DIR}"/live/"${SRV_CN}"/fullchain.pem ]]; then
451        certtool --generate-privkey --outfile "${SSL_DIR}"/live/"${SRV_CN}"/privkey.pem
452        certtool --generate-certificate --load-privkey "${SSL_DIR}"/live/"${SRV_CN}"/privkey.pem --load-ca-certificate "${CERTS_DIR}"/ca-cert.pem --load-ca-privkey "${CERTS_DIR}"/ca-key.pem --template "${SSL_DIR}"/server.tmpl --outfile "${SSL_DIR}"/live/"${SRV_CN}"/fullchain.pem
453    fi
454
455    pam_otp &
456    echo "Starting OpenConnect Server"
457    exec "$@" || { echo "Starting failed" >&2; exit 1; }
458fiopenconnect.service — the systemd unit file for autostart:
 1[Unit]
 2Description=OpenConnect VPN service
 3Requires=docker.service
 4After=docker.service
 5
 6[Service]
 7Restart=on-failure
 8RestartSec=5
 9WorkingDirectory=/opt/openconnect
10ExecStart=/usr/bin/docker compose up
11ExecStop=/usr/bin/docker compose down
12
13[Install]
14WantedBy=multi-user.targetssl_update.sh — bash script for renewing SSL certificates from Let’s Encrypt:
 1#!/usr/bin/env bash
 2
 3set -e
 4
 5WORK_DIR="/opt/openconnect"
 6CONTAINER_NAME="openconnect"
 7
 8to_log () {
 9    local text="$1"
10    echo "[$(date '+%F %T')] ${text}"
11}
12
13cd "$WORK_DIR" || exit 1
14
15if [[ -r ./docker-compose.yml ]]; then
16    to_log "Run certbot service container"
17    docker compose up certbot
18    sleep 3
19    to_log "Reload ocserv config"
20    docker exec "$CONTAINER_NAME" occtl reload
21    to_log "Delete all unused docker images"
22    docker system prune -af
23fiOverriding variables: domain, server name, email, etc.
Now we need to set the environment variables that will be used for automatic substitution when building and running the container. To do this, open the .env file located in the project files directory with any editor:
📝 Note
The .env file is typically used to define environment variables that are read by the docker-compose utility when referenced in the service description file — docker-compose.yml. We will also pass these variables into the openconnect container.
vim .env
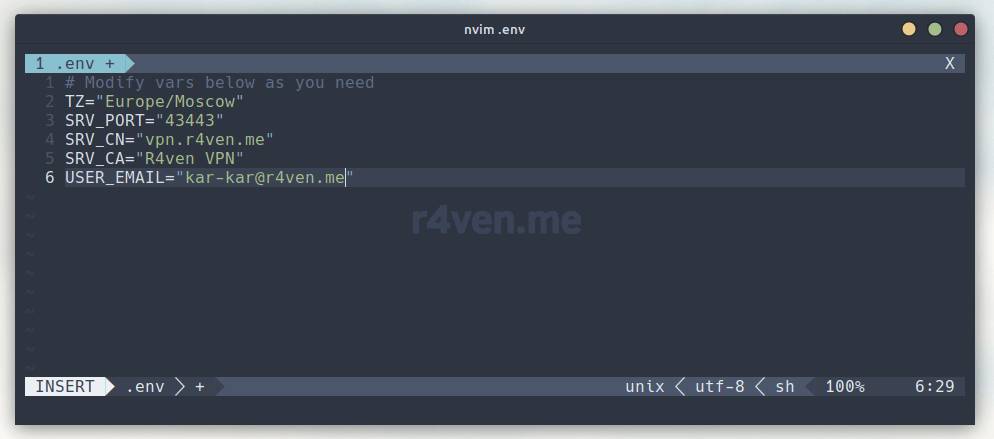
There are 5 variables in total:
TZ— time zone;SRV_PORT— the network port for connecting to the server;SRV_CN— here we set the domain name pointing to the Linux server (if there’s no domain, specify an arbitrary name);SRV_CA— the name of the certificate authority for self-signed certificates (arbitrary, but required);USER_EMAIL— email address, if a domain name is used. This parameter is required to obtain SSL certificates from letsencrypt.
Readers pointed out in the comments that when connecting to ocserv with a Keenetic router, “the port in
.envneeds to be set to the default 443 (which doesn’t need to be specified in the connection string)”. This router ignores other ports.
Save the file and exit:
:wqLiked my Neovim config?

You can easily create a similar one by following the article: Neovim — Installing and configuring a code editor with IDE features in just a few commands.
Building the image and first container startup with docker-compose
If you don’t have a domain, go to the steps inside the spoiler below: “Click here if you don’t have a domain”.
Now we simply run the image build command followed by starting the container in the background, and then attach to the standard output of docker-compose:
docker compose up -d && docker compose logs -f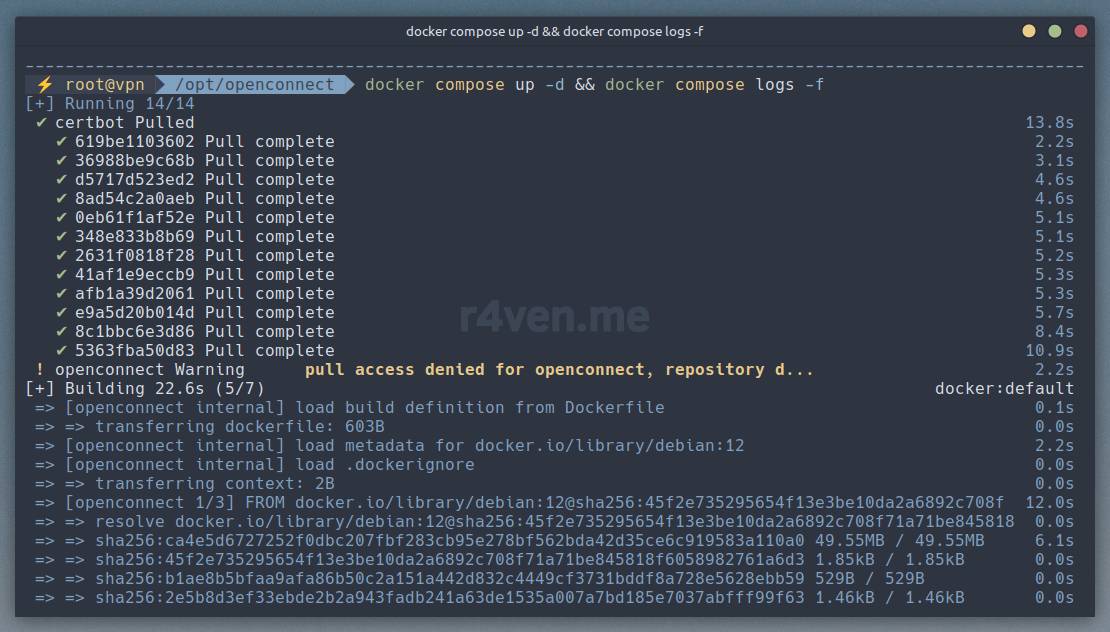
Note that the openconnect service described in the docker-compose.yml file is deliberately limited in hardware resource usage with
cpus: '0.50'andmemory: 200M, i.e., the maximum allowed CPU usage is 50% of one core and 200 MB of RAM. Adjust these parameters as needed for your requirements.Read more about service resource limits when using docker-compose here.
In docker-compose.yml, the depends-on parameter specifies the service startup order. First certbot (Let’s Encrypt) runs, requesting and obtaining valid SSL certificates, and only then does the container with the VPN server start:
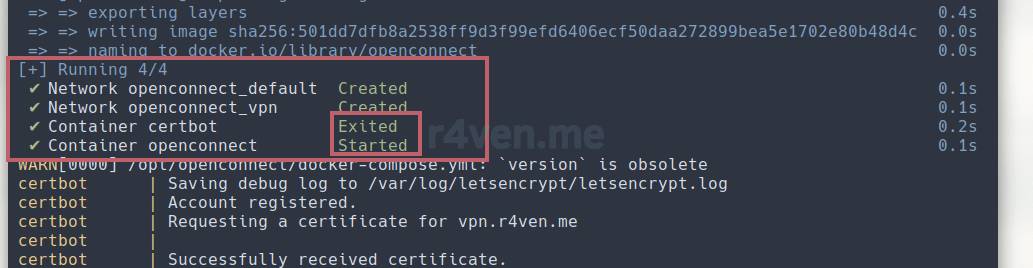
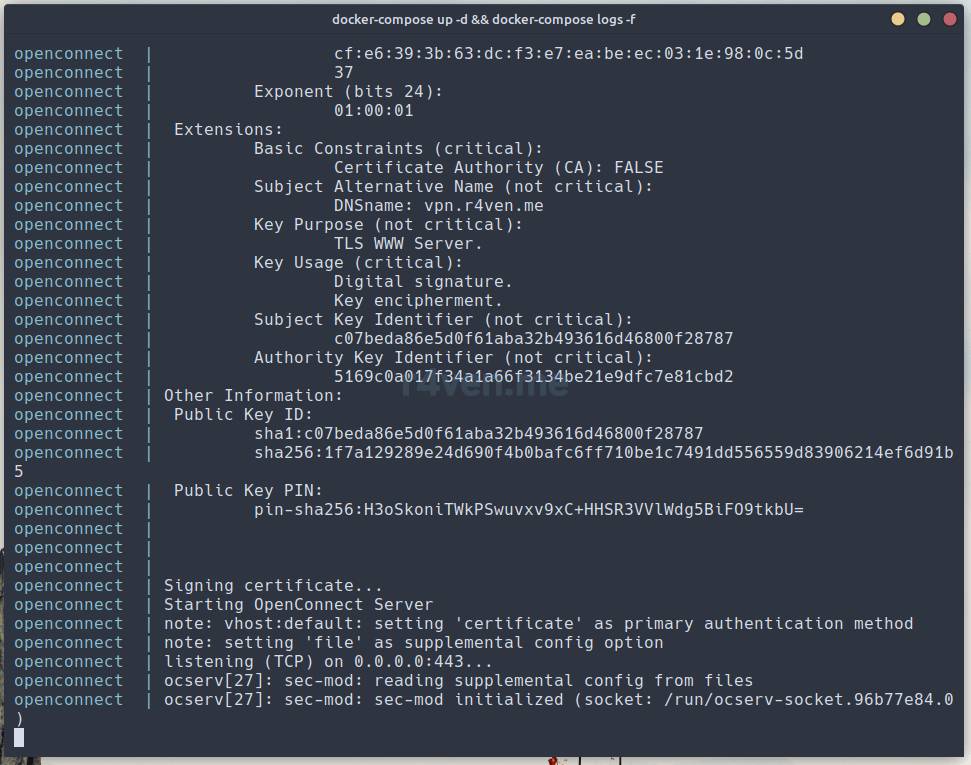
See the detailed documentation on using certbot here.
If successful, the output will look like the screenshot above. You can stop viewing the output with Ctrl+C.
To make sure the container is running, execute:
docker compose ps

ls -l ./data

ls -l ./data/ssl/live/vpn.r4ven.me/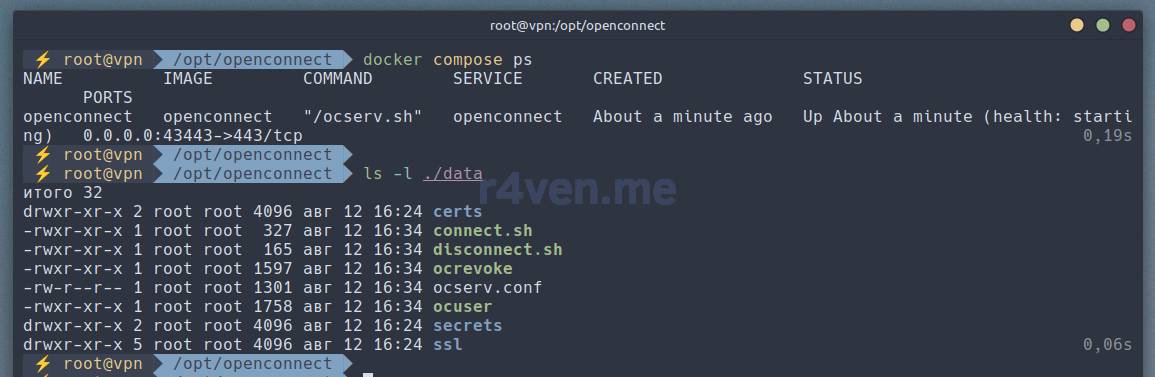

A ./data folder should be created with the server files + certificates obtained by the certbot container.
Click here to view the description of the contents of the data folder, which the ocserv.sh script creates on first start
ocserv.conf— the configuration file for our VPN server. You can also modify it to suit your needs. By the way, the full ocserv config with a description of available parameters can be studied on the project’s official GitLab via this link;
auth = "certificate"
#auth = "plain[passwd=/etc/ocserv/ocpasswd]"
#auth = "plain[passwd=/etc/ocserv/ocpasswd,otp=/etc/ocserv/secrets/users.oath]"
#enable-auth = "certificate"
#enable-auth = "pam"
tcp-port = 443
socket-file = /run/ocserv-socket
server-cert = /etc/ocserv/ssl/live/example.com/fullchain.pem
server-key = /etc/ocserv/ssl/live/example.com/privkey.pem
ca-cert = /etc/ocserv/certs/ca-cert.pem
isolate-workers = true
max-clients = 20
max-same-clients = 2
rate-limit-ms = 200
server-stats-reset-time = 604800
keepalive = 10
dpd = 120
mobile-dpd = 1800
switch-to-tcp-timeout = 25
try-mtu-discovery = false
cert-user-oid = 0.9.2342.19200300.100.1.1
tls-priorities = "NORMAL:%SERVER_PRECEDENCE:%COMPAT:-VERS-SSL3.0:-VERS-TLS1.0:-VERS-TLS1.1:-VERS-TLS1.3"
auth-timeout = 1000
min-reauth-time = 300
max-ban-score = 100
ban-reset-time = 1200
cookie-timeout = 600
deny-roaming = false
rekey-time = 172800
rekey-method = ssl
connect-script = /etc/ocserv/scripts/connect
disconnect-script = /etc/ocserv/scripts/disconnect
use-occtl = true
pid-file = /run/ocserv.pid
log-level = 1
device = vpns
predictable-ips = true
default-domain = example.com
ipv4-network = 10.10.10.0
ipv4-netmask = 255.255.255.0
tunnel-all-dns = true
dns = 8.8.8.8
ping-leases = false
config-per-user = /etc/ocserv/config-per-user/
cisco-client-compat = true
dtls-legacy = true
client-bypass-protocol = false
crl = /etc/ocserv/certs/crl.pem
#camouflage = true
#camouflage_secret = "secretword"
#camouflage_realm = "Welcome to admin panel"bin— the directory with internal scripts/commands of the openconnect container:connect— a bash script that runs for each client when connecting to our VPN server. It can be extended and customized for any of your needs. Just make sure not to break the original functionality);
#!/bin/bash

set -Eeuo pipefail

echo "$(date) User ${USERNAME} Connected - Server: ${IP_REAL_LOCAL} VPN IP: ${IP_REMOTE}  Remote IP: ${IP_REAL} Device:${DEVICE}"
echo "Running iptables MASQUERADE for User ${USERNAME} connected with VPN IP ${IP_REMOTE}"
iptables -t nat -A POSTROUTING -s ${IP_REMOTE}/32 -o eth0 -j MASQUERADEdisconnect— a bash script that runs when a user disconnects;
#!/bin/bash

set -Eeuo pipefail

echo "$(date) User ${USERNAME} Disconnected - Bytes In: ${STATS_BYTES_IN} Bytes Out: ${STATS_BYTES_OUT} Duration:${STATS_DURATION}"
iptables -t nat -D POSTROUTING -s "${IP_REMOTE}"/32 -o eth0 -j MASQUERADEocuser— a bash script for creating new users and connection certificates.p12;
#!/bin/bash

set -Eeuo pipefail

# Check and set script params
if [[ $# -eq 2 ]]; then
    USER_UID="$1"
    USER_CN="$2"
elif [[ $# -eq 3 ]]; then
	if [[ "$1" == "-A" ]]; then
    		USER_UID="$2"
    		USER_CN="$3"
	else
		echo "Use -A key as a first param to generate cert for IOS devices" >&2
        exit 1
	fi
else
    echo "Please run script with two params: username and 'Common Username'" >&2
    echo "Example: ocuser john 'John Doe'" >&2
    echo "For IOS or HarmonyOS devices add -A key as first param in command" >&2
    echo "Example: ocuser -A steve 'Steve Jobs'" >&2
    exit 1
fi

# Modify user cert template and generate user key, cert and protected .p12 file
sed -i -e "s/^organization.*/organization = $SRV_CN/" -e "s/^cn.*/cn = $USER_CN/" -e "s/^uid.*/uid = $USER_UID/g" "${CERTS_DIR}"/users.cfg
echo "$(tr -cd "[:alnum:]" < /dev/urandom | head -c 60)" | ocpasswd -c "${OCSERV_DIR}"/ocpasswd "$USER_UID"
certtool --generate-privkey --outfile "${CERTS_DIR}"/"${USER_UID}"-privkey.pem
certtool --generate-certificate --load-privkey "${CERTS_DIR}"/"${USER_UID}"-privkey.pem --load-ca-certificate "${CERTS_DIR}"/ca-cert.pem --load-ca-privkey "${CERTS_DIR}"/ca-key.pem --template "${CERTS_DIR}"/users.cfg --outfile "${CERTS_DIR}"/"${USER_UID}"-cert.pem
if [[ "$1" == "-A" ]]; then
	sleep 1 && certtool --to-p12 --load-certificate "${CERTS_DIR}"/"${USER_UID}"-cert.pem --load-privkey "${CERTS_DIR}"/"${USER_UID}"-privkey.pem --pkcs-cipher 3des-pkcs12 --hash SHA1 --outder --outfile "${SECRETS_DIR}"/"${USER_UID}".p12
else
	sleep 1 && certtool --load-certificate "${CERTS_DIR}"/"${USER_UID}"-cert.pem --load-privkey "${CERTS_DIR}"/"${USER_UID}"-privkey.pem --pkcs-cipher aes-256 --to-p12 --outder --outfile "${SECRETS_DIR}"/"${USER_UID}".p12
fiocuser2fa— a bash script for generating TOTP secrets when using two-factor authorization;
#!/bin/bash

set -Eeuo pipefail

if [[ $# -eq 1 ]]; then
    USER_ID="$1"
    OTP_SECRET="$(head -c 16 /dev/urandom | xxd -c 256 -ps)"
    OTP_SECRET_BASE32="$(echo 0x"${OTP_SECRET}" | xxd -r -c 256 | base32)"
    OTP_SECRET_QR="otpauth://totp/$USER_ID?secret=$OTP_SECRET_BASE32&issuer=Example CA&algorithm=SHA1&digits=6&period=30"

    if [[ ! -e "${SECRETS_DIR}"/users.oath ]] || ! grep -qP "(?<!\S)${USER_ID}(?!\S)" "${SECRETS_DIR}"/users.oath; then
        echo "HOTP/T30 $USER_ID - $OTP_SECRET" >> "${SECRETS_DIR}"/users.oath
        echo "OTP secret for $USER_ID: $OTP_SECRET"
        echo "OTP secret in base32: $OTP_SECRET_BASE32"
        echo "OTP secret in QR code:"
        qrencode -t ANSIUTF8 "$OTP_SECRET_QR"
        qrencode "$OTP_SECRET_QR" -s 10 -o "${SECRETS_DIR}"/otp_"${USER_ID}".png
        echo "TOTP secret in png image saved at: ${SECRETS_DIR}/otp_${USER_ID}.png"

        send_qr_by_email() {
            EMAIL_REGEX="^[a-zA-Z0-9._-]+@[a-zA-Z0-9.-]+\.[a-zA-Z]{2,}$"

            if [[ $USER_ID =~ $EMAIL_REGEX ]]; then
                cat << EOF | msmtp --file="${SCRIPTS_DIR}"/msmtprc "$USER_ID"
Subject: TOTP QR code for OpenConnect auth
MIME-Version: 1.0
Content-Type: multipart/mixed; boundary="boundary"

--boundary
Content-Type: text/plain

TOTP secret for OpenConnect (base32):
$OTP_SECRET_BASE32

--boundary
Content-Type: image/png; name="file.png"
Content-Transfer-Encoding: base64
Content-Disposition: attachment; filename="file.png"

$(base64 "${SECRETS_DIR}"/otp_"${USER_ID}".png)
--boundary--
EOF
                echo "[$(date '+%F %T')] - TOTP secret and QR code successfully sent to $USER_ID via Email" | tee -a "${OCSERV_DIR}"/pam.log
            else
                return 0
            fi
        }

        if [[ "$OTP_SEND_BY_EMAIL" == "true" ]]; then send_qr_by_email; fi

        send_qr_by_telegram() {
            TG_REGEX="^[a-zA-Z][a-zA-Z0-9_]{4,31}$"

            if [[ $USER_ID =~ $TG_REGEX ]]; then
                TG_MESSAGE="TOTP secret for OpenConnect (base32):
$OTP_SECRET_BASE32"
                TG_USER_FILE="${SCRIPTS_DIR}/tg_users.txt"

                if grep -qP "(?<!\S)${USER_ID}(?!\S)" "$TG_USER_FILE" 2> /dev/null; then
                    TG_CHAT_ID=$(grep -P "(?<!\S)${USER_ID}(?!\S)" "$TG_USER_FILE" | awk '{print $1}')
                else
                    TG_RESPONSE="$(curl -s "https://api.telegram.org/bot$TG_TOKEN/getUpdates")"
                    TG_CHAT_ID=$(echo "$TG_RESPONSE" | jq -r --arg USERNAME "$USER_ID" '.result[] | select(.message.from.username == $USERNAME) | .message.chat.id')

                    if [[ -z "$TG_CHAT_ID" ]]; then
                        echo "[$(date '+%F %T')] - User was not found or did not interact with the bot" >> "${OCSERV_DIR}"/pam.log
                        return 0
                    fi
                    echo "$TG_CHAT_ID $USER_ID" >> "$TG_USER_FILE"
                fi

                curl -s -X POST "https://api.telegram.org/bot$TG_TOKEN/sendPhoto" \
                    -H "Content-Type: multipart/form-data" \
                    -F "chat_id=$TG_CHAT_ID" \
                    -F "photo=@${SECRETS_DIR}/otp_${USER_ID}.png" \
                    -F "caption=$TG_MESSAGE" > /dev/null 2>> "${OCSERV_DIR}"/pam.log

                echo "[$(date '+%F %T')] - TOTP secret and QR code successfully sent to $USER_ID via Telegram" | tee -a "${OCSERV_DIR}"/pam.log
            fi
        }

        if [[ "$OTP_SEND_BY_TELEGRAM" == "true" ]]; then send_qr_by_telegram; fi

    else
        echo "OTP token already exists for $USER_ID in ${SECRETS_DIR}/users.oath"
        exit 1
    fi
else
    echo "Usage: $(basename "$0") <user_id>"
    exit 1
fiotp_sender— a bash script for sending TOTP tokens via Email and Telegram when using PAM authorization with two-factor authentication (2FA) enabled;
#!/bin/bash

set -Eeuo pipefail

OCSERV_DIR="/etc/ocserv"
SECRETS_DIR="/etc/ocserv/secrets"
SCRIPTS_DIR="/etc/ocserv/scripts"
OTP_SEND_BY_EMAIL="true"
OTP_SEND_BY_TELEGRAM="true"
TG_TOKEN="1234567890:QWERTYuio-PA1DFGHJ2_KlzxcVBNmqWEr3t"

echo "[$(date '+%F %T')] - PAM user $PAM_USER is trying to connect to ocserv" >> "${OCSERV_DIR}"/pam.log

otp_sender_by_email() {
    EMAIL_REGEX="^[a-zA-Z0-9._-]+@[a-zA-Z0-9.-]+\.[a-zA-Z]{2,}$"
    if [[ $PAM_USER =~ $EMAIL_REGEX ]]; then true; else return 0; fi

    if [[ -e "${SECRETS_DIR}"/users.oath ]] && grep -qP "(?<!\S)${PAM_USER}(?!\S)" "${SECRETS_DIR}"/users.oath; then
        OTP_TOKEN="$(oathtool --totp=SHA1 --time-step-size=30 --digits=6 $(grep -P "(?<!\S)${PAM_USER}(?!\S)" ${SECRETS_DIR}/users.oath | awk '{print $4}'))"

        echo -e "Subject: TOTP token for OpenConnect\n\n${OTP_TOKEN}" | msmtp --file="${SCRIPTS_DIR}"/msmtprc "$PAM_USER"
        echo "[$(date '+%F %T')] - TOTP token successfully sent to $PAM_USER" >> "${OCSERV_DIR}"/pam.log
    fi
}

otp_sender_by_telegram() {
    TG_REGEX="^[a-zA-Z][a-zA-Z0-9_]{4,31}$"
    if [[ $PAM_USER =~ $TG_REGEX ]]; then true; else return 0; fi

    if grep -qP "(?<!\S)${PAM_USER}(?!\S)" "${SECRETS_DIR}"/users.oath 2> /dev/null; then
        OTP_TOKEN="$(oathtool --totp=SHA1 --time-step-size=30 --digits=6 $(grep -P "(?<!\S)${PAM_USER}(?!\S)" ${SECRETS_DIR}/users.oath | awk '{print $4}'))"
        TG_MESSAGE="TOTP token for OpenConnect: $OTP_TOKEN"
        TG_USER_FILE="${SCRIPTS_DIR}/tg_users.txt"

        if grep -qP "(?<!\S)$PAM_USER(?!\S)" "$TG_USER_FILE"; then
            TG_CHAT_ID=$(grep -P "(?<!\S)${PAM_USER}(?!\S)" "$TG_USER_FILE" | awk '{print $1}')
        else
            TG_RESPONSE="$(curl -s "https://api.telegram.org/bot$TG_TOKEN/getUpdates")"
            TG_CHAT_ID=$(echo "$TG_RESPONSE" | jq -r --arg USERNAME "$PAM_USER" '.result[] | select(.message.from.username == $USERNAME) | .message.chat.id')

            if [[ -z "$TG_CHAT_ID" ]]; then
                echo "[$(date '+%F %T')] - User was not found or did not interact with the bot" >> "${OCSERV_DIR}"/pam.log
                return 0
            fi
            echo "$TG_CHAT_ID $PAM_USER" >> "$TG_USER_FILE"
        fi

        curl -s -X POST "https://api.telegram.org/bot$TG_TOKEN/sendMessage" -d "chat_id=$TG_CHAT_ID" -d "text=$TG_MESSAGE" 2>> "${OCSERV_DIR}"/pam.log
        echo "[$(date '+%F %T')] - TOTP token successfully sent to $PAM_USER" >> "${OCSERV_DIR}"/pam.log
    fi
}

if [[ "$OTP_SEND_BY_EMAIL" == "true" ]]; then otp_sender_by_email; fi &

if [[ "$OTP_SEND_BY_TELEGRAM" == "true" ]]; then otp_sender_by_telegram; fi &ocrevoke— a bash script for revoking user certificates;
#!/bin/bash

set -Eeuo pipefail

if [[ ! -e "${CERTS_DIR}"/crl.tmpl ]]; then
cat << __EOF__ > "${CERTS_DIR}"/crl.tmpl
crl_next_update = 365
crl_number = 1
__EOF__
fi

if [[ $# -eq 1 ]]; then
    if [[ "$1" == "HELP" ]]; then
        echo "Usage:
        CMD to revoke cert of some user: ocrevoke <exist_user>
        CMD to apply current revoked.pem: ocrevoke RELOAD
        CMD to reset all revokes: ocrevoke RESET
        CMD to print this help: ocrevoke HELP"
    elif [[ "$1" == "RESET" ]]; then
        certtool --generate-crl --load-ca-privkey "${CERTS_DIR}"/ca-key.pem --load-ca-certificate "${CERTS_DIR}"/ca-cert.pem --template "${CERTS_DIR}"/crl.tmpl --outfile "${CERTS_DIR}"/crl.pem
        occtl reload
    elif [[ "$1" == "RELOAD" ]]; then
        certtool --generate-crl --load-ca-privkey "${CERTS_DIR}"/ca-key.pem --load-ca-certificate "${CERTS_DIR}"/ca-cert.pem --load-certificate "${CERTS_DIR}"/revoked.pem --template "${CERTS_DIR}"/crl.tmpl --outfile "${CERTS_DIR}"/crl.pem
    else
        USER_UID="$1"
        cat "${CERTS_DIR}"/"${USER_UID}"-cert.pem >> "${CERTS_DIR}"/revoked.pem
        certtool --generate-crl --load-ca-privkey "${CERTS_DIR}"/ca-key.pem --load-ca-certificate "${CERTS_DIR}"/ca-cert.pem --load-certificate "${CERTS_DIR}"/revoked.pem --template "${CERTS_DIR}"/crl.tmpl --outfile "${CERTS_DIR}"/crl.pem
        occtl reload
    fi
else
    echo "Usage:
    CMD to revoke cert of some user: ocrevoke <exist_user>
    CMD to apply current revoked.pem: ocrevoke RELOAD
    CMD to reset all revokes: ocrevoke RESET
    CMD to print this help: ocrevoke HELP"
ficerts— the directory with SSL files of our “certificate authority”;secrets— the directory where user certificates (.p12) are stored after they are created;ssl— SSL certificates of the openconnect server, self-signed or obtained from the Let’s Encrypt project.
Let’s also check the TCP port the container is listening on and forwarding to the host, with this command:
ss -tnap | grep -E '43443'
That’s it, the server is up and running. All that’s left is to create users and set up client connections.
Click here if you don’t have a domain
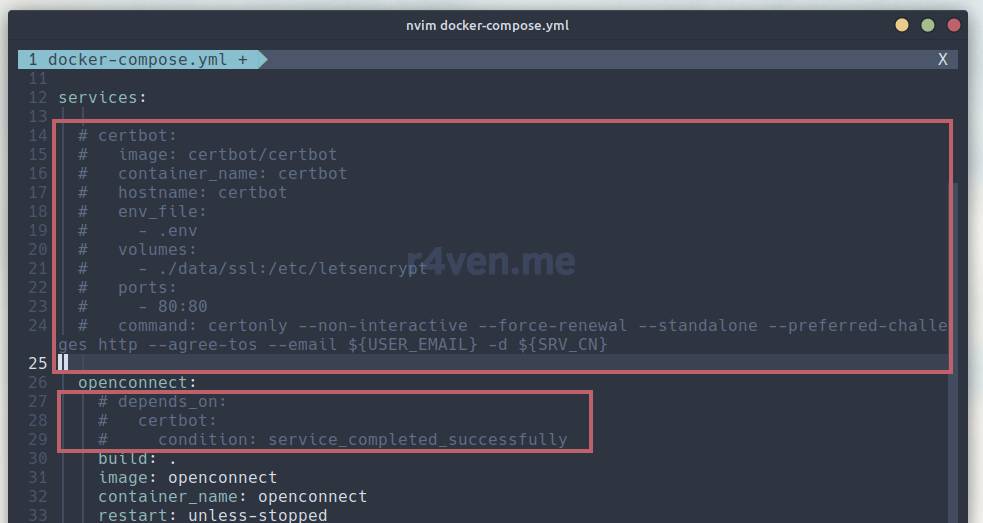
In this case, edit the service description file docker-compose.yml:
vim docker-compose.yml
In this file, you need to comment out the certbot service and the depends_on directive of the openconnect service, as shown in the screenshot:
After that, run the build and check the output:
docker compose up -d && docker compose logs -f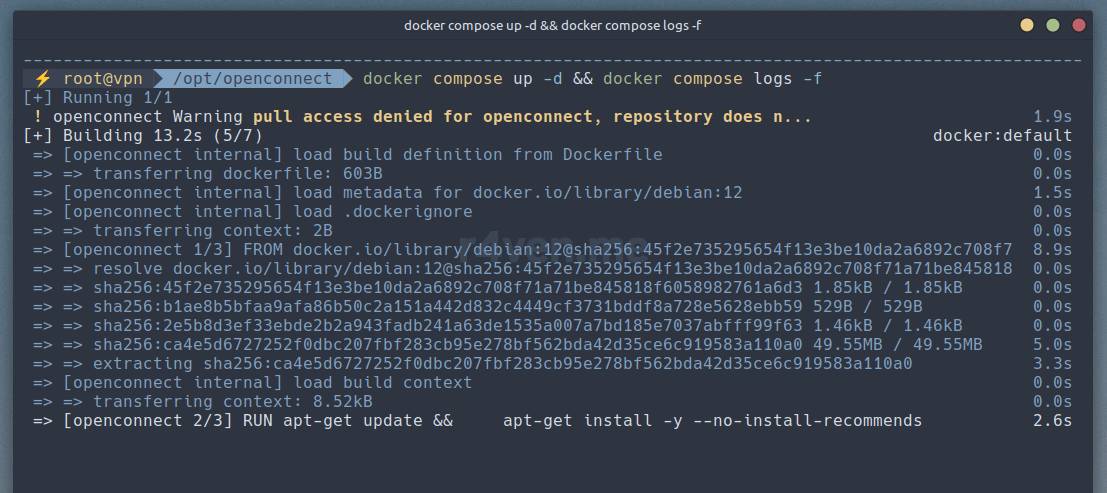
If everything worked correctly, exit log viewing mode with the Ctrl+C key combination and check the running service:
docker compose ps

ss -tnap | grep -E '43443'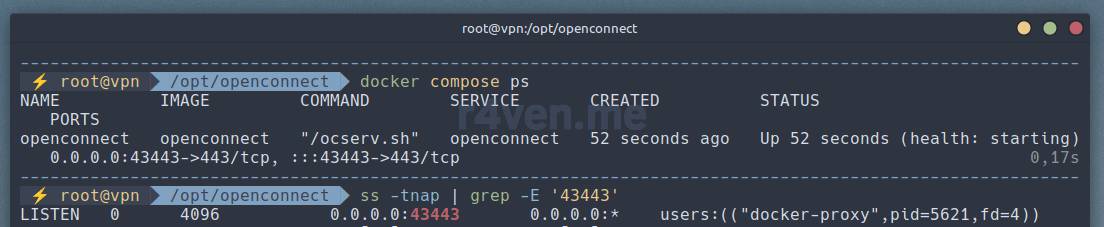
Also check for the presence of ocserv system files:
ls -l ./data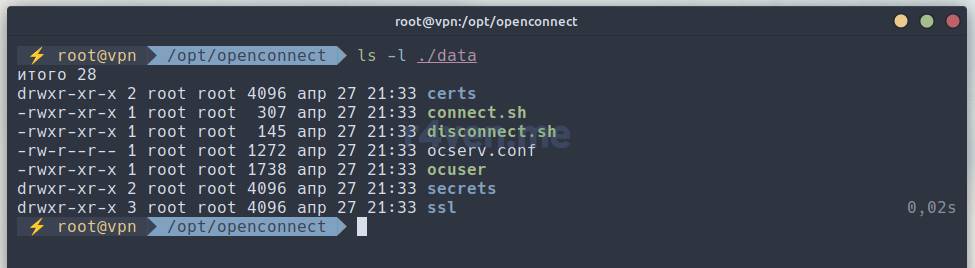
Great, let’s move on.
Creating users
A few words about authorization methods on the OpenConnect server.
Since
ocservis popular in the corporate world, it supports many user authorization methods. From a plain login/password, to integration with centralized tools such as LDAP/Active Directory, PAM, Radius, etc. Out of the box, it even has support for token-based two-factor authentication — this functionality, plus the ability to send TOTP tokens by email and Telegram, has been added to the container; a description will follow later in this article.As a reliable yet convenient authorization method, I chose connection based on a user certificate, which is packaged into an encrypted (if a password is specified) file with the
.p12extension. As a result, the client side only needs to specify the path to the certificate file and the password to decrypt it. Clients are usually able to remember passwords, so entering them again isn’t necessary.It’s worth noting that a password still needs to be set for a user when creating them, even though this authorization method is disabled in the server’s config file. If you were curious and looked into the contents of the
ocuseruser creation script, you may have noticed the command that generates a pseudo-random string: tr -cd «[:alnum:]» < /dev/urandom | head -c 60Its output is set as the user’s password when they are created. A little extra safety net)
Creating users for Linux/Windows/Android
So, let’s create a user with this command:
docker exec -it openconnect ocuser ivan 'Ivan Cherniy'
Where ivan is the username and identifier in ocserv (try to specify the identifier without spaces to avoid errors), and ‘Ivan Cherniy’ is the user’s full name, which will be displayed in the user certificate’s metadata.
After entering the command, you will need to interactively specify the certificate file name and the password to encrypt it.
If the creation command completed successfully, a .p12 certificate file will be created for the specified user in the secrets directory:
ls -l ./data/secrets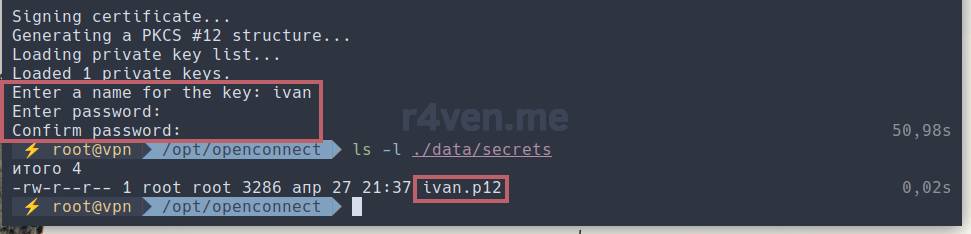
You can view the list of users in the ./data/ocpasswd file.
Creating users for HarmonyOS/iOS
When creating users for mobile OSes from Huawei and Apple, the -A flag needs to be passed to the ocuser command. In this case, a different certificate encryption algorithm will be used.
Example command:
docker exec -it openconnect ocuser -A steve 'Steve Jobs'
Let’s check the created certificate:
ls -l ./data/secrets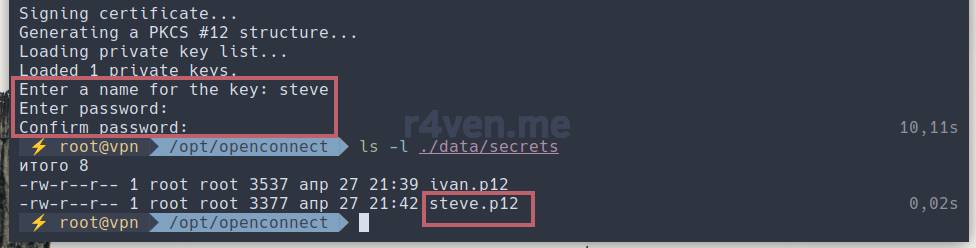
If you generate certificates for devices running HarmonyOS and iOS without the -A flag, you will get an error at the certificate import stage when configuring the client connection.
Note that the Ciso AnyConnect app on iOS doesn’t support AES-256 cipher. It will refuse to import the client certificate. If the user is using iOS device, then you can choose the
3des-pkcs12cipher.linuxbabe.com
Downloading the p12 file
Download the created user certificate file in a way that’s convenient for you. For example:
cp ./data/secrets/ivan.p12 /tmp
And on the client machine:
scp vpn.r4ven.me:/tmp/ivan.p12 .
ls -l ivan.p12
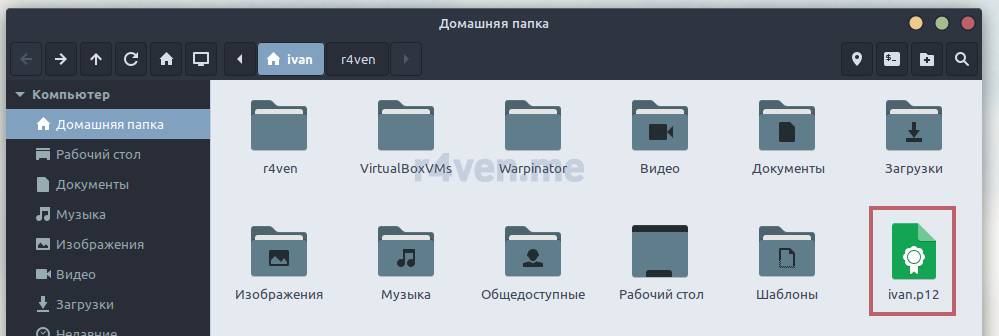
At this point, you can already move on to configuring the clients. But if you need individual settings for each user, such as client IP address, routes, DNS, as well as configuring OpenConnect service autostart and SSL certificate auto-renewal, then let’s proceed step by step.
Optional: individual ocserv settings for each user
Create the system directory config-per-user and a separate file for each user, with the same name that was specified during creation (if you forgot, check the ./data/ocpasswd file):
mkdir ./data/config-per-user

vim ./data/config-per-user/ivan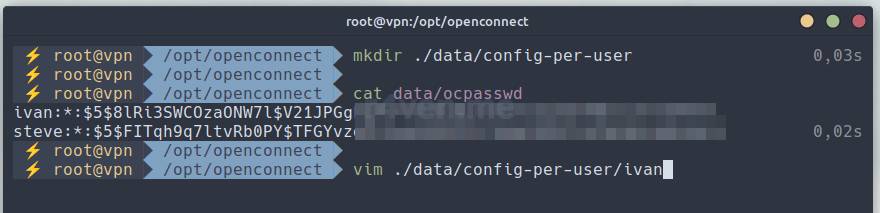
The parameter names in the user config file are mostly identical to the main server config:
explicit-ipv4 = 10.10.10.5
route = 10.10.10.50/32
route = 64.233.164.139/32
dns = 1.1.1.1
In the example above, I set a specific IP for the user ivan (from the subnet specified in the main config), individual routes, and a DNS server address.
Update. If you prefer to increase your level of privacy, it’s advisable to have your own DNS server when tunneling traffic. Here’s a guide on setting it up and integrating it with OpenConnect:
Setting up your own Unbound DNS server and the Pihole ad blocker in docker
With this configuration, this user will access the specified resources through the VPN server, while the rest of the traffic will go through their default gateway (or not, depending on network settings).
After making changes to the config, you need to have the ocserv process inside the container re-read the configuration file. This is done with the following command:
docker exec -it openconnect occtl reloadAutostarting the OpenConnect server with systemd
Now let’s set up automatic start/restart of our VPN server using the systemd init system.
From the project files directory, copy the openconnect.service file to the systemd system directory, reload the systemd configuration, and stop our running containers:
cp ./openconnect.service /etc/systemd/system/

systemctl daemon-reload

docker compose down
Now let’s enable autostart and try to start the container with the OpenConnect server as a systemd service:
systemctl enable --now openconnect

systemctl status openconnect

docker compose ps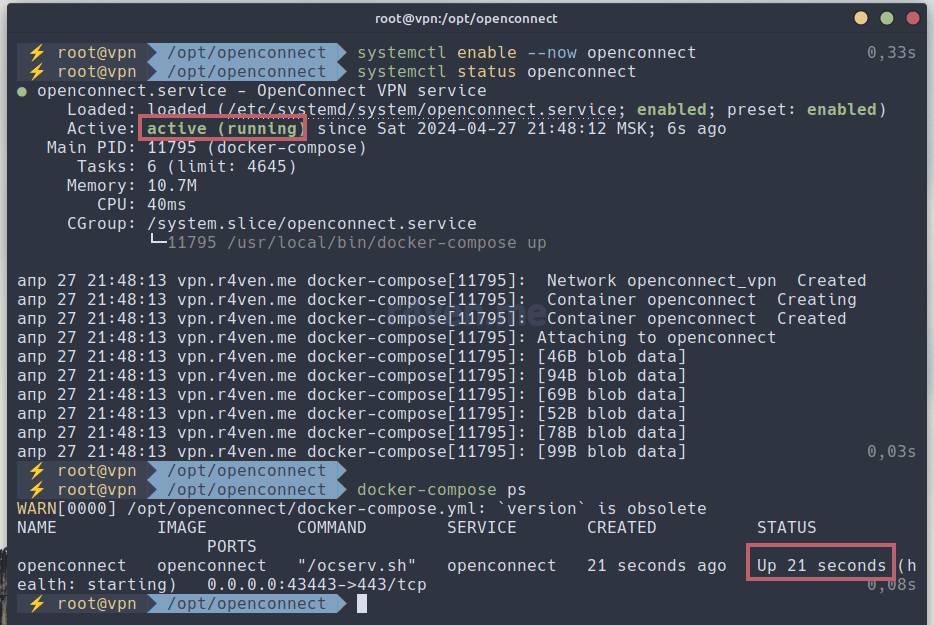
Everything’s great.
Configuring automatic SSL certificate renewal (if you have a domain)
A feature of certificates from the Let’s Encrypt certificate authority is that they are issued for 3 months. In this situation, it’s prudent to set up automatic renewal. To do this, we add running the ssl_update.sh script once a week to the system task scheduler cron, for example, on Sunday at 3 AM:
{ crontab -l; echo "0 3 * * 0 /opt/openconnect/ssl_update.sh"; } | crontab -

crontab -l
The curly brace syntax in bash
{ command1; command2 }allows combining several commands into one. Here, with its help, the first command outputs the list of cron jobs for the current user, the second command outputs a line with the new job, and then, using the redirection mechanism, we pass all the output to thecrontab -command. If you pass only one task to thecrontab -command, it will overwrite all the previous ones. You shouldn’t do that)Even though there are no other jobs in the scheduler in my example, the command is specifically written with “fool-proofing”)
To check that the certificate renewal script works, we can run it manually:
UPD 16.05.2024
In the certbot renewal command, I replaced the
--force-renewalparameter with--keep-until-expiring, which checks the certificate’s expiration date, and if it’s not close to expiring, the certificate renewal doesn’t happen.
/opt/openconnect/ssl_update.sh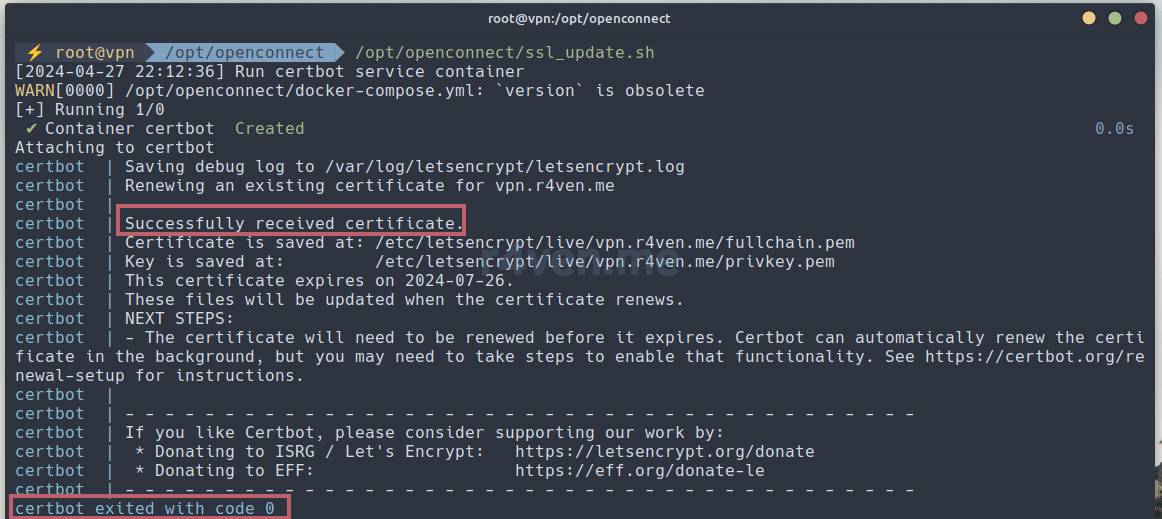
The script will also clean up disk space from unused docker images:
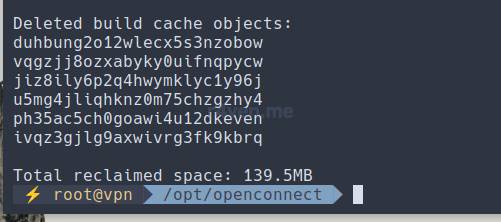
Let’s check the update time of the SSL files:
ls -l ./data/ssl/live/vpn.r4ven.me/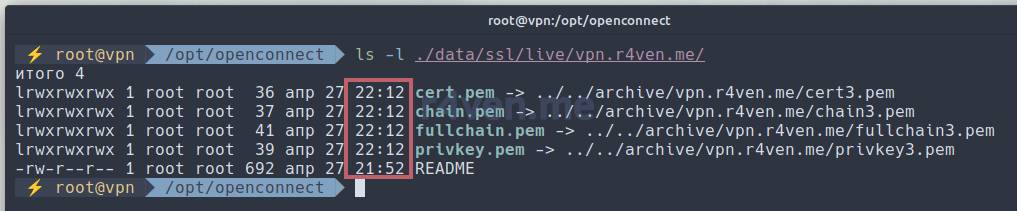
Alright, seems like everything’s fine)
Note that if you renew certificates too often, certbot (letsencrypt) will error out for this reason.
Setting up client connections
Configuring the OpenConnect client for Linux
Method #1: network connection manager — NetworkManager
If you’re a user of popular desktop distributions, then most likely your network subsystem is managed by NetworkManager.
I’ll note right away that this method is preferable for desktop systems, since using NM to connect to ocserv doesn’t cause DNS system conflicts.
For deb-based systems, install the special NetworkManager plugin package for connecting to ocserv.
As usual, I’ll demonstrate this using Linux Mint 21 Cinnamon (Ubuntu 22.04) as an example.
Plugin installation command:
sudo apt update && sudo apt install network-manager-openconnect-gnome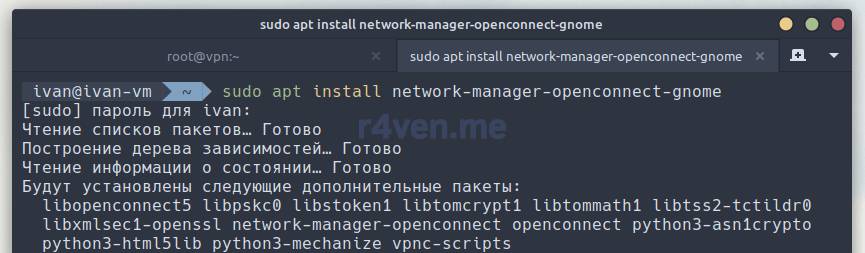
After installation:
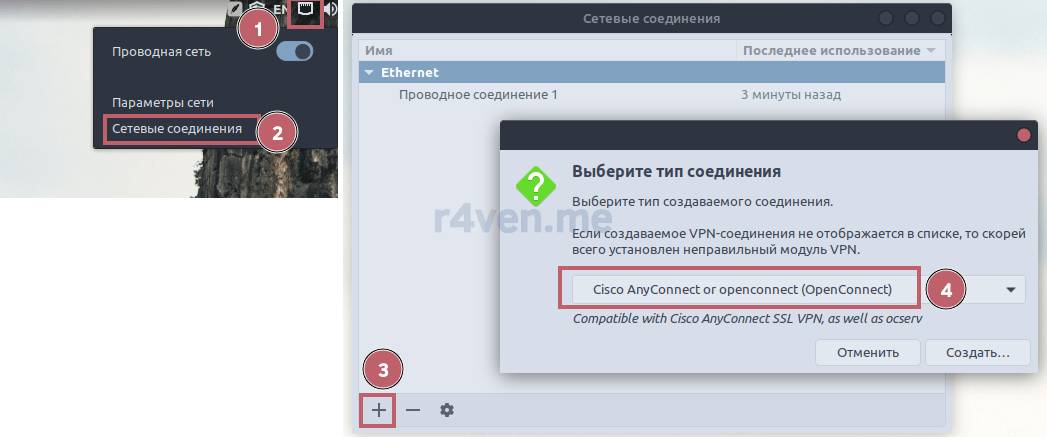
- Go to “Network Connections” via the tray or any convenient method;
- Then click the button to add a new connection, select “Cisco AnyConnect or openconnect (OpenConnect)” from the list, and click “Create”;
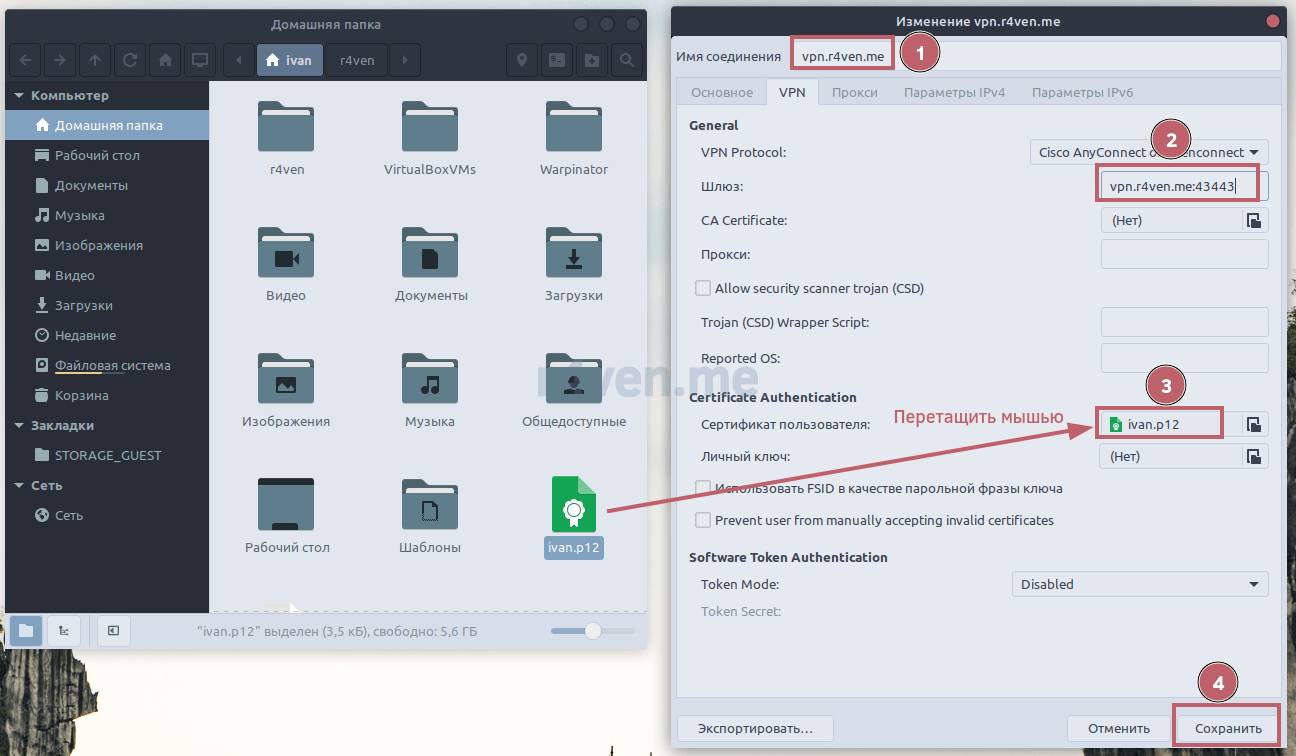
- In the window that opens, specify
- “Connection name” — arbitrary
- “Gateway” — the DNS name of our server or its IP address (if without a domain) + connection port. Example:
vpn.r4ven.me:43443
- In the “Certificate authentication” section, in the “User certificate” parameter, select our
.p12file that we generated during user creation. In older versions of nmapplet there’s a bug where it doesn’t see files with the.p12extension when selecting the certificate. In that case, just drag-and-drop the file from the file manager into this parameter’s field, as shown in the screenshot below; - Then click “Save”.
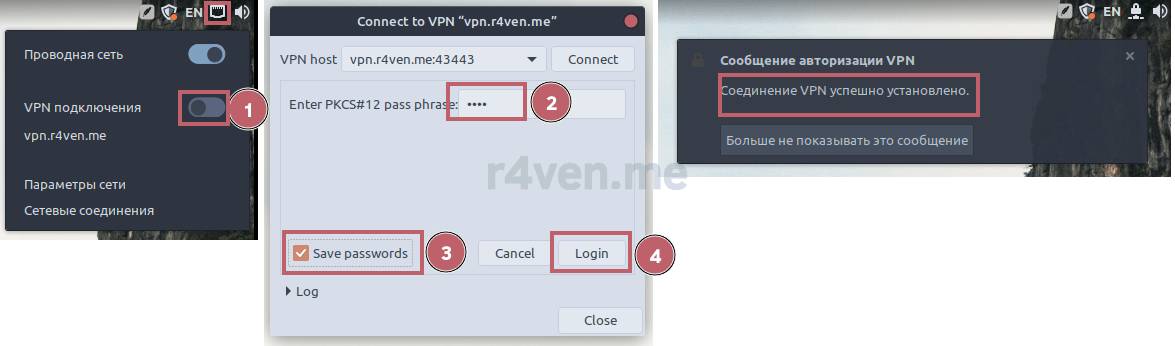
If everything was done correctly, let’s try connecting to our server. Click on the network connections applet, then on the “VPN connections” toggle. A window should appear kindly asking us to enter the certificate file password (if you set one), which we established at the ocserv user creation stage. Check the “Save password” box and then click “Connect”. Upon a successful connection, a corresponding notification will appear on the desktop:
You can also create a new connection for NetworkManager using the console utility nmcli. Here’s an example:
nmcli connection add \
    type vpn \
    con-name "vpn.r4ven.me" \
    ifname '*' \
    vpn-type openconnect \
    vpn.data "gateway=vpn.r4ven.me:43443, usercert=/home/ivan/ivan.p12"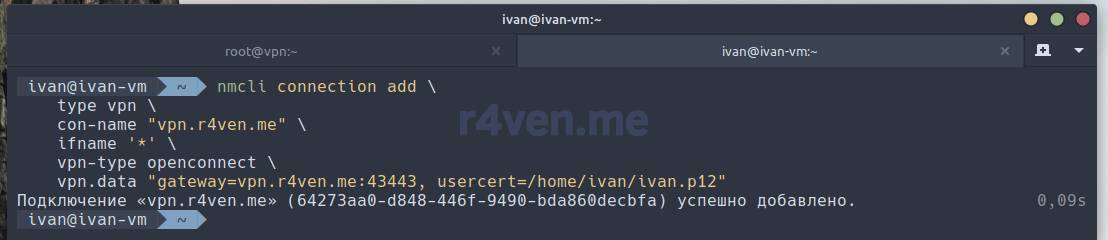
Let’s try to connect:
nmcli connection up vpn.r4ven.me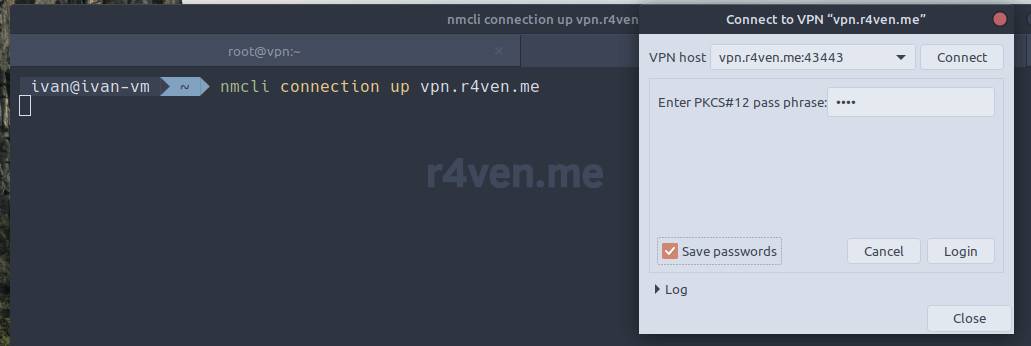
Success.
You can view the network parameters of our VPN connection using these commands:
ip -c address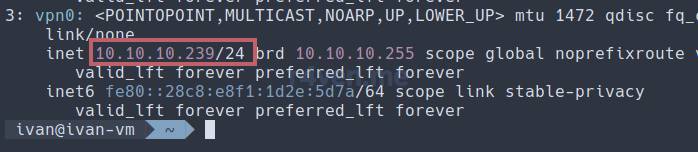
nmcli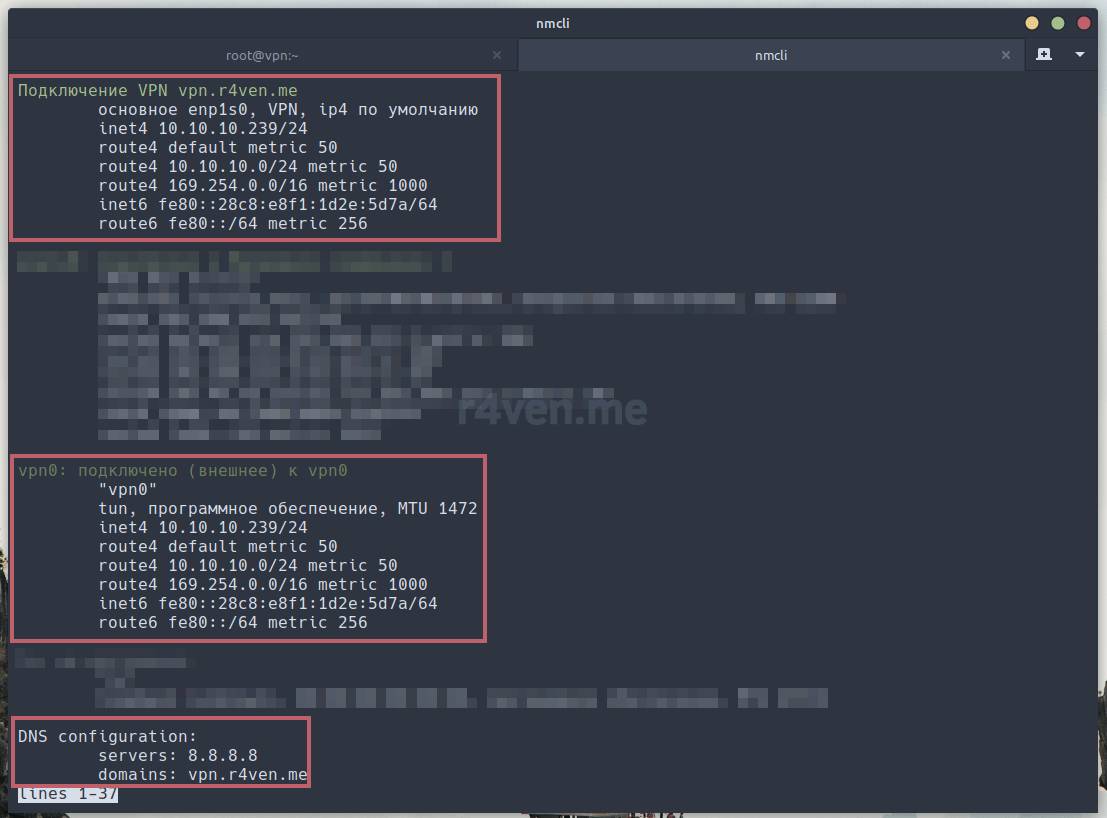
You can find out your external IP in the console with this command:
curl ifconfig.me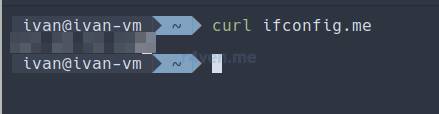
The command’s output will be a single line with your external IP address.
Method #2: command line utility — openconnect
Another way to connect a client in Linux where NetworkManager is absent is the console utility of the same name, openconnect. This connection method is most often used for clients without a GUI, i.e., on Linux servers.
The connection example is, as before, for deb-based systems.
Install the client package openconnect:
sudo apt update && sudo apt install openconnect
You can connect to the OpenConnect server with this command:
# if using a domain
sudo openconnect -c /home/ivan/ivan.p12 vpn.r4ven.me:43443 <<< $(echo "password"$'\n')

# if without a domain (with additional confirmation of the self-signed certificate)
sudo openconnect -c /home/ivan/ivan.p12 12.345.67.89:43443 <<< $(echo "password"$'\n'yes$'\n')
Here, the -c flag is passed the path to the .p12 certificate file, and using the here string mechanism (<<<) and substitution, the output of the command echo "password"$'\n' is passed, which outputs a text string and performs a line break — in this case, this simulates pressing Enter so you don’t have to type it manually.
Replace password with your certificate password.
To automate the connection/reconnection process using the
openconnectutility, I wrote a small script. You can study it in the article: Writing a bash script to connect to an OpenConnect VPN server.
The result of the connection command should look something like this:
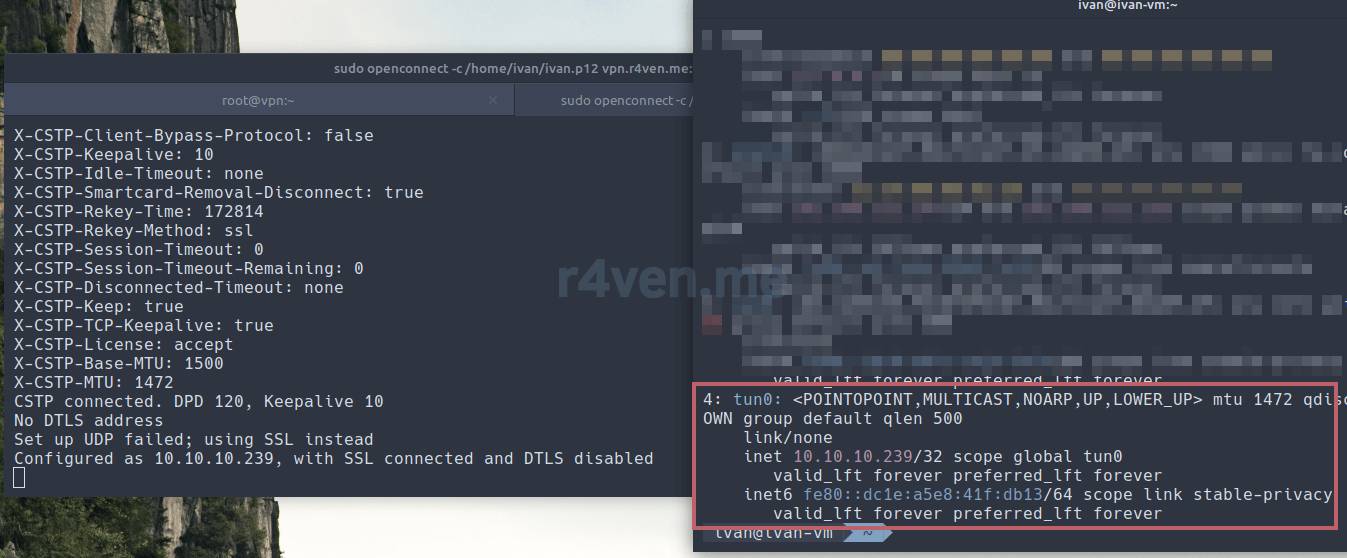
If you use a connection with the openconnect utility on a Linux server and plan to tunnel all of its traffic, you need to add special routing rules, without which you will lose access to your server, including via SSH:
ip rule add table 128 from <public-ip>
ip route add table 128 to <public_ip_subnet> dev <ineteface_name>
ip route add table 128 default via <gateway>Where:
- **128** — the name of the new routing table;
- **<piblic-ip>** — the primary IP of your server;
- **<public\_ip\_subnet>** — the subnet of the server's primary IP;
- **<interface\_name>** — the name of the physical interface the primary IP is attached to;
- **<gateway>** — the network gateway through which the primary IP traffic goes.Configuring the OpenConnect client for Windows/MacOS
To set up the client on Windows and MacOS, you need to download the graphical client program from the official website https://gui.openconnect-vpn.net/download/ or on the releases page on GitLab: https://gitlab.com/openconnect/openconnect-gui/-/releasesGitLab:
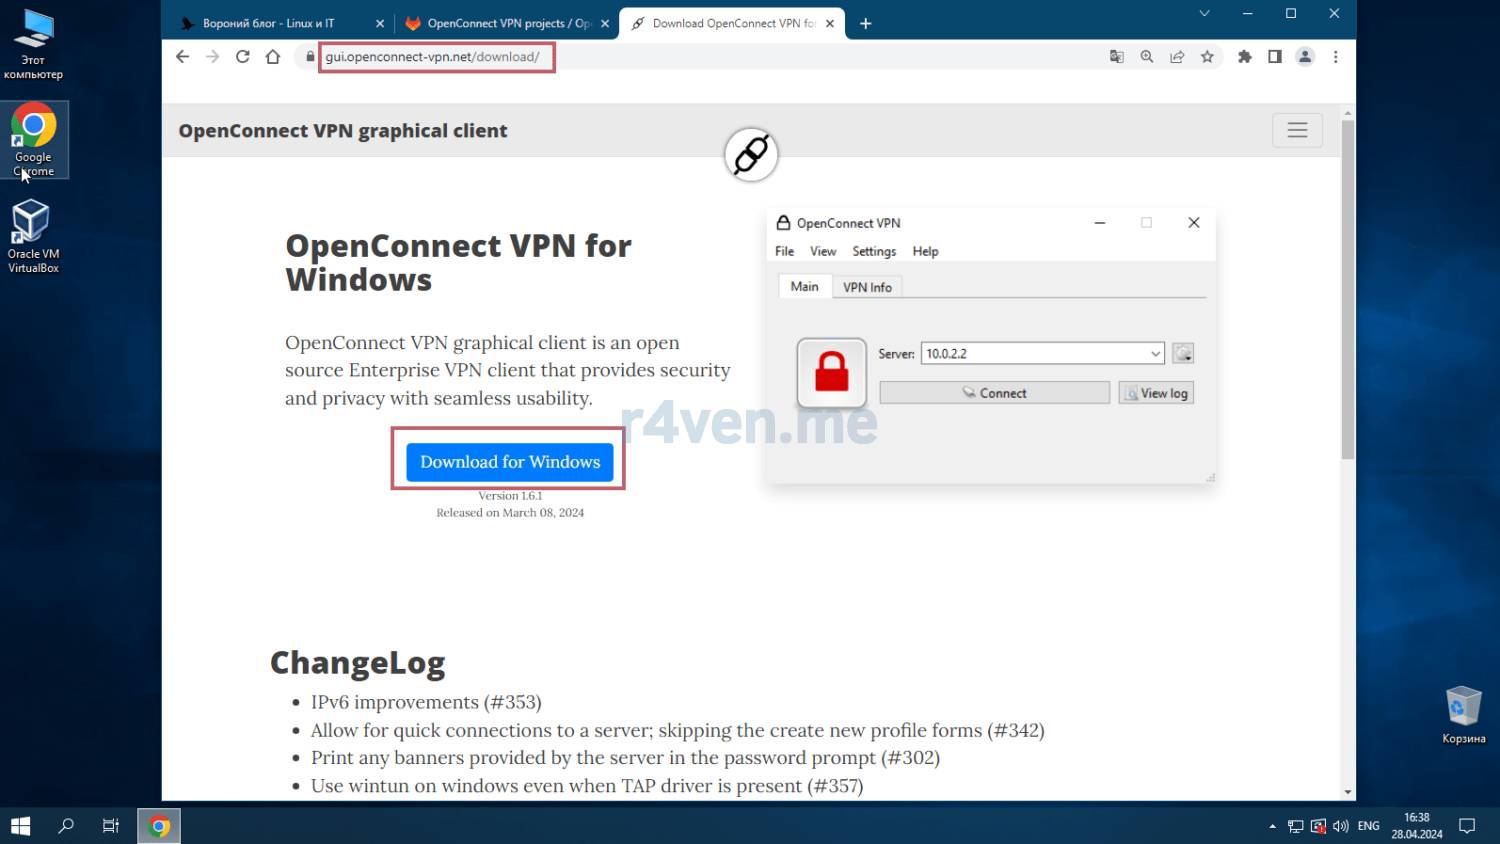
Next, install the program on the Windows desktop with the usual “Next, next..” clicks. As for how to install the client on MacOS, I can’t tell you. You’ll have to research this yourself; links to all the materials will be at the bottom.
After installing and launching the OpenConnectVPN program, configure it as shown in the screenshots below. I’ll just note one thing: be sure to enable the “Disable UDP” parameter, since its use is disabled in our server configuration:
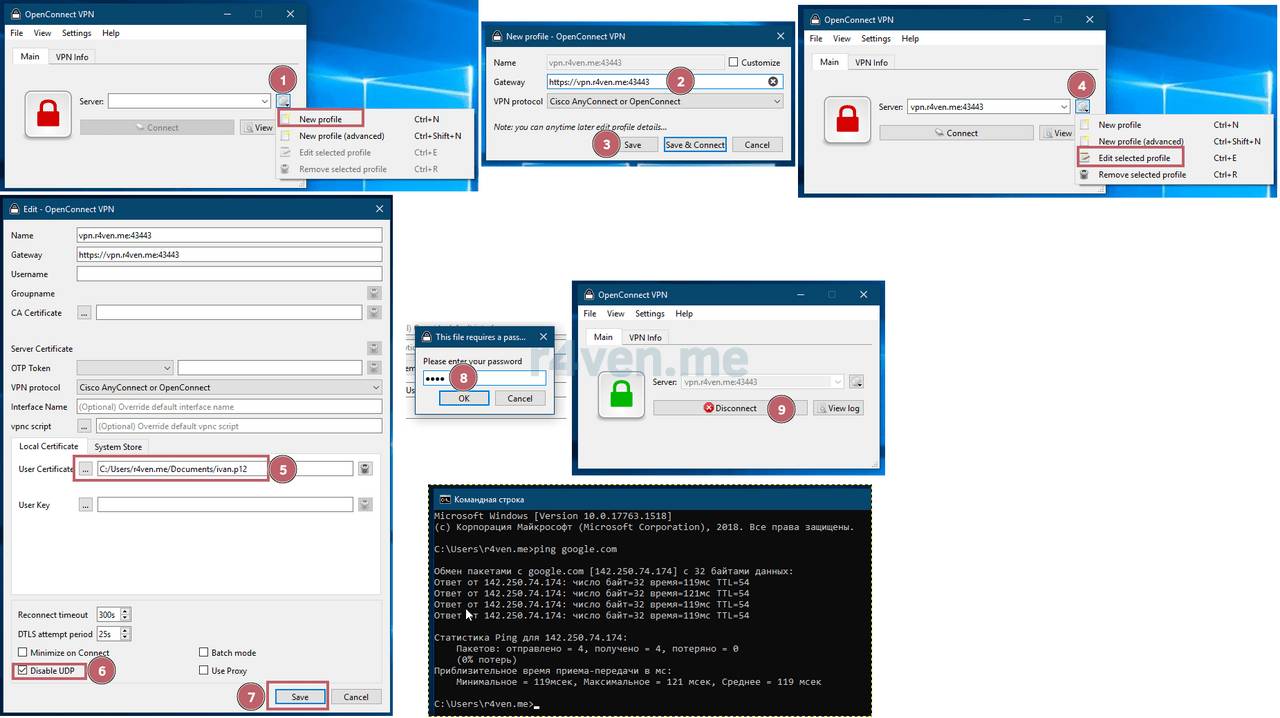
Let’s check the network parameters:
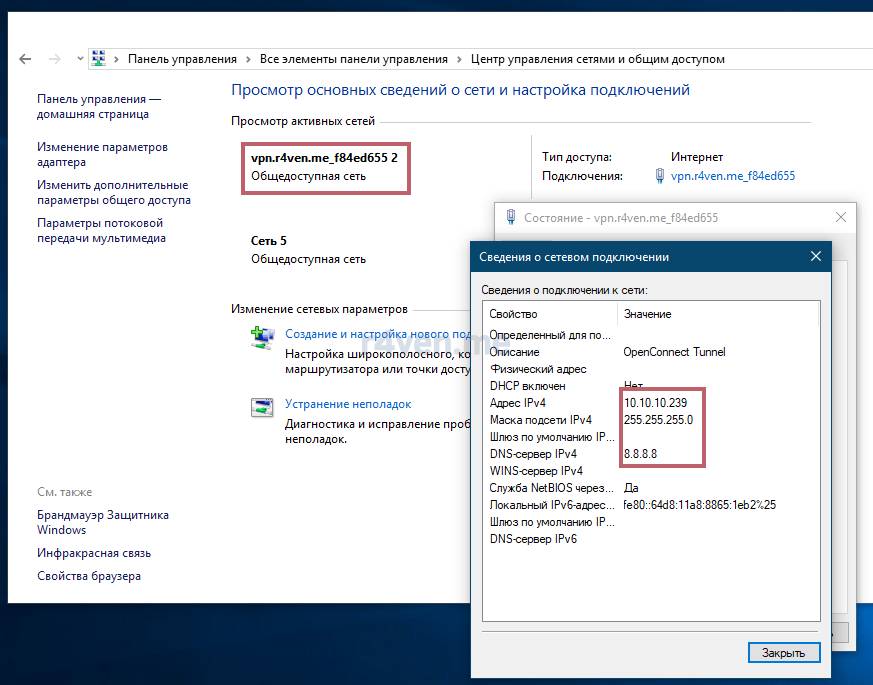
Everything works.
Configuring the OpenConnect client for Android/HarmonyOS
For mobile OSes, you need to install the Cisco Secure Client-AnyConnect app.
Please note that this mobile app does not have open source code. When using it, you’ll have to trust the developer.
There is an open source mobile client, but its development stopped some N years ago, and it didn’t work correctly for me.
After opening the app, you need to create a connection, specify the gateway address + port, and import the user certificate. A step-by-step guide is shown in the screenshots below:
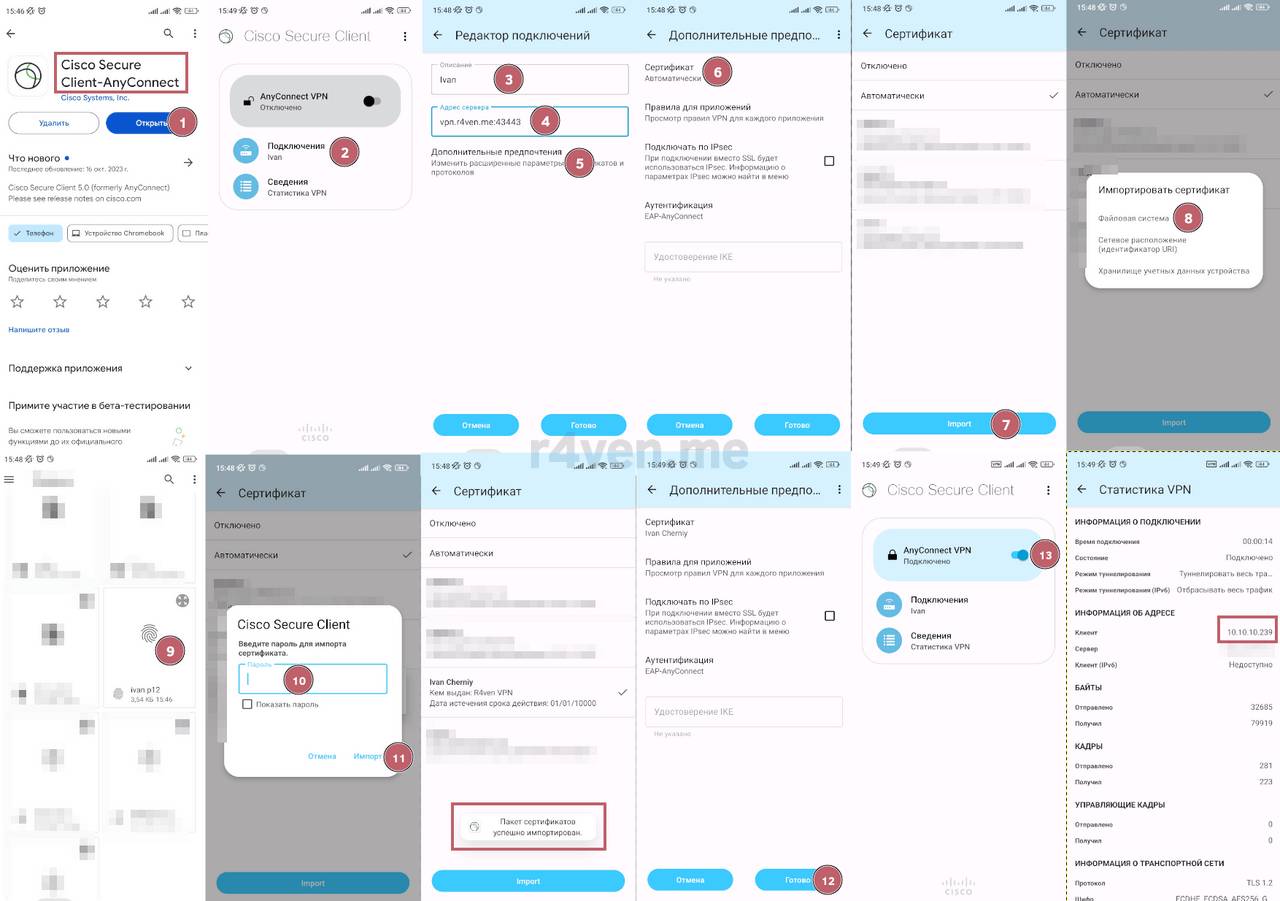
Configuring the OpenConnect client for iOS
Instructions kindly provided by a subscriber in the Raven chat
You download the file to your phone. Open Files and long-press this icon (just tapping it will show a technical message that the profile has been downloaded). Select the share option — More — Scroll all the way down, there will be Any Connect. The app opens and asks for a password. Enter it and tap import.
Then, following your own scheme, select the certificate in the tunnel settings.
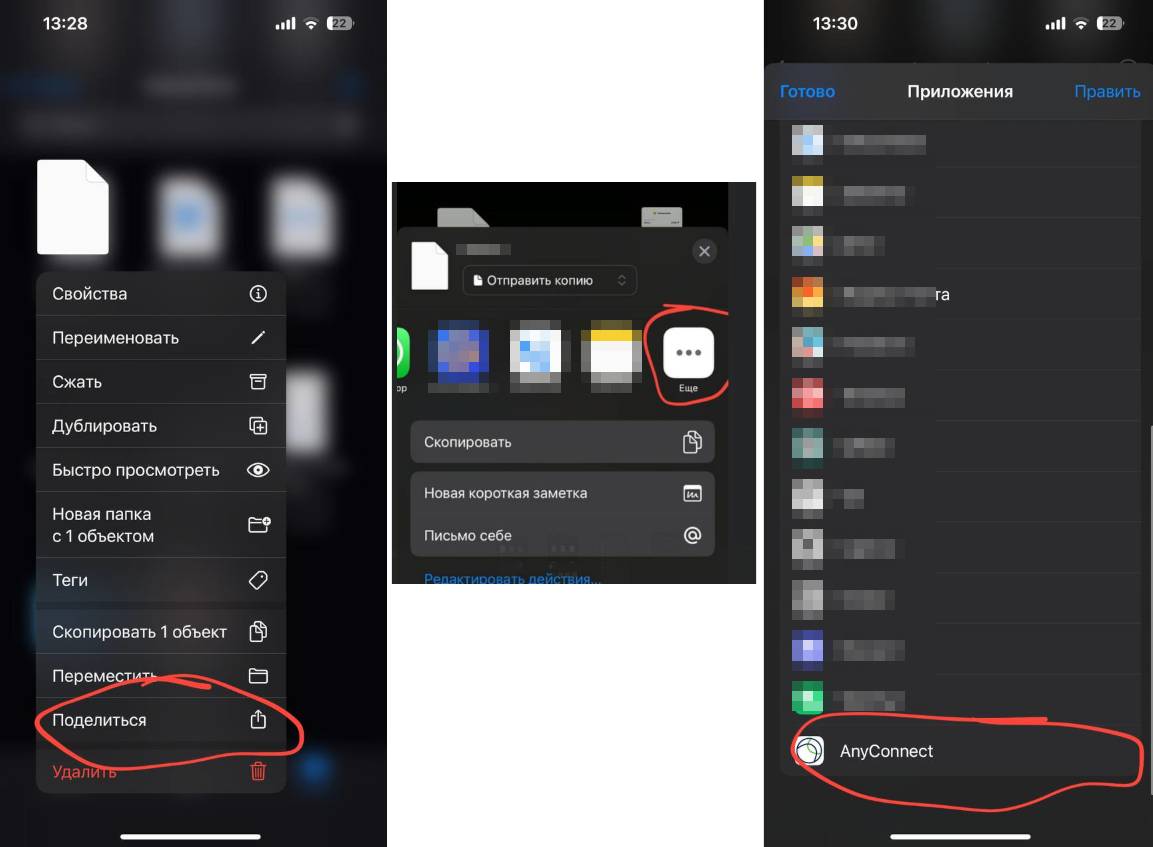
Well, that’s about it.
Configuring the OpenConnect client for OpenWrt
This task isn’t trivial, so it’s covered in a separate article:
Blocking users by revoking their certificate
If you need to block a user, you can do so by revoking their SSL certificate.
If you just set up ocserv using this guide, simply use the ocrevoke command inside the container:
# revoke the certificate of user ivan
docker exec -it openconnect ocrevoke ivan

# reload the user blacklist
docker exec -it openconnect ocrevoke RELOAD

# remove everyone from the blacklist
docker exec -it openconnect ocrevoke RESETWhere instead of ivan you substitute the username whose certificate-based access needs to be blocked.
On the next connection attempt, the user will get an error:
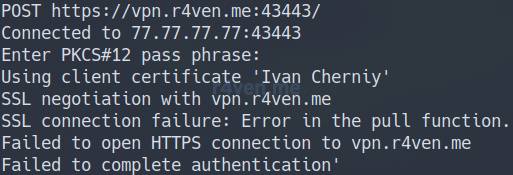
If your server was set up using this guide some time ago, you’ll need to do a bit of manual work.
First, add this parameter to the end of the ./data/ocserv.conf config:
crl = /etc/ocserv/certs/crl.pemThen run the commands:
cat ./data/certs/ivan-cert.pem >> ./data/certs/revoked.pem

docker exec -it openconnect certtool --generate-crl --load-ca-privkey /etc/ocserv/certs/ca-key.pem --load-ca-certificate /etc/ocserv/certs/ca-cert.pem --load-certificate /etc/ocserv/certs/revoked.pem --template /etc/ocserv/certs/crl.tmpl --outfile /etc/ocserv/certs/crl.pem

docker exec -it openconnect occtl reloadWhere in the first command, instead of ivan, substitute the username whose certificate-based access needs to be blocked.
As you may have guessed, the key file here is ./data/certs/revoked.pem, to which users’ public certificates <user_name>-cert.pem are added.
To clear the entire blacklist, run:
docker exec -it openconnect certtool --generate-crl --load-ca-privkey /etc/ocserv/certs/ca-key.pem --load-ca-certificate /etc/ocserv/certs/ca-cert.pem --template /etc/ocserv/certs/crl.tmpl --outfile /etc/ocserv/certs/crl.pem

docker exec -it openconnect occtl reloadIf you don’t need this functionality, just comment out the line crl = /etc/ocserv/certs/crl.pem in the ocserv config.
Login/password authorization
In some cases you may need to enable login/password authorization. For example, when configuring openconnect on Keenetic routers, which don’t support certificate-based connections.
In the ocserv config file — /opt/openconnect/data/ocserv.conf — allow login/password authorization by adding this parameter:
enable-auth = "plain[passwd=/etc/ocserv/ocpasswd]"It’s worth noting that with this configuration, certificate-based authorization will remain in place.
Then restart the server:
docker compose restart openconnectNext, create a new user:
docker exec -it openconnect ocpasswd exampleuserAnd set a password for them.
After that, you can connect using a login/password pair.
Be sure to use only long and complex passwords.
Configuring two-factor authentication (2FA/TOTP) with ocpasswd and PAM
Ocserv supports two types of two-factor authentication out of the box: HOTP and TOTP. My configuration uses TOTP, as the more common option.
2FA can be configured in ocserv for two authorization methods on the server: for internal users in the ocpasswd file, and for external host users via the PAM module.
Note that only one password authentication method can be used in ocserv at a time. A comment from the official documentation:
Note that authentication methods utilizing passwords cannot be combined (e.g., the plain, pam or radius methods).
It’s worth noting that PAM authentication provides a more flexible approach to configuring user authentication on the server. It’s precisely via PAM that the container implements sending TOTP secrets and tokens via Email and Telegram (more on this below).
To activate 2FA inside the container, you need to edit the .env and ocserv.conf files.
Editing .env
Add/change the parameter:
OTP_ENABLE="true"Editing ocserv.conf
Choose one of the authentication methods for which the second factor will be applied:
- 2FA using
ocpasswd:
- 2FA using
auth = "plain[passwd=/etc/ocserv/ocpasswd,otp=/etc/ocserv/secrets/users.oath]"For this authentication to work, you need to create a user the standard way and set a password for them. Example:
docker exec -it openconnect ocpasswd ivan- 2FA using PAM:
auth = "pam"In the case of PAM, you also need to pass the files with the list of local host OS users into the container in the docker-compose.yml file:
volumes:
  - ./data:/etc/ocserv
  - /etc/passwd:/etc/passwd:ro
  - /etc/group:/etc/group:ro
- /etc/shadow:/etc/shadow:ro📝 Note
Note that each time a new user is added on the host system, the container needs to be restarted to synchronize the mounted files.
Example of creating a local Linux user without a home directory and without the ability to log into an OS shell session:
adduser --no-create-home --allow-bad-names --quiet --shell /bin/false --comment "Ocserv user" ivan@r4ven.meRestarting the service
Now let’s recreate the container:
systemctl restart openconnectTwo-factor authentication is now active; all that’s left is to configure it for existing users. To do this, use the special command/script ocuser2fa. Example for user ivan:
docker exec -it openconnect ocuser2fa ivanThe command will print to the console the secret generated for the specified user, as well as this secret in base32 format and as a QR code for scanning and saving it in a special authenticator app on a smartphone, for example: FreeOTP, Google Authenticator, Yandex Key, and others.
Also, for convenience, the QR code is saved as a png file in the /opt/openconnect/data/secrets/otp_<user_id>.png directory.
Most often, scanning the QR code doesn’t cause any issues with generating correct TOTP codes, but there are nuances when adding the secret manually. Here are the correct TOTP parameters supported by ocserv when manually adding the secret, using the FreeOTP app as an example:
- Username — an arbitrary value
- Company — an arbitrary value
- Secret — the secret in base32 encoding
- Type — totp
- Digits — 6
- Algorithm — SHA1
- Interval — 30
You can also obtain one-time passwords in the Linux console using the oathtool utility:
apt install -y oathtool

oathtool --base32 --totp=SHA1 --time-step-size=30 --digits=6 <totp_base32_secret>Replace <totp_base32_secret> with the secret generated by the ocuser2fa command.
Each one-time token is available for use within 20 “windows”, i.e. 20 * 30 sec = 10 min.
(Optional) Sending the TOTP secret + QR code and one-time passwords via Email and Telegram
The container implements functionality for sending the TOTP secret as a base32 string and the QR code as a png file to the user’s Email address/Telegram chat while the ocuser2fa command runs.
Also, if the corresponding variable is set, the ability to send one-time passwords via the specified channels on every connection to the VPN server is activated — this only works when using PAM authorization, since ocserv itself cannot run custom scripts specifically during the user authentication process.
Sending via Email
Sending via email is done through an external mail service using the console SMTP client — msmtp. For it to work, you need to set the corresponding parameters via environment variables in the .env file. Here’s an example:
MSMTP_HOST="smtp.example.com"
MSMTP_PORT="465"
MSMTP_USER="email@example.com"
MSMTP_PASSWORD="supersecretpassword"
MSMTP_FROM="email@example.com"
# for sending one-time passwords on every authorization
OTP_SEND_BY_EMAIL="true"If necessary, adjust the msmtp parameters in the
/opt/openconnect/data/scrits/msmtprcfile after recreating the container.
It’s recommended to use an “app password” rather than your full email account password. The SMTP server details for all popular providers are easy to find via a search engine.
Data is sent via Email only if the ocserv username is an email address in the standard format: username@example.com.
Sending via Telegram
Sending messages to Telegram is done by sending HTTP requests using curl to api.telegram.org. For this feature to work, you need:
1) a Telegram bot token (instructions on how to get one from the official docs or more clearly explained here), which needs to be set in the .env file, example:
TG_TOKEN="1234567890:QWERTYqwerty-QWERTY123_QwErTy123qWeRtY123"
# for sending one-time passwords on every authorization
OTP_SEND_BY_TELEGRAM="true"2) the user to whom the secret with the QR code and one-time tokens will be sent needs to send any message to your bot’s chat within the last 24 hours (required only once)
3) the ocserv username must exactly match the user’s nickname in Telegram
Restarting the service
To apply the changes, restart the service:
systemctl restart openconnectVerification
Let’s configure 2FA for an existing user whose name is in the form of an email address:
docker exec -it openconnect ocuser2fa ivan@r4ven.me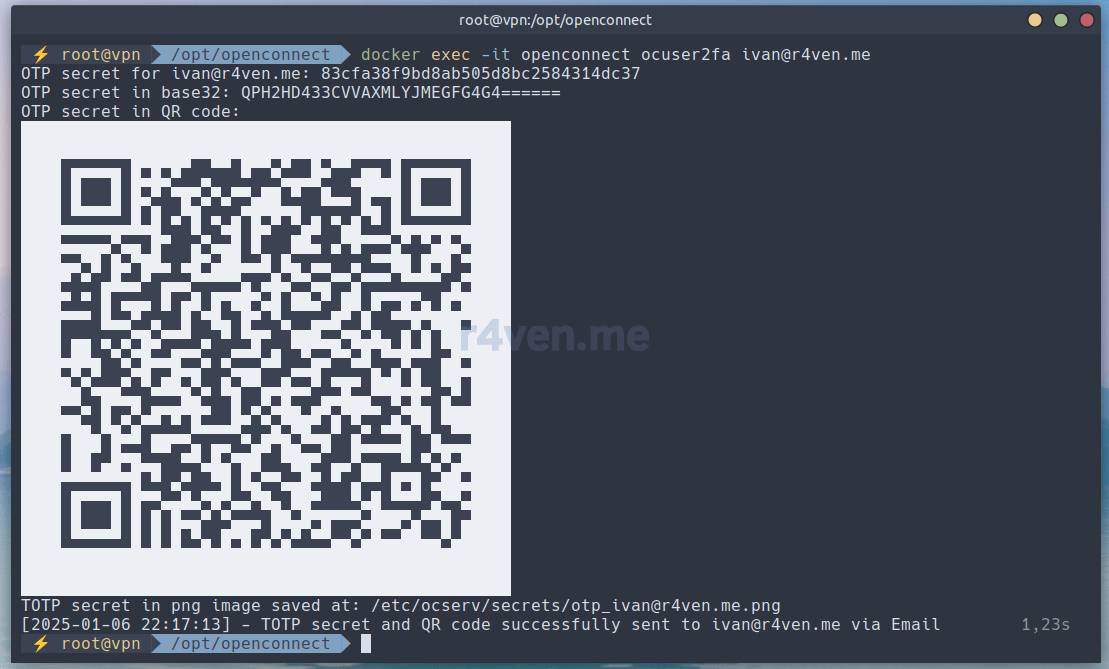
You should receive emails like these:
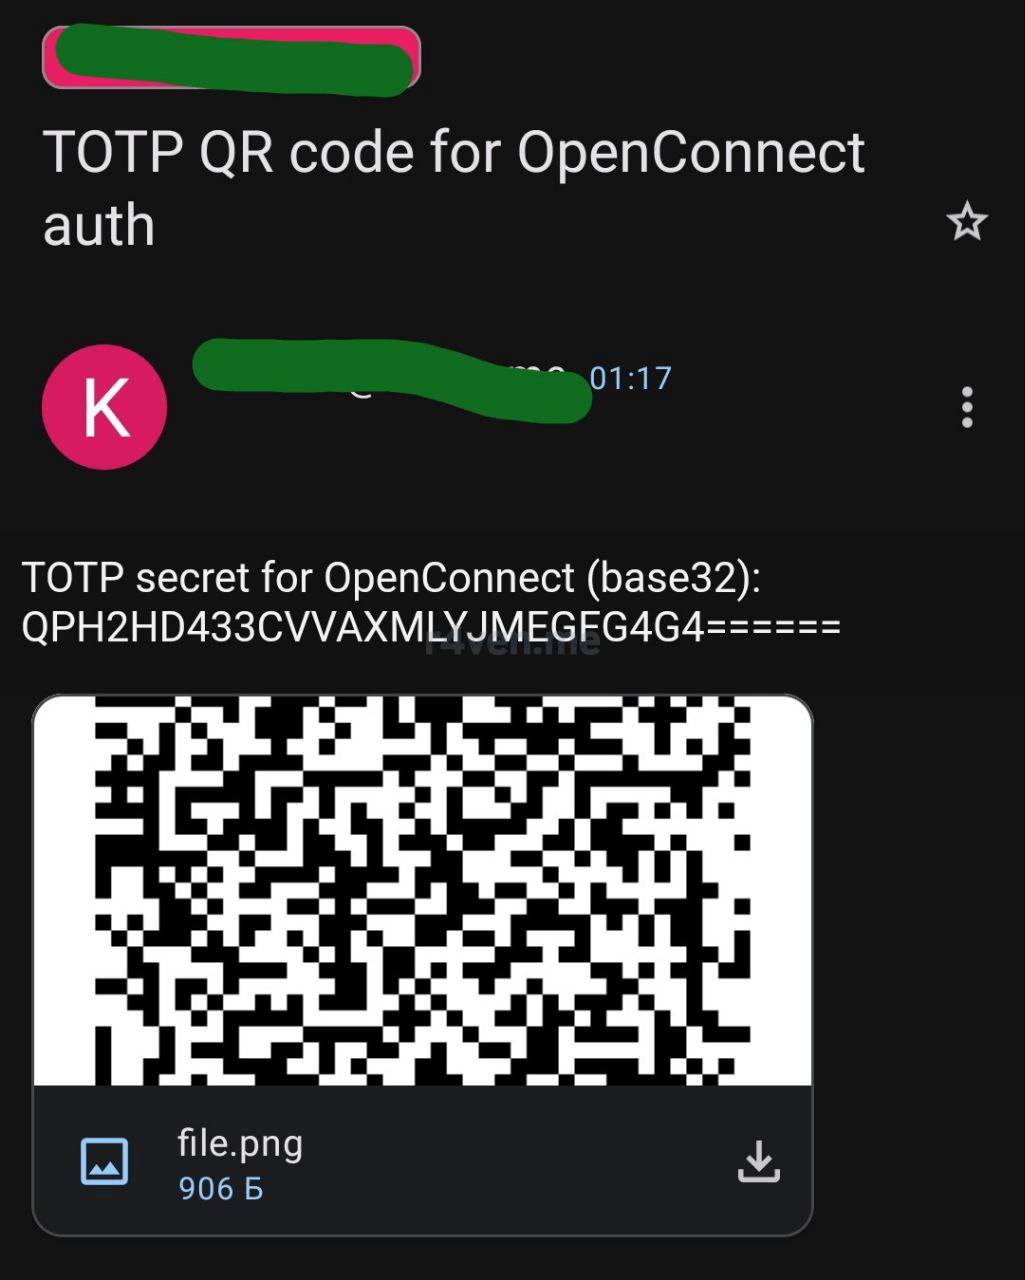
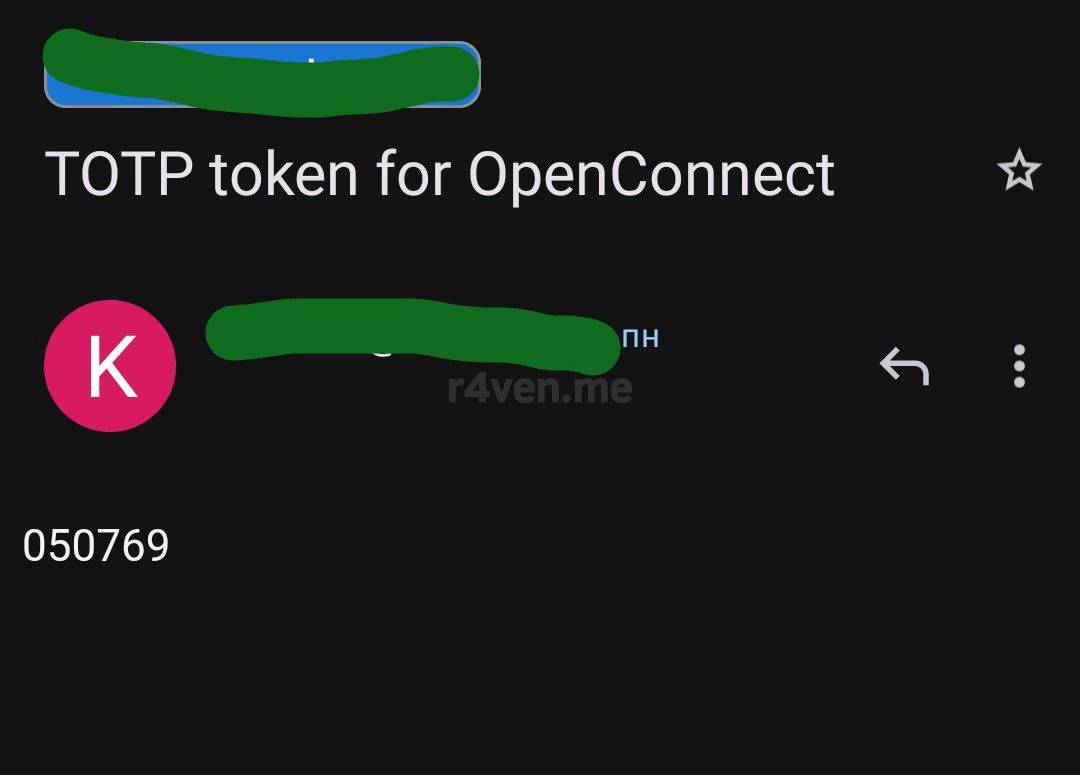
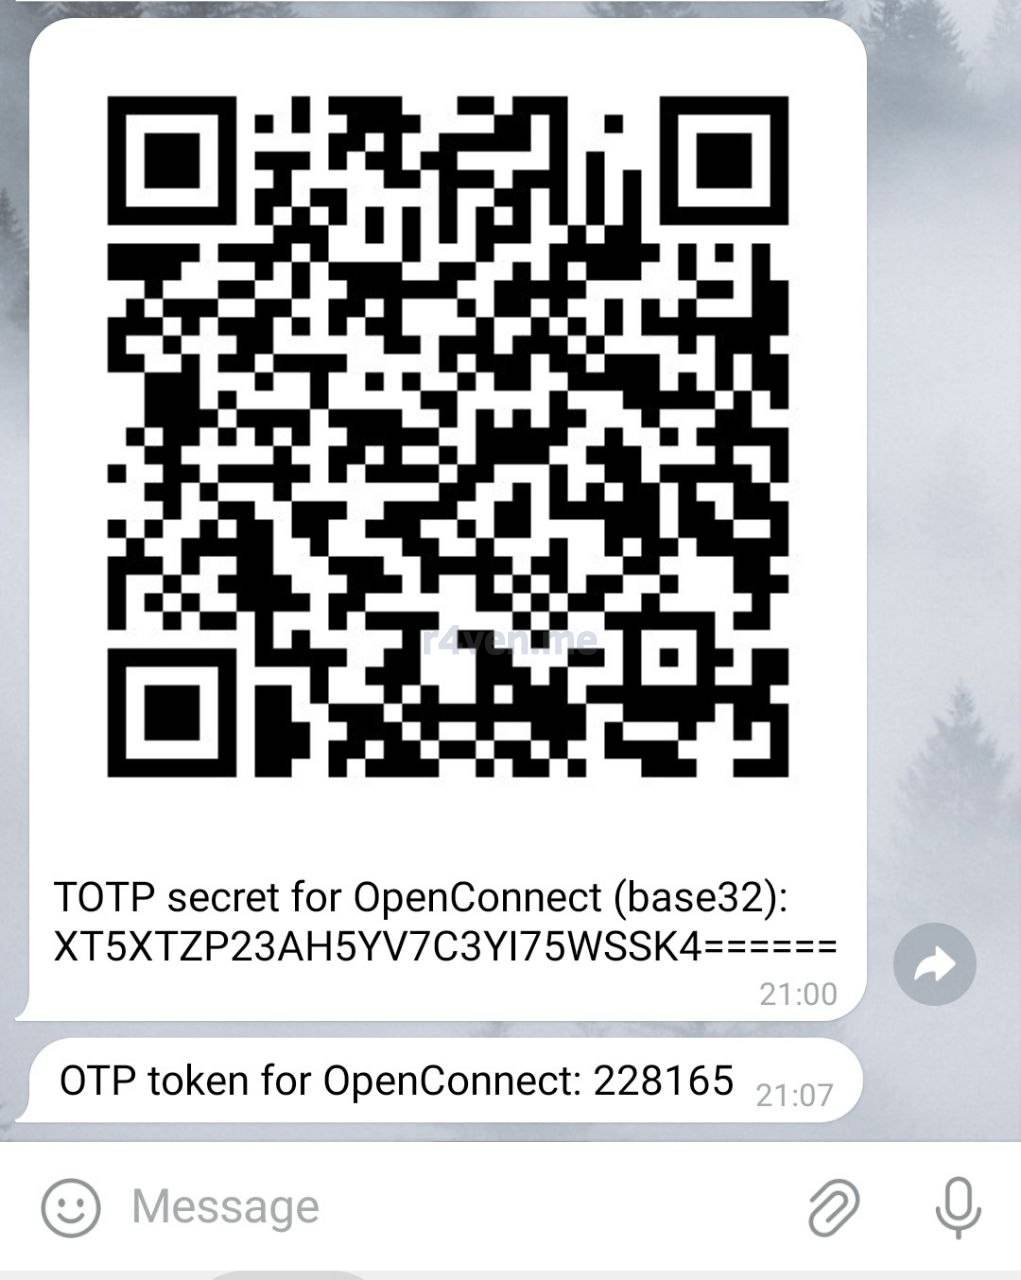
For a user whose name matches their Telegram username:
docker exec -it openconnect ocuser2fa ivan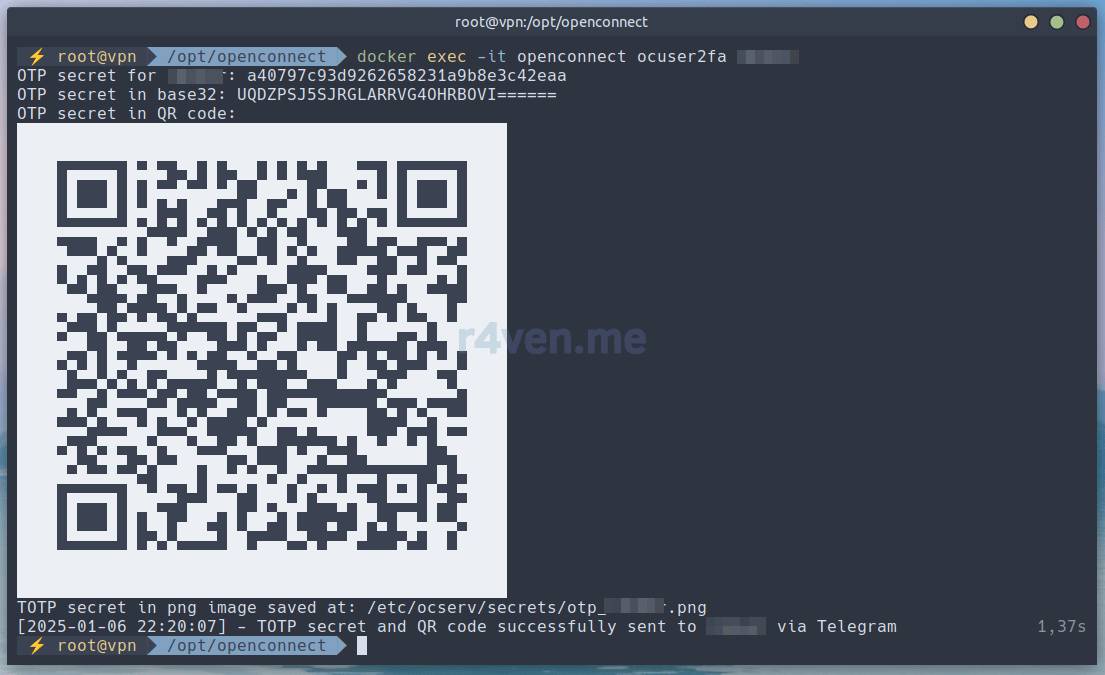
In the chat with the bot, you’ll see something like this:
Protection against automated access — Camouflage
Starting with ocserv version >= 1.23, an additional layer of protection is available against scanning by internet bots that can automatically brute-force credentials for access to the internal network. To enable protection, add the following parameters to your ocserv.conf:
# enable protection against active probing
camouflage = true
# additional part of the URL for connecting
camouflage_secret = "secretword"
# enable a fake login window that rejects any login attempts
#camouflage_realm = "My admin panel"And restart the server:
systemctl restart openconnectNow, to connect to the server, the client needs to specify the address with the additional sub-URL specified in the config. Example:
https://vpn.r4ven.me:43443/?secretwordAnd all requests to the base URL: https://vpn.r4ven.me:43443/ will end with a client error — 404. And if the camouflage_realm = "My admin panel" parameter is active, requests will hit a fake login window.
Useful systemctl/docker/docker-compose/ocserv commands
A small list of commands that might be useful when setting up and maintaining the OpenConnect server.
# managing the openconnect service with systemd
systemctl stop openconnect
systemctl start openconnect
systemctl restart openconnect

# shows the list of all available docker images
docker image ls

# shows the list of all docker containers, including running and stopped ones
docker container ls -a

# removes all unnecessary docker resources, such as unused containers, images, networks and volumes, without confirmation prompt
docker system prune -af

# shows the status and information of containers started with docker-compose
docker compose ps

# starts the containers from the docker-compose.yml file in the background
docker compose up -d

# stops and removes all containers and networks started with docker-compose
docker compose down

# displays the standard output of containers started with docker-compose
docker compose logs -f

# restart the container named "openconnect"
docker compose restart openconnect

# launches an interactive bash shell inside the "openconnect" container
docker exec -it openconnect bash

# shows help for the VPN server management utility command
docker exec -it openconnect occtl --help

# reloads the ocserv configuration file
docker exec -it openconnect occtl reload

# shows the ocserv status
docker exec -it openconnect occtl show status

# shows the list of ocserv users
docker exec -it openconnect occtl show users

# shows the list of active ocserv sessions
docker exec -it openconnect occtl show sessions all

# creates a user with id "ivan" and name "Ivan Cherniy" for ocserv
docker exec -it openconnect ocuser ivan 'Ivan Cherniy'Conclusion
Phew! Creating this material took a considerable amount of time and effort, but it wasn’t wasted. In the process of preparing it, I learned a lot of new things about how networking works in Linux, plus many bash nuances while writing the project’s scripts, and much more.
In the future, I’ll be writing articles about deploying various personal services, and access to them will use VPN connections based on OpenConnect.
If you run into any difficulties with the setup or still have questions, feel free to leave comments on this article or in our Telegram chat: @r4ven_me_chat.
Also, don’t forget to subscribe to our Telegram channel: @r4ven_me. Links to all new articles appear there the moment they’re published.
Thanks for making it through this article with me. Good luck!
Materials used
- Project files from the article on my GitHub
- Official GitLab repository of the ocserv project (EN)
- Official GitLab repository of the gui clients (EN)
- Example ocserv.conf file with parameter descriptions (EN)
- Guide: Set Up OpenConnect VPN Server (ocserv) on Ubuntu 20.04 with Let’s Encrypt (EN)
- Guide: Ocserv Advanced (Split Tunneling, IPv6, Static IP, Per User Configs, Virtual Hosting) (EN)
- Guide: Setting up my OpenConnect Server (EN)
- Official manual: GitHub (EN)
- certbot documentation: User Guide — Certbot (EN)
- 2FA configuration documentation (EN)
- FreeOTP authenticator mobile app website (EN)
Comments
📝 Note
Valentin:
Does this version support camouflage?
Иван Чёрный:
Good day.
The article installs the stable version of ocserv — 1.1, from the Debian repository. It doesn’t support the parameter you mentioned.
But at the request of subscribers, I manually built a separate image with the latest ocserv version — 1.3.
You can use it by editing the parameter:
image: r4venme/openconnect:v1.3Or build it yourself following a separate article:
Building OpenConnect (ocserv) version 1.3 from source on Debian 12 + docker image
📝 Note
Kirill Tarashev:
The article mentions connecting to the server from Keenetic… Well, in the latest current beta (and maybe in all of them), Keenetic can’t save an address with a port… it just removes it.. And so it doesn’t connect, accordingly.
It makes sense to add a note that if you’re planning to connect through these routers, the port in .env should be set to the default 443 (which doesn’t need to be specified in the connection string)
Иван Чёрный:
Hi!
Useful information. Added it to the article. Thanks 👍
📝 Note
Vladimir:
Good day.
Are there any requirements for configuring ufw and iptables?
I’ve been struggling with these settings for two days now.
Иван Чёрный:
Greetings!
Please clarify what exactly the problem is? ufw / iptables on the host system or in the container?
Since, according to my guide, the ocserv container is deployed with docker, in that case, when forwarding a port from the container to the host system, docker automatically adds the necessary rules to iptables / ufw, in its own separate rule chain.
You can verify this by running:
sudo iptables -L -nOr
sudo iptables-saveFor quicker communication, I recommend asking questions in our chat: @r4ven_me_chat. We have a friendly community there 🙂
📝 Note
survland:
My download speed is 0.70 and upload is 27 mbit, how do I fix the speed?
Иван Чёрный:
It depends on a large number of factors. Most often the issue isn’t with ocserv, but with the connection channel to your server.
Here’s how you can check Download|Upload speed in real time using ssh, to determine whether the problem is in the VPN or not.
Install the pipeline monitoring utility:
sudo apt update && sudo apt install pvThen disable the VPN and check the download speed:
ssh root@123.45.67.89 dd if=/dev/zero bs=1M count=1024 | pv | cat > /dev/nullThen upload:
dd if=/dev/zero bs=1M count=1024 | pv | ssh root@123.45.67.89 'cat > /dev/null'Then enable the VPN and check again. If the speed is much higher without the VPN, then the issue is in the channel.
📝 Note
Mashrooms Peter:
When connecting I get this error, even though the SSL handshake does go through.
Got inappropriate HTTP CONNECT response: HTTP/1.1 401 Cookie is not acceptable

Error establishing the CSTP channel

disconnectI’m proxying traffic into the container through nginx, but I also tried haproxy. The result is the same. I can’t figure out what’s wrong
Иван Чёрный:
Show how you configured nginx for proxying.
If you connect directly, without nginx, does everything work correctly?
Mashrooms Peter:
haproxy config
frontend https_frontend
  bind haproxy:8443
  mode tcp
	tcp-request inspect-delay 5s
  tcp-request content accept if { req_ssl_hello_type 1 }

    acl host_vpn hdr(host) -i example.com
    use_backend ocserv if { req_ssl_sni -i example.com }

backend ocserv
  mode tcp
  option ssl-hello-chk
server ocserv openconnect:9443 send-proxy-v2I’m listening on 8443 in the haproxy container, forwarding to 9443 ocserv
directly, without a proxy
| 198c | Failed to open HTTPS connection to example.com
| 198c | Authentication error; cannot obtain cookie
| 2d98 | Disconnectedwith haproxy it’s like this. The “signer not found” is concerning, but that seems to be half the problem
Server certificate verify failed: signer not found
| 4088 | Connected to HTTPS on example.com with ciphersuite (TLS1.3)-(ECDHE-SECP256R1)-(RSA-PSS-RSAE-SHA256)-(AES-256-GCM)
| 4088 | Got HTTP response: HTTP/1.1 200 OK
| 4088 | Connection: Keep-Alive
| 4088 | Content-Type: text/xml
| 4088 | Content-Length: 189
| 4088 | X-Transcend-Version: 1
| 4088 | Set-Cookie: webvpncontext=AEG244K5UOM9lu9jQ4qa69GXypuR9ybC0YNRdqif4EI=; Secure; HttpOnly
| 4088 | Set-Cookie: webvpn=<elided>; Secure; HttpOnly
| 4088 | Set-Cookie: webvpnc=; expires=Thu, 01 Jan 1970 22:00:00 GMT; path=/; Secure; HttpOnly
| 4088 | Set-Cookie: webvpnc=bu:/&p:t&iu:1/&sh:F050A2A4D159D3086B9A5353CC5EDCD6C62F5515; path=/; Secure; HttpOnly
| 4088 | HTTP body length:  (189)
| 4088 | XML POST enabled
| 4088 | SSL negotiation with example.com
| 4088 | Server certificate verify failed: signer not found
| 4088 | Connected to HTTPS on example.com with ciphersuite (TLS1.3)-(ECDHE-SECP256R1)-(RSA-PSS-RSAE-SHA256)-(AES-256-GCM)
| 4088 | TCP_MAXSEG 1440
| 4088 | Got inappropriate HTTP CONNECT response: HTTP/1.1 401 Cookie is not acceptable
| 4088 | Error establishing the CSTP channel
| 2d98 | DisconnectedИван Чёрный:
The messages in the output point to problems with the certificates of the local certificate authority (CA), which are generated by the script in the container on first startup.
In the directory
/opt/openconnect/data/certsThere should be the files
ca-key.pem
ca-cert.pemCheck whether these files exist.
If they do, you can check the certificate file with this command:
openssl x509 -in /opt/openconnect/data/certs/ca-cert.pem -text -nooutThe output should start something like this:
Certificate:
  Data:
    Version: 3 (0x2)
    Serial Number: 1 (0x1)
    Signature Algorithm: sha256WithRSAEncryption
    Issuer: O = vpn.r4ven.me, CN = My VPN
    Validity
      Not Before: May 23 13:19:12 2024 GMT
      Not After : Dec 31 23:59:59 9999 GMT
    Subject: O = vpn.r4ven.me, CN = My VPN
    Subject Public Key Info:
      Public Key Algorithm: rsaEncryption
        Public-Key: (3072 bit)
        Modulus:
00:f2:fe:18:f6:a2:29:34:5e:89:de:fb:b4:9c:2e:Also worth checking the certbot certificates, if you’re using a domain name connection.
I recommend writing to us in the Telegram chat: https://t.me/r4ven_me_chat
Otherwise we could be going through options here for a while.
Иван Чёрный:
Solution from a user in the Telegram chat:
All in all I figured it out, it’s working now. The issue was with passing through /dev/net/tun in the test environment
📝 Note
Татьяна Германова:
Good day.
What if ports 80 and 443 are already taken, what should I do?
Иван Чёрный:
Good day.
Please share more details.
The article demonstrates installing ocserv using port 43443, not 443.
I’ll assume you want to run ocserv on port 443, but it’s already used by other services. In that case, the solution would be to set up a reverse proxy server, such as nginx or haproxy.
The topic of reverse proxies is beyond the scope of this article. But our subscribers in the Telegram chat have already discussed a solution to this issue. If you’d like, you can search for the answer in the message history or ask a question 😌.
📝 Note
Денис Тутельян:
Hello. Can you tell me what’s causing this error? It happens at the image build stage.
ERROR: The Compose file ‘./docker-compose.yml’ is invalid because:
services.openconnect.ports is invalid: Invalid port «»43443″:443/tcp», should be [[remote_ip:]remote_port[-remote_port]:]port[/protocol]
networks.vpn.ipam.config value Additional properties are not allowed (‘gateway’ was unexpected)
services.openconnect.depends_on contains an invalid type, it should be an array
Иван Чёрный:
Good day.
It looks like the error is in the syntax of the docker-compose.yml file. Specifically, “”43443″:443/tcp” — there seem to be extra quotes here.
Try just specifying — 43443:443/tcp
I’ll also guess that the extra quotes might be coming from the value of the ${SRV_PORT} variable, if you wrapped it in additional quotes in docker-compose.yml.
Денис Тутельян:
I checked the syntax, and read that it’s related to the new docker-compose, which doesn’t support the gateway field. The image built successfully with the docker compose command, not docker-compose
Иван Чёрный:
What docker engine version do you have? I checked on several of my machines, and everywhere the gateway network parameter is specified and the containers start correctly.
As for docker-compose — it used to be an unofficial plugin from third-party developers. Later, docker took it under its wing, and starting from a certain version, docker compose became a built-in command.
Денис Тутельян:
Engine 27.4.1, but compose 1.2.5, so I was wrong — it’s not that the new compose is the issue, but rather that it’s too old in Debian 11
📝 Note
Kirill NS:
Good day.
Haven’t set it up yet, just asking in advance. Does this connection allow access to the resources of the network where this linux server is located? I didn’t find an explicit description in the article.
Иван Чёрный:
Hi!
The host network is available by default through the docker bridge that’s created when the container starts.
But to communicate with clients from the host, you need to add a route:
Roughly:
ip route add 10.11.11.0/24 via 10.10.10.2Where:
10.10.10.2 — the address of the ocserv container
10.11.11.0/24 — the internal ocserv network
Иван Чёрный:
If you need more control, a bash script /opt/openconnect/data/connect.sh runs for each client when they connect.
You can restrict access, for example to the 10.10.200.0/24 network, with iptables like this:
iptables -A FORWARD -s "${IP_REMOTE}"/32 -d 10.10.200.0/24 -j REJECTKirill NS:
Got it, thanks.
📝 Note
Родион Солошенко:
Have you considered LDAP (AD) authentication? Could you tell me where I can look at the configuration? So that it doesn’t differ too much from your ocserv configuration. Otherwise I’ll have to redo everything from scratch.
Иван Чёрный:
Since I don’t have any particular need for LDAP, I haven’t looked into it yet. But it’s an interesting question, maybe I’ll add the functionality in the future.
To add new functionality while keeping the configuration from the article — you’ll need to rebuild the docker container.
I wrote in detail about how PAM authorization is configured, including inside the container, in one of the Telegram posts here.
LDAP authorization in Linux can be implemented via sssd and the PAM module — pam_sss.so.
I need to study the question in more detail. I’m not ready to give specific recommendations yet.
📝 Note
Егоров Иван:
Does anyone have a working one, I can’t get it running, there are no explanations in the article, found it on Habr ))
[Unit]
Description=OpenConnect SSL VPN server
Documentation=man:ocserv(8)
After=network-online.target

[Service]
PrivateTmp=true
PIDFile=/run/ocserv.pid
Type=simple
ExecStart=/usr/sbin/ocserv —foreground —pid-file /run/ocserv.pid —config /etc/ocserv/ocserv.conf
ExecReload=/bin/kill -HUP $MAINPID

[Install]
WantedBy=multi-user.targetИван Чёрный:
It’s all on the website.
Writing a bash script to connect to an OpenConnect VPN server
Егоров Иван:
service unit occlient.service: that’s what’s there, as I understand it that’s the client )) But a server is needed.
Иван Чёрный:
Didn’t the unit you posted in your message work?
📝 Note
Илья Сердобинцев:
Good day!
Got everything installed, thank you very much!
I’m having difficulty setting up permission for login/password authorization for the Keenetic router. When entering the command: enable-auth = «plain[passwd=/etc/ocserv/ocpasswd]»
It says the following: /opt/openconnect# enable-auth = «plain[passwd=/etc/ocserv/ocpasswd]»
-bash: enable-auth: command not found
Could you please tell me what I’m doing wrong?
Иван Чёрный:
Good day.
That’s not a command, it’s an ocserv parameter that needs to be added to the config file:
/opt/openconnect/data/ocserv.conf
Илья Сердобинцев:
Good day!
Please tell me how to add this parameter?
Иван Чёрный:
echo 'enable-auth = "plain[passwd=/etc/ocserv/ocpasswd]"' >> /opt/openconnect/data/ocserv.confИван Чёрный:
After that, reload the ocserv configuration:
docker exec -it openconnect occtl reload📝 Note
Владимир Яруничев:
Hi. My OpenConnect has stopped working
I was using an old version of OpenConnect, installed via the ansible role https://github.com/hos7ein/ansible-ocserv
I decided to try your version 1.3 image, enabled camouflage, but with no result at all — over wi-fi it can’t even reach the server, over mobile internet the connection is established, but there’s no internet on the phone. Does openconnect work for you?
Иван Чёрный:
Good day.
Yes, openconnect works for me. But this isn’t the first time I’ve heard about failures.
Unfortunately I’m forced to disable comments on the site. To continue the conversation, please go to the Telegram chat: @r4ven_me_chat.
Comments