

In this article we will configure OpenWrt to connect to an OpenConnect server (ocserv) and set up flexible routing: all traffic, only specific domains, or specific IP subnets.
🖐️Hey!
Subscribe to our Telegram channel @r4ven_me📱, so you don’t miss new posts on the website 😉. If you have questions or just want to chat about the topic, feel free to join the Raven chat at @r4ven_me_chat🧐.
podklyuchenie-openwrt-k-openconnect-serveru
☝️ Important
Starting with OpenWRT 25.12, a different package manager, apk, is used instead of opkg. Package management commands for newer versions will differ.
Preparation
The most important thing — it is assumed that you already have:
in order to perform the further steps in this article.
Backing up the router configuration
Before doing any work with OpenWrt, you need to make a backup of the current router configuration and know how to restore from it. Like many other operations, a backup in OpenWrt can be made in two ways: via the console (SSH)🖥️ and the web interface (LuCI)🌐.
Obviously, backups should not be stored on the router itself. Below is the command to back up the OpenWrt config via the console:
☝️Connecting to the router’s console via SSH is done using the root account and the same password you use to connect to the Web GUI.
ssh root@openwrt.lan 'sysupgrade --create-backup -' | cat > ./backup.tar.gz📝This command uses sysupgrade to create a tar archive and pass its contents through the stream redirection mechanism to the local cat command, which in turn saves the received output to a file named ./backup.tar.gz in the current directory on your computer.
It is recommended to reboot the router after restoring from a backup.
If needed, run the following commands:
cat ./backup.tar.gz | ssh root@openwrt.lan 'sysupgrade --restore-backup -'

ssh root@openwrt.lan reboot📝Here, similarly, the cat command passes the contents of the backup.tar.gz archive to the input of the remote sysupgrade command, which performs the configuration restore.
It is also convenient to make and restore a backup via the router’s graphical interface. Section: System — Backup / Flash firmware — [Generate archive | Upload archive]
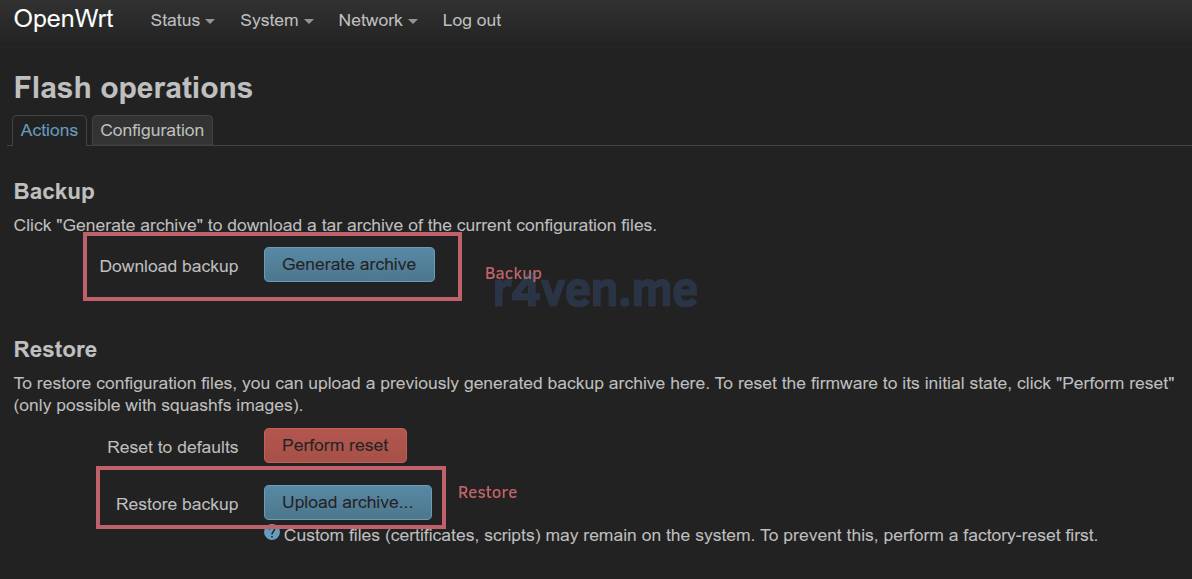
Good, we’ve dealt with backup and restore. Let’s move on to making configuration changes.
Installing the dnsmasq-full package
A bit of context: in OpenWrt firmware, dnsmasq (DNS and DHCP server) is a key system component. OpenWrt uses a lightweight version of dnsmasq by default to save the router’s flash storage💽.
To configure selective routing by domain list, we’ll need the full version: dnsmasq-full, available from the standard OpenWrt project repositories.
| dnsmasq | dansmasq-full |
|---|---|
| DNS-server | DNS-server |
| DHCP-server | DHCP-server |
| DNSSEC | |
| DHCPV6 | |
| Auth DNS | |
| IPset | |
| Nfsets | |
| Conntrack | |
| TFTP server |
Functionality of the dnsmasq and dnsmasq-full packages
So, we open an SSH session to the router:
ssh root@openwrt.lan💡Instead of openwrt.lan, you can specify the IP address of your router, which is 192.168.1.1 by default.
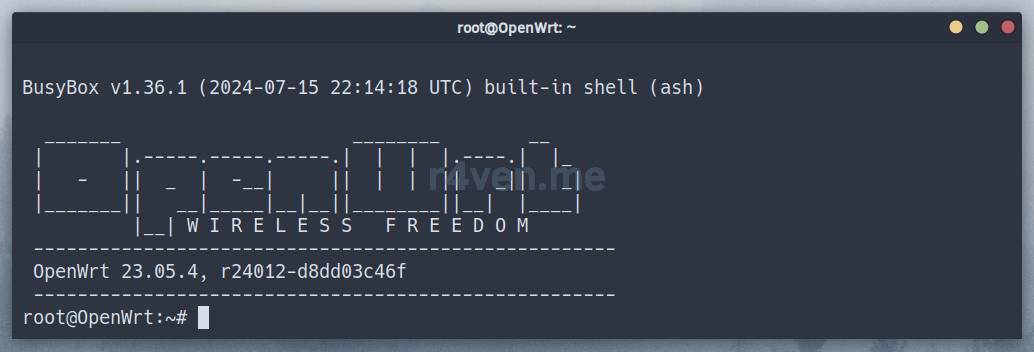
Before installing dnsmasq-full, you need to remove the standard dnsmasq, which will cause DNS to stop working on the router. Therefore, you should first download the dnsmasq-full installation package as a file onto the router, and only then perform the removal and installation:
❗️Please be careful when entering commands. Always verify that they completed successfully.
opkg update

mkdir /tmp/dnsmasq_full && cd /tmp/dnsmasq_full

opkg download dnsmasq-full

opkg remove dnsmasq && opkg install dnsmasq-full --cache /tmp/dnsmasq_full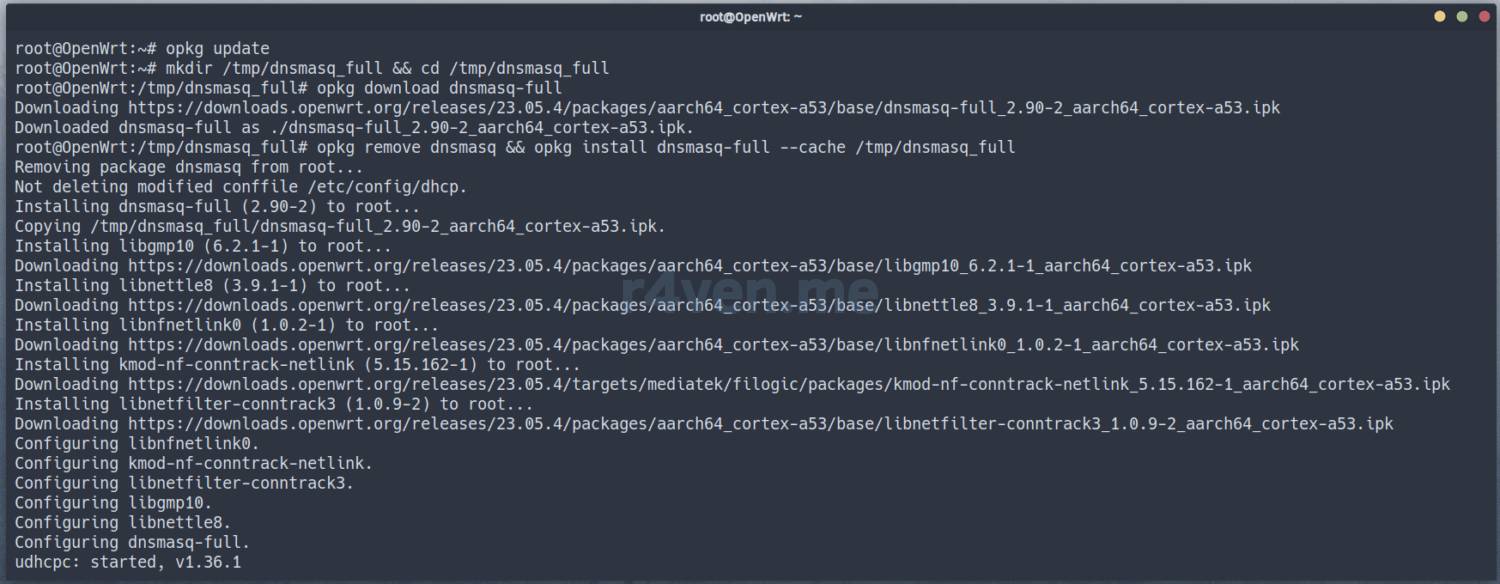
The dnsmasq-full package also includes its own DHCP configuration file. But since we previously had dnsmasq installed, which already used /etc/config/dhcp, the dnsmasq-full config file was saved at /etc/config/dhcp-opkg:
Collected errors:
* resolve_conffiles: Existing conffile /etc/config/dhcp is different from the conffile in the new package. The new conffile will be placed at /etc/config/dhcp-opkg.If you had specific DHCP settings on the router, transfer them from /etc/config/dhcp to /etc/config/dhcp-opkg, for example using vim, then make the new config the primary one:
mv /etc/config/dhcp-opkg /etc/config/dhcpAnd restart the dhcp module:
service dnsmasq restartIn case of problems, we have the backup we made at the beginning of this guide. We did make it, right?😬

Installing the openconnect client
Now we need to install the openconnect client packages, as well as the curl utility, which we’ll need to verify secure connections. Run:
opkg install openconnect luci-proto-openconnect curl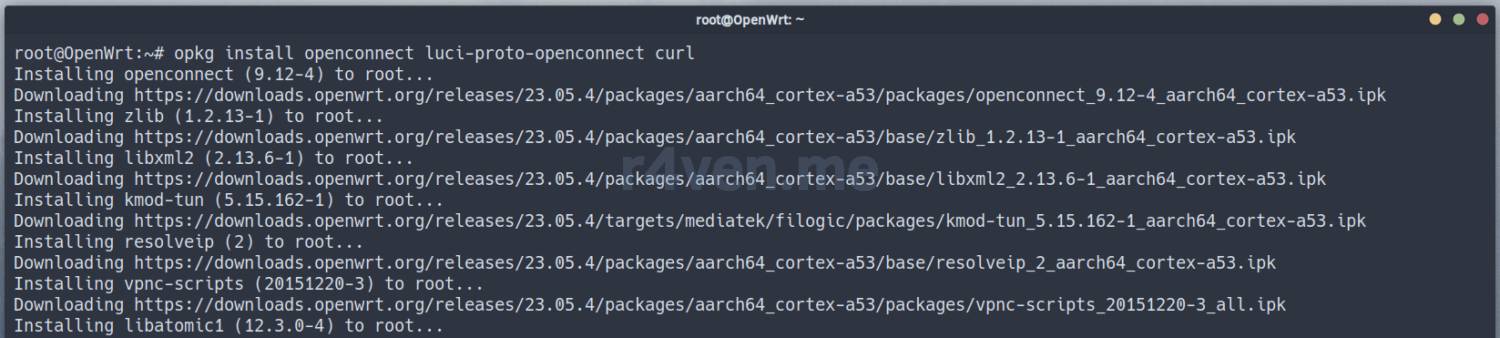
The luci-proto-openconnect package provides the ability to manage OpenConnect connection configurations in the router’s GUI:
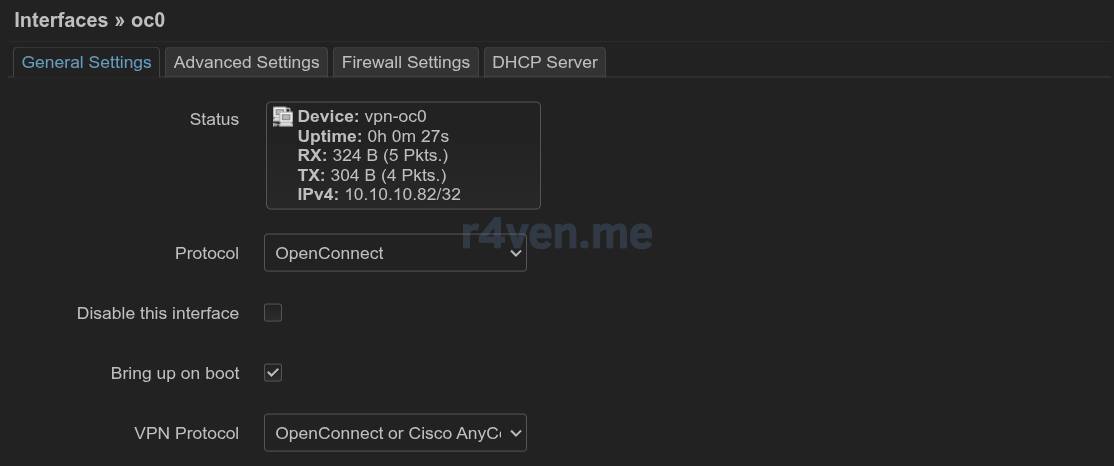
Connecting to the OpenConnect server
In this article I’ll show an example configuration using the uci console utility, which manages module settings whose configuration files with matching names are located in /etc/config/.
For universality, at the start of some command blocks we will need to set variables with your own values.
At this stage we set the key variable OC_ID right in the console, with an arbitrary name for the OpenConnect virtual network interface, for example:
OC_ID="oc0"Connecting using a login/password pair
Below are the console commands for configuring the network module to create a new tunnel connection. Substitute your own values for the parameters:
uri— the ocserv server address;username— the ocserv username;password— the ocserv user’s password.
uci set network.${OC_ID}=interface
uci set network.${OC_ID}.proto="openconnect"
uci set network.${OC_ID}.uri="vpn.r4ven.me:4443"
uci set network.${OC_ID}.username="openwrt"
uci set network.${OC_ID}.password="PaSSw0rD"
uci set network.${OC_ID}.vpn_protocol="anyconnect"
uci set network.${OC_ID}.defaultroute="0"💡 Tip
If you’re using ocserv with camouflage functionality, specify the full address in the uri parameter (in single quotes). For example:
uci set network.${OC_ID}.uri='vpn.r4ven.me:4443/?SeCrEt_WoRd'We apply the changes made by committing the network module config and restarting it:
uci commit network

service network restart💡 Tip
You can roll back changes made before the commit using the revert command. Example:
uci revert networkConnecting using a certificate file
To configure a connection using a user certificate, you need to create the config the same way, but you can omit the password parameter:
uci set network.${OC_ID}=interface
uci set network.${OC_ID}.proto="openconnect"
uci set network.${OC_ID}.uri='vpn.r4ven.me:4443/?SeCrEt_WoRd'
uci set network.${OC_ID}.username="openwrt"
uci set network.${OC_ID}.vpn_protocol="anyconnect"
uci set network.${OC_ID}.defaultroute="0"Then you need to take the user’s key and certificate files and, as stated in the official OpenWrt README, place them on the router at the path:
/etc/openconnect/user-cert-vpn-${OC_ID}.pem
/etc/openconnect/user-key-vpn-${OC_ID}.pemWhere OC_ID, as we recall, is the name of the network device we defined at the beginning of the section. Note that the paths and file names on the router must exactly match the example above. They are hardcoded in the connection script /lib/netifd/proto/openconnect.sh. For example, the key file there looks like this: /etc/openconnect/user-key-vpn-$config.pem.
💡 Tip
If you configured the OpenConnect server following my guide, then user files, for example for the username openwrt, will be located at:
/opt/openconnect/data/certs/openwrt-cert.pem
/opt/openconnect/data/certs/openwrt-privkey.pemWe commit and apply the changes:
uci commit network

service network restartBelow, in a spoiler, are instructions for the paranoid😅 on how to set the servershash parameter.
Click for spoiler
Actually, servershash doesn’t need to be specified (neither in the config nor as a file) and everything will work (the hash obtained at connection time is used). But if this matters to you, you need to specify the hash of the public SSL certificate of your domain, for example one obtained from Let’s Encrypt.
In that case, keep in mind that this hash will need to be updated in the config every time the domain certificate is renewed. In the case of Let’s Encrypt, the hash will need to be updated every 3 months. This isn’t convenient, and this process needs to be automated or this mechanism should not be used. In any case, I’ll explain how to configure it.
You can obtain this hash in two ways:
1) Using the scary openssl command (replace vpn.r4ven.me:4443 with your ocserv server’s address):
openssl x509 -in \
    <(openssl s_client -showcerts -connect vpn.r4ven.me:4443 < /dev/null 2> /dev/null) \
    -pubkey -noout | openssl pkey -pubin -outform der | openssl dgst -sha256 -binary | \
openssl enc -base64For example, the hash might look like this:
71DEapj8SBSa+/TImW+2JCeuQeRkm5MNpJWZG3hsuFU=2) If the hash is specified incorrectly, the connection log output (the logread command) on the router will show a hint with the hash:
--servercert pin-sha256:71DEapj8SBSa+/TImW+2JCeuQeRkm5MNpJWZG3hsuFU=Once you’ve determined the hash, set it in the serverhash option in the corresponding block of the network module, adding pin-sha256: as a prefix:
uci set network.${OC_ID}.serverhash='pin-sha256:71DEapj8SBSa+/TImW+2JCeuQeRkm5MNpJWZG3hsuFU='An alternative way to validate the server without specifying the serverhash parameter is to use a certificate file.
We obtain the public SSL cert and upload it to the router via SSH, for example like this:
☝️The command is run on the local machine (not on the router), where the openssl utility is available.
openssl s_client -showcerts -connect vpn.r4ven.me:4443 < /dev/null 2> /dev/null | \
ssh root@openwrt.lan 'cat > /etc/openconnect/ca-vpn-oc0.pem'Where oc0 is the name of the OpenConnect interface in OpenWrt.
Or you can manually copy the certificate file from the OpenConnect server (for the truly paranoid😉).
After all the changes, we go back to the router’s console and run:
uci commit network

service network restartConfiguring the firewall zone
For traffic from the router’s local network to be able to flow through the OpenConnect interface, the firewall needs to be configured (the latest versions of OpenWrt use nftables).
We create a new zone associated with the OpenConnect interface and using masquerading:
uci set firewall.zone_${OC_ID}="zone"
uci set firewall.zone_${OC_ID}.name="zone_${OC_ID}"
uci set firewall.zone_${OC_ID}.device="vpn-${OC_ID}"
uci set firewall.zone_${OC_ID}.input="REJECT"
uci set firewall.zone_${OC_ID}.output="ACCEPT"
uci set firewall.zone_${OC_ID}.forward="REJECT"
uci set firewall.zone_${OC_ID}.masq="1"
uci set firewall.zone_${OC_ID}.mtu_fix="1"
uci set firewall.zone_${OC_ID}.family="ipv4"Now we create a forwarding rule for traffic from the lan zone to the OpenConnect zone:
uci set firewall.lan_to_${OC_ID}="forwarding"
uci set firewall.lan_to_${OC_ID}.src="lan"
uci set firewall.lan_to_${OC_ID}.dest="zone_${OC_ID}"
uci set firewall.lan_to_${OC_ID}.family="ipv4"We apply the changes:
uci commit firewall
service firewall restartThe connection is configured.
Verifying the connection
After configuration, you need to make sure the connection has appeared and is working. Run the following commands in the router’s console:
# tunnel interface status
ip address show dev vpn-${OC_ID}

# ping through the tunnel
ping -c3 -I vpn-${OC_ID} r4ven.me

# external IP (should differ)
curl eth0.me
curl --interface vpn-${OC_ID} eth0.me

# detailed connection status
ifstatus $OC_ID📝The site eth0.me returns your external IP in response to a regular HTTP request.
Note the following:
- an interface named
vpn-oc0should appear inip address(in OpenWrt, tunnel device names start with thevpn-prefix); - the external IP through the regular interface and through the OC interface (
--interface vpn-oc0) should differ if everything is working correctly;
If there are problems, check the logs:
logread -e openconnect

# or

logread -fConfiguring traffic routing through OpenConnect
Routing all traffic
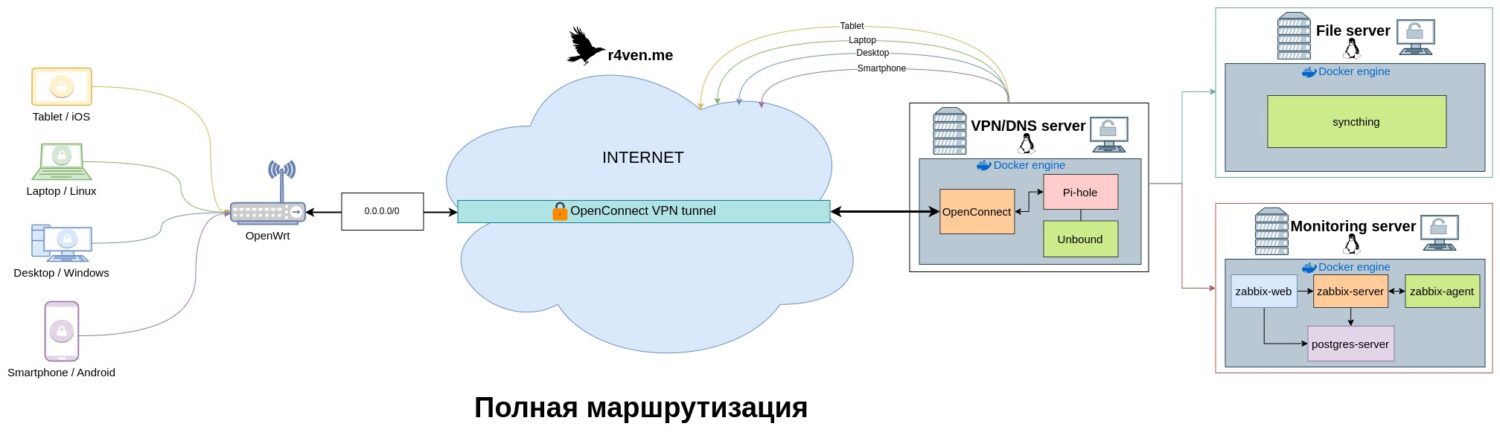
If your goal is to send all router traffic through OpenConnect, you need to configure 2 routes: the 1st route to the OpenConnect server via WAN, the 2nd default route for the remaining traffic.
Before configuring, you need to determine the IP address of your OpenConnect server and the gateway IP address of your provider:
OC_ID="oc0"
OC_IP=$(nslookup vpn.r4ven.me | awk '/^Address: / {print $2}')
WAN_GTW=$(ip route show default | awk '{print $3}')

echo -e "OC_ID=$OC_ID\nOC_IP=$OC_IP\nWAN_GTW=$WAN_GTW"☝️Replace vpn.r4ven.me with the address of your OpenConnect server.
Now we configure saving the route to the OC server via WAN:
uci set network.route_${OC_ID}="route"
uci set network.route_${OC_ID}.name="route_${OC_ID}"
uci set network.route_${OC_ID}.interface="wan"
uci set network.route_${OC_ID}.target="$OC_IP"
uci set network.route_${OC_ID}.gateway="$WAN_GTW"And we set the default route in the OpenConnect connection settings:
uci set network.${OC_ID}.defaultroute="1"Earlier we set a zero value for the defaultroute parameter. A value of 1 will create a default via rule for all traffic except the route to the OC server.
At the end of the configuration, we apply the changes:
uci commit network

service network restartAnd we check the external IP:
curl eth0.me

curl --interface vpn-${OC_ID} eth0.meThe IP address in the output of both commands should be the address of the OpenConnect server.
Selective routing by a list of domains
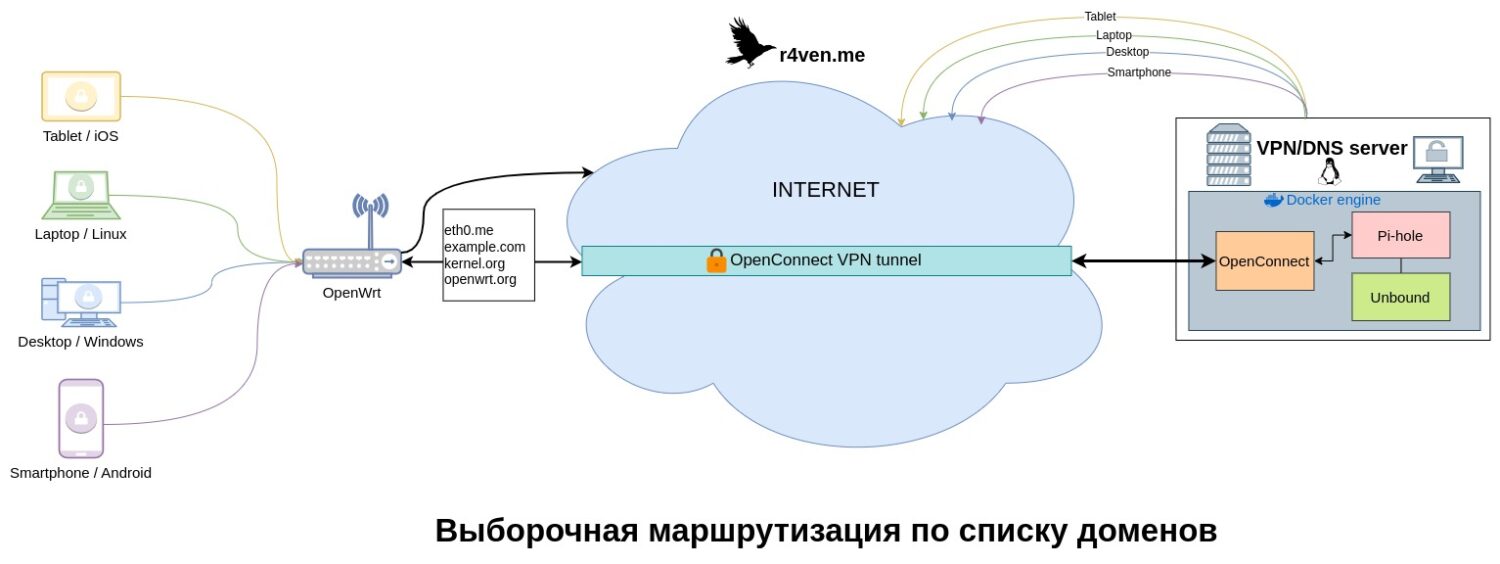
In my opinion, a more in-demand routing option is by a specified list of domains.
Briefly, here’s how it works:
- When a request is made to a domain from a predefined list,
dnsmasqgets IP addresses from the upstream DNS server, returns them to the client, and adds them to an ipset set. - Packets addressed to IPs from this ipset are marked using firewall rules.
- Marked traffic is redirected to a separate routing table, in which a route through the OpenConnect tunnel is specified. The rest of the traffic goes through the main WAN interface.
One advantage of this approach is that the ipset is built based on wildcards — in other words, you add the domain example.com to the list, and when accessing lower-level domains, for example test.example.com, traffic will automatically go through OpenConnect.
So, the variables:
OC_IF="oc0"
OC_TABLE="91"
OC_MARK="0x1"
OC_ID="${OC_IF}_${OC_MARK}"Where:
OC_IF— the OpenConnect connection name;OC_TABLE— an arbitrary routing table ID;OC_MARK— an arbitrary mark in HEX format;OC_ID— the key connection identifier; for uniqueness it now consists of the connection name and the traffic mark.
We add a new routing table:
grep -q "${OC_TABLE} table_${OC_ID}" /etc/iproute2/rt_tables || \
echo "${OC_TABLE} table_${OC_ID}" >> /etc/iproute2/rt_tablesWe add the default route (0.0.0.0/0) into the specified table:
uci set network.route_${OC_ID}="route"
uci set network.route_${OC_ID}.interface="${OC_IF}"
uci set network.route_${OC_ID}.table="table_${OC_ID}"
uci set network.route_${OC_ID}.target="0.0.0.0/0"We tell the kernel: if a packet has the mark ${OC_MARK}, use the table_${OC_ID} table:
uci set network.rule_${OC_ID}="rule"
uci set network.rule_${OC_ID}.name="rule_${OC_ID}"
uci set network.rule_${OC_ID}.mark="$OC_MARK"
uci set network.rule_${OC_ID}.priority="100"
uci set network.rule_${OC_ID}.lookup="table_${OC_ID}"We create an ipset in firewall, where IPs matching the desired domains will be added:
uci set firewall.ipset_${OC_ID}="ipset"
uci set firewall.ipset_${OC_ID}.name="ipset_${OC_ID}"
uci set firewall.ipset_${OC_ID}.match="dst_net"We mark packets if their address is in the ipset:
uci set firewall.mark_${OC_ID}="rule"
uci set firewall.mark_${OC_ID}.name="mark_${OC_ID}"
uci set firewall.mark_${OC_ID}.src="lan"
uci set firewall.mark_${OC_ID}.dest="*"
uci set firewall.mark_${OC_ID}.proto="all"
uci set firewall.mark_${OC_ID}.ipset="ipset_${OC_ID}"
uci set firewall.mark_${OC_ID}.set_mark="$OC_MARK"
uci set firewall.mark_${OC_ID}.target="MARK"
uci set firewall.mark_${OC_ID}.family="ipv4"We specify which domains should be resolved into the ipset via dnsmasq:
uci set dhcp.ipset_${OC_ID}="ipset"
uci set dhcp.ipset_${OC_ID}.table_family="inet"
uci add_list dhcp.ipset_${OC_ID}.name="ipset_${OC_ID}"
uci add_list dhcp.ipset_${OC_ID}.domain="eth0.me"
uci add_list dhcp.ipset_${OC_ID}.domain="example.com"
uci add_list dhcp.ipset_${OC_ID}.domain="kernel.org"We apply the changes:
uci commit network
uci commit firewall
uci commit dhcp

service network restart
service firewall restart
service dnsmasq restartIn the previous step, we added the resource eth0.me to the domain list for selective routing. Let’s run a check on a client device (connected to the router’s LAN) using curl:
# should return the provider's IP
curl ifconfig.me

# should return the OpenConnect IP
curl eth0.me

# the route should go through the tunnel
tracepath eth0.meIf the second command returns an IP that matches the OpenConnect server’s address — selective routing is working🥳.
Adding new domains to the list
To add a new domain to the list, update the ipset in the dhcp module and restart dnsmasq:
uci add_list dhcp.ipset_${OC_ID}.domain="openwrt.org"

uci commit dhcp

service dnsmasq restartThe Ipset list can also be conveniently changed in the GUI, in the section Network — DHCP and DNS — IP Sets:
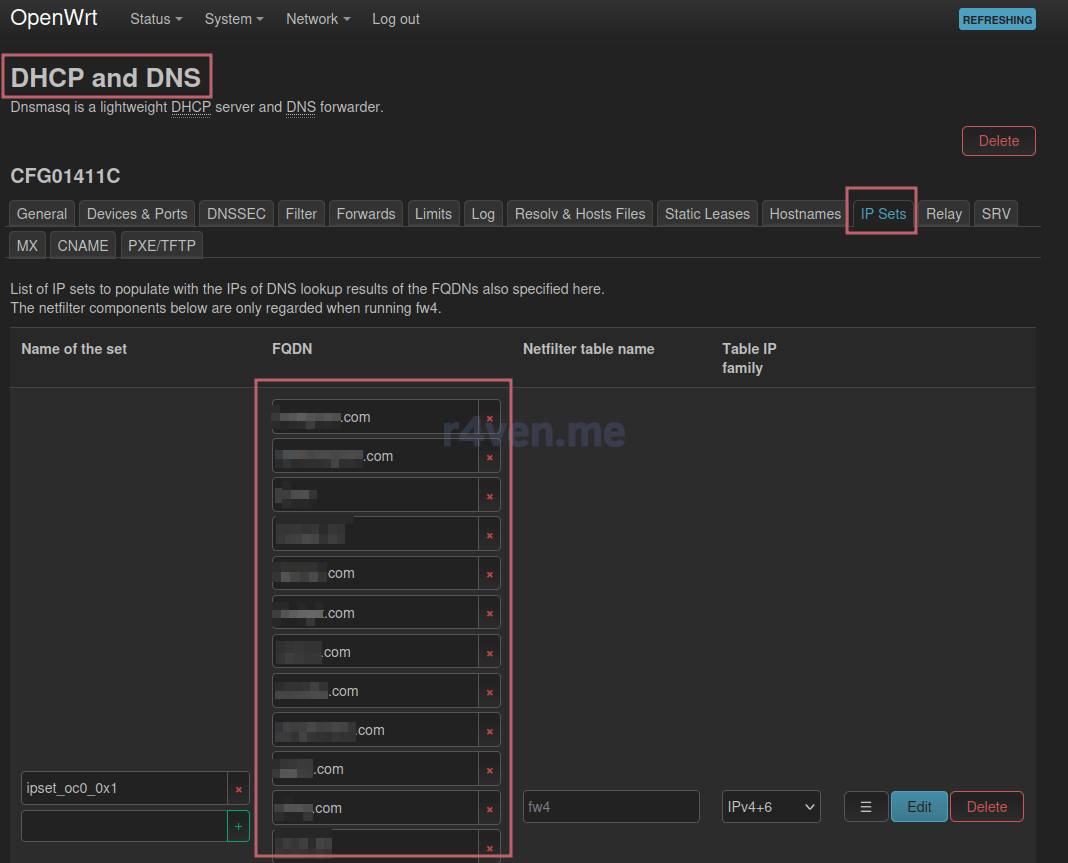
Unlike the console, applying changes in the GUI requires rebooting the router🤷♂️ (or restarting the network module via SSH).
Check on the client device:
tracepath openwrt.orgThe route should go through the tunnel.
Selective routing by IP subnets
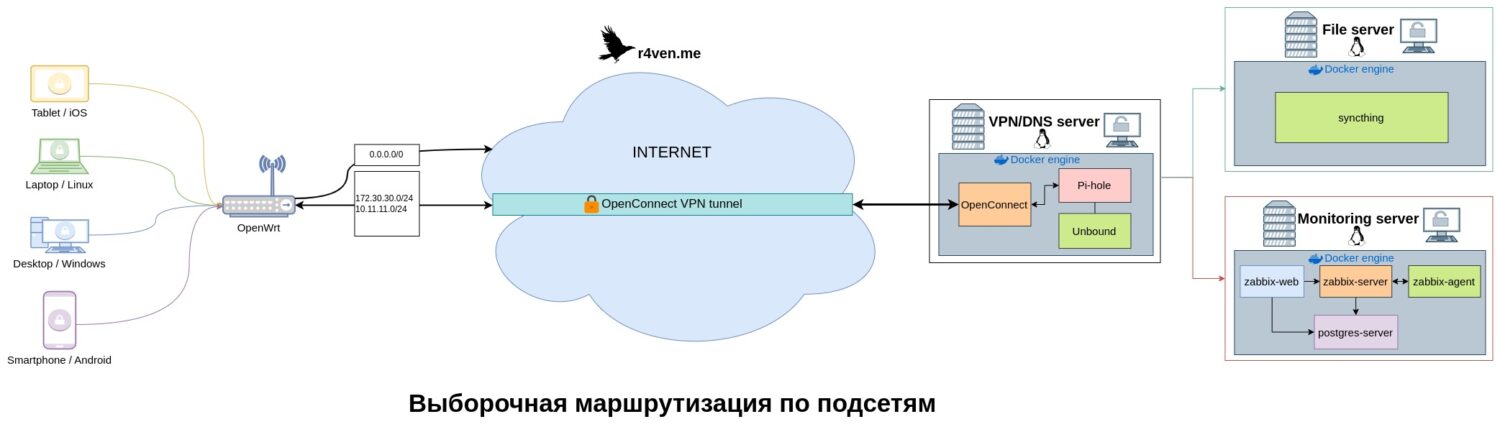
If you need to direct specific IP subnets into OpenConnect, you need to:
- create a new routing table;
- add a route to the desired subnet;
- add a routing rule;
- add a firewall rule to mark the traffic.
To extend the list of subnets that should be routed through the OpenConnect tunnel, it’s enough to create a new route and add the subnet to the existing list for marking in the firewall rule.
Let’s begin the configuration, starting with the variables:
OC_IF="oc1"
OC_MARK="0x2"
OC_TABLE="92"
OC_NET="172.30.30.0/24"
OC_ID="${OC_IF}_${OC_MARK}"
ROUTE_ID="172_30_30_0"⚠️Note that the mark and routing table identifiers are different.
We add a new table:
grep -q "${OC_TABLE} table_${OC_ID}" /etc/iproute2/rt_tables || \
echo "${OC_TABLE} table_${OC_ID}" >> /etc/iproute2/rt_tablesWe specify the route to the desired subnet:
uci set network.route_${OC_ID}_${ROUTE_ID}="route"
uci set network.route_${OC_ID}_${ROUTE_ID}.name="route_${OC_ID}_${ROUTE_ID}"
uci set network.route_${OC_ID}_${ROUTE_ID}.interface="$OC_IF"
uci set network.route_${OC_ID}_${ROUTE_ID}.table="table_${OC_ID}"
uci set network.route_${OC_ID}_${ROUTE_ID}.target="$OC_NET"We mark the packets and direct them through the table_${OC_ID} table:
uci set network.rule_${OC_ID}="rule"
uci set network.rule_${OC_ID}.mark="$OC_MARK"
uci set network.rule_${OC_ID}.priority="100"
uci set network.rule_${OC_ID}.lookup="table_${OC_ID}"We configure the rule that will catch IP packets to the desired subnet and mark them:
uci set firewall.mark_${OC_ID}="rule"
uci set firewall.mark_${OC_ID}.name="mark_${OC_ID}"
uci set firewall.mark_${OC_ID}.src="lan"
uci set firewall.mark_${OC_ID}.dest="*"
uci set firewall.mark_${OC_ID}.dest_ip="$OC_NET"
uci set firewall.mark_${OC_ID}.proto="all"
uci set firewall.mark_${OC_ID}.set_mark="$OC_MARK"
uci set firewall.mark_${OC_ID}.target="MARK"
uci set firewall.mark_${OC_ID}.family="ipv4"We apply the changes:
uci commit network
uci commit firewall

service network restart
service firewall restartCheck on the client device:
tracepath 172.30.30.1Adding new subnets to the list
As mentioned earlier, you only need to add a route and extend dest_ip in firewall.mark_${OC_ID}:
OC_IF="oc1"
OC_MARK="0x2"
OC_NET="10.11.11.0/24"
OC_ID="${OC_IF}_${OC_MARK}"
ROUTE_ID="10_11_11_0"

uci set network.route_${OC_ID}_${ROUTE_ID}="route"
uci set network.route_${OC_ID}_${ROUTE_ID}.name="route_${OC_ID}_${ROUTE_ID}"
uci set network.route_${OC_ID}_${ROUTE_ID}.interface="$OC_IF"
uci set network.route_${OC_ID}_${ROUTE_ID}.table="table_${OC_ID}"
uci set network.route_${OC_ID}_${ROUTE_ID}.target="$OC_NET"

uci add_list firewall.mark_${OC_ID}.dest_ip="$OC_NET"

uci commit network
uci commit firewall

service network restart
service firewall restartSelective routing of DNS requests
This step is optional.
If your OpenConnect network has its own DNS server, then selective routing of DNS requests is a great addition to selective traffic tunneling by domain list. After all, host resolution happens before the traffic goes through the tunnel — unless, of course, you are tunneling all traffic completely.
You can add domains to the list as follows:
uci add_list dhcp.@dnsmasq[0].server="/example.com/10.11.11.100"
uci add_list dhcp.@dnsmasq[0].server="/kernel.org/10.11.11.100"

uci commit dhcp

service dnsmasq restartWhere 10.11.11.100 is the address of the DNS server in the OpenConnect network.
📝Or in the LuCI web interface: Network — DHCP and DNS — Forwards..
To verify this, you need to install and run the tcpdump utility on the router to listen to traffic sent toward the DNS server:
opkg update

opkg install tcpdump

tcpdump -nn -i any host 10.11.11.100With tcpdump running, go to the client device and perform a resolution:
nslookup example.com

nslookup kernel.orgThe OpenWrt console should show DNS traffic entries going through the OpenConnect tunnel:
10:49:05.680946 vpn-oc0 Out IP 10.11.11.15.43005 > 10.11.11.100.53: 14686+ [1au] A? example.com. (39)
10:49:05.841774 vpn-oc0 In IP 11.11.11.100.53 > 10.11.11.15.43005: 14686 2/0/1 A 11.22.33.44, A 55.66.77.88 (71)Possible problems
☝️This section will be expanded as new cases are discovered.
Changing the MTU
By default, the tunnel’s MTU is set to 1500, which can affect network operation. You can change this parameter like this:
OC_ID="oc0"

uci set network."${OC_ID}".mtu="1434"

uci commit network

service network restartConclusion
So.. we’ve configured OpenWrt so that it can route traffic into the OpenConnect tunnel as flexibly as possible: entirely, only for specific domains, or for specific IP subnets.
In my own tasks, I use the option with selective routing by subnets to access protected infrastructure directly from the router’s local network. There’s no need to connect clients on each device individually every time.
I hope this article was useful to you😌. Thanks for reading!
Sources used
- Configuring the OpenConnect client | OpenWrt.com
- Additional OpenConnect settings | OpenWrt.com
- OpenConnect client connection README | GitHub.com
- Selective routing by domains | Habr.com
- Setting up an OpenConnect server (ocserv) in docker | Raven’s blog
- Example of installing OpenWrt on a router | Raven’s blog
👨💻And…
Don’t forget about our Telegram channel 📱 and chat
Or maybe you want to become a co-author? Then click here🔗
💬 All the best ✌️
That should be it. If not, check the logs 🙂

Comments