

In this note, we will look at using an OpenConnect server as an intermediate server for access to closed infrastructure.
I will point out an important detail right away: the main goal here is not to bring up a regular ocserv once again. I already have a separate guide for that. The more interesting part here is the middle server, which accepts user connections, establishes its own client OpenConnect connection to the closed network, and then routes traffic further.
📝 If you still have only a vague idea of what an OpenConnect server is, or you want to look at a basic ocserv installation in Docker first, I recommend starting here: Deploying an OpenConnect SSL VPN server (ocserv) in Docker for internal projects.
Preface
📝 First, let’s clarify the definition:
📝 Note
A middle server is an intermediate server between a client and the main server/service. It is also called a proxy, relay, middleware server, or jump server, depending on the task.
In my case, the task was as follows: there is closed infrastructure available only through a protected entry point. At the same time, I needed to give users access not directly to that point, but through a separate intermediate server that I can manage independently.
🖐️Hey!
Subscribe to our Telegram channel @r4ven_me📱, so you don’t miss new posts on the website 😉. If you have questions or just want to chat about the topic, feel free to join the Raven chat at @r4ven_me_chat🧐.
For this, I built a Docker image where an OpenConnect client runs alongside ocserv. The result is this scheme:
- the user connects to the middle server;
- the middle server maintains its own connection to the private server;
- user traffic goes further through the client tunnel of the middle server;
- if needed, not all traffic goes through this tunnel, but only selected domains and subnets.
☝️ I will emphasize separately: in this article, I call the private server the point to which the middle server connects as a client. The middle server is the server to which your users connect.
A bit more detail about what the image can do:
- Bring up a regular OpenConnect server for incoming user connections;
- Bring up an outgoing OpenConnect connection from the container to the private server;
- Forward all client traffic into this upstream tunnel;
- Forward only selected traffic by a list of domains and subnets;
- Update domain and route lists without restarting the container;
- Automatically configure nftables, policy routing, and dnsmasq;
- Work with multiple upstream profiles for simple failover;
- Be managed through a single
.envfile.
📝 You will find all source files, including the Dockerfile for building it yourself, on my GitHub: https://github.com/r4ven-me/openconnect-middle-server.
Preparation
Further on, it is assumed that you have two Linux servers:
- private server - the server through which the closed infrastructure is already available;
- middle server - the intermediate server to which users will connect.
It is also assumed that on the servers:
- basic Linux settings have been applied;
- the user has sudo privileges;
- Docker Engine is installed and running.
I will use real domains so that valid TLS certificates can be obtained from Let’s Encrypt. For a simple test, you can also use internal certificates: if the certificate is not mounted in ./data/ssl/live/$OC_SRV_CN/, the entrypoint script will generate an internal CA and server certificate by itself.
Input data for the example from the article:
| Server | External IP | VPN subnet | Role |
|---|---|---|---|
| private.r4ven.me | 188.227.86.98 | 10.11.11.0/24 | Closed entry point |
| middle.r4ven.me | 188.227.32.92 | 10.10.10.0/24 | Intermediate server for users |
☝️ The OpenConnect subnets on the private and middle servers must be different. If you specify identical subnets, you can create fascinating routing adventures for yourself 🙃.
Both servers run Debian GNU/Linux version 13.
Configuring the private server
On the private server, we need a regular ocserv to which the middle server can connect as an OpenConnect client.
☝️ If OpenConnect is already running on your private server and you understand how to create a separate .p12 for the middle server, you can skim through this section. The main thing is to obtain a client certificate that the middle server will use to connect to the private server.
Connect to the private server via the secure SSH protocol and work as root:
ssh private.r4ven.me

sudo -iCreate a working directory:
mkdir -vp /opt/openconnect

cd /opt/openconnectCreate a service description file:
vim compose.yaml---
services:
certbot:
image: certbot/certbot
container_name: certbot
restart: no
stop_grace_period: 5s
cpus: 0.5
mem_limit: 512M
environment:
TZ: ${TZ}
hostname: certbot
volumes:
- ./data/ssl:/etc/letsencrypt
entrypoint: >
sh -c "
certbot certonly --non-interactive --keep-until-expiring --standalone --preferred-challenges http --agree-tos --email ${OC_USER_EMAIL} -d ${OC_SRV_CN}; exit 0;
"
ports:
- "80:80"
openconnect:
depends_on:
certbot:
condition: service_completed_successfully
build:
context: .
dockerfile: Dockerfile
image: r4venme/openconnect:v1.4-client
container_name: openconnect
restart: always
stop_grace_period: 30s
cpus: 1
mem_limit: 512M
cap_add:
- NET_ADMIN
- NET_RAW
hostname: openconnect
env_file:
- .env
volumes:
- ./data/:/etc/ocserv
devices:
- /dev/net/tun:/dev/net/tun
- /dev/vhost-net:/dev/vhost-net
ports:
- "${OC_SRV_PORT}:${OC_SRV_PORT}/tcp"
certbot_renew:
depends_on:
certbot:
condition: service_completed_successfully
image: certbot/certbot
container_name: certbot-renew
restart: unless-stopped
stop_grace_period: 5s
cpus: 0.5
mem_limit: 512M
environment:
TZ: ${TZ}
hostname: certbot-renew
volumes:
- ./data/ssl:/etc/letsencrypt
entrypoint: >
sh -c "
trap exit TERM;
while true; do
certbot renew --non-interactive --keep-until-expiring --standalone --preferred-challenges http --agree-tos;
sleep 24h;
done
"
ports:
- "80:80"📝 Note
As you may have noticed, in addition to the OpenConnect service, two more services are used: certbot and certbot_renew:
certbotstarts first, and both theopenconnectandcertbot_renewservices wait for it to finish. Its task is to obtain valid TLS certificates from Let’s Encrypt. For this, your server must have a public IP address and an A-type DNS record pointing to this IP.certbot_renewstarts in the background and runs continuously. Its task is to check the expiration period of the current certificates once a day and renew them when they approach expiration. This way, we do not depend on external scripts/schedulers; Docker does everything.
Create .env:
vim .envFor the private server, the server part is enough. Leave the client and split tunneling parameters disabled (although, if necessary, it can also be a middle server):
# System
TZ="Europe/Moscow"

# Certbot, if you use Let's Encrypt
OC_USER_EMAIL="kar-kar@r4ven.me"

# OpenConnect server
OC_SRV_PORT="443"
OC_SRV_CN="private.r4ven.me"
OC_SRV_CA="R4ven private CA"
OC_IPV4_NET="10.11.11.0"
OC_IPV4_MASK="255.255.255.0"
OC_DNS1="8.8.8.8"
OC_DNS2="8.8.4.4"
OC_CAMOUFLAGE_ENABLE="true"
OC_CAMOUFLAGE_SECRET="secretPrivateServerWord"
OC_CAMOUFLAGE_REALM="Private service"Start it:
docker compose up -d

docker compose logs -f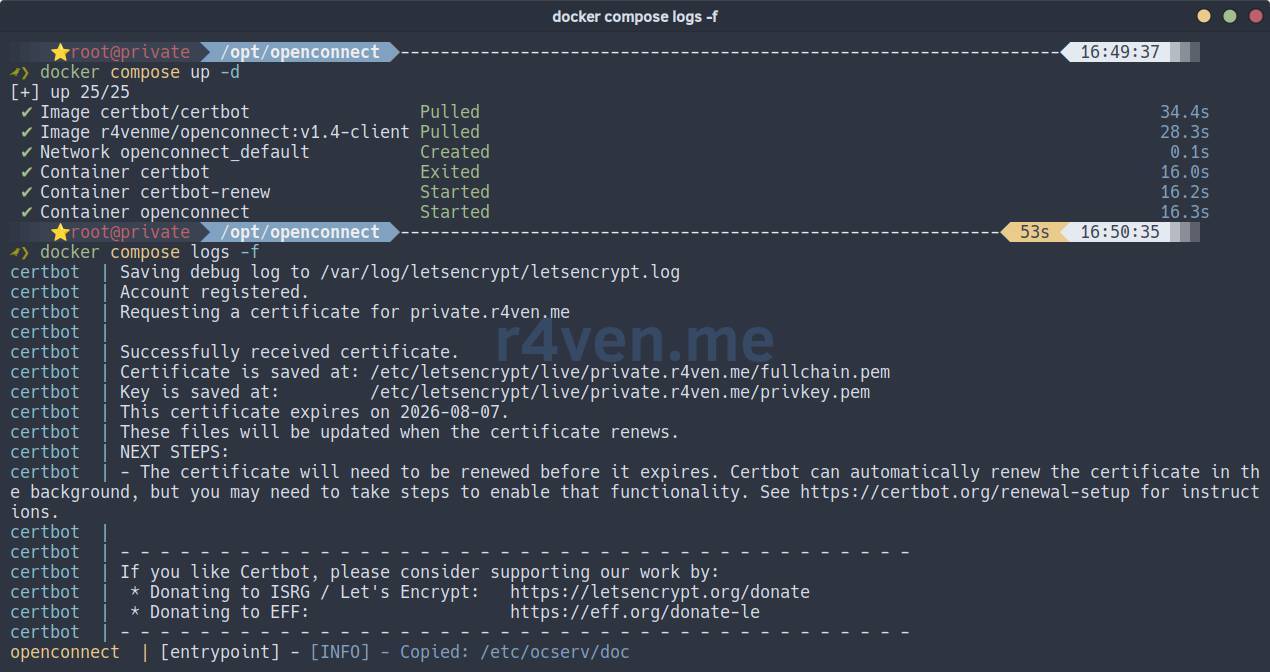
Now create the user that the middle server will use to connect to the private server:
docker exec -it openconnect ocuser private "Private Client"The ready file will appear here:
ls -l ./data/secrets/private.p12Copy it to a temporary directory so that it can then be retrieved on the middle server:
cp -v ./data/secrets/private.p12 /tmp/private.p12

chmod 644 /tmp/private.p12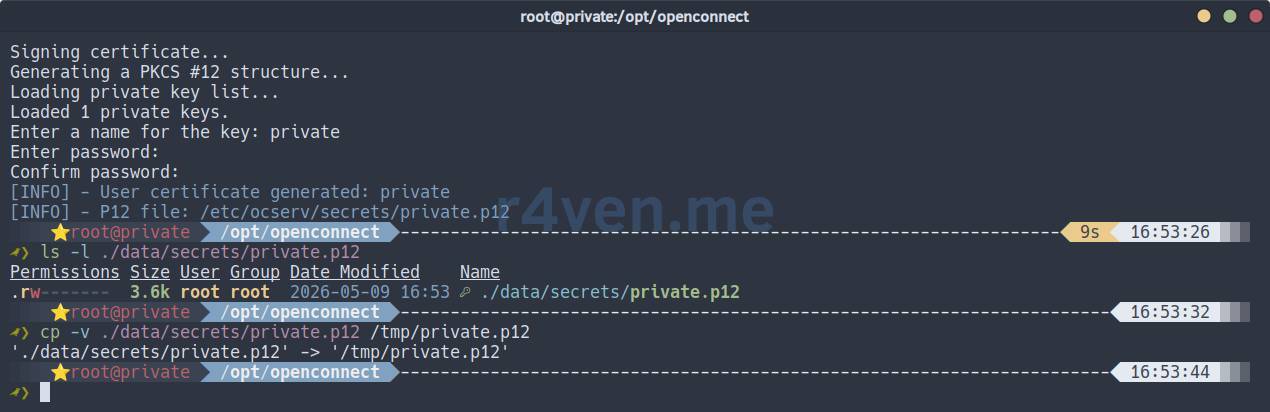
☝️ This .p12 is the middle server key for connecting to the private server. Store it carefully and do not use the same certificate for regular users.
Configuring autostart with Systemd
Once everything is checked, you can configure autostart for our private server through systemd:
docker compose downcat << EOF > /etc/systemd/system/openconnect.service
[Unit]
Description=OpenConnect middle server
Requires=docker.service
After=docker.service
[Service]
Restart=always
RestartSec=5
WorkingDirectory=/opt/openconnect
ExecStart=/usr/bin/docker compose up
ExecStop=/usr/bin/docker compose down
[Install]
WantedBy=multi-user.target
EOFsystemctl daemon-reload
systemctl enable --now openconnect
journalctl -fu openconnectConfiguring the middle server
Now move on to the main part. It is the middle server that will accept user connections and decide where to send their traffic.
As I said earlier, two modes are supported:
- Full routing - all user traffic goes through the private server;
- Split routing - only selected domains and subnets go through the private server.
Let’s start with the general preparation.
Using scp, copy the .p12 file to the middle server, then connect to it and switch to root as well:
scp private.r4ven.me:/tmp/private.p12 middle.r4ven.me:/tmp

ssh middle.r4ven.me

sudo -iNow create a working directory, copy the .p12 file into it, and create a service description file:
mkdir -vp /opt/openconnect

cd /opt/openconnect

cp /tmp/private.p12 ./

vim compose.yamlFill it in:
---

services:
  certbot:
    image: certbot/certbot
    container_name: certbot
    restart: no
    stop_grace_period: 5s
    cpus: 0.5
    mem_limit: 512M
    environment:
      TZ: ${TZ}
    hostname: certbot
    volumes:
      - ./data/ssl:/etc/letsencrypt
    entrypoint: >
      sh -c "
        certbot certonly --non-interactive --keep-until-expiring --standalone --preferred-challenges http --agree-tos --email ${OC_USER_EMAIL} -d ${OC_SRV_CN}; exit 0;
      "
    ports:
      - "80:80"

  openconnect:
    depends_on:
      certbot:
        condition: service_completed_successfully
    build:
      context: .
      dockerfile: Dockerfile
    image: r4venme/openconnect:v1.4-client
    container_name: openconnect
    restart: always
    stop_grace_period: 30s
    cpus: 1
    mem_limit: 512M
    cap_add:
      - NET_ADMIN
      - NET_RAW
    hostname: openconnect
    env_file:
      - .env
    volumes:
      - ./data/:/etc/ocserv
      - ${OC_CLIENT_0_CERT_FILE}:${OC_CLIENT_0_CERT_FILE}
      # - ${OC_CLIENT_1_CERT_FILE}:${OC_CLIENT_1_CERT_FILE}
      # - /etc/iproute2/rt_tables.d:/etc/iproute2/rt_tables.d
    devices:
      - /dev/net/tun:/dev/net/tun
      - /dev/vhost-net:/dev/vhost-net
    ports:
      - "${OC_SRV_PORT}:${OC_SRV_PORT}/tcp"

  certbot_renew:
    depends_on:
      certbot:
        condition: service_completed_successfully
    image: certbot/certbot
    container_name: certbot-renew
    restart: unless-stopped
    stop_grace_period: 5s
    cpus: 0.5
    mem_limit: 512M
    environment:
      TZ: ${TZ}
    hostname: certbot-renew
    volumes:
      - ./data/ssl:/etc/letsencrypt
    entrypoint: >
      sh -c "
        trap exit TERM;
        while true; do
          certbot renew --non-interactive --keep-until-expiring --standalone --preferred-challenges http --agree-tos;
          sleep 24h;
        done
      "
    ports:
- "80:80"Full Routing mode
Below is a network interaction diagram where all client traffic is sent through the upstream tunnel of the middle server:
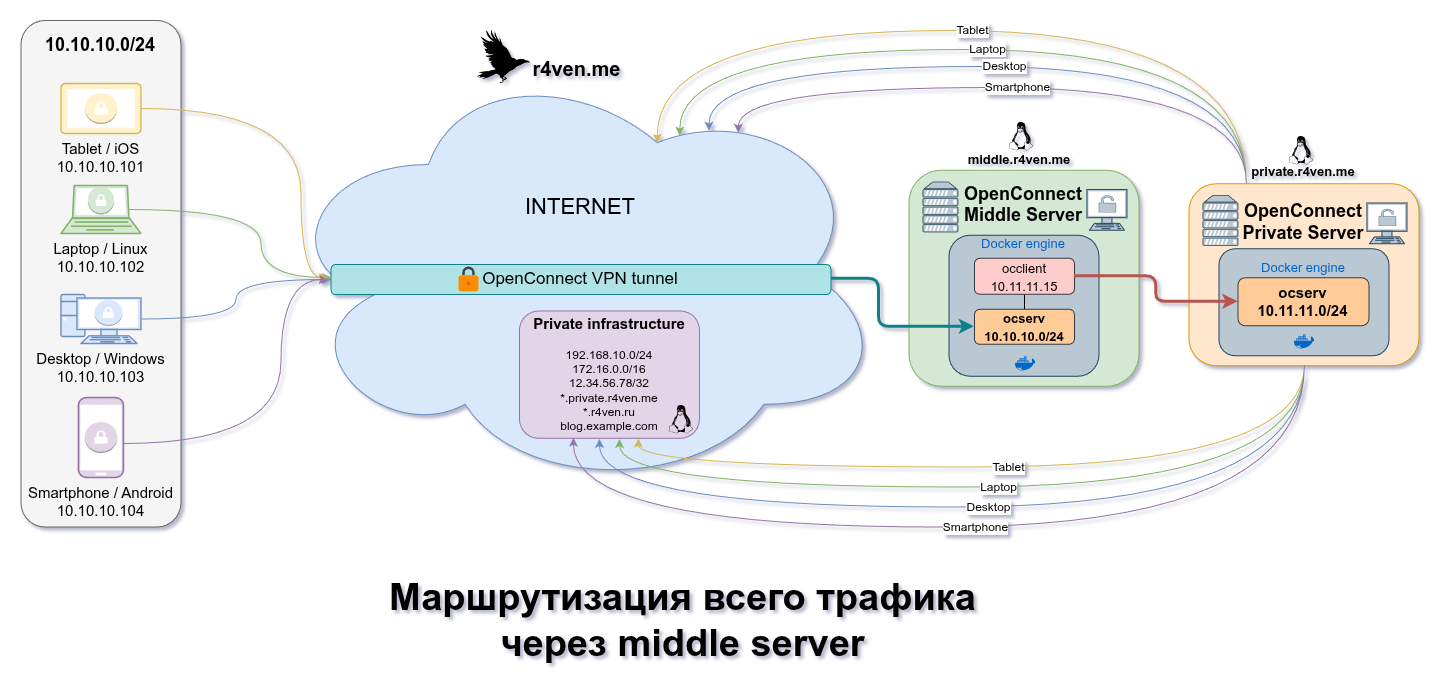
For this mode, enable OC_CLIENT_ENABLE and add the connection parameters for the private server:
vim .env# System
TZ="Europe/Moscow"
# Certbot, if you use Let's Encrypt
OC_USER_EMAIL="kar-kar@r4ven.me"
# OpenConnect server
OC_SRV_PORT="443"
OC_SRV_CN="middle.r4ven.me"
OC_SRV_CA="R4ven CA"
OC_IPV4_NET="10.10.10.0"
OC_IPV4_MASK="255.255.255.0"
OC_DNS1="8.8.8.8"
OC_DNS2="8.8.4.4"
OC_CAMOUFLAGE_ENABLE="true"
OC_CAMOUFLAGE_SECRET="secretMiddleServerWord"
OC_CAMOUFLAGE_REALM="Middle service"
# OpenConnect client
# Optional: force physical uplink interface for NAT rules. Empty means auto-detect.
# OC_MAIN_IFACE="eth0"
OC_CLIENT_ENABLE="true"
OC_CLIENT_IFACE="oc-middle"
OC_CLIENT_CHECK_INTERVAL="5"
OC_CLIENT_CHECK_THRESHOLD="3"
# Number of configured OC_CLIENT_<index> profiles.
# Set to "2" when OC_CLIENT_1_* variables are enabled, "3" for OC_CLIENT_2_*, etc.
OC_CLIENT_COUNT="1"
OC_CLIENT_0_SSL_FLAG=true
OC_CLIENT_0_SERVER="private.r4ven.me"
OC_CLIENT_0_SERVER_PORT="443/?secretPrivateServerWord"
OC_CLIENT_0_CERT_FILE="/opt/openconnect/private.p12"
OC_CLIENT_0_CERT_PASS="p12SecretInBase64encode"
OC_CLIENT_0_CHECK_HOST="10.11.11.1"
# OC_CLIENT_1_SSL_FLAG=false
# OC_CLIENT_1_SERVER="private2.example.com"
# OC_CLIENT_1_SERVER_PORT="443/?SecretUrl"
# OC_CLIENT_1_CERT_FILE="/opt/openconnect/private2.p12"
# OC_CLIENT_1_CERT_PASS="p12SecretInBase64encode"
# OC_CLIENT_1_CHECK_HOST="10.12.12.1"Explanation of OC_CLIENT parameters
Now let’s take a closer look at the parameters responsible for the outgoing OpenConnect connection from the middle server to the private server.
| Parameter | Example | Description |
|---|---|---|
OC_CLIENT_ENABLE | "true" | Enables the OpenConnect client inside the container. If the value is false, the middle server works as a regular ocserv. |
OC_CLIENT_IFACE | "oc-middle0" | The interface name that the upstream OpenConnect client will create. This name is then used in routes, nftables, and split tunneling. |
OC_CLIENT_CHECK_INTERVAL | "5" | The health check interval in seconds. The script regularly checks the availability of OC_CLIENT_<index>_CHECK_HOST through OC_CLIENT_IFACE. |
OC_CLIENT_CHECK_THRESHOLD | "3" | How many failed checks in a row are needed before the script starts reconnecting. |
OC_CLIENT_COUNT | "1" | The number of described upstream profiles. If you use OC_CLIENT_0_* and OC_CLIENT_1_*, this must be "2". |
Each upstream profile uses an index: 0, 1, 2, and so on.
| Parameter | Example | Description |
|---|---|---|
OC_CLIENT_0_SSL_FLAG | "true" | If true, the private server certificate is considered trusted. If false, the client additionally answers yes to certificate confirmation. For production use, it is better to configure a valid certificate and leave true. |
OC_CLIENT_0_SERVER | "private.r4ven.me" | The private server address to which the OpenConnect client will connect. |
OC_CLIENT_0_SERVER_PORT | "443/?secretPrivateServerWord" | The port and, if necessary, the camouflage secret. If camouflage is not used, you can simply specify "443". |
OC_CLIENT_0_CERT_FILE | "/opt/openconnect/private.p12" | Path to the .p12 on the host and inside the container. |
OC_CLIENT_0_CERT_PASS | "..." | Password for the .p12, encoded in base64. |
OC_CLIENT_0_CHECK_HOST | "10.11.11.1" | The address checked through the upstream tunnel. Usually it is convenient to specify the address of the private server itself inside the VPN subnet. |
The logic works as follows:
occlient.shwaits until the localocservstarts listening on the port;- loads the
OC_CLIENT_0_*profile; - starts
openconnectwith the specified.p12; - creates the routing table
430 oc_vpn; - in full routing mode, adds a policy rule for the connected user to table
430; - regularly checks
OC_CLIENT_0_CHECK_HOST; - reconnects or switches to the next profile if there are problems.
☝️ Important
The .p12 password must be specified in base64. For example:
printf '%s' 'password-for-private-p12' | base64Put the resulting string into OC_CLIENT_0_CERT_PASS.
☝️ Important
The .p12 file must be available inside the container. Accordingly, the path to the file in the OC_CLIENT_0_CERT_FILE variable is specified relative to the path inside the container.
The simplest option is to keep the same path on the host and in the container, and specify this in the mount parameters in compose.yaml:
- ${OC_CLIENT_0_CERT_FILE}:${OC_CLIENT_0_CERT_FILE}Multiple upstream profiles
If the closed infrastructure is available through several entry points, you can describe several profiles:
OC_CLIENT_COUNT="2"

OC_CLIENT_0_SSL_FLAG="true"
OC_CLIENT_0_SERVER="private.r4ven.me"
OC_CLIENT_0_SERVER_PORT="443/?secretPrivateServerWord"
OC_CLIENT_0_CERT_FILE="/etc/ocserv/secrets/private.p12"
OC_CLIENT_0_CERT_PASS="p12SecretInBase64encode"
OC_CLIENT_0_CHECK_HOST="10.11.11.1"

OC_CLIENT_1_SSL_FLAG="true"
OC_CLIENT_1_SERVER="private2.r4ven.me"
OC_CLIENT_1_SERVER_PORT="443/?secretPrivate2ServerWord"
OC_CLIENT_1_CERT_FILE="/opt/openconnect/private2.p12"
OC_CLIENT_1_CERT_PASS="anotherP12SecretInBase64"
OC_CLIENT_1_CHECK_HOST="10.12.12.1"If the current profile stops passing the health check, the script first tries to reconnect to the same profile. If that does not help, it switches to the next profile. And so on in a loop, until it connects somewhere and the health check becomes successful.
📝 This is not a full-fledged load balancer. This is a simple and understandable failover: one active upstream point at a specific point in time.
☝️ If several profiles are defined, the OC_CLIENT_COUNT variable must contain a value equal to their number: 1, 2, 3, etc.
Starting the middle server
Start the middle server:
docker compose up -d

docker compose logs -f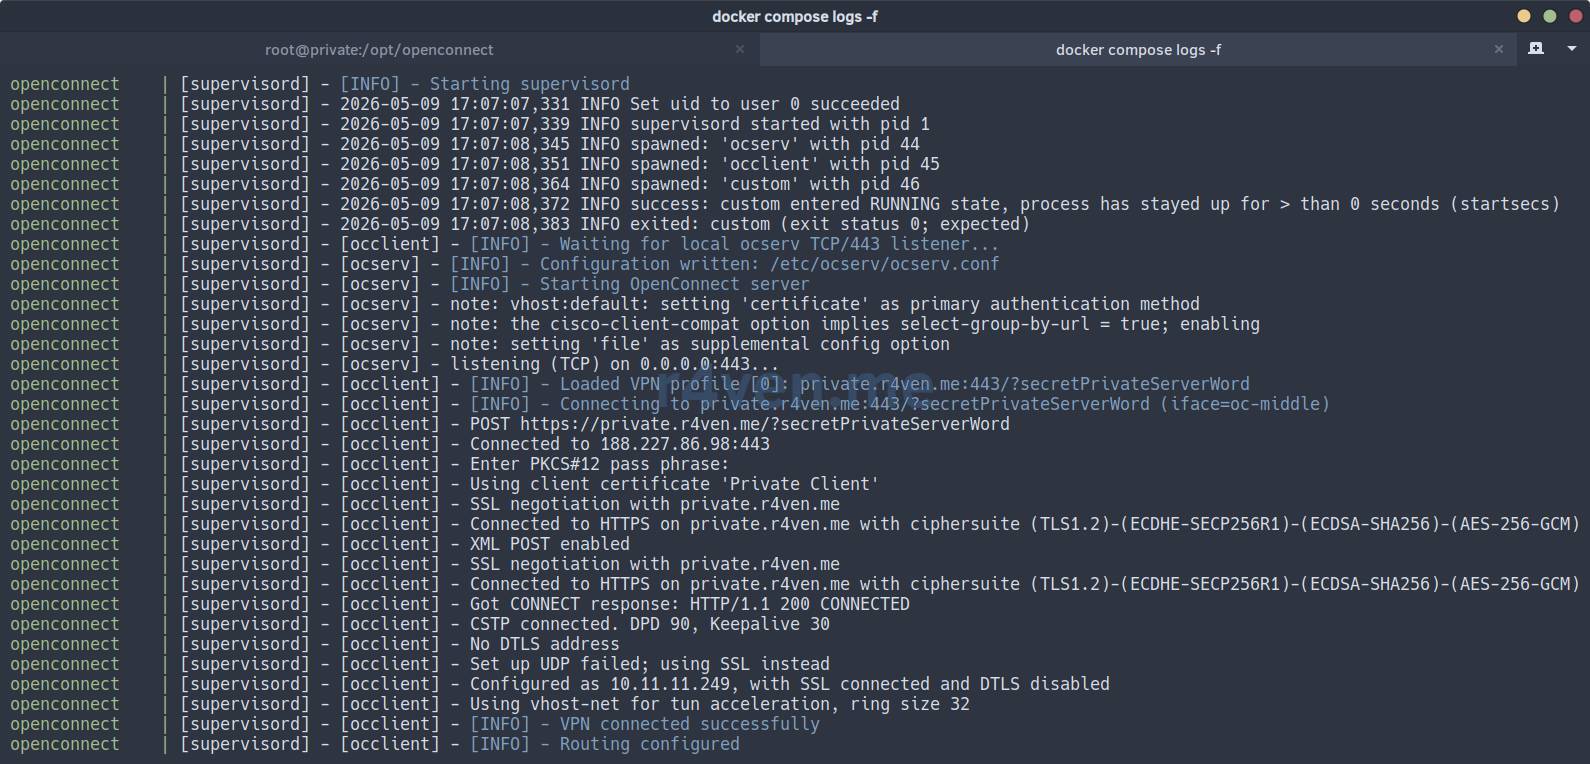
Create a user already on the middle server:
docker exec -it openconnect ocuser middleuser "Middle User"Copy the client .p12 to /tmp:
cp -v ./data/secrets/middleuser.p12 /tmp/middleuser.p12

chmod 644 /tmp/middleuser.p12Checking Full Routing
On the client machine, download the .p12 file:
scp middle.r4ven.me:/tmp/middleuser.p12 ./Connect to the middle server:
sudo openconnect -c ./middleuser.p12 'middle.r4ven.me/?secretMiddleServerWord'Check the external IP:
curl ifconfig.meThe response should contain the external IP of the private server, because all client traffic went through the middle server, and then through the upstream tunnel to the private server.
Additionally, you can view the route:
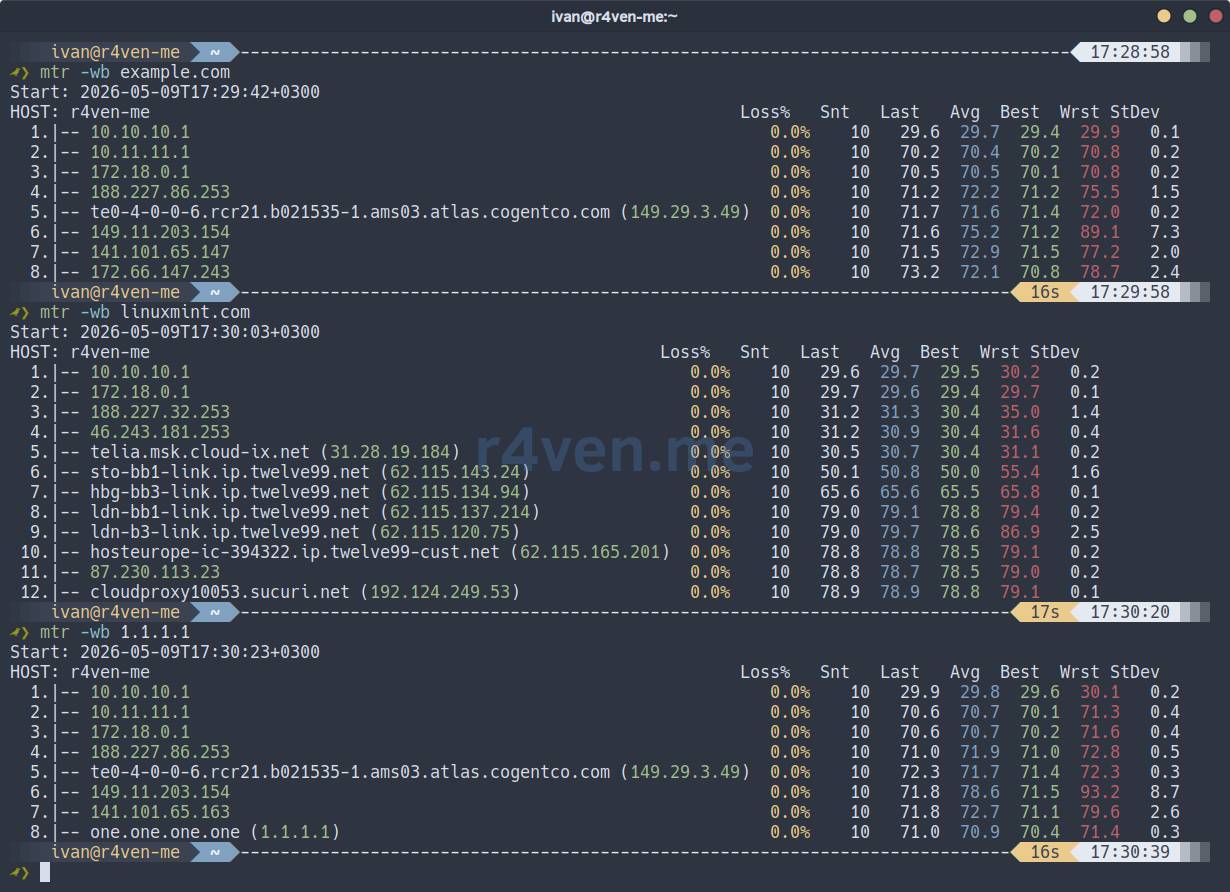
mtr -wb linuxmint.com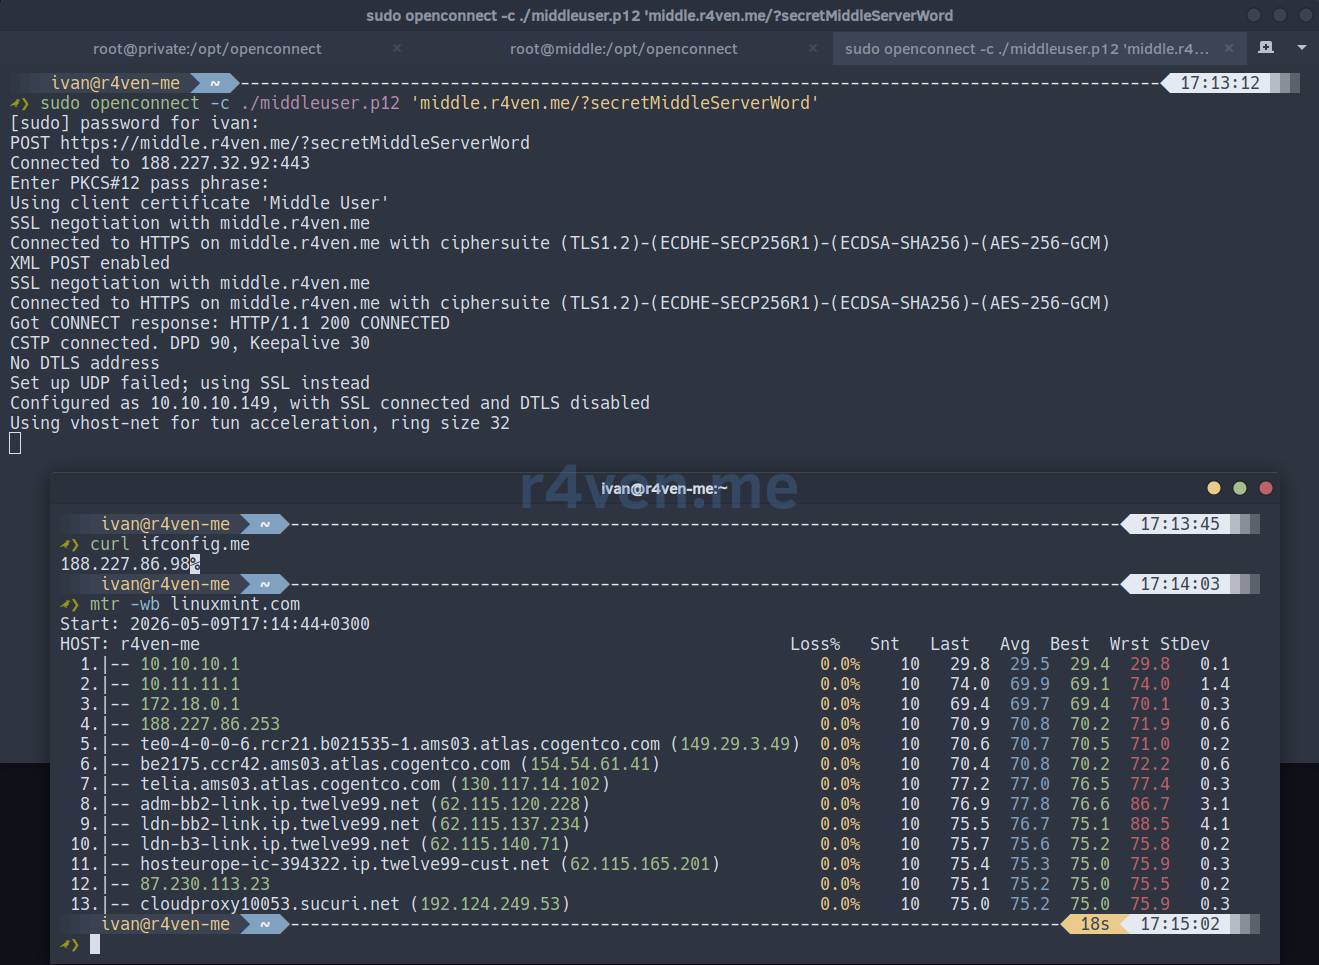
It should go through the middle server (10.10.10.1) and then through the private server (10.11.11.1).
Split Routing mode
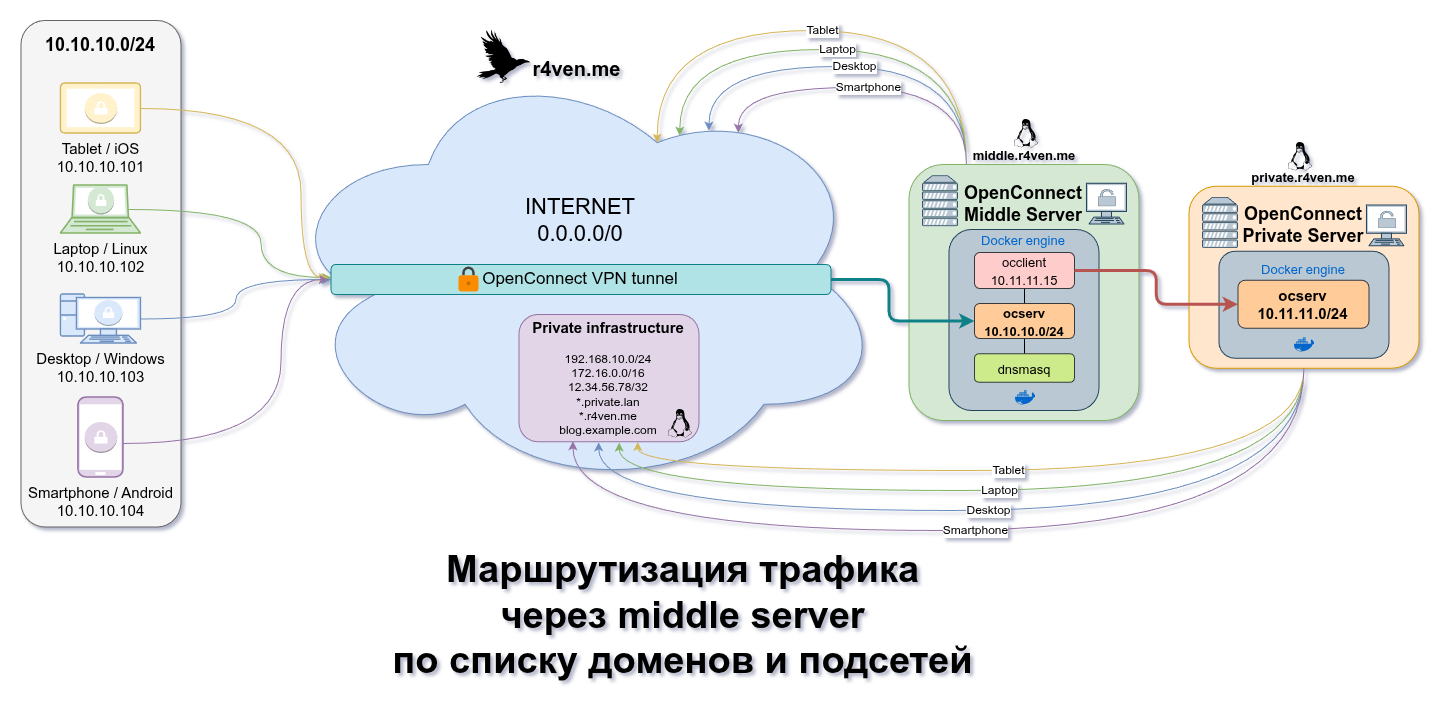
Now let’s look at a more interesting mode. In it, the user connects to the middle server, but only the traffic that we explicitly specified goes through the private server.
For example:
- send
ifconfig.meandexample.comthrough the private server; - send the
192.168.25.0/24subnet through the private server; - all other internet traffic remains on the client side and is not routed into the private server.
The scheme looks like this:
For this, enable the client part and add split tunneling:
# System
TZ="Europe/Moscow"

# Certbot, if you use Let's Encrypt
OC_USER_EMAIL="kar-kar@r4ven.me"

# OpenConnect server
OC_SRV_PORT="443"
OC_SRV_CN="middle.r4ven.me"
OC_SRV_CA="R4ven CA"
OC_IPV4_NET="10.10.10.0"
OC_IPV4_MASK="255.255.255.0"
OC_DNS1="8.8.8.8"
OC_DNS2="8.8.4.4"
OC_CAMOUFLAGE_ENABLE="true"
OC_CAMOUFLAGE_SECRET="secretMiddleServerWord"
OC_CAMOUFLAGE_REALM="Middle service"

# OpenConnect client
# Optional: force physical uplink interface for NAT rules. Empty means auto-detect.
# OC_MAIN_IFACE="eth0"
OC_CLIENT_ENABLE="true"
OC_CLIENT_IFACE="oc-middle0"
OC_CLIENT_CHECK_INTERVAL="5"
OC_CLIENT_CHECK_THRESHOLD="3"

# Number of configured OC_CLIENT_<index> profiles.
# Set to "2" when OC_CLIENT_1_* variables are enabled, "3" for OC_CLIENT_2_*, etc.
OC_CLIENT_COUNT="1"

OC_CLIENT_0_SSL_FLAG=true
OC_CLIENT_0_SERVER="private.r4ven.me"
OC_CLIENT_0_SERVER_PORT="443/?secretPrivateServerWord"
OC_CLIENT_0_CERT_FILE="/opt/openconnect/private.p12"
OC_CLIENT_0_CERT_PASS="p12SecretInBase64encode"
OC_CLIENT_0_CHECK_HOST="10.11.11.1"

# Split tunneling
OC_SPLIT_ENABLE="true"
OC_SPLIT_TUNNEL_DNS="true"
OC_SPLIT_ROUTES='
192.168.25.0/24
10.1.0.0/16
1.1.1.1/32
'
OC_SPLIT_DOMAINS='
ifconfig.me
example.com
gnu.org
'Explanation of OC_SPLIT parameters
Now let’s break down split tunneling. It is enabled only together with OC_CLIENT_ENABLE=true, because without an upstream tunnel there is simply nowhere to split traffic.
| Parameter | Example | Description |
|---|---|---|
OC_SPLIT_ENABLE | "true" | Enables selective routing mode. If false, with OC_CLIENT_ENABLE enabled, user traffic goes into the upstream tunnel entirely. |
OC_SPLIT_TUNNEL_DNS | "true" | Sends the DNS servers specified in OC_DNS1 and OC_DNS2 through the upstream tunnel. Useful if these DNS servers are available only from the private network. |
OC_SPLIT_ROUTES | 192.168.25.0/24 | Initial list of IP addresses and subnets that should be sent through the private server. |
OC_SPLIT_DOMAINS | example.com | Initial list of domains whose IP addresses dnsmasq will add to the nftables set for routing through the private server. |
When split tunneling is enabled, several things happen inside the container:
- the routing table
431 oc_splitis created; - the rule
fwmark 0x1 table 431is added; - a default route through
OC_CLIENT_IFACEis used for the selected IPs; dnsmasqstarts listening on the DNS address of the middle server inside the VPN subnet;ocserv.confis updated so that VPN clients receive the DNS of the middle server;- domains from the list are converted into
dnsmasqrules of the formnftset=/domain/4#ip#oc_nat#oc_set; nftablesmarks IPs fromoc_set, and only such traffic goes into the upstream tunnel.
I will try to describe it a bit more clearly:
- When requesting a domain from the predefined list,
dnsmasqreceives IP addresses from the upstream DNS server, returns them to the client, and adds them to the nftset set. - Packets directed to IP addresses from this
nftsetare marked using firewall rules. - Marked traffic is redirected into a separate routing table where a route is defined through the OpenConnect tunnel leading to the private server. The rest of the traffic goes through the main interface of the middle server.
One advantage of this method is building the nftset by wildcard. In other words, you add the domain example.com to the list, and when accessing lower-level domains, for example test.example.com, traffic automatically goes through the OpenConnect tunnel.
I previously implemented a similar scheme in the article about connecting an OpenWRT router to an OpenConnect server.
Domains
Domains can be specified directly in .env:
OC_SPLIT_DOMAINS='
ifconfig.me
example.com
gnu.org
'On the first start, the entrypoint script will put them into the file:
./data/domains.txtAfter startup, it is more convenient to edit this file instead:
vim ./data/domains.txtThe format is simple:
ifconfig.me
example.com
gnu.orgEmpty lines and lines with # are ignored.
Subnets and IP addresses
Routes can also be specified through .env:
OC_SPLIT_ROUTES='
192.168.25.0/24
10.1.0.0/16
1.1.1.1/32
'Or edit the file after startup:
vim ./data/routes.txtThe format is just as simple:
192.168.25.0/24
10.1.0.0/16
1.1.1.1/32Changes in domains.txt and routes.txt are picked up automatically. There is no need to restart the container. If you update variables in .env, you will have to restart the container.
Starting the middle server
docker compose down

docker compose up -d

docker compose logs -f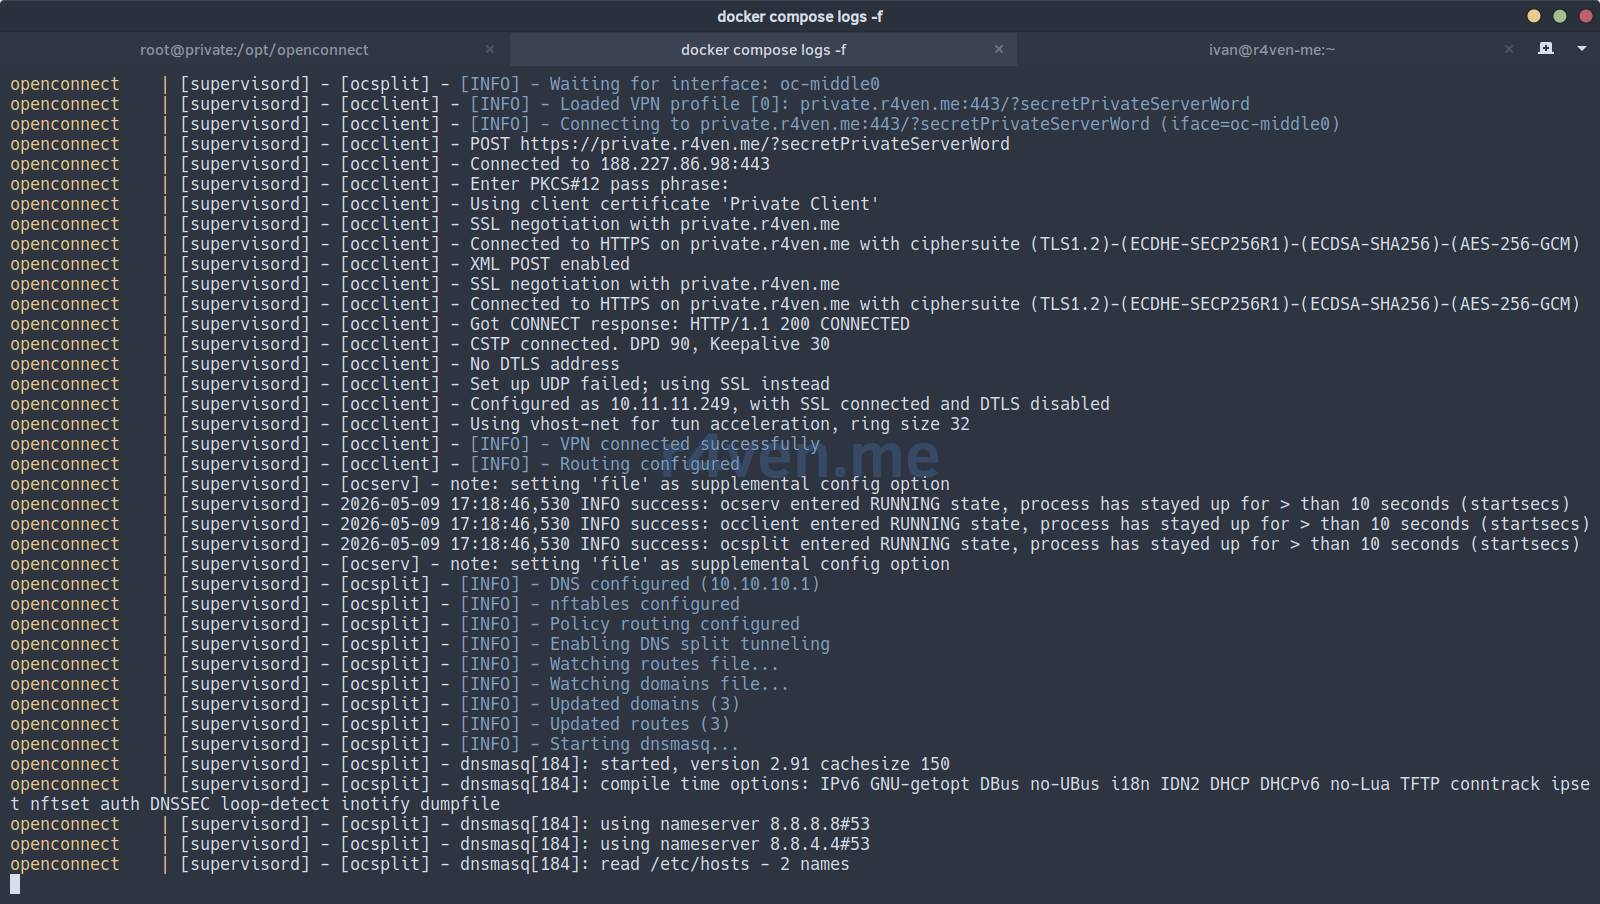
Checking Split Routing
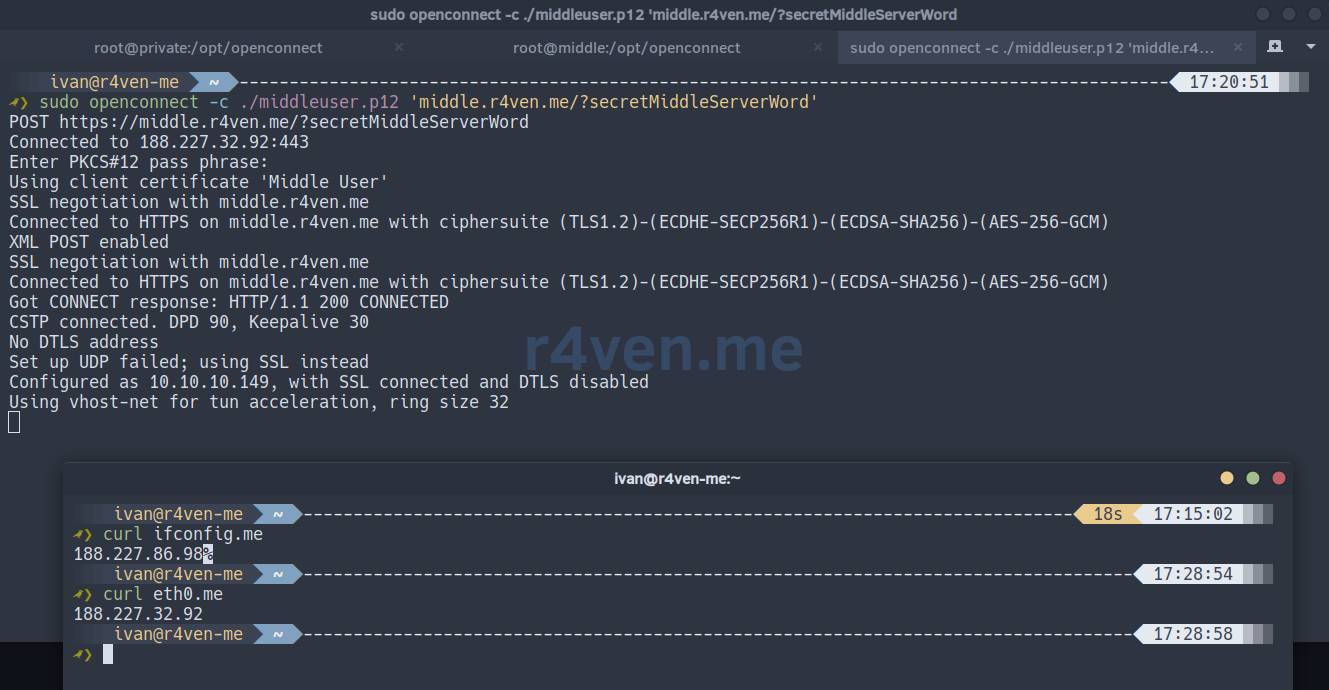
Connect to the middle server on the client:
sudo openconnect -c ./middleuser.p12 'middle.r4ven.me/?secretMiddleServerWord'Check the domains from the list:
curl ifconfig.me

curl eth0.meIf ifconfig.me is added to OC_SPLIT_DOMAINS, it should open through the private server. If eth0.me was not added to the list, it should show the external IP of the middle server.
Check the routes:
mtr -wb example.com

mtr -wb linuxmint.com

mtr -wb 1.1.1.1Pay attention to the second hop: for addresses from the list, traffic should go toward the middle/private chain, and for the other addresses, it should take the usual path.
Example of updating domain and subnet lists on the fly
For example, add a domain and a separate IP:
echo 'eth0.me' >> ./data/domains.txt

echo '9.9.9.9/32' >> ./data/routes.txtAfter a while, you can flush the DNS cache on the client and check:
resolvectl flush-caches

curl eth0.me

mtr -wb 9.9.9.9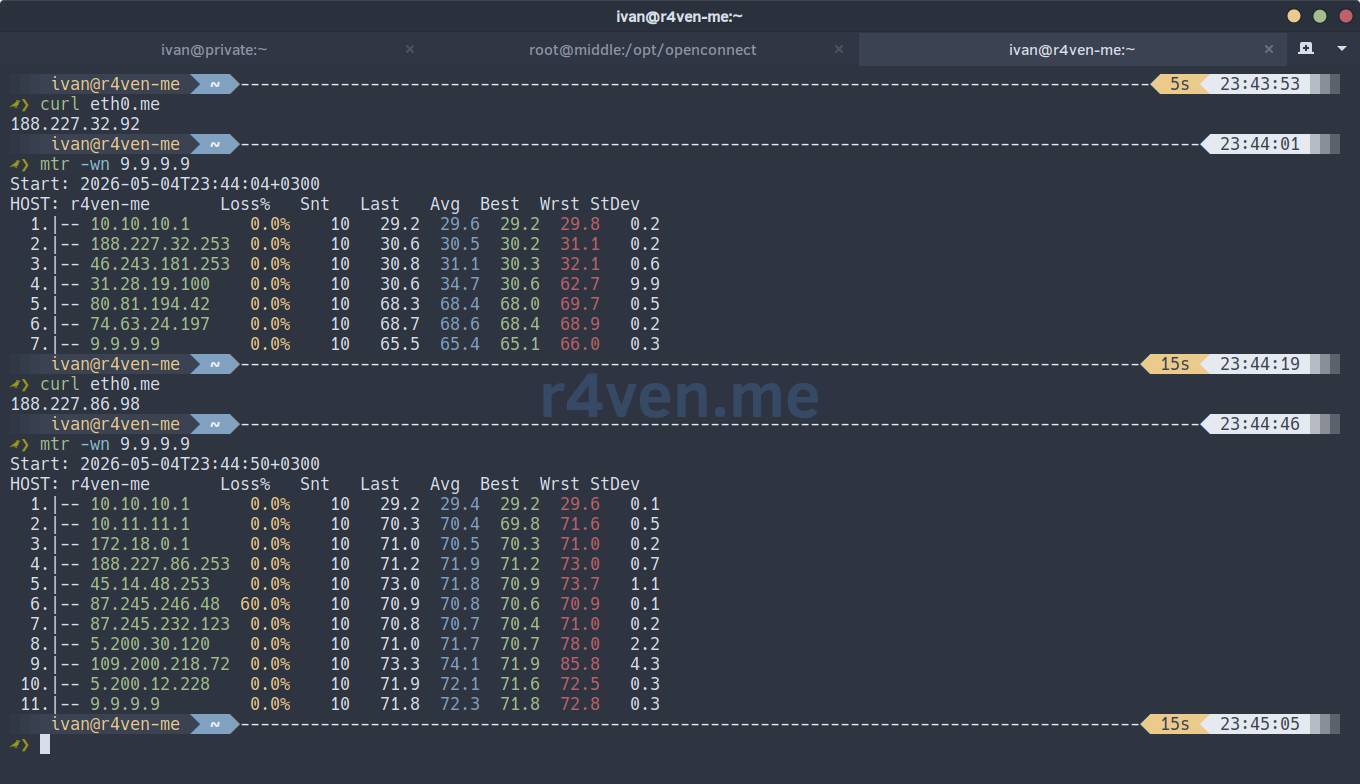
📝 For domains, it is important that the client actually uses the DNS issued by ocserv. If DoH/DoT is enabled on the client or an external DNS is hardcoded, domain-based split tunneling may work unpredictably or not work at all.
Running in network_mode: host mode
Although running services in an isolated Docker environment is an advantage, it also has disadvantages. When the client connection to the private server runs inside the container, the speed of clients connected to the middle server can be, on average, 3 times lower.
If speed is critical for you, you can run the middle server in the host network mode. To do this, simply replace the ports directive with network_mode: host.
Example:
---

services:
  openconnect:
    depends_on:
      certbot:
        condition: service_completed_successfully
    build:
      context: .
      dockerfile: Dockerfile
    image: r4venme/openconnect:v1.4-client
    container_name: openconnect
    restart: always
    stop_grace_period: 30s
    cpus: 1
    mem_limit: 512M
    cap_add:
      - NET_ADMIN
      - NET_RAW
    hostname: openconnect
    env_file:
      - .env
    volumes:
      - ./data/:/etc/ocserv
    devices:
      - /dev/net/tun:/dev/net/tun
network_mode: hostI tried to adapt the script logic inside the container as much as possible so that it works identically in host network mode too.
However!
Be careful, because in this mode the scripts will make changes to the network parameters of the host itself, more specifically: manage routes and routing rules, as well as firewall settings using nftables.
Configuring autostart with systemd
Once everything is checked, you can configure autostart for our middle server through systemd:
docker compose downcat << EOF > /etc/systemd/system/openconnect.service
[Unit]
Description=OpenConnect **middle server**
Requires=docker.service
After=docker.service
[Service]
Restart=always
RestartSec=5
WorkingDirectory=/opt/openconnect
ExecStart=/usr/bin/docker compose up
ExecStop=/usr/bin/docker compose down
[Install]
WantedBy=multi-user.target
EOFsystemctl daemon-reload
systemctl enable --now openconnect
journalctl -fu openconnectUseful diagnostic commands
View container logs:
docker compose logs -f openconnectCheck whether the upstream interface is up:
docker exec -it openconnect ip addr show oc-middle0View policy routing:
docker exec -it openconnect ip rule show
docker exec -it openconnect ip route show table 430
docker exec -it openconnect ip route show table 431View nftables:
docker exec -it openconnect nft list table ip oc_nat

docker exec -it openconnect nft list chain DOCKER-USERView the current domains and split tunneling routes:
cat ./data/domains.txt
cat ./data/routes.txtIf necessary, you can manually clear the nftables set with domain IPs:
docker exec -it openconnect nft flush set ip oc_nat oc_setAfterword
During development of the image, quite a few mugs of tea were drunk and far more nerves were spent than planned. But I think the result was worth it.
In the end, it turned out to be a very convenient and flexible tool for managing routing inside private networks.
Users connect to the middle server, and then you choose the logic yourself: send all their traffic through the private server or pass only the needed domains and subnets there.
I like this approach because it does not require giving users direct access to the private server. The private network remains closed, while the middle server can be updated, moved, restricted, and used as a managed entry point separately.
I am sure many users may have various questions. Feel free to ask them in the Raven chat, in an issue on GitHub, or write to me by email: kar-kar@r4ven.me.
Thank you for reading. All the best!
👨💻And…
Don’t forget about our Telegram channel 📱 and chat
Or maybe you want to become a co-author? Then click here🔗
💬 All the best ✌️
That should be it. If not, check the logs 🙂

Comments