

This time we will perform basic Linux server setup using the Debian 12 distribution as an example.
🖐️Hey!
Subscribe to our Telegram channel @r4ven_me📱, so you don’t miss new posts on the website 😉. If you have questions or just want to chat about the topic, feel free to join the Raven chat at @r4ven_me_chat🧐.
Preface
We continue the topic of Linux server administration. In previous articles we:
- Installed VirtualBox on Linux Mint
- Installed Debian 12 in VirtualBox
- Took a detailed look at the process of connecting to a server via SSH
Today we will perform the initial setup of a Debian 12 server before putting it into further use.
⚠️ Warning
❗Dear readers, please note that the materials on my site are for recommendation purposes only. You perform all actions at your own risk. Always back up important files, take snapshots before configuring virtual machines, and always test changes locally on your own virtual machines before applying them to production servers. Thanks for understanding.
Ivan Cherniy
This guide is relevant both for setting up virtual servers, created for example in VirtualBox locally or with hosting providers, such as a Virtual Private Server (VPS), and for classic bare-metal servers.
CLICK if the server is installed in VirtualBox
Creating a system snapshot
If you’re setting up a local virtual server, I recommend creating a system snapshot before you begin. For example, to do this in VirtualBox, you need to click on the virtual machine menu:
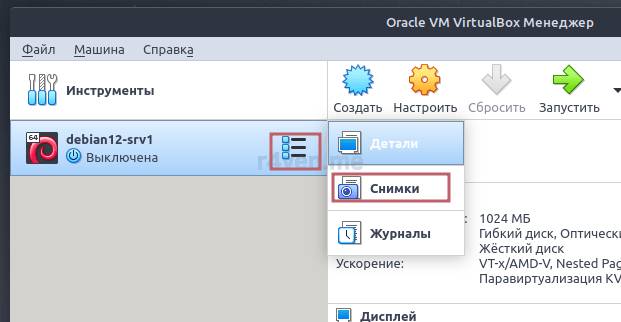
Select the “Snapshots” section, click “Take”, specify a name and description, and click “OK”:
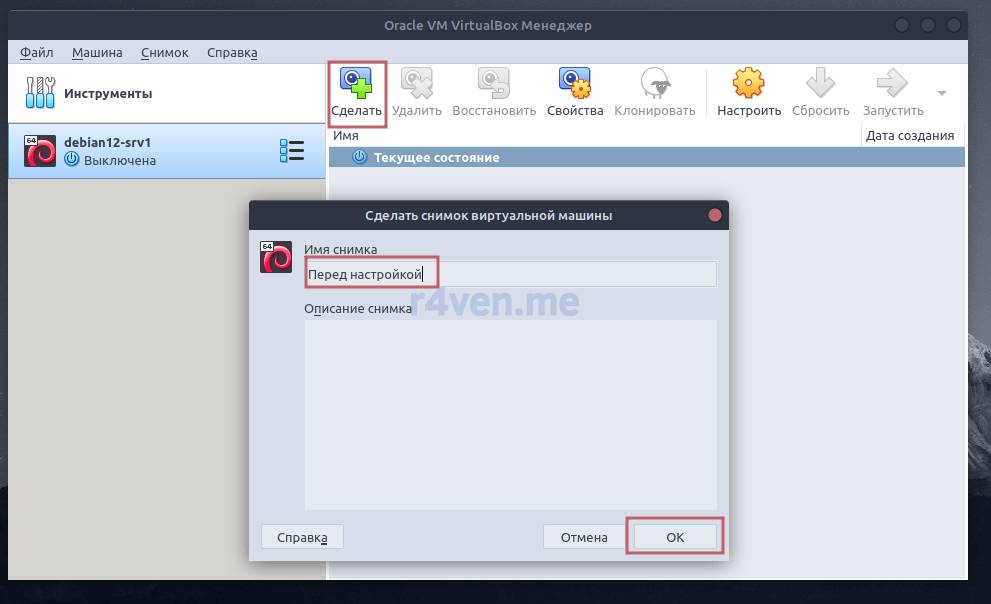
That’s it, the snapshot has been created.
Keep in mind that virtual machine snapshots are not a full backup. This is the hypervisor recording the current state of the machine, essentially a change log, which allows you to quickly roll back to a needed point. It’s not recommended to keep snapshots for a long time, since as changes are made to the VM, the created snapshots will grow in size and put a noticeable load on the host system and the VM itself.
Therefore, it’s recommended to take snapshots before making significant changes to the system, as a safety net. And after finishing the work and all functionality checks — it’s advisable to delete them.
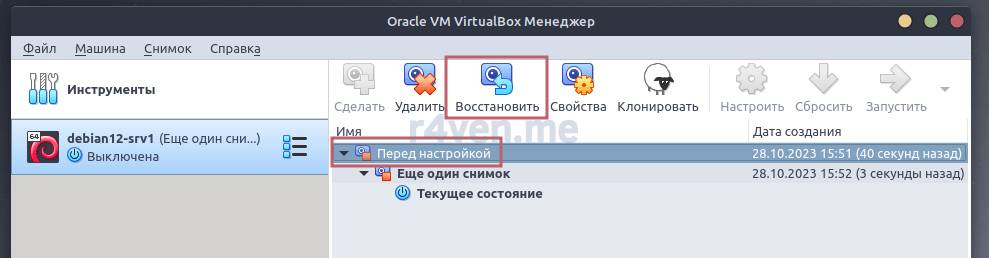
To restore, you need to shut down the machine, go to the snapshot management section, select the desired one, and click “Restore”:
Creating a virtual host interface
For convenient communication with the server installed in VirtualBox, let’s create a virtual network interface on the host system, through which we will interact with our VM as if we were on the same network.
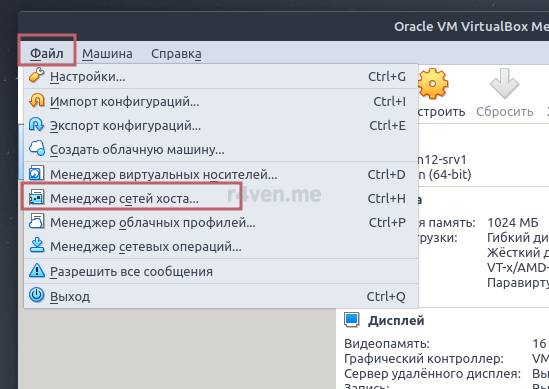
To do this, click “File” —> “Host Network Manager” and then the “Create” button:
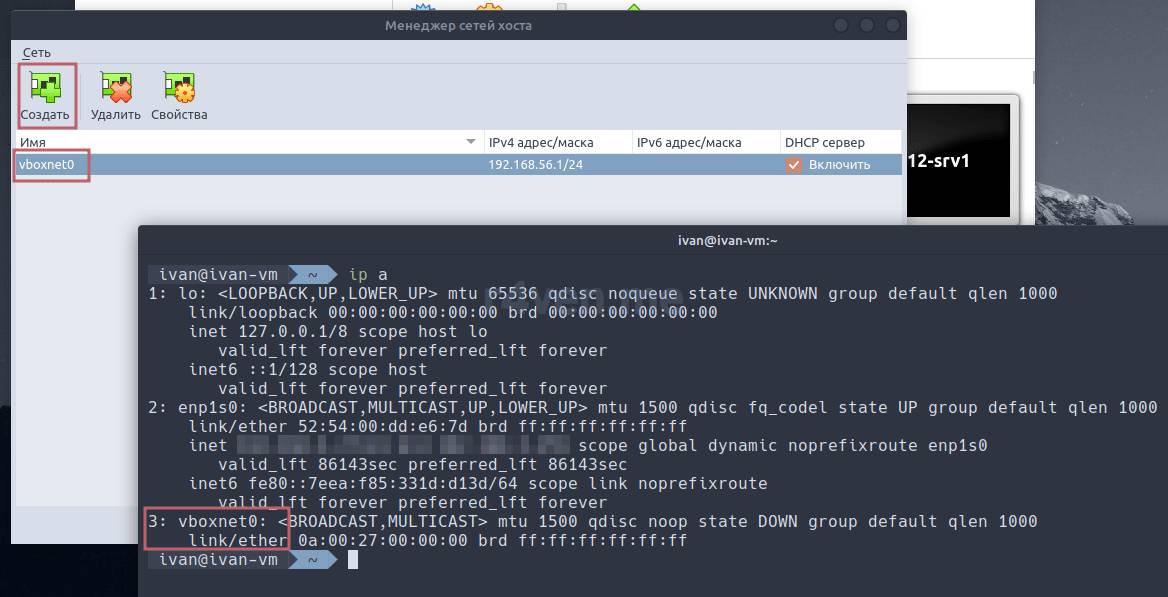
Run the ip a command (displays the list of network interfaces) in the host system’s terminal, and we’ll see our virtual interface.
Now go into the network settings of our VM, then “Adapter 2” (don’t touch the first one, or internet access will disappear), enable it and choose the connection type: “Host-only Adapter” (the virtual adapter will be selected automatically) and then “OK”:
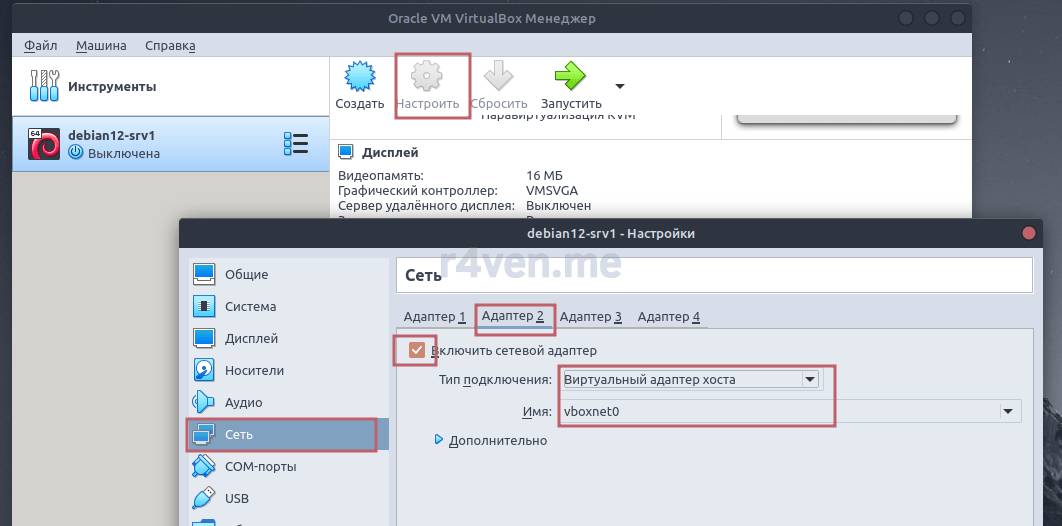
Start the VM. Run ip a in it and find out the name of the new interface on our server. At the moment the interface is not active. To bring it up, run:
ip link set enp0s8 up

dhclient enp0s8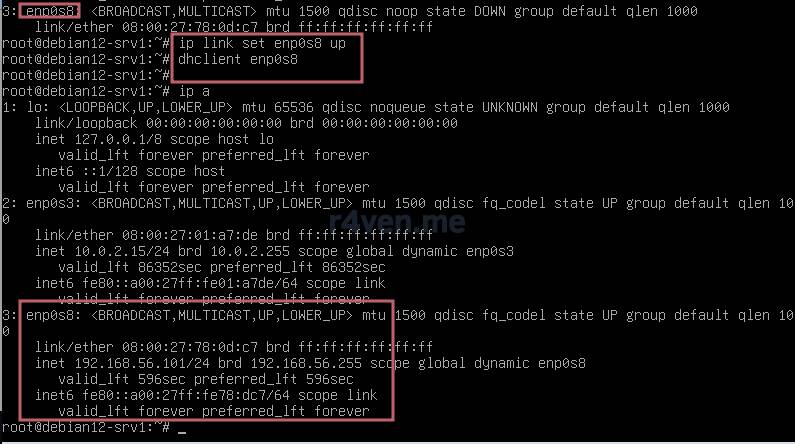
Where enp0s8 is the name of the new network interface. Yours may be different.
Now let’s set up “auto-bringing-up” of this interface when the system starts. Open the network interface settings file for Debian for editing:
vi /etc/network/interfacesAnd add the settings for the additional interface below the settings of the main one. You can simply copy it, changing only the interface name. In my case it looks like this:
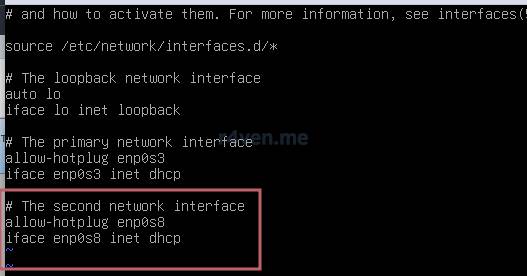
We save and restart the VM:
rebootLet’s check:
ip a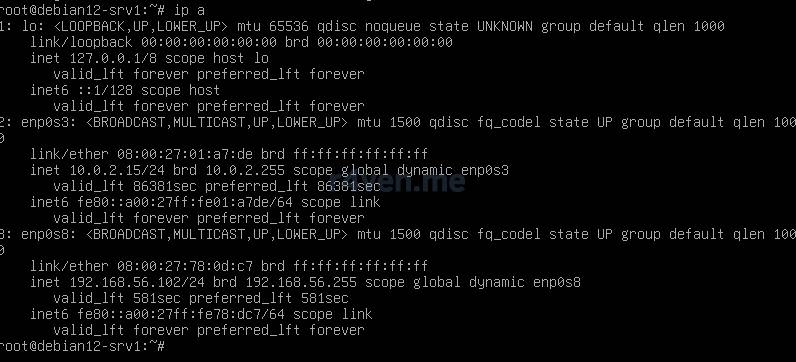
After restarting, VirtualBox for some reason assigns the next IP in the list (it was 101, now it’s 102), but let’s not get into the nuances of how this hypervisor works. The main thing is we have an IP address that is directly accessible from the host system. In my case it’s: 192.168.56.102
Let’s check connectivity to the VM from the host machine, as well as the VM’s internet access:
# on the client
ping -c3 192.168.56.102

# on the server
ping -c3 google.com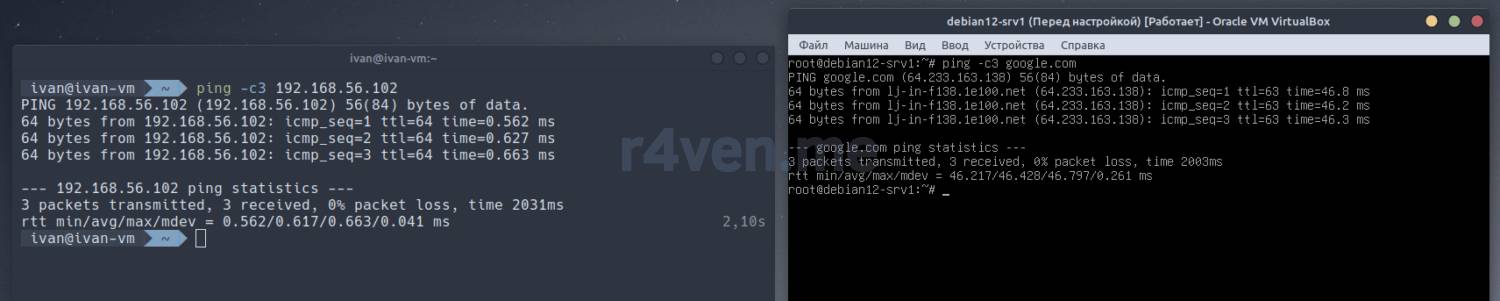
As you can see, there is direct communication from the host to the VM, and the VM has internet access — we can continue 😉
To be able to connect to the VM via SSH as the root user using a password, you need to change the default values that forbid this. Later in the article we will turn this setting back off.
sed -i 's/^#PermitRootLogin.*/PermitRootLogin\ yes/' /etc/ssh/sshd_config

sshd -t

systemctl restart sshdAfter that, check the SSH connection:
ssh root@192.168.56.102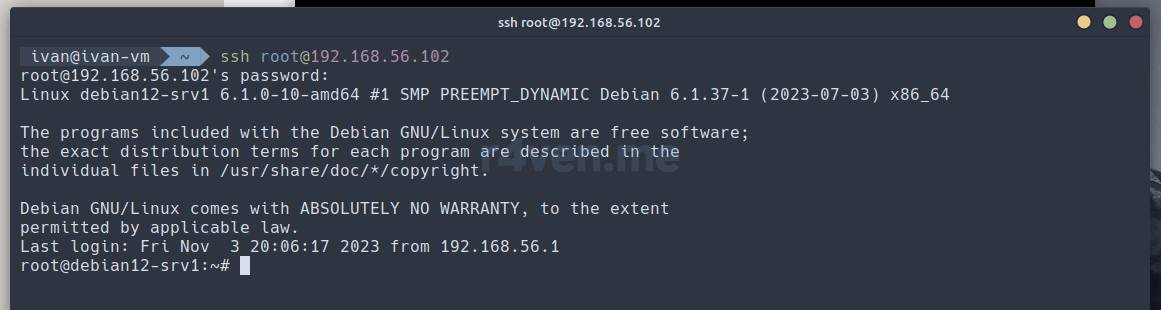
Initial setup of the Debian server
Input data used in this article:
| VM server IP address | 192.168.56.102 |
|---|---|
| New server hostname | r4ven-test |
| Local user name on the server | ivan |
| New SSH port, different from the default one | 27244 |
In this article, I assume that you have root access to the server, since the initial setup will be performed under that account.
Open the console of our VM and the first thing we do is…
Changing the root user’s password
Run:
passwdand enter the new password twice:
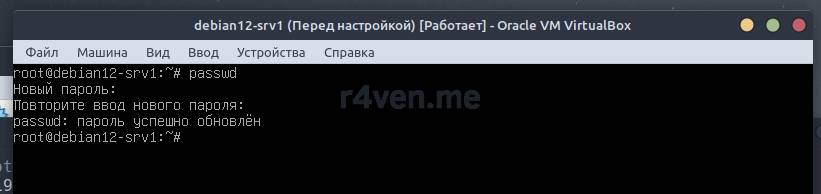
Now, for convenience, we can connect to the server via SSH and continue the setup in the terminal:
ssh root@192.168.56.102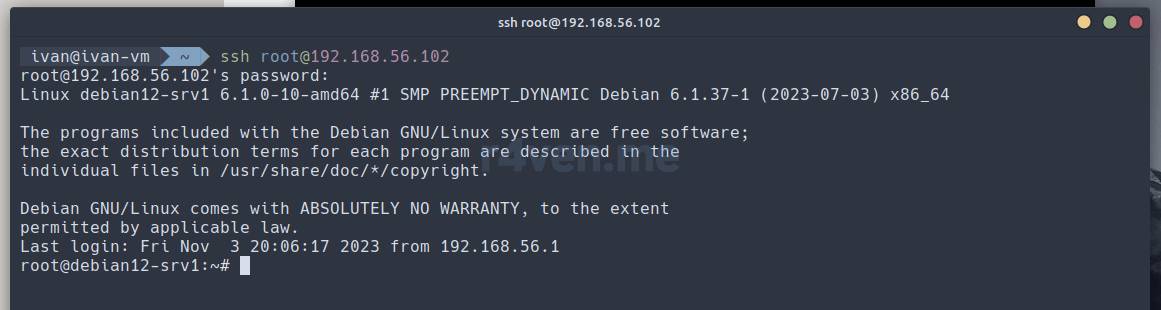
Setting up automatic installation of security updates
sudo unattended-upgrades apt-listchanges

sudo dpkg-reconfigure --priority low unattended-upgrades

systemctl status unattended-upgradesInstalling the necessary utilities
Now let’s update the package cache, update the packages themselves, and install some useful utilities for further work with the server:
apt update && apt upgrade -y

apt install -y sudo ufw zsh software-properties-common neovim curl wget git mc fzf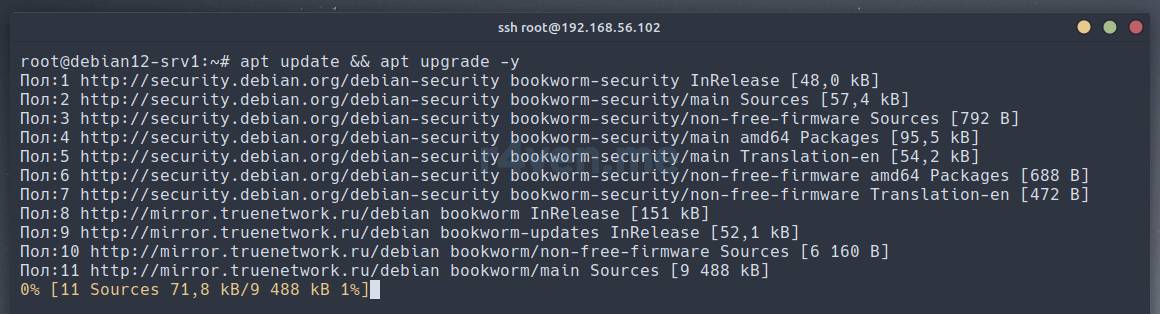
Description of the packages being installed:
| Package name | Description |
|---|---|
| sudo | utility for obtaining superuser privileges |
| ufw | a convenient frontend for the native Linux firewall — iptables/nftables |
| zsh | interactive command shell (there’s a separate article on setting it up) |
| software-properties-common | package for managing additional software repositories |
| neovim | advanced console text editor (there’s an article introducing Vim/Neovim) |
| curl | utility for exchanging data between hosts on the internet using data transfer protocols |
| wget | convenient utility for downloading content from the internet |
| git | version control system |
| mc | MidnightCommander — a two-pane console file manager |
| fzf | “fuzzy” search utility |
Setting up the network with systemd-networkd
⚠️If your network is already configured, you can skip this step.
For the sake of consistency I prefer to configure the network on Linux servers using systemd-networkd.
❗Before making any changes, make sure you have physical access to the server / access to the VM console from the hypervisor, so that you can promptly roll back the configuration if something goes wrong.
First we back up the current settings files as recommended in the Debian documentation:
mv -v /etc/network/interfaces{,.backup}
mv -v /etc/network/interfaces.d{,.backup}If you use netplan, back it up too:
mv -v /etc/netplan{,.backup}Now let’s open a new network settings file for editing:
nvim /etc/systemd/network/10-lan0.network💡The number
10in the file name determines the order in which settings are read from files, if there are several (10, 20, etc).
For static addressing, fill the file with content roughly like this:
⚠️Replace the network parameters with your own. You can find them in the
/etc/network/interfaces*files.
[Match]
Name=eth0

[Network]
Description=Local network
Address=192.168.56.102/24
Gateway=192.168.56.1If you get your network parameters via DHCP, then the content would be roughly like this:
[Match]
Name=eth0

[Network]
DHCP=ipv4systemd-networkd accepts wildcard characters. If you have several interfaces getting their settings via DHCP, you can fill the file like this:
[Match]
Name=e*

[Network]
DHCP=ipv4💡For more details on all
systemd-networkdparameters see here.
Apply the settings and enable autostart:
systemctl restart systemd-networkd

systemctl enable systemd-networkd

systemctl status systemd-networkd💡To manage the network use the standard commands
systemctl start|stop|restart systemd-networkd.
systemd-networkd comes with a convenient utility, networkctl, which you can use to view and manage network connection information:
networkctl statusYou can also check the status the classic way:
ip addressLet’s check internet access:
ping -c3 r4ven.meIt’s highly recommended to restart the server to make sure that the network comes up automatically and correctly:
rebootsystemd-networkd allows you to configure the network in Linux quite flexibly. Network routes, routing rules, DNS, NTP settings, and so on are set in the files in a similar way.
Setting up DNS with systemd-resolved
⚠️If your DNS is already configured, you can skip this step.
Many modern Linux distributions use one of the systemd modules — systemd-resolved — to manage DNS.
systemd-resolved is a Systemd component responsible for DNS operation. It manages queries, caches results, and supports various protocols.
Let’s install the package:
❗Also make sure you have access to the server console before making changes.
apt install systemd-resolved☝️According to Debian’s policy, installed daemon services are most often started right after installation with autostart enabled on system boot.
To edit the DNS parameters, open the configuration file:
nvim /etc/systemd/resolved.confAnd in the Resolve block, change (or add) the DNS= directive with your own values:
[Resolve]
DNS=8.8.8.8 1.1.1.1
Domains=~.☝️If you don’t specify the
Domains=~.option,systemd-resolvedmay use the DNS servers from the settings of individual network interfaces, if theDomains=~.parameter is present in them. This option does not affect domain name queries that match a more specific search domain from the interface settings.
Let’s save and restart the service, enabling autostart just in case + clear the DNS cache:
💡The
systemd-resolvedpackage comes with a DNS settings management utility —resolvectl.
systemctl restart systemd-resolved

systemctl enable systemd-resolved

systemctl status systemd-resolved

resolvectl flush-cachesAlso, for compatibility with applications that don’t use library calls but access the DNS server directly, it’s recommended to create such a symlink (with a prior backup of the resolv.conf file):
mv /etc/resolv.conf{,.backup}

ln -sv /run/systemd/resolve/stub-resolv.conf /etc/resolv.confFor a detailed look at the DNS configuration process using systemd-resolved, I recommend checking out this wiki article.
⚠️ From experience, in the case of systemd-resolved it’s preferable to restart the entire system, but this is not mandatory.
Let’s check that DNS works:
resolvectl status

resolvectl query r4ven.me

ping -c3 r4ven.me

nslookup r4ven.me💡To manage DNS use the standard commands
systemctl start|stop|restart systemd-resolved.
systemd-resolved has flexible settings, including DNSSEC, DNS over TLS, Multicast DNS (mDNS), Link-Local Multicast Name Resolution (LLMNR), and others.
Read more about how the DNS subsystem works in Linux here and here.
Setting up NTP with systemd-timesyncd
For many services in Linux, time accuracy is important. To make sure the server always knows the exact time, it’s recommended to configure its synchronization with the nearest NTP server. For this purpose we’ll use the systemd-timesyncd module.
Let’s install it:
apt install systemd-timesyncdOpen the service’s config file for editing:
nvim /etc/systemd/timesyncd.confAnd fill it with content roughly like this:
⚠️If needed, replace the list of NTP servers with your own.
[Time]
NTP=0.ru.pool.ntp.org 1.ru.pool.ntp.org 2.ru.pool.ntp.org 3.ru.pool.ntp.org
FallbackNTP=0.pool.ntp.org 1.pool.ntp.org 2.pool.ntp.org 3.pool.ntp.org
RootDistanceMaxSec=5
PollIntervalMinSec=32
PollIntervalMaxSec=2048NTP=— list of primary NTP servers, you can get them, for example, from here;FallbackNTP=— fallback servers;RootDistanceMaxSec=— maximum distance to the source (in seconds);PollIntervalMinSec,PollIntervalMaxSec— minimum and maximum polling interval.
The NTP server used will be determined according to the following rules:
- Priority is given to any NTP servers received for a specific interface from the systemd-networkd settings or via DHCP;
- NTP servers specified in the
/etc/systemd/timesyncd.conffile will be added to the list of servers for each interface at runtime, and the daemon will contact them in turn until some server responds; - If a working server still isn’t found after that, the servers from the
FallbackNTP=setting will be used.
For a more detailed description of how systemd-timesyncd works, check out this wiki article.
Let’s restart the service, add it to autostart, and check the status:
systemctl restart systemd-timesyncd

systemctl enable systemd-timesyncd

systemctl status systemd-timesyncdSystemd comes with a convenient management utility, timedatectl. You can check the service status with it like this:
timedatectl status

timedatectl timesync-status💡To manage
systemd-timesyncduse the standard commandssystemctl start|stop|restart systemd-timesyncd.
systemd-timesyncd is a convenient and easy-to-use NTP client that lets you quickly set up time synchronization over the network.
Adding a new user
⚠️ If you already have an existing local user, you can skip this step.
If, when installing Debian 12 or setting up the VM, for example in the case of a VPS, you didn’t create a new system user, let’s create one:
useradd -m -G sudo -s /bin/bash ivan

passwd ivan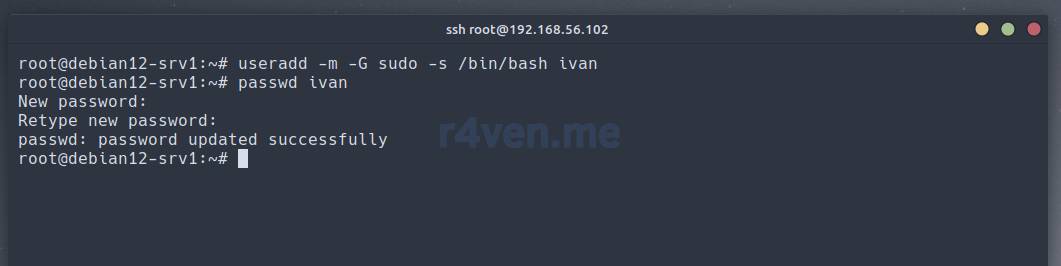
Where in the first command:
-m— an option indicating the need to create the user’s home directory (in the/homefolder by default);ivan— this is the new user’s name, set your own;-G sudo— an option specifying that the new user should be added to the listed groups (in this case a single one — thesudogroup);-s /bin/bash— a parameter setting the default shell for the user. I specified this parameter for demonstration purposes. If not set, the user is assigned thebashshell by default.
And with the passwd command we set a password for the new user. By default, new users don’t have one/it’s disabled.
Setting up SSH on the client host
For security reasons, it’s recommended not to work in Linux-based systems directly as the root user. Connecting under this user to remote servers is usually disabled. That’s what we’ll do, but a bit later, and for now let’s set up a connection with SSH key authorization on behalf of the user we created earlier.
Note that the steps in this section are performed on the user’s system, i.e. not on the server.
A few words about the type of keys to generate. Keys are generated using the ssh-keygen utility, which by default creates keys of the RSA type. This is a rather old cryptographic algorithm, created back in 1977, but still very popular, as it’s supported by most systems. You can read more about it on wikipedia.
The developers of the SSH protocol themselves recommend using keys of a more modern encryption algorithm — EdDSA, namely ed25519. This algorithm is based on elliptic curves. More details also on wiki. It is claimed to be more secure and better optimized for speed. That’s the one we’ll use.
So, on our desktop system let’s open a terminal and generate new keys (if you haven’t done this before):
test -e ~/.ssh || mkdir -v $HOME/.ssh/ && chmod 700 ~/.ssh

ssh-keygen -t ed25519 -f ~/.ssh/id_ed25519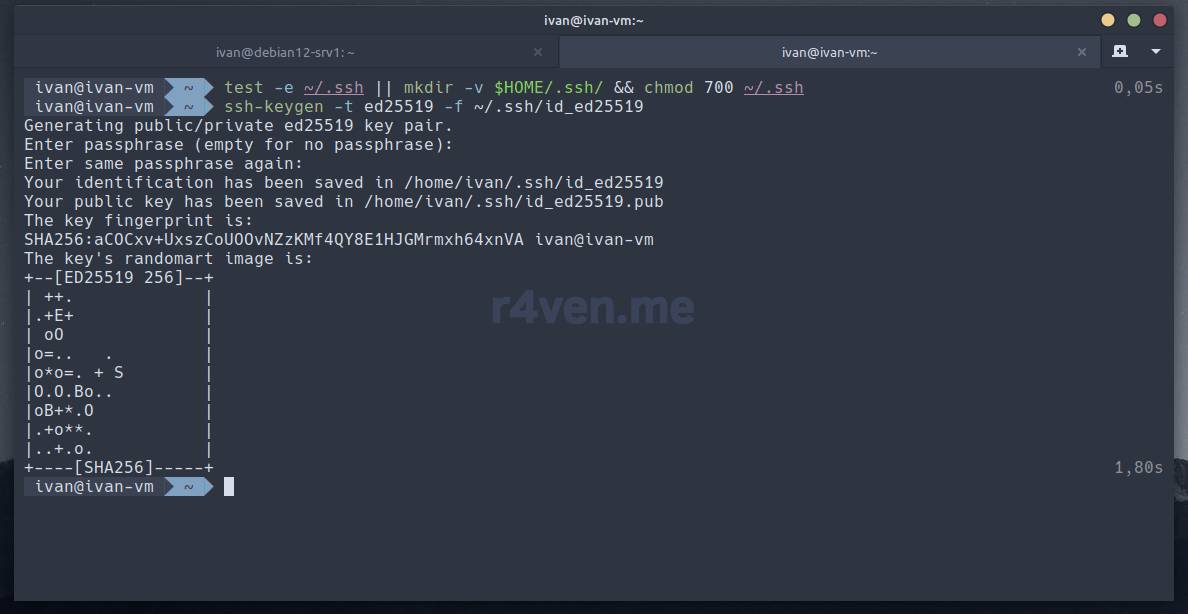
With the command
test -e ~/.ssh || mkdir $HOME/.ssh/ && chmod 700 ~/.sshwe checked for the presence of the SSH files directory, and if it doesn’t exist — we create it and set the correct permissions.More about the redirection mechanism and command execution control operators can be read here: Command execution control: the “&&”, “||”, “;” and “&” operators.
During generation you’ll be asked for a passphrase to encrypt the key file itself. If you set one, each time you authenticate with this key the system will ask you for a password to decrypt the key file.
Ideally, you should set a password, but then the point of “passwordless” authorization on remote systems is lost. It all depends on your level of paranoia and where you’ll be connecting from. If these are your personal projects, for convenience you can skip setting a password. In this example I won’t set a password. To do this, press Enter twice at the key passphrase prompt.
There are also alternative solutions that let you encrypt the key file without entering a password every time to decrypt it — using the
ssh-agentutility. But that’s a topic for a separate note)
After generation, two files will appear in the ~/.ssh directory:
id_ed25519— the private key, which must not be shared with anyone;id_ed25519.pub— the public key, which is not scary to lose.
Let’s check:
ls -l ~/.ssh/id_ed*
Now let’s copy our public SSH key to log in to our server using a special command:
ssh-copy-id -i $HOME/.ssh/id_ed25519.pub ivan@192.168.56.102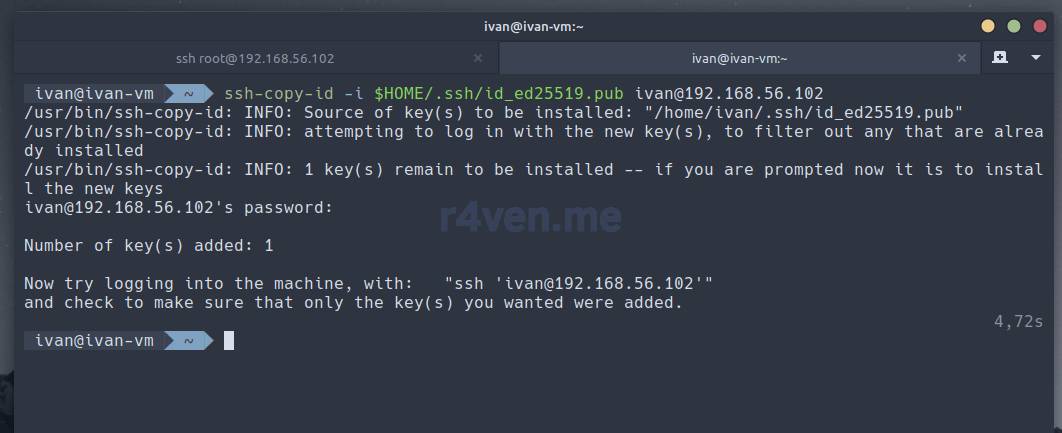
Don’t forget to substitute your own username and server IP address.
When running this, the system will ask for our user’s password on the server.
After the command finishes, a file ~/.ssh/authorized_keys will appear in the user’s home directory on our server, containing our public key from the client machine. We can check this:
- On the client machine:
cat ~/.ssh/id_ed25519.pub- On the server:
cat /home/ivan/.ssh/authorized_keys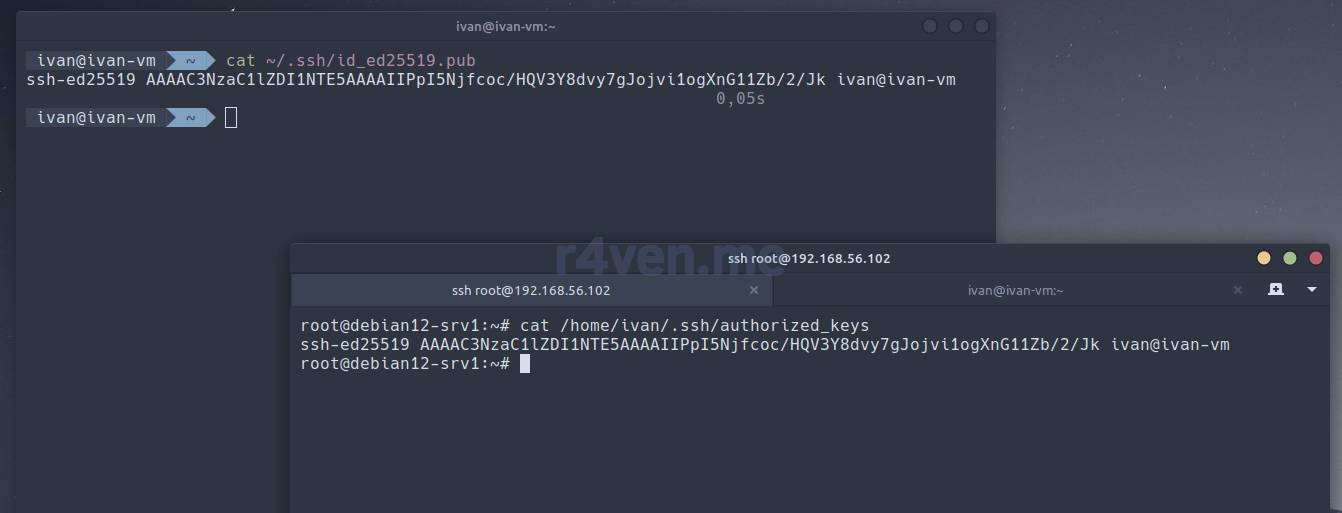
Essentially, we could have manually added this key/set of characters to the ~/.ssh/authorized_keys file, but the utility does everything itself + sets the correct permissions on the files.
Note that permissions on sensitive SSH files must be set exclusively for the file owner. Namely:
- 700 for directories, including
~/.ssh- 600 for files, including
~/.ssh/authorized_keysOtherwise the system simply won’t let you use them.
Now let’s try connecting to the server using the SSH key:
ssh ivan@192.168.56.102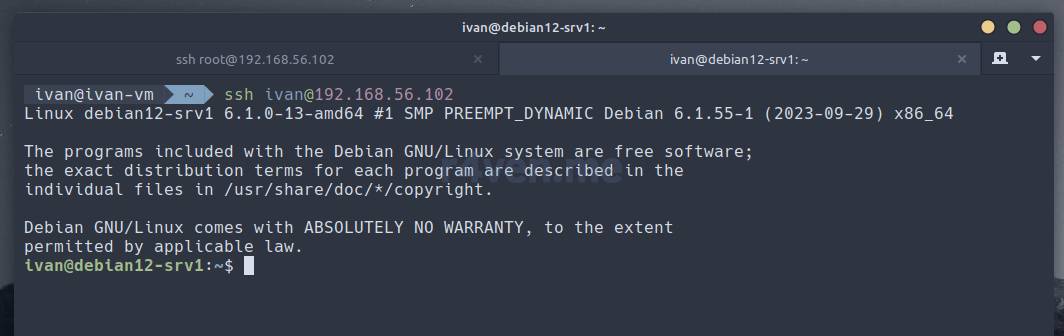
As we can see, the password is no longer requested.
Now, having successfully connected to the server under the new user, let’s continue the setup.
Before continuing, I’d like to highlight one more nuance. For the sake of greater security and to prevent unwanted consequences — it’s recommended to work in the Linux console under a regular user account, but one that has the ability to run commands as the root superuser.
In other words: connecting to the system, performing typical tasks that don’t require privileges, etc. should be done under a regular user. And when it’s necessary to carry out more serious manipulations, for example making some changes to the system settings — use the
sudocommand, without switching to the root account.This way overall security is increased and the chance of accidentally breaking something is reduced. Of course, this can sometimes be inconvenient, and nothing stops you from simply switching to root. Just remember that what was said above is a recommendation that it’s simply advisable to follow.
Setting the default text editor
Readers of my previous articles already know that I prefer Vim/Neovim as a console text editor. If you’re interested in learning what this is and why I chose it, please go ahead and read . By the way, my Neovim config, as it gets configured further, will be updated in the repo on GitHub.
To set the default editor in the server’s console, run the command:
echo 'SELECTED_EDITOR="/usr/bin/nvim"' > ~/.selected_editorYou can also create such a file for root, so that the settings are the same everywhere:
echo 'SELECTED_EDITOR="/usr/bin/nvim"' | sudo tee ~/.selected_editorYou probably noticed that for performing the same operation, but for the root user, we used a slightly different command.
The thing is, if you run: sudo echo 'SELECTED_EDITOR="/usr/bin/nvim"' > /root/.selected_editor — we’ll get an error. In the case of the second command — there won’t be an error:
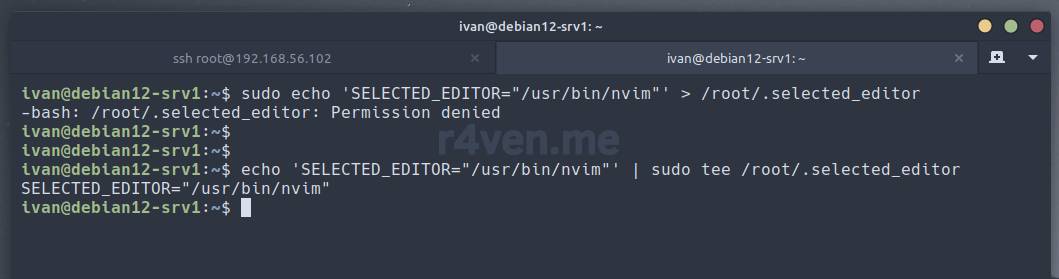
The peculiarity is that although the echo command is executed via sudo, the output redirection, intercepted by the > operator, is still executed as the regular user, so we get Permission denied.
In the case of the second command, it’s the opposite: first we output the desired text, and then, using the tee command run through sudo, we redirect the output on behalf of the superuser. In real practice you can often encounter this nuance of how the privilege mechanism works in Linux.
The
teecommand reads standard input and writes it to the specified file while also passing it to standard output.You can read more about standard input/output in a separate article of mine: Linux command line, output and reading contents: echo, cat, less commands.
Disabling IPv6
I won’t go into detail about why you might want to disable IPv6 if it’s not being used. I’ll leave that for you to study on your own. I’ll just show how it’s done in Linux.
Open the system config for editing:
sudo nvim /etc/sysctl.confAnd add the following lines to the end of the file:
net.ipv6.conf.all.disable_ipv6 = 1
net.ipv6.conf.default.disable_ipv6 = 1
net.ipv6.conf.lo.disable_ipv6 = 1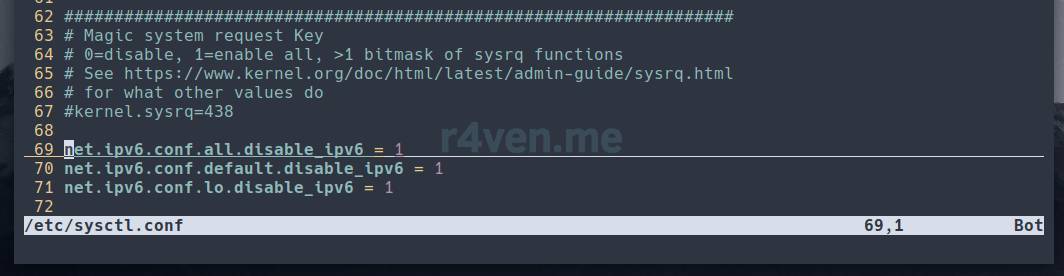
To reread the config, run:
sudo sysctl -p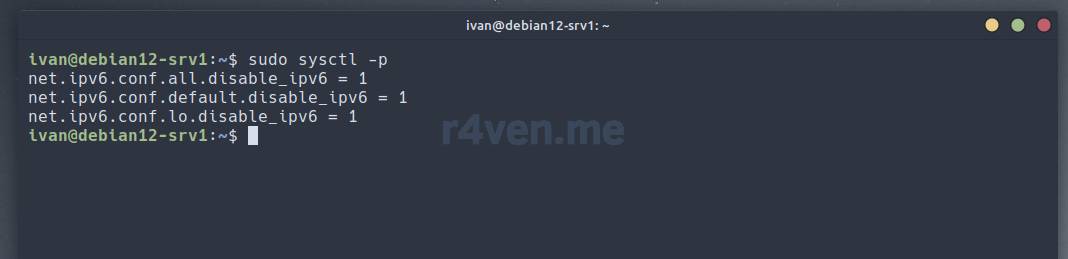
Setting up the UFW firewall
On every server I make sure to enable and configure a firewall. Linux-based OSes include the Netfilter module in the kernel, which is responsible for processing network packets. This module is managed by the iptables utility or its modern version, nftables. These utilities are low-level, and configuring them is a separate topic. For deb-based distributions there’s a simpler and more intuitive firewall management utility — ufw. In rpm distributions there’s a similar program — firewallcmd. But since we have Debian 12, I use ufw (installed it at the package installation step). Let’s do the basic network protection setup.
Let’s disable IPv6 in UFW. Open the ufw configuration file for editing:
sudo nvim /etc/default/ufwChange the line IPV6=yes to no:
IPV6=no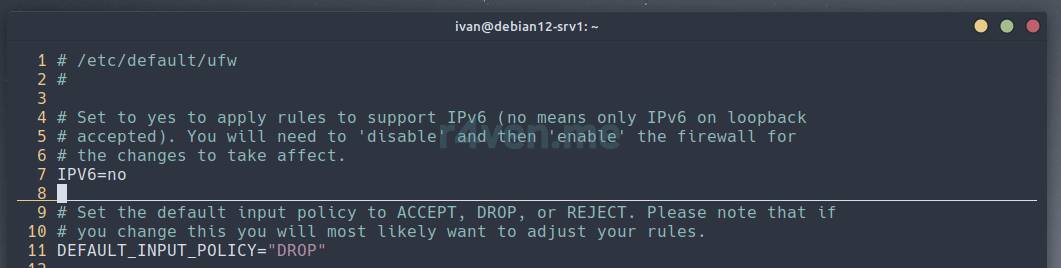
Next let’s open external access to the SSH ports:
sudo ufw allow 22/tcp

sudo ufw allow 27244/tcp
27244is a non-standard port for SSH connections, which we’ll set below in the SSH server settings. It’s recommended to change the default ports of services where possible, since they’re usually scanned by bots.We opened port 22 in order to avoid a broken connection and losing contact with the server. Be careful at this step!

Let’s enable and restart ufw:
sudo ufw enable && sudo systemctl restart ufw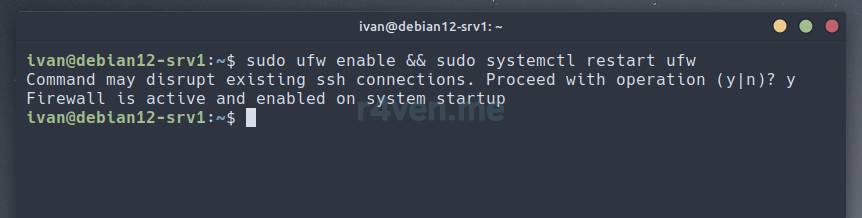
We’ll be warned that activating the firewall may drop the current SSH connection. But if you correctly added the rule to open port 22 TCP, everything should be fine.
If you’re still connected after running the command, congratulations, let’s continue.
You can view the existing rules in UFW like this:
sudo ufw status verbose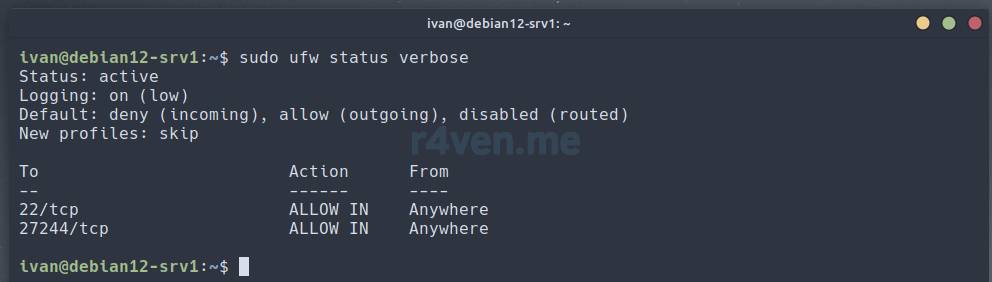
Here we see that we have two ports “open” for external access. Pay attention to the 3rd line — this is the default packet handling policy
That is:
- all incoming connections (except for the specified rules) are dropped;
- outgoing connections are allowed;
- routing between interfaces is disabled.
Blocking ICMP responses
Blocking ICMP with ufw
If you’re setting up a server with an external IP, you might want to disable ping and traceroute responses over the ICMP protocol.
To do this, open the /etc/ufw/before.rules file for editing:
sudo nvim /etc/ufw/before.rulesFind and comment out the rule blocks related to ICMP:
# ok icmp codes for INPUT
# -A ufw-before-input -p icmp --icmp-type destination-unreachable -j ACCEPT
# -A ufw-before-input -p icmp --icmp-type time-exceeded -j ACCEPT
# -A ufw-before-input -p icmp --icmp-type parameter-problem -j ACCEPT
# -A ufw-before-input -p icmp --icmp-type echo-request -j ACCEPT

# ok icmp code for FORWARD
# -A ufw-before-forward -p icmp --icmp-type destination-unreachable -j ACCEPT
# -A ufw-before-forward -p icmp --icmp-type time-exceeded -j ACCEPT
# -A ufw-before-forward -p icmp --icmp-type parameter-problem -j ACCEPT
# -A ufw-before-forward -p icmp --icmp-type echo-request -j ACCEPTAfter that restart the firewall:
sudo ufw reloadTry running ping and traceroute -I to your server, there should be no responses.
Blocking ICMP using kernel parameters
You can block ICMP responses in Linux at the kernel level using the sysctl utility or by editing files in /proc/sys.
💡
sysctlis a convenient wrapper for reading and writing Linux kernel parameters in the/proc/sysvirtual filesystem.
For a temporary block, run these commands:
sysctl -w net.ipv4.icmp_echo_ignore_all=1

# or

echo 1 > /proc/sys/net/ipv4/icmp_echo_ignore_all💡For
ipv6replace4with6.
To allow ICMP responses again:
sysctl -w net.ipv4.icmp_echo_ignore_all=0

# or

echo 0 > /proc/sys/net/ipv4/icmp_echo_ignore_allIf you need to make the changes permanent — add these parameters to the /etc/sysctl.conf file:
sudo nvim /etc/sysctl.confnet.ipv4.icmp_echo_ignore_all = 1
net.ipv6.icmp.echo_ignore_all = 1After that, reread the config:
sysctl -pIt’s worth noting that this doesn’t fully disable ICMP interaction. For example, it’s worth studying the following parameters:
net.ipv4.icmp_echo_ignore_broadcastsnet.ipv4.icmp_ignore_bogus_error_responsesnet.ipv4.icmp_ratelimit0net.ipv4.icmp_ratemask
See the description of these and other ICMP parameters here 🧐.
Changing the server hostname and editing the hosts file
To change our system’s hostname, open the corresponding file for editing:
sudo nvim /etc/hostnameI’ll set it to:
r4ven-test
Let’s also add our new hostname to the hosts file (in Linux this file serves the same function as in Windows):
sudo nvim /etc/hostsAdd:
127.0.0.1 r4ven-test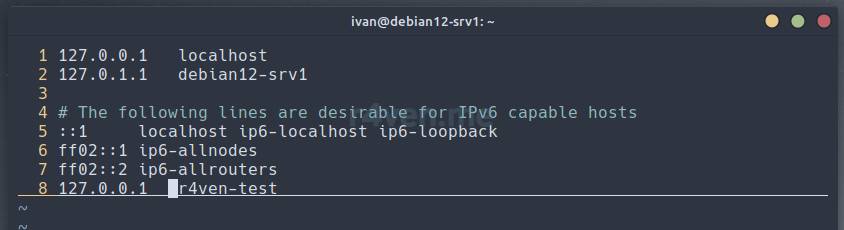
Creating a swap file (optional)
If you don’t have a swap file, it’s recommended to create one. A swap file can be either a separate partition or a simple file. More virtuality for everyone!
Let’s check for an active swap in the system:
free -m
Creation and startup:
# create a 1GB file
sudo fallocate -l 1G /swap

# set read-write permissions for the owner only (root)
sudo chmod 600 /swap

# create swap from the file
sudo mkswap /swap

# activate it
sudo swapon /swapLet’s check again:
free -m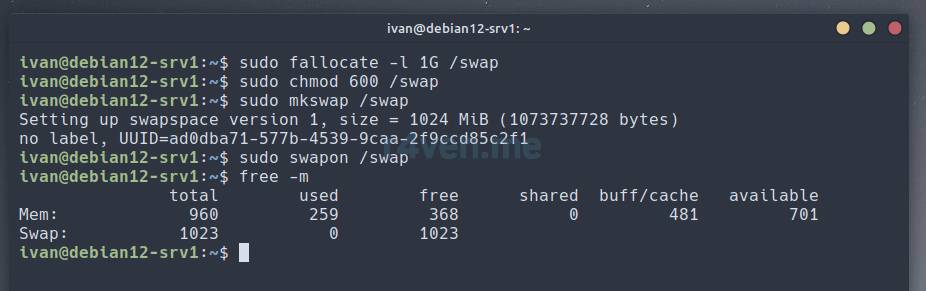
We created a swap file and started it manually. But when the server restarts it won’t start on its own. To do that we need to add it to a special file that lists the filesystems that are mounted at system startup — /etc/fstab:
echo "/swap none swap sw 0 0" | sudo tee -a /etc/fstabThe -a option for the tee command is mandatory! It tells tee to append to the end of the file, rather than overwrite it.
Let’s check fstab just in case:
cat /etc/fstab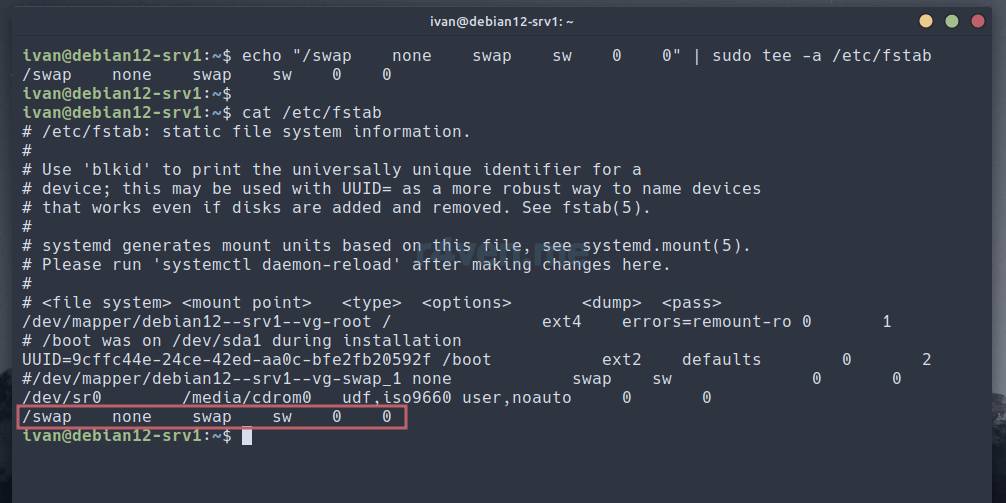
Please be careful. Only add the swap file to autostart if its creation and activation succeeded. If not, there’s a risk that on the next system restart, the system simply won’t boot.
Installing and configuring locales and timezone
Every system has such an entity as a “locale” — in other words, localization. By default, if you don’t choose otherwise during Debian 12 installation, the C.UTF-8 UTF-8 locale is installed. Let’s install the recommended English one: en_US.UTF-8 UTF-8 and add the Russian one: ru_RU.UTF-8 UTF-8 locale. This is done like this:
# installing the locales package
sudo apt install -y locales

# interactive locale configuration
sudo dpkg-reconfigure localesUsing the Space key, check the box for en_US.UTF-8 UTF-8 (mandatory) and a second one for the one you need (in my case that’s ru_RU.UTF-8 UTF-8). Then use the Tab key to move the cursor to the <Ok> button and press Enter.
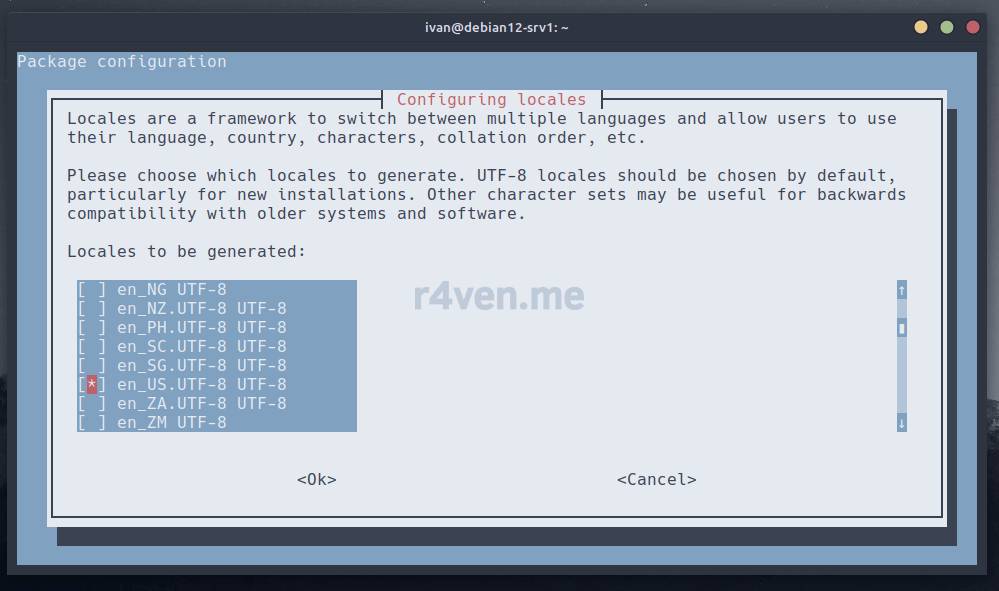
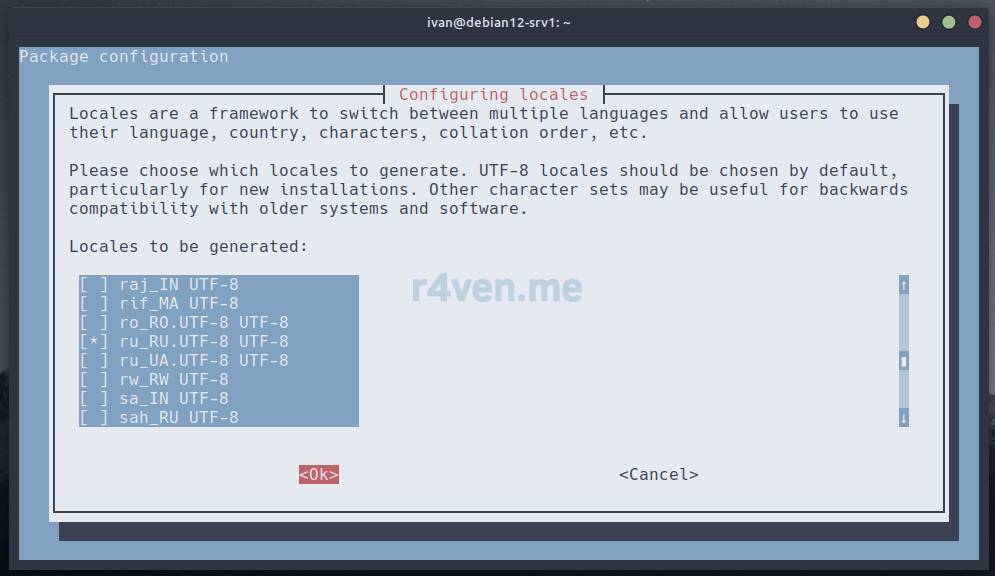
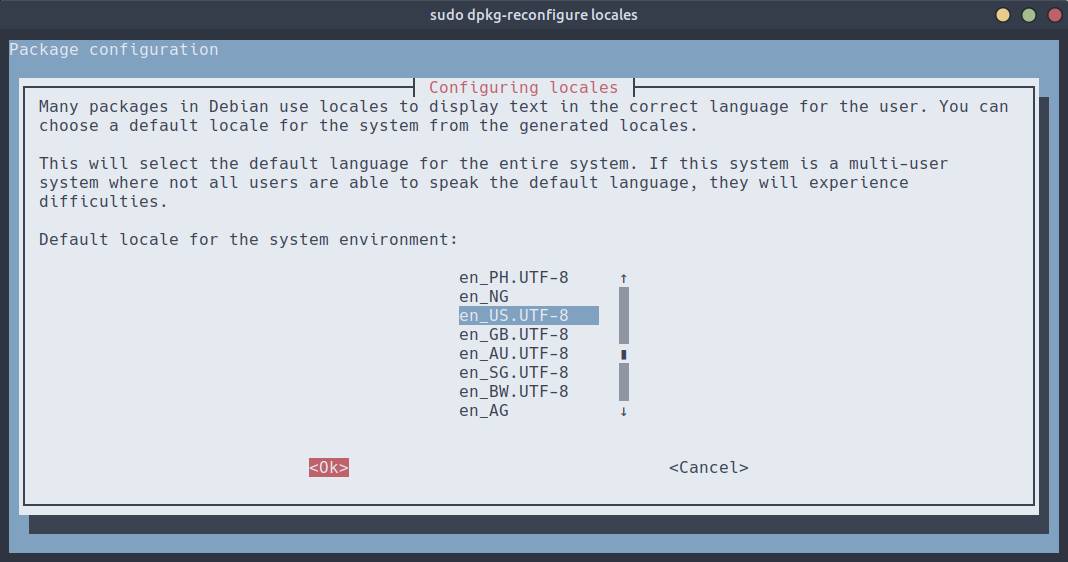
Next choose the main locale, which is exactly what will be used to display system information. English text doesn’t scare me (especially with a translator), so I’ll leave en_US.UTF-8:
By the way, I have a short note on a great translator: Crow Translate — The Most Convenient Text Translator.
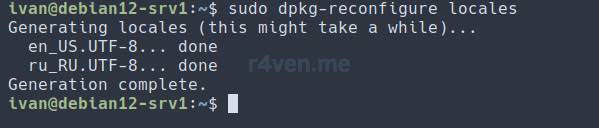
Use the Tab key to move the cursor to <Ok> and press Enter. A couple of seconds and the locales are generated:
Now let’s set the time zone for our server with this command:
sudo timedatectl set-timezone Europe/Moscow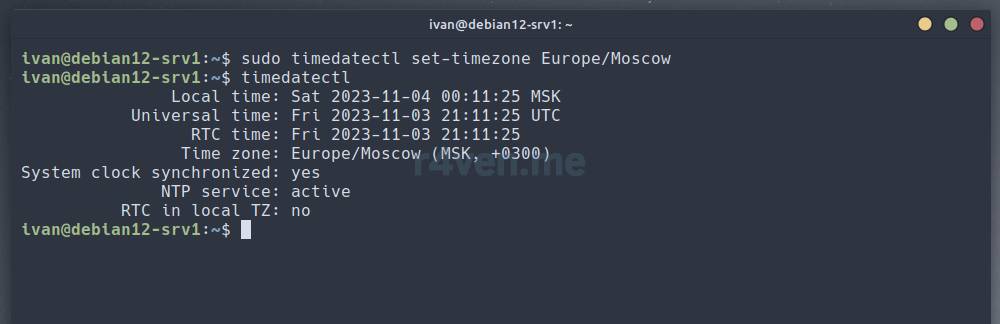
You can see the list of all available time zones with the command:
timedatectl list-timezones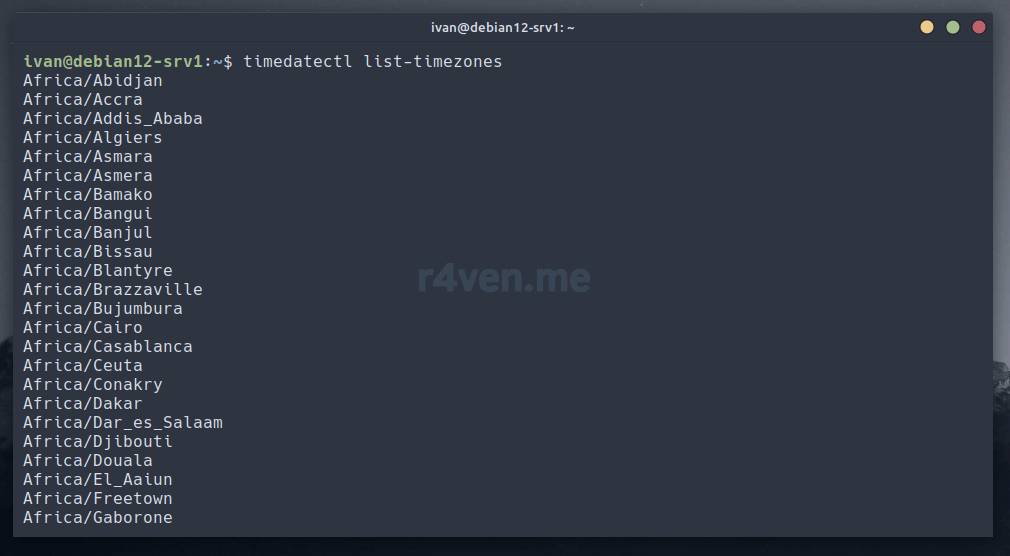
System log rotation
By default in Debian GNU/Linux, system event logging is configured without limits on the number of stored files. To avoid finding a disk completely filled with system logs in the future, it’s recommended to set limits.
In Debian 12 the systemd program is responsible for system initialization, including logging. Log management is performed by a specific utility from the systemd package — journald.
You can limit the number of logs with it:
- by retention time;
- by size.
To do this, edit the logging service config:
sudo nvim /etc/systemd/journald.conf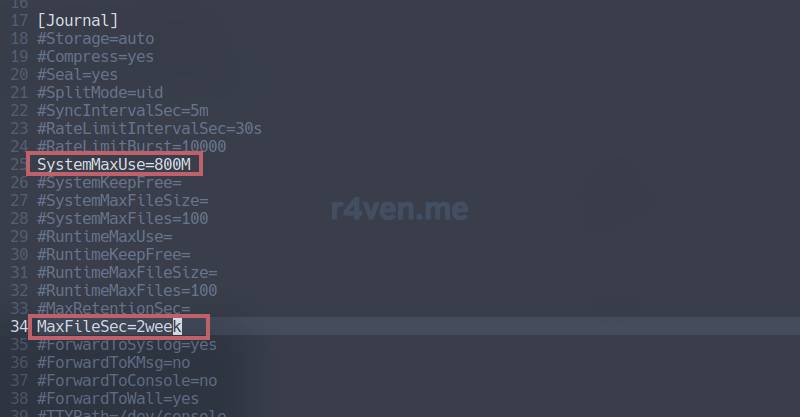
Where SystemMaxUse=800M is the size limit for stored logs, and MaxFileSec=2week is the time limit.
Choose the number of days and size based on your needs, or preferences.
Don’t forget to save and restart the service:
sudo systemctl restart systemd-journaldIf you find yourself in a situation where logs have already accumulated, you can clear them with special commands.
By time:
sudo journalctl --vacuum-time=15dBy size:
sudo journalctl --vacuum-size=800M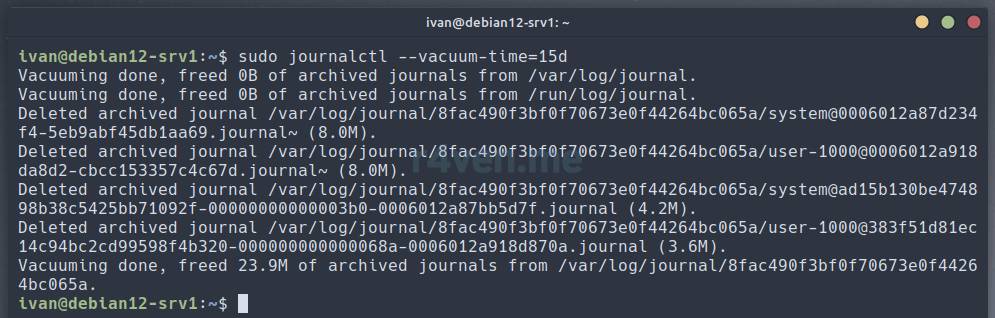
Configuring the SSH server
Open the SSH server configuration file:
sudo nvim /etc/ssh/sshd_configAnd set the following parameters:
# change the default connection port
Port 27244

# enable using IPv4 only
AddressFamily inet

# disable the ability to log in as the root user
PermitRootLogin no

# explicitly allow key-based connections
PubkeyAuthentication yes

# disable password-based connections
PasswordAuthentication no

# disable authorization via the PAM subsystem
UsePAM no

# optionally, allow connections only for specified users
AllowUsers ivanPlease be careful with the SSH server settings. The configuration I’m demonstrating heavily restricts the ability to connect to the server. Allowing connections only via SSH keys and only for the specified users.
If something is configured incorrectly, you may lose access to your server. Remember that this article is for recommendation purposes only. You perform all actions at your own risk.
Overall, the config file is fairly well documented with comments from the developers. Configuring it shouldn’t cause difficulties.
Let’s check the correctness of the config file with a special command:
sudo sshd -tHere’s an example of what happens if the config fails validation:

The system tells us there’s an invalid parameter on line 15. Let’s fix it, then again:
sudo sshd -t
And if the output is empty, that means the check passed. Let’s restart the SSH server:
sudo systemctl restart sshdIf you’re lucky and weren’t dropped, then, without disconnecting from the current SSH session, open a new terminal window or tab and try to connect to the server. Remember that we changed the SSH connection port from the standard 22 to 27244. To tell the ssh command to use a different port, use the -p option:
ssh ivan@192.168.56.102 -p 27244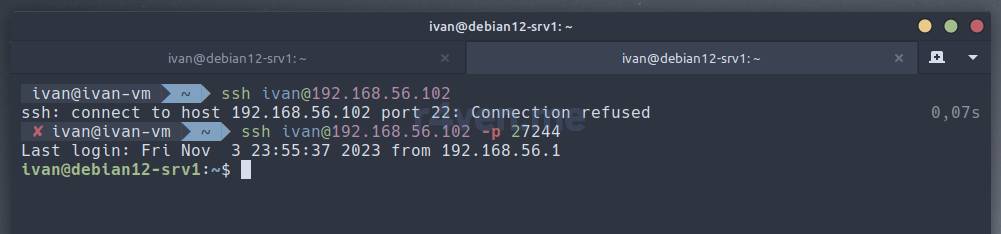
If the authorization succeeds, congratulations. If not we’ll talk about that later, go back to the neighboring session and check what you did wrong. Don’t close this backup session until you’ve achieved other successful logins.
Closing port 22 in UFW
Now we can safely close port 22 in ufw. To delete a rule, you need to insert the word delete before the command that added the rule:
sudo ufw delete allow 22/tcp

sudo ufw reload

sudo ufw status verbose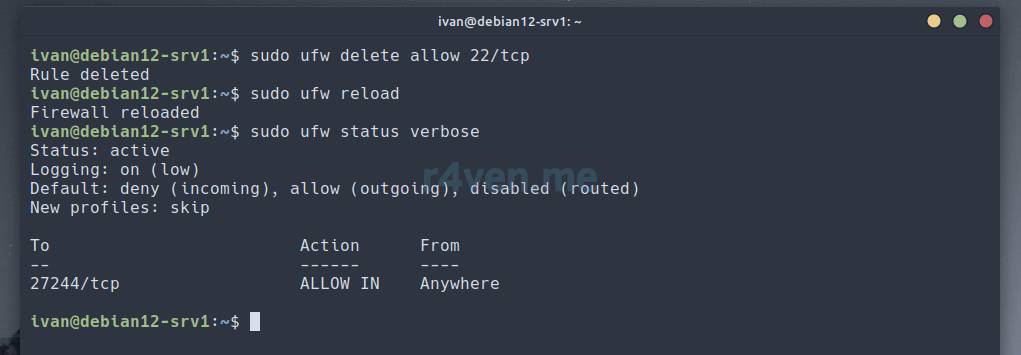
Setting up brute-force protection — fail2ban
Fail2Ban is a network security tool for Linux that automatically blocks IP addresses engaging in suspicious activity (for example, multiple failed SSH login attempts). It analyzes logs (text files or journald) and applies temporary or permanent bans through iptables or nftables.
This step is especially useful if you haven’t disabled password-based SSH connections to the server (I don’t recommend doing that).
❗Please make sure you have physical access to the server or to its console from the hypervisor before making the following changes.
Below I’ll show the basic setup of fail2ban to protect the server from brute-force attacks, using SSH as an example.
Let’s install the package from the standard repositories:
sudo apt install -y fail2ban💡 Main
fail2banconfiguration files/directories:
/etc/fail2ban/fail2ban.conf— main daemon config;/etc/fail2ban/jail.conf— jail settings template (we do NOT TOUCH this);/etc/fail2ban/jail.local— local jail configuration (we WILL edit THIS);/etc/fail2ban/filter.d/— filter templates (regular expressions for logs);/etc/fail2ban/action.d/— action templates (what to do on a violation);
The package already comes with a set of ready-made filters for popular services, such as sshd, nginx, apache, etc. (take a look in /etc/fail2ban/filter.d/) and actions: iptables, nftables, firewall-cmd, etc. Also, nothing stops you from writing your own filters, if you’re good with regex 😉.
Let’s open the user config file for editing:
sudo nvim /etc/fail2ban/jail.local⚠️ Don’t confuse it with the main config
/etc/fail2ban/jail.conf, which is not recommended to edit.
And fill it in:
[DEFAULT]
# exceptions for local networks
ignoreip = 127.0.0.0/8 192.168.0.0/16 172.16.0.0/12 10.0.0.0/8
# IP ban duration (s|m|h)
bantime = 1h
# period over which failed attempts are counted
findtime = 10m
# number of failed attempts before blocking
maxretry = 5
# use nftables for banning
banaction = nftables-multiport
# default action
action = %(action_)s

[sshd]
# enable protection for ssh
enabled = true
# SSH server port, used for firewall rules
port = 27244
# which logs to read (this can be a path to a text file)
logpath = %(sshd_log)s
# backend for reading logs - journald
backend = systemd☝️The firewall’s default ban action is
reject, which means sending a connection refused message to blocked addresses. To avoid sending this notification, change the action in thebanactionparameter tonftables-multiport[blocktype=drop].
Let’s enable the service’s autostart, restart it, and check the status:
sudo systemctl enable fail2ban

sudo systemctl restart fail2ban

sudo systemctl status fail2banTo view the block status, use these commands:
sudo fail2ban-client status

sudo fail2ban-client status sshdNow, on another device (not the one you’re configuring the server from!), or if the server has a public IP then from a different network, try to make 5 failed SSH connection attempts. Example:
ssh test@192.168.56.102 -p 27244💡It’s worth noting that IPs from which failed attempts to connect with a private key were made also get banned. But by default, addresses that use logins of existing users are not banned in such connections. To also ban such connections, add the
mode = aggressiveparameter to the[DEFAULT]section. But be careful not to block yourself☝️.
The command below lets you view the sshd ban status in real time:
sudo watch -n2 fail2ban-client status sshd☝️ The
watchcommand in Linux runs the command passed as an argument at a given interval, in my example 2 sec.
The fail2ban package also comes with a utility for checking regular expressions and matching log entries against them. In the case of SSH you can view matches like this:
sudo fail2ban-regex systemd-journald /etc/fail2ban/filter.d/sshd.confIn Debian 12, nftables is used as the firewall. Let’s look at the rules created by the fail2ban daemon:
sudo nft list table inet f2b-tableTo unban a specific address use the command:
sudo fail2ban-client set sshd unbanip 1.2.3.4See the list of available client utility commands with descriptions on the man page.
Final reboot
After completing all checks, let’s do a preventive restart of the Debian 12 server to make sure we’ve configured everything correctly:
sudo rebootAfter a while let’s try to connect to the server again:
ssh ivan@192.168.56.102 -p 27244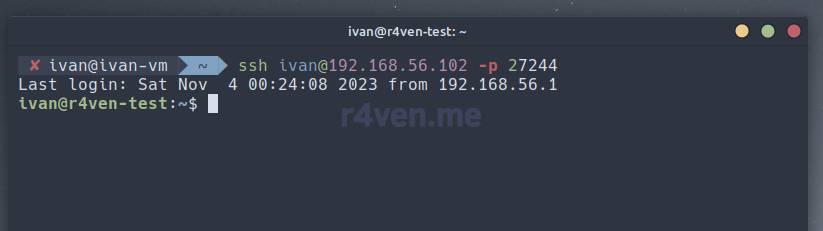
Hooray, a small victory) As we can see, the hostname has also been updated.
Now you could, for example, set up Zshell following my article, or something else.
Installing and configuring ZSH (optional)
If you’re too lazy to read the whole article, here’s the TLDR:
# installing Z-Shell and helper utilities
sudo apt update && sudo apt install -y zsh fzf git curl

# checking that everything installed correctly
whereis {zsh,fzf,git,curl}

# installing Oh-My-Zsh - answer yes
sh -c "$(curl -fsSL https://raw.githubusercontent.com/ohmyzsh/ohmyzsh/master/tools/install.sh)"

# installing the zsh-autosuggestions plugin
git clone https://github.com/zsh-users/zsh-autosuggestions ${ZSH_CUSTOM:-$HOME/.oh-my-zsh/custom}/plugins/zsh-autosuggestions

# installing the fast-syntax-highlighting plugin
git clone https://github.com/zdharma-continuum/fast-syntax-highlighting ${ZSH_CUSTOM:-$HOME/.oh-my-zsh/custom}/plugins/fast-syntax-highlighting

# installing the cmdtime plugin
git clone https://github.com/tom-auger/cmdtime ${ZSH_CUSTOM:-$HOME/.oh-my-zsh/custom}/plugins/cmdtime

# changing the theme to agnoster
sed -i 's/^ZSH_THEME=.*/ZSH_THEME="agnoster"/' ~/.zshrc

# disabling Oh-My-Zsh auto-updates
sed -i "s/^#.*omz:update.*disabled/zstyle ':omz:update' mode disabled/" ~/.zshrc

# enabling the installed plugins
sed -i 's/^plugins=\(.*\)/plugins=\(git zsh-autosuggestions fast-syntax-highlighting fzf cmdtime\)/' ~/.zshrc

# setting colors for the fzf plugin (this is all one command)
echo "export FZF_DEFAULT_OPTS=$FZF_DEFAULT_OPTS'
        --color=fg:#e5e9f0,bg:#3b4252,hl:#81a1c1
        --color=fg+:#e5e9f0,bg+:#3b4252,hl+:#81a1c1
        --color=info:#eacb8a,prompt:#bf6069,pointer:#b48dac
        --color=marker:#a3be8b,spinner:#b48dac,header:#a3be8b'\n\n\
        $(cat ~/.zshrc)" > ~/.zshrc

# applying the changes made
source ~/.zshrc

# for a minimalist prompt
echo "prompt_context() [ ]" >> ~/.zshrc && source ~/.zshrc

## setting up Oh-My-Zsh for the root user

# copying our user's files into the root user's directory
sudo cp -r {~/.oh-my-zsh,~/.zshrc} /root/

# changing root's default shell
sudo chsh -s /usr/bin/zsh

# switching to root to check
sudo -sAfterword
Well, there we go, we’ve performed the initial basic setup of a Debian 12 Linux server. Going forward, based on such a configuration, I’ll be installing and configuring various server software and, of course, writing articles about it.
So subscribe to our telegram to not miss new materials. Thanks for reading, penguins (:
Related materials
- Installing a Debian 12 server in VirtualBox
- Installing VirtualBox on Linux Mint 21
- SSH — Secure connection to remote hosts: introduction
- VIM — Console editor: introduction
- Neovim — editor configuration: basic setup
- ZSH — Interactive command shell for Linux + Oh-My-Zsh
👨💻And…
Don’t forget about our Telegram channel 📱 and chat
Or maybe you want to become a co-author? Then click here🔗
💬 All the best ✌️
That should be it. If not, check the logs 🙂

Comments