
This is the fourth post in a series dedicated to working in the Linux command line. Today we’ll look at commands for working with files in Linux: touch, mkdir, cp, mv, rm.
If you’re just starting to learn Linux, I strongly recommend checking out the previous posts:
- Linux command line, introduction: command types, plain text, file system, shell prompt
- Linux command line, navigating the system and viewing directories: pwd, ls, cd commands
- Linux command line, output and reading content: echo, cat, less commands
The practical examples in this series of posts were performed in a Linux Mint 21 distribution environment.
🖐️Hey!
Subscribe to our Telegram channel @r4ven_me📱, so you don’t miss new posts on the website 😉. If you have questions or just want to chat about the topic, feel free to join the Raven chat at @r4ven_me_chat🧐.
Join our channel: t.me/r4ven_me and chat: t.me/r4ven_me_chat on Telegram.
List of commands
Well, today our toolkit will be expanded with probably the most popular commands (not counting ls and cat) in Linux:
| Command | Description |
|---|---|
touch | creates simple files |
mkdir | creates directory/-ies |
cp | copies files and directories |
mv | moves/renames files and directories |
rm | deletes files and directories |
The touch command — creating simple files
Syntax:
touch [keys] <file_name>We’re already a bit familiar with this command from the previous post. Today we’ll take a closer look at it.
This command is usually used to create empty files or change the timestamp of existing ones.
Frequently used keys:
| Key | Value |
|---|---|
-a | to set only the access time (atime) of a file |
-m | to set only the modification time (mtime) of a file |
-c | to create a file only if it doesn’t already exist |
Examples of using the touch command:
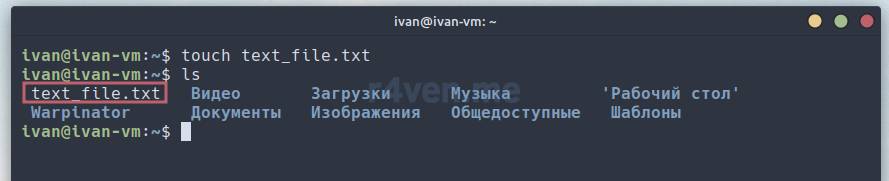
1. Creating a new file:
touch text_file.txtWe created an empty file. Let’s run ls to check:
2. Updating the access time and modification time of a file:
ls -l text_file.txt

touch text_file.txt

ls -l text_file.txt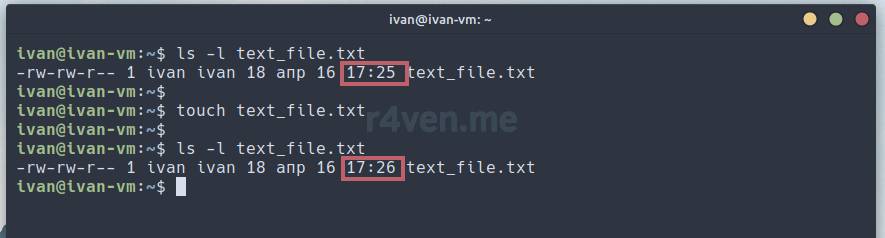
Running this command on an existing file changes its timestamp, as can be seen in the screenshot above.
3. Creating a new file with specific timestamps:
touch -t 202301011200 time_text_file.txt

ls -l time_text_file.txt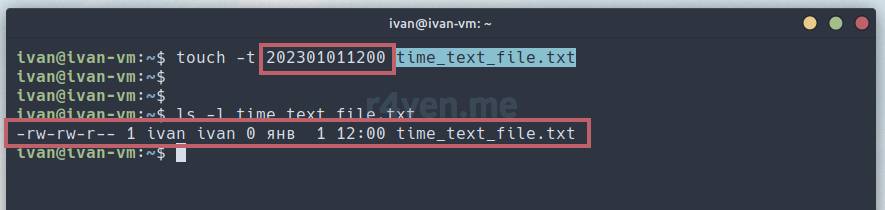
Here we created a new file with a specific timestamp.
For more detailed information about the touch command, you can refer to the official documentation or use the man touch command in the Linux terminal.
The mkdir (make directory) command — creating directories
Syntax:
mkdir [keys] <directory_name>Frequently used keys:
| Key | Value |
|---|---|
— p | creates parent directories as needed |
— v | outputs a message for each operation performed |
— m | sets file access permissions (like in chmod) |
Let’s create a directory for testing, then verify its existence with the ls command and change into it using cd. Then let’s check the current working directory with the pwd command. Let’s run four commands in the terminal one after another:
mkdir testdir

ls

cd testdir

pwd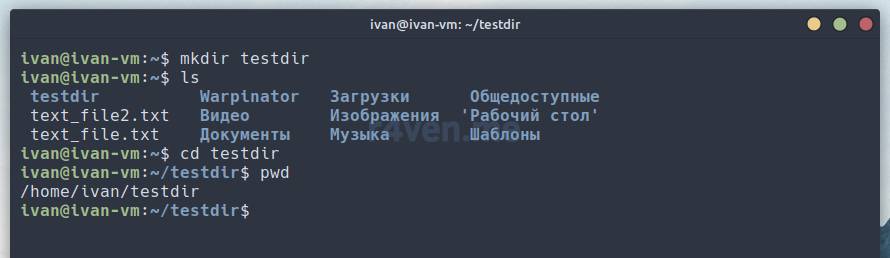
If you’re not familiar with the commands mentioned, please read my previous posts on the Linux command line.
Great. Now let’s create another directory inside the current one, adding the -v (verbose) key to the command and look at the command’s output:
mkdir -v testdir2
We see that the shell outputs a message about the result of the command’s execution.
Now let’s create several nested directories with one command using the -p (parents) key:
mkdir -vp testdir3/testdir4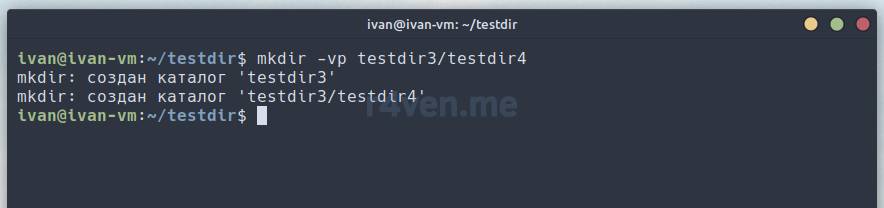
As you can see, the command created two directories: testdir3 in the current directory and testdir4 inside testdir3 using the -p key.
If you don’t use the -p key when creating nested directories, the command will return an error and create nothing.
As you may have noticed, by default, if you don’t specify an address for creating a new directory, the mkdir command creates it in the current working directory.
Let’s try to create two directories at once somewhere else, for example let’s create directories testdir5 and testdir6 in our home directory while being in the testdir directory. To do this, we need to specify the path before the name of the directory being created:
mkdir -v /home/ivan/testdir5 ~/testdir6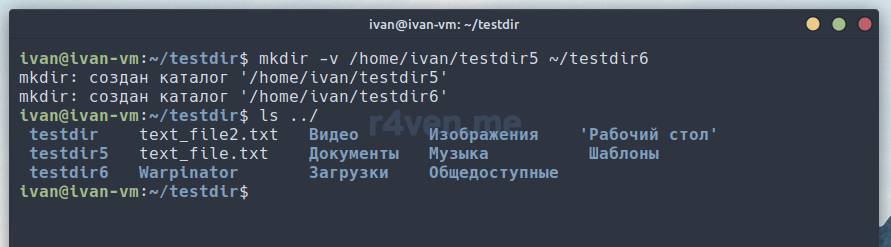
As we can see, we passed two new directories as arguments to the mkdir command, specifying the path to our home directory using two different methods. Then, being in the /home/ivan/testdir directory, we output the contents of the parent directory by specifying the relative path .. as an argument to the ls command.
We’ll talk about the -m key another time, when we get into file permissions in Linux.
The cp (copy) command — copying files and directories
Syntax:
cp [keys] <name_of_file_being_copied> <new_file_name>Frequently used keys:
| Key | Value |
|---|---|
-v | outputs the actions being performed to standard output |
-i | interactive mode (asks before overwriting a file) |
-r | copies directories recursively |
-p | copies a file while preserving its attributes (owner, group, permissions) |
For practice, let’s copy the text file we created text_file.txt into the testdir directory, first returning to the home directory:
cd

ls

cp text_file.txt testdir

ls -l testdir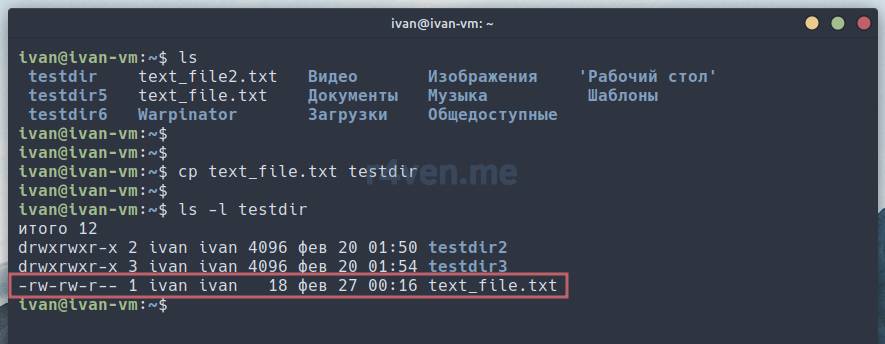
Now let’s create and copy the file text_file2.txt into the testdir directory using the -v key:
touch text_file2.txt

cp -v text_file2.txt testdir
We see that the shell clearly displayed the details of the actions being performed.
You can also pass several files as arguments to the cp command.
Let’s go into the testdir directory, create a new directory testdir2 and copy the files text_file.txt and text_file2.txt located in the current directory into testdir2:
cd testdir

ls -l

cp -v text_file.txt text_file2.txt testdir2/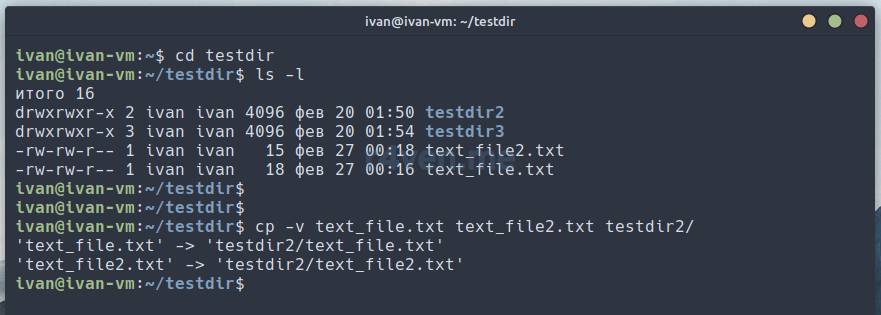
Let’s check the contents of the testdir2 directory:
ls -l testdir2
As we can see, we successfully copied the files.
Now let’s try to copy the testdir2 directory:
cp testdir2 testdir2copyAs we can see, we got an error. The fact is that directories need to be copied with the cp command using the -r key. The screenshot below shows an example of running the cp -r command after getting the error.
cp -r testdir2 testdir2copy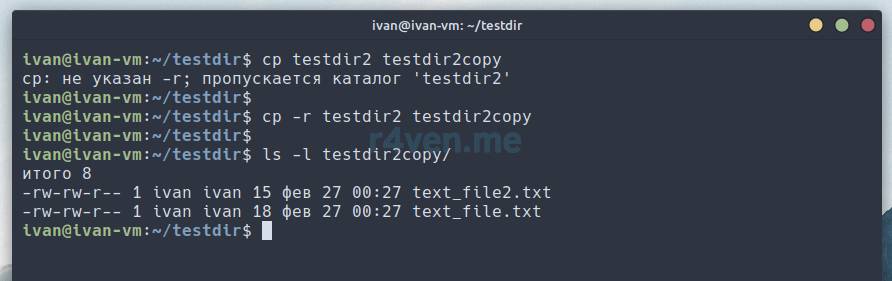
This command has one feature you should always remember. By default, when copying files/directories with cp, if you copy files with the name of already existing files, they get overwritten! I.e. the existing file is deleted, and the newly created copy takes its place.
Be very careful when copying any important files.
To avoid accidental overwriting, you need to use the -i key, which will ask you for permission to overwrite a file if files with an identical name already exist in the destination directory.
A simple example. Being in the testdir directory let’s try to copy the file text_file.txt into testdir2:
cp -vi text_file.txt testdir2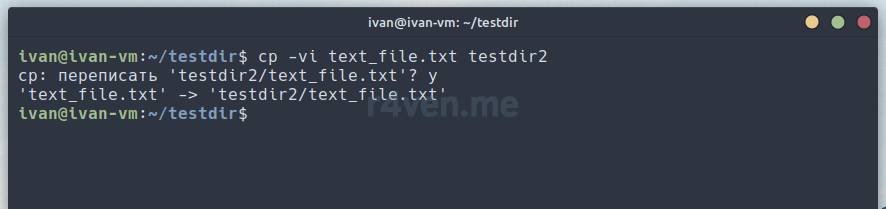
If a file with the name of the copied file exists in the destination directory, the shell will ask us for confirmation to overwrite. The answer to the request should be y or yes to confirm overwriting, and correspondingly n or no to interrupt the copy operation.
As the last example let’s look at the cp command with the -p key, which preserves the original file attributes.
For a clear demonstration, let’s copy the file text_file.txt to the current directory as the root user (entering the admin password after entering the first command), and then run the same command with the -p key:
sudo cp -v text_file.txt root_file.txt

sudo cp -vp text_file.txt root2_file.txt

ls -l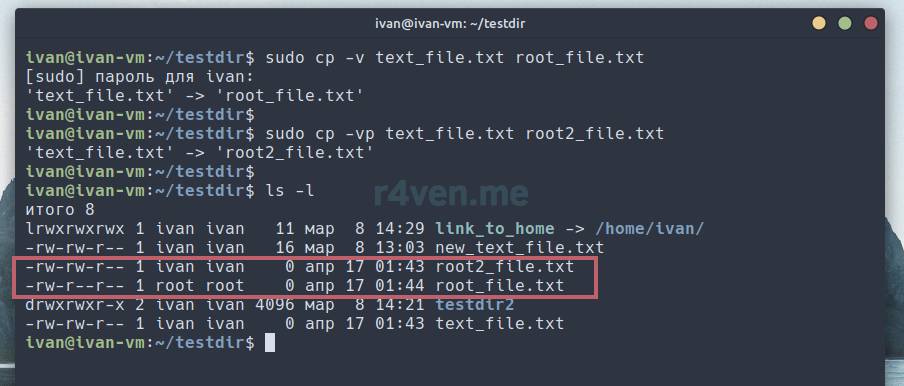
As we can see, with normal file copying, the owner becomes the user under whose name the copy was performed.
Note that the access permissions of the file also changed, globally set for the root user by default -rw-r--r--.
But when using the -p key, the original attributes were preserved.
An interesting point: if you try, as a regular user, to copy a file owned by root while preserving attributes, the new file’s owner will be the user under whose name the command is running, not the original owner. This is because only root itself can assign root as owner and owner group.
The mv (move) command — moving/renaming files
Syntax (renaming):
mv [keys] <file_name> <new_file_name>Syntax (moving):
mv [keys] <path/file_name> <new_path/file_name>Frequently used keys:
| Key | Value |
|---|---|
-v | outputs the actions being performed to standard output |
-i | interactive mode (asks before overwriting) |
-u | update, moves only if the SOURCE is newer than the destination file |
In Linux, the same command is used for renaming and moving files. To rename a file, you need to pass the current file name and the new file name as arguments, while being in the same directory.
To move a file, you need to specify the current file name and its new location. Let’s practice.
Let’s open our file text_file.txt in a text editor and fill it with any content. For example, I’ll add “Hello R4ven.me!!!” to it
xed text_file.txtNow, being in the testdir/ directory, let’s rename the file text_file.txt to new_text_file.txt using the -v key, which has the same effect as with the cp command:
cat text_file.txt

mv -v text_file.txt new_text_file.txt

ls -l

cat new_text_file.txt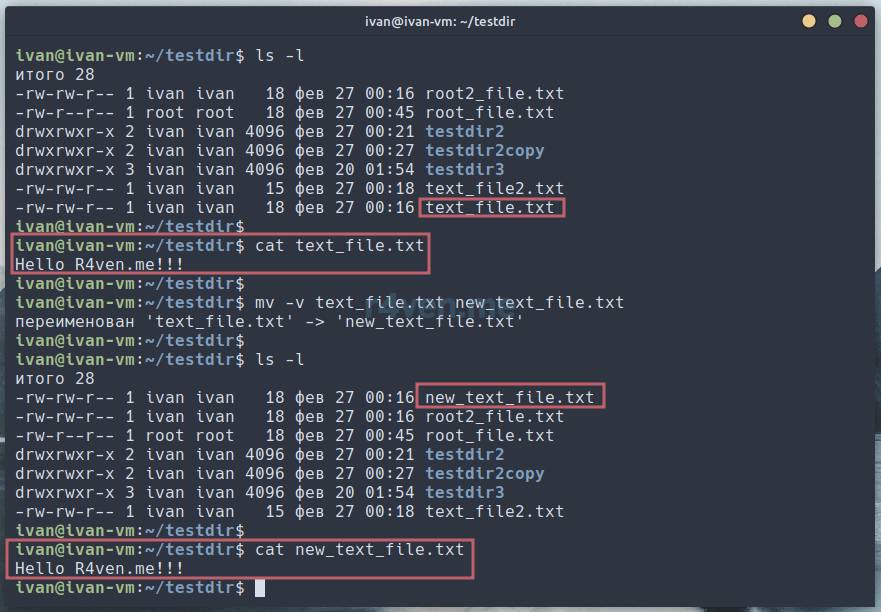
To confirm this is the same file, we output its contents with cat.
The -i key of the mv command is also analogous here to the cp command’s key: it triggers interactive mode in case your command would overwrite a file.
There’s also an interesting -u (update) key, which, in case of file overwriting, compares the timestamp of the file you want to move with the file that would be overwritten. If the timestamp of the file being moved is newer, it will overwrite the file in the destination folder. Otherwise, the command does nothing.
For demonstration, let’s take our file new_text_file.txt and copy it into the testdir2 directory:
cat new_text_file.txt

cp -v new_text_file.txt testdir2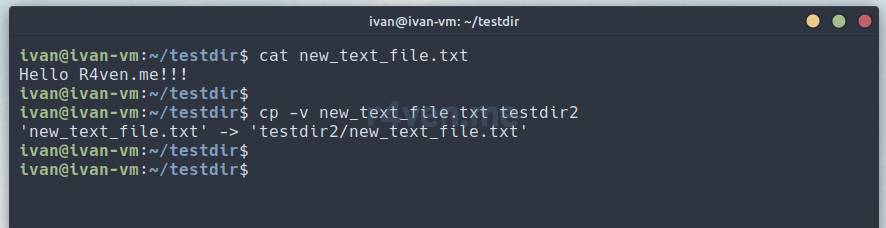
Then let’s open our file new_text_file.txt in the current directory in a text editor and change the content to “Bye R4ven.me!!!” using xed:
xed new_text_file.txt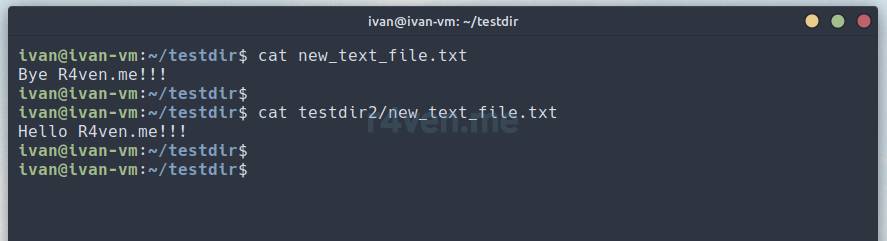
Now let’s transfer the file testdir2/new_text_file.txt back into our current directory testdir using the -u keys:
mv -ivu testdir2/new_text_file.txt .Note that as the destination path we use the dot . which denotes the relative path of our current directory.
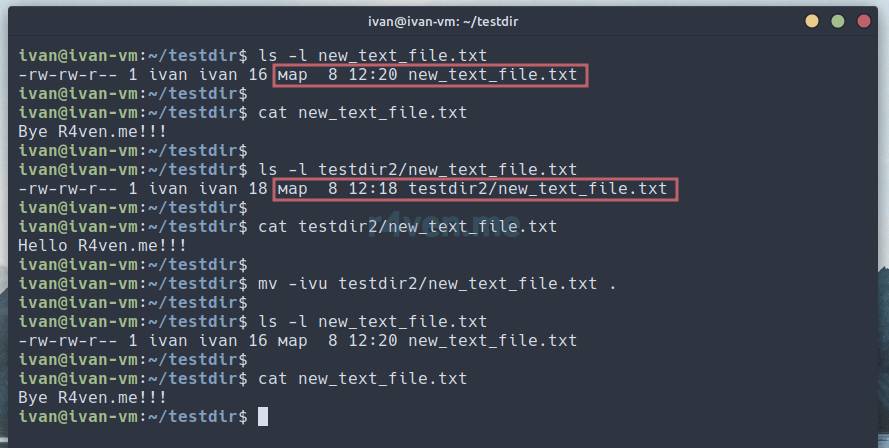
As we can see, our current file new_text_file.txt hasn’t changed. Because the timestamp of the file in testdir2/new_text_file.txt is newer, and with the -u key, no overwriting occurred.
Let’s do the move the other way around: let’s move the recently modified file new_text_file.txt into testdir2 with the same keys:
mv -ivu new_text_file.txt ./testdir2/

cat testdir2/new_text_file.txt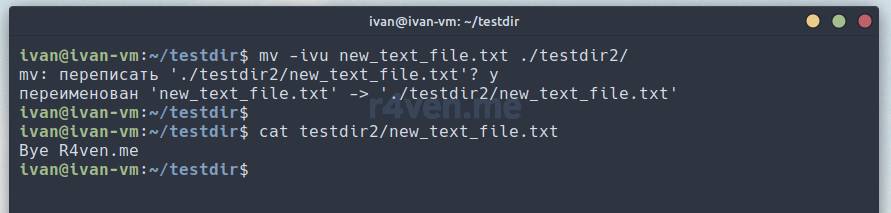
Now the command with the -u key detected that the destination file was older than the one being moved, and the -i key kicked in, asking us for confirmation to overwrite the destination file. We press y or yes and check the file’s content, for verification.
By the way, you can update a file’s timestamp using the touch command we already know, passing it the name of the target file as an argument:
ls -l new_text_file.txt

touch new_text_file.txt

ls -l new_text_file.txt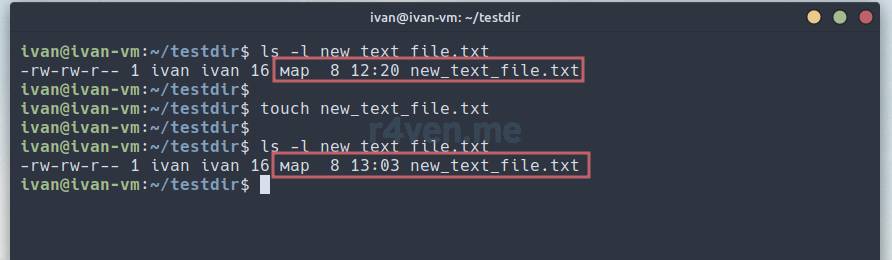
The rm (remove) command — deleting files and directories
Syntax (deleting a file):
rm [keys] <name_of_file_to_delete>

# or

rm [keys] </path/to/file_to_delete>Frequently used keys:
| Key | Value |
|---|---|
-v | outputs the actions being performed to standard output |
-i | interactive mode (asks before deleting) |
-r | recursively deletes directories and their content |
-f | ignores non-existent files and arguments, performs deletion without asking anything |
We’ve already learned how to create files, now let’s talk about deleting them.
Please be careful with the rm command, since files deleted with it are permanently removed from the system. This command doesn’t imply any “recycle bin,” like in Windows. It’s possible to recover files deleted with rm, but it’s not that simple and without any guarantees. Always use the -i key for interactive deletion with confirmation.
So, being in the ~/testdir directory let’s delete the existing file text_file2.txt there:
ls -l

rm text_file2.txt

ls -l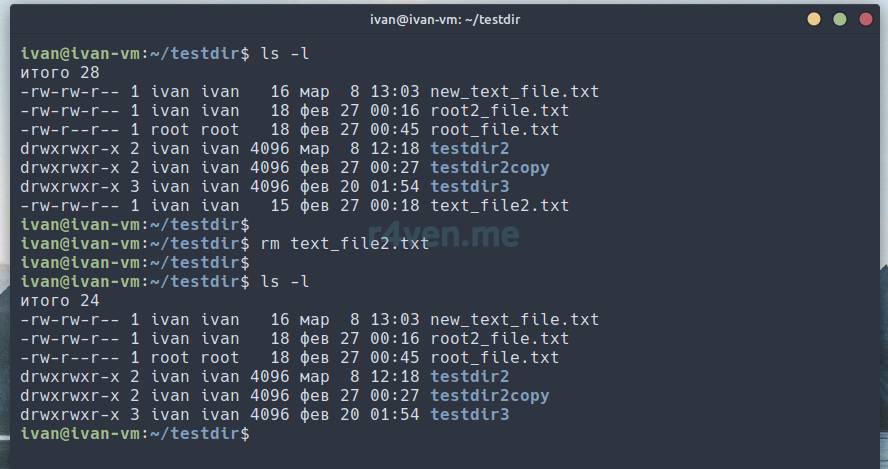
As we can see the file was deleted. Now let’s delete the file testdir2/new_text_file.txt using the -v key:
rm -v testdir2/new_text_file.txt
We see detailed output.
The -i key here has the same effect as with the cp and mv commands:
ls -l

rm -vi root2_file.txt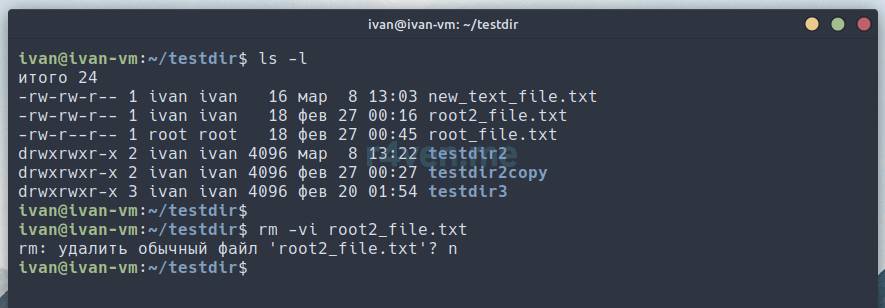
To cancel the deletion press n or no.
Now let’s try to delete the testdir3 directory:
rm -iv testdir3We got an error:

The -r key is required for deleting directories. Let’s try with it:
rm -ivr testdir3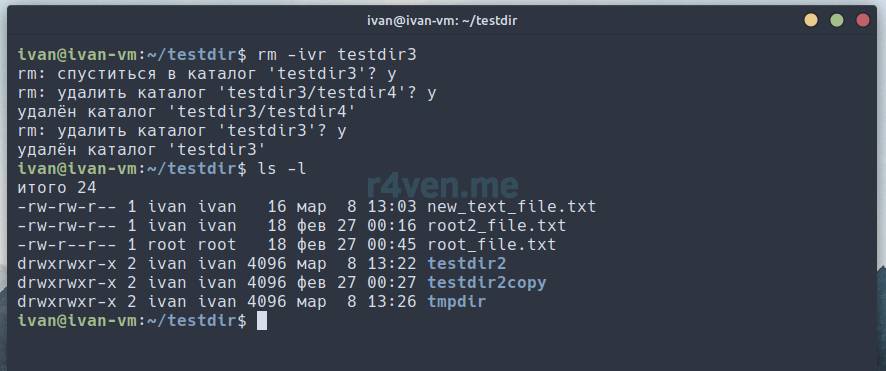
We see that the -i and -v keys work, asking us for confirmation to perform the actions and displaying detailed information about them.
To quickly delete a directory just use -r. Let’s delete testdir2copy:
rm -r testdir2copy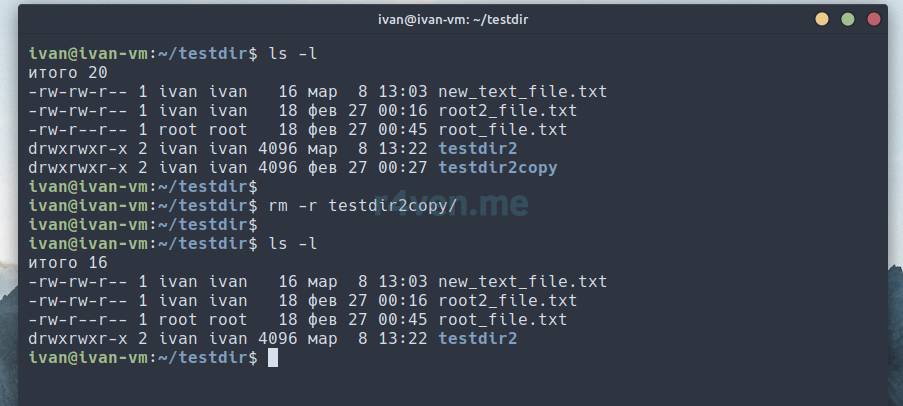
Now about the -f (force) key.
We have a file root_file.txt owned by root, and write permissions for this file for other users, including us, are absent. Let’s try to delete this file:
ls -l

rm -v root_file.txtThe command warns us that the file is write-protected and asks for a warning confirmation. Let’s decline deleting this file by pressing n and try again but with the -f key:
rm -vf root_file.txt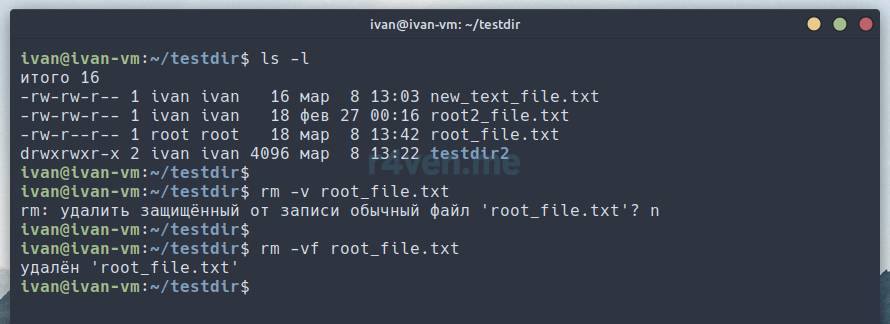
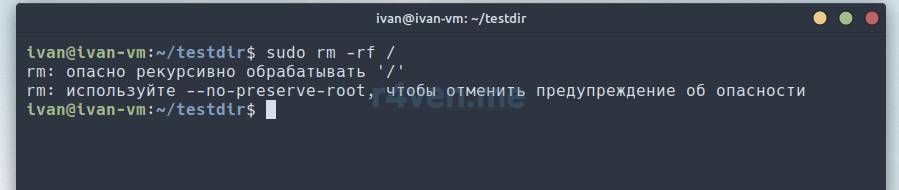
You’ve probably often seen jokes about the rm -rf / command — never run it, especially as the root user.
Given the information provided above, we now understand what it does:
rm — the delete command
-rf — recursively deletes directories with their content, ignoring all warnings and errors
/ — this is the path denoting the root of our system.
I.e. this command deletes the content of our entire system. Most modern distributions add protection against running this command in the form of a warning or an additional key, but it’s still possible to run it, since the system fully belongs to the user, i.e. to you and me :) and that’s cool.
For example, in Linux Mint this command won’t run without a certain key:
Afterword
Today we looked at some of the most popular and most useful commands in the world of the Linux console — commands for working with files. We learned how to create, copy and delete files and directories. We also discussed cases of how deleting the system NOT to do it.
In the next post we’ll talk about a specific type of files in Linux — links. How hard links differ from symbolic links and what advantages and disadvantages each type has.
Useful sources
- Manual for the touch command — OpenNet
- Manual for the mkdir command — OpenNet
- Manual for the cp command — OpenNet
- Manual for the mv command — OpenNet
- Manual for the rm command — OpenNet
Previous posts in the series
- Linux command line, introduction: command types, plain text, file system, shell prompt
- Linux command line, navigating the system and viewing directories: pwd, ls, cd commands
- Linux command line, output and reading content: echo, cat, less commands
👨💻And…
Don’t forget about our Telegram channel 📱 and chat
Or maybe you want to become a co-author? Then click here🔗
💬 All the best ✌️
That should be it. If not, check the logs 🙂

Comments