

Today we’ll talk about an important and integral part of an operating system — processes. In this note we will cover the following console commands: jobs, fg, bg, ps, pgrep, kill, pkill, htop.
🖐️Hey!
Subscribe to our Telegram channel @r4ven_me📱, so you don’t miss new posts on the website 😉. If you have questions or just want to chat about the topic, feel free to join the Raven chat at @r4ven_me_chat🧐.
📝 Note
All examples in this article were run in the console of the Debian 12 distribution, whose installation and setup I described in detail in the article: Installing a Debian 12 server in VirtualBox.
In almost all other Linux distributions everything will look similar.
I also recommend reading the other articles in the Linux command line series.
A bit of theory
In Linux operating systems (and in most modern OSes in general) a process represents a running program or task. Processes are the basic building blocks on which multitasking and parallel execution in the system are based.
Each process has its own virtual address space, including the program code, data, and execution stack. This allows processes to be isolated from each other and ensures system reliability. Processes can also interact with each other through inter-process communication (IPC) mechanisms, such as sockets, pipes, signals, shared memory, and others.
Processes in Linux can be in various states, for example:
- Running — the process is actively executing on the processor;
- Waiting — the process is waiting for some event, such as the completion of I/O;
- Stopped — the process is suspended and not running, but can be resumed;
- Zombie — a process that has finished executing but has not yet been fully removed from the system. Zombies occur when the parent process does not handle the termination event of its child process;
- Runnable — processes that are ready to run but are waiting for their turn on the processor;
- and others.
Processes can be created in various ways, including running executable files, creating child processes via system calls, and also in response to events in the system (for example, timers or external signals).
Processes running in the current shell
Let’s look at the situation with processes running in the current shell session.
To do this, open a terminal program in our Linux and run, for example, the following command:
sleep 500 &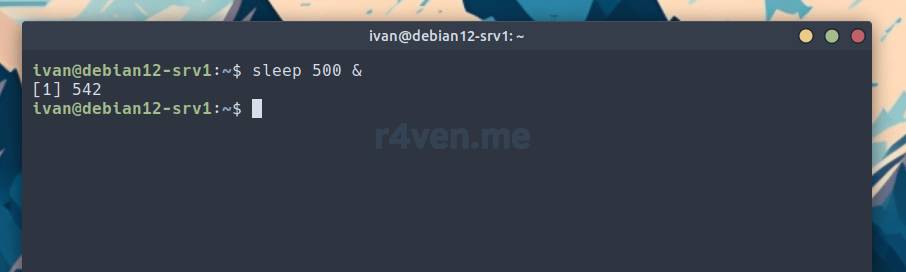
For example, we used the sleep 500 command, which sends the process into a wait state for the specified amount of time, in this case 500 seconds.
📝 Note
This command is often used to introduce a delay before executing other commands, among other things. Here we used it only as a demonstration.
The & (ampersand) operator at the end of a line sends the command preceding it to run in the background, thereby freeing up the current command-line session for further work. I discussed this and other command execution control operators in more detail in the article: Linux command line, command execution control: the “&&”, “||”, “;” and “&” operators.
Pay attention to the informational message with numbers — the number in square brackets is the process id in the current shell session (the so-called job_spec), and the longer number tells us the process id (PID) in the system-wide process list (more on this shortly).
The jobs command
To work with background processes in the current session we’ll need the jobs command.
Description:
The jobs command in Linux is used to display the list of background jobs associated with the current shell.
Syntax:
jobs [options] [job_id]Commonly used options:
-l: — displays detailed information about background jobs, including their status (stopped or running) and job number;-p— displays only the process identifiers (PIDs) of background jobs;-s — displays only background jobs in the stopped state;-r — displays only background jobs in the running state.
To view current background processes, run in the terminal:
jobs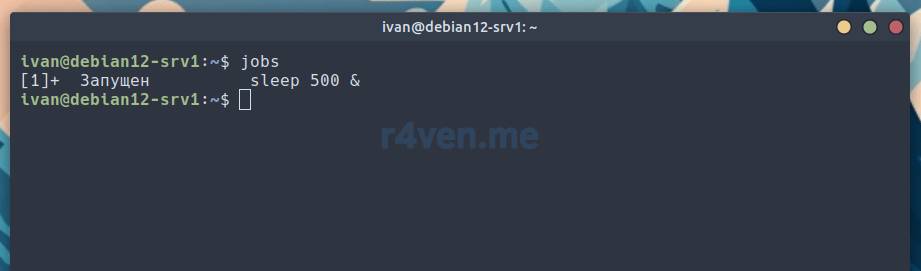
We see that we have one running process (Running) and the command that initiated it.
The fg command
To continue working with the previously started process, we’ll use the fg (foreground) command.
Description:
The fg command resumes execution of the most recently suspended (stopped) job in the foreground.
Syntax:
fg [job_id]Let’s bring our background process back to the foreground with this command:
fg %1%1 is an argument of the fg command containing the local process number (job_spec, starts with a % sign) that we want to bring to the foreground. We found out the process number using the jobs command (in square brackets).
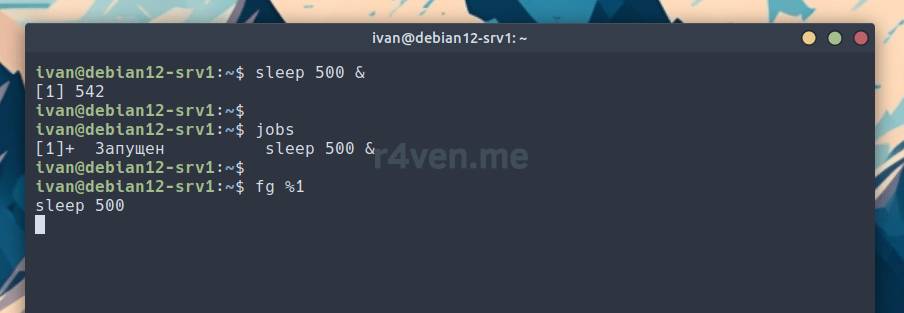
Now this process has returned to the “foreground” and has taken over our shell.
To interrupt its execution you can send the process one of the special signals. For example, the Ctrl+c key combination sends the SIGINT signal to the active process, which, most often, terminates the process.
But let’s send this process to “sleep” using the Ctrl+z key combination, which sends the process the SIGTSTP signal (Terminal Stop Signal):
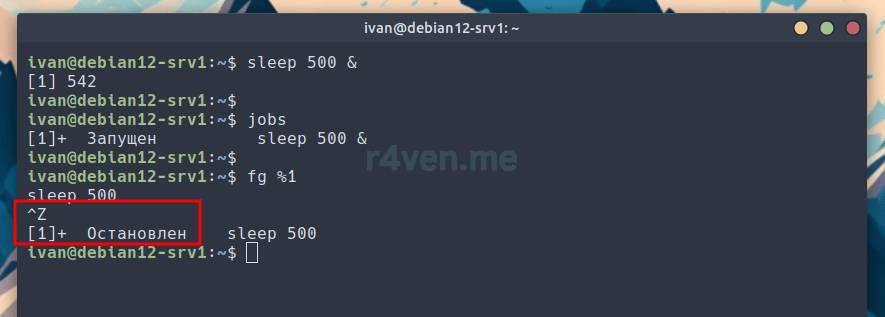
The process has stopped its work, but has not terminated. It is simply waiting.
The bg command
The next command we’ll use to resume a stopped background process is the bg (background) command.
Description:
The bg command resumes the execution of the most recently suspended (stopped) job in the background.
Syntax:
bg [job_id]So our process is “sleeping” and not running. To bring it back to life we can either bring it to the foreground again with the fg command or send it to run in the background with the bg command. Let’s try the second option.
bg %1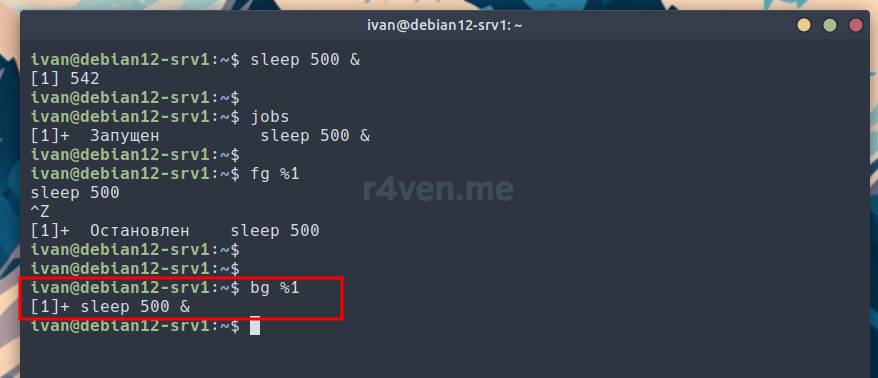
Let’s check the result with the jobs command, then bring the process to the foreground with the fg command and terminate it with the Ctrl+c key combination:
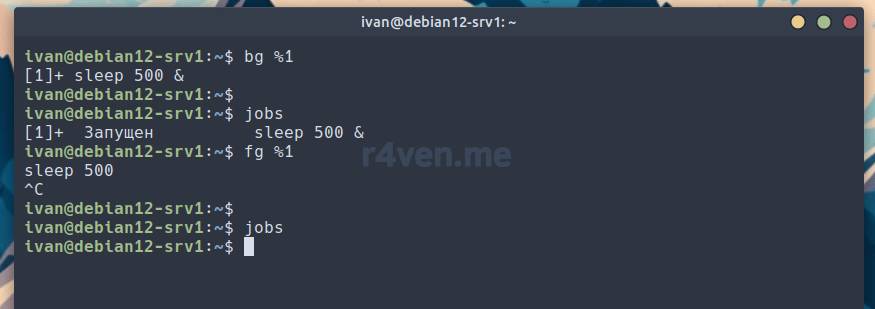
This is how working with processes happens in a local session on behalf of the current user.
System processes
Now let’s talk about processes running not only within the current session, including processes launched under the root user.
The ps command
The ps (processes) command is used to view such processes.
Description:
The ps command in Linux is used to display information about the currently running processes in the system.
Syntax:
ps [options]Commonly used options:
-e— show all active processes in the system;-f— output the full format with additional details;-u <username>— show processes only for the specified user;-p <PID>— output information about the process with the specified PID;--forest— show a tree structure of processes;-o <format>— configure the output format, selecting fields to display;--sort=-%cpu— sort processes by CPU usage (descending);--sort=-%mem— sort processes by memory usage (descending).- BSD-style options (without a hyphen):
a— show processes associated with a terminal;u— output additional information about the user who created the process;x— show processes not associated with a terminal, i.e. daemons.
Let’s look at locally running processes from the point of view of the system-wide list.
Let’s start a couple of local processes and then run the ps command:
sleep 1000 &

ping 8.8.8.8 > /dev/null &

ps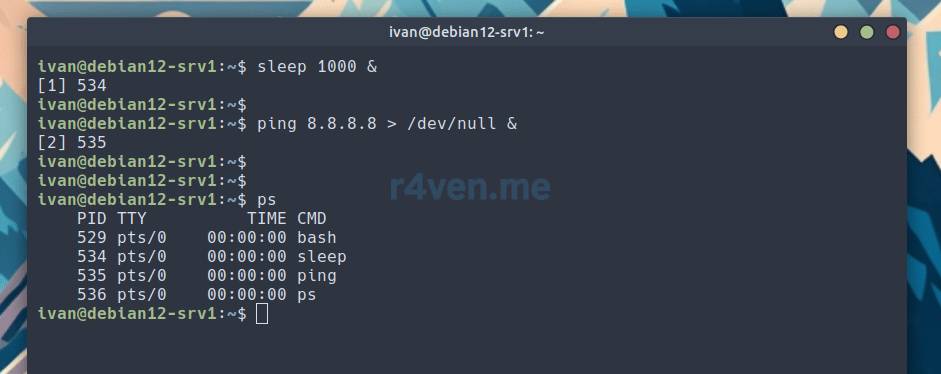
The essence of the ps command is that it takes a snapshot of the running processes at the moment of execution and outputs this list to standard output.
In our case, we see the list of processes running in the current session and their process id (PID) in the system-wide process list.
The list also contains: the process of our shell session — bash, the background commands sleep and ping, as well as the ps command itself, which at the moment of taking the process “snapshot” was also in this list.
To see the list of all system processes you can pass three arguments to the ps command: aux:
ps aux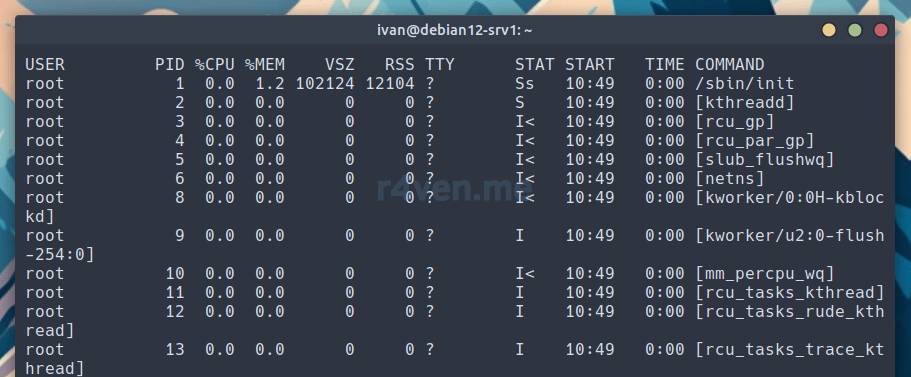
The output can be very long, so for page-by-page viewing you can pipe the output of ps to the less command, which we discussed in the article Linux command line, output and reading contents: echo, cat, less commands.
At the bottom of the list we’ll also find our locally started processes:

The ps command provides quite flexible options for displaying process information.
For example, let’s output a list showing the process “lineage”:
ps ux --forest
You can also output the list of processes sorted, for example, by memory consumption:
ps aux --sort=-%mem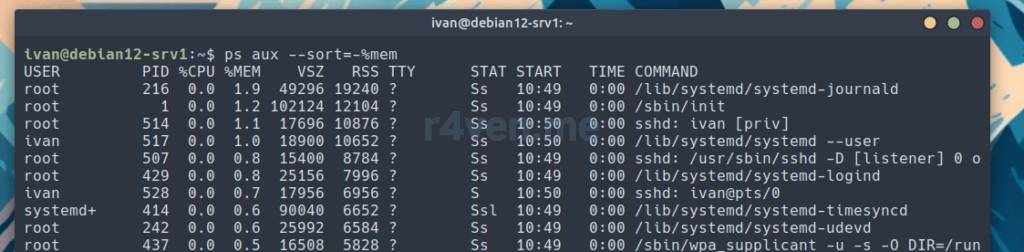
The pgrep command
For faster and more convenient searching of the process I need, I regularly use the pgrep command. You can pass it the name (or part of the name) of the process being searched for as an argument, and if such a process exists, the command will output information about it. Note that the command is case-sensitive.
Description:
The pgrep command in Linux is used to search for and output the identifiers of processes matching the specified criteria.
Syntax:
pgrep [options] <search_pattern>Commonly used options:
-a— outputs information about the command line the process was started with;-f— outputs full information about the processes;-l— outputs process identifiers along with their names;-u <username>— selects processes belonging to the specified user;-x— makes the search exact, looking for a process by full name match;-n— limits the output to the specified number of identifiers;-o— outputs only the identifier of the oldest (earliest created) process.
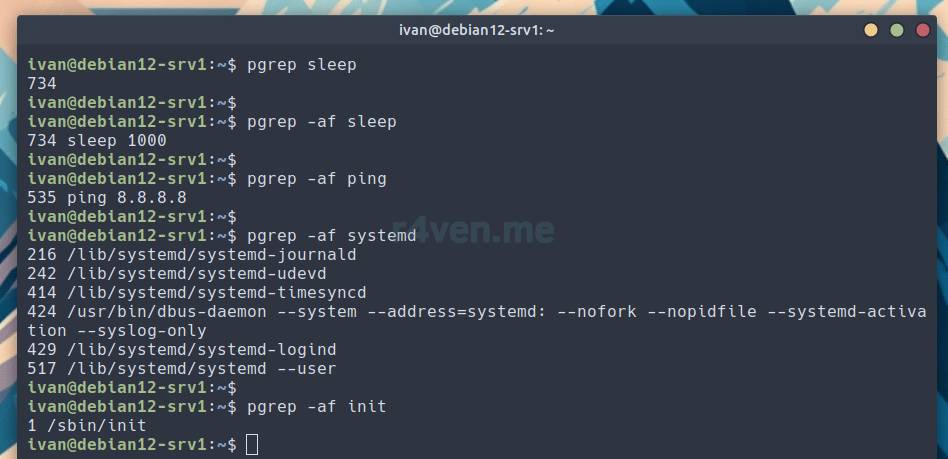
If you use pgrep without options, it will output only the PID of the process:
pgrep sleepBut if you add a couple of useful options, for example -a and -f (or -af), the pgrep command will search for processes and also output full information about them, including command names and additional details:
The pstree command
I’d also like to mention another useful command — pstree.
Description:
The pstree command is used to display a tree structure of processes in the system. It shows the relationships between parent and child processes, making their hierarchy clear.
Syntax:
pstree [options] [PID | USER]Commonly used options:
-p— outputs process identifiers (PIDs) along with process names;-u <username>— displays the process tree only for the specified user;-a— shows the command-line arguments the processes were started with.
In Linux Mint 21 this command is installed out of the box. But in the minimal version of Debian 12 it is missing, though it’s easy to install with the command:
sudo apt install psmisc
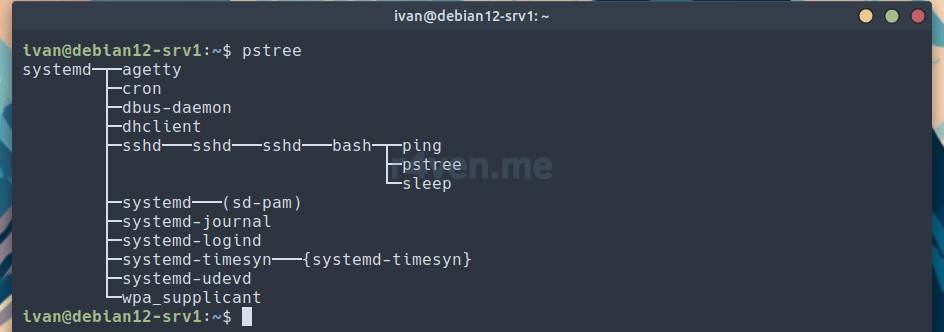
When run, it sends a snapshot of the list of active processes in the form of a “tree” to standard output. This allows you to more clearly study the relationships between parent and child processes:
pstreeDebian 12 server:
Linux Mint 21:
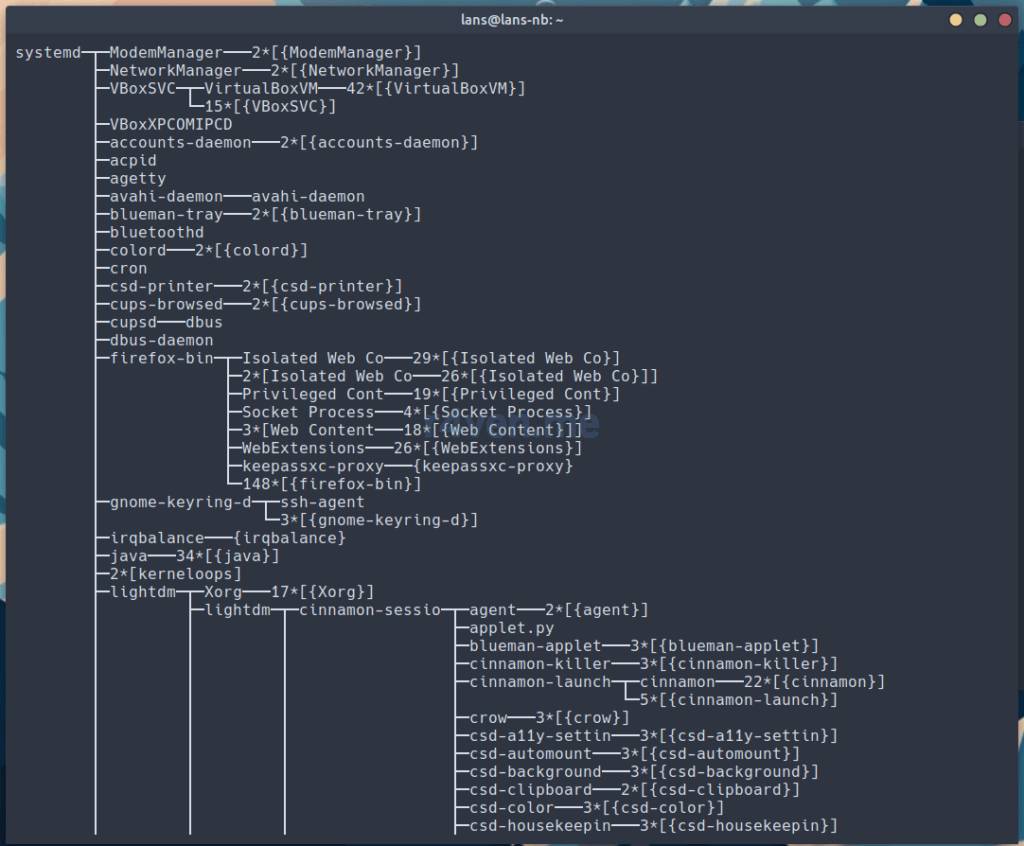
Quite a noticeable difference, isn’t it? Especially given that the entire output from the Linux Mint screenshot simply didn’t fit)
Terminating and “killing” processes
We know how to start processes, now let’s learn how to terminate them, gracefully and not so gracefully)
To terminate a process in Linux, a special signal is sent to it.
List of common signals sent to processes
Here’s a list of frequently used signals:
- SIGTERM (15): The standard termination signal. Sent to a process asking it to terminate. The process can handle this signal and perform necessary actions before terminating. This signal is the default signal used by termination commands. For example, if you run
killwithout specifying a signal code, signal-15will be used. - SIGKILL (9): A hard termination signal. The process will be terminated immediately, and its resources freed. The process cannot ignore or intercept this signal.
- SIGINT (2): Interrupt signal. Usually generated by pressing Ctrl+C in the terminal. Allows the process to “leave gracefully,” performing necessary actions before terminating.
- SIGHUP (1): Termination signal on terminal disconnect (hang up). Often used to restart daemons and services (for example to make nginx or apache reread their config).
- SIGSTOP (19) and SIGCONT (18): Signals for pausing and resuming process execution. SIGSTOP stops the process, and SIGCONT resumes its execution. Similar to the
Ctrl+zkey action and thefgcommand from the examples above. - SIGTSTP (20): This signal causes the process to be suspended and go into a stopped (Suspended) state. This signal is sent by pressing
Ctrl+zwhile the process is running in the foreground. - and many others.
The kill command
There are many ways to send a signal to a process in Linux. One of the most popular is the kill command.
Description:
The kill command in Linux is used to send signals to processes, allowing you to interact with their execution. It allows you to change the state and behavior of processes.
Syntax:
kill [options] [signal] <process_id>- The
signalcan be passed as a code, for example-15, or as its full or abbreviated name, for exampleSIGKILLorKILL. - By
process_idwe mean either its local id displayed by thejobscommand, or the process’s PID in the system-wide list.
Commonly used options:
-lor--list— output a list of available signals. Each signal has a number and a name.
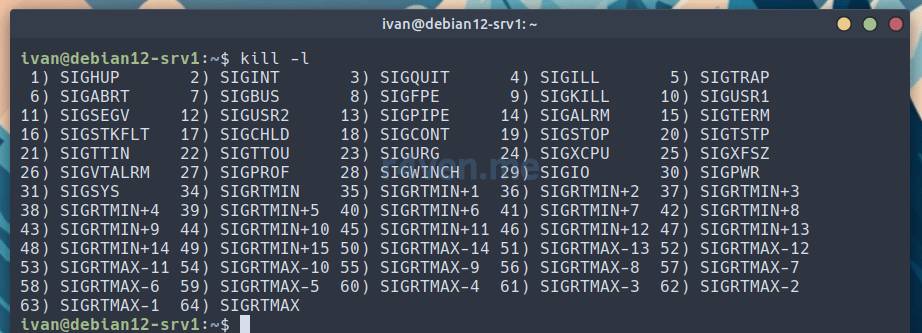
*To affect processes of other users, including the root user, you need to run the commands with superuser privileges.
Let’s start several background processes for the experiment:
sleep 1000 &

ping 8.8.8.8 > /dev/null &

sleep 100 && ls -l && sleep 1000 &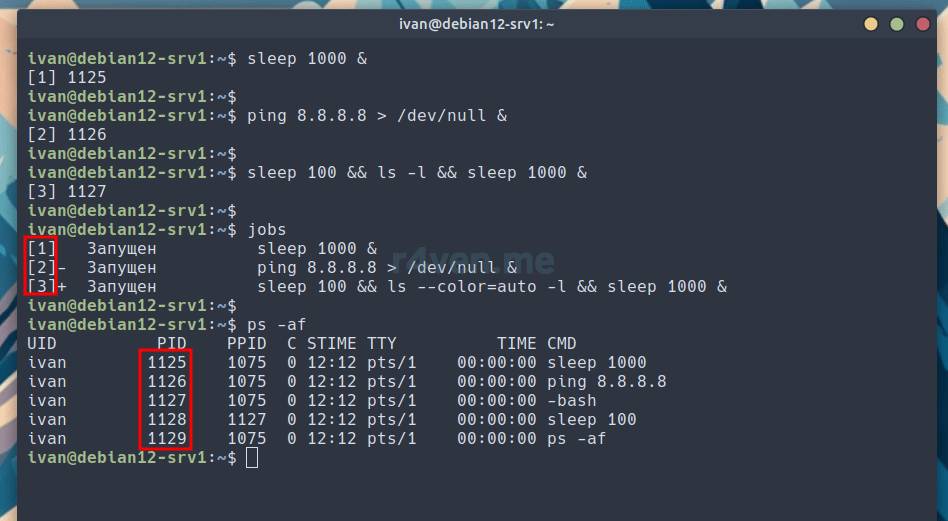
Now let’s send several signals to our local processes using the kill command:
kill -2 %1

kill -15 %2

kill -9 1127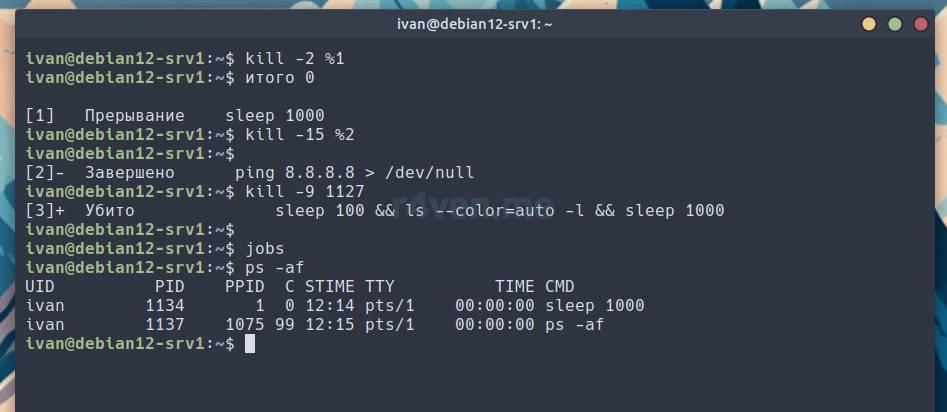
With the first command we sent SIGINT to the process numbered 1 in the current session, with the second command the SIGTERM signal to the second local process, and with the third command we sent SIGKILL to the third local process, but by specifying its PID.
In the console output you can see messages about the interruption, termination, and “killing” of the specified processes)
The pkill command
There is also the pkill command, which takes as an argument not the process’s PID but its name (or part of the name). This command has options similar to those of the pgrep command, but not all of them.
Description:
The pkill command in Linux is used to terminate processes matching the specified criteria, such as process name, user, terminal, and other attributes.
Syntax:
pkill [options] [signal] <search_pattern>Commonly used options:
-e— enables matching against the process name in full, including the command line;-f— performs the search against the entire command line, not just the process name;-u <username>— terminates processes only for the specified user;-x— performs an exact search, requiring a full match of the process name;-n— limits the number of processes terminated;-l— outputs the list of available signals;-o— terminates only the oldest (earliest started) process.
For example, let’s start 3 processes with the sleep command:
sleep 300 &

sleep 500 &

sleep 1000 &

ps -af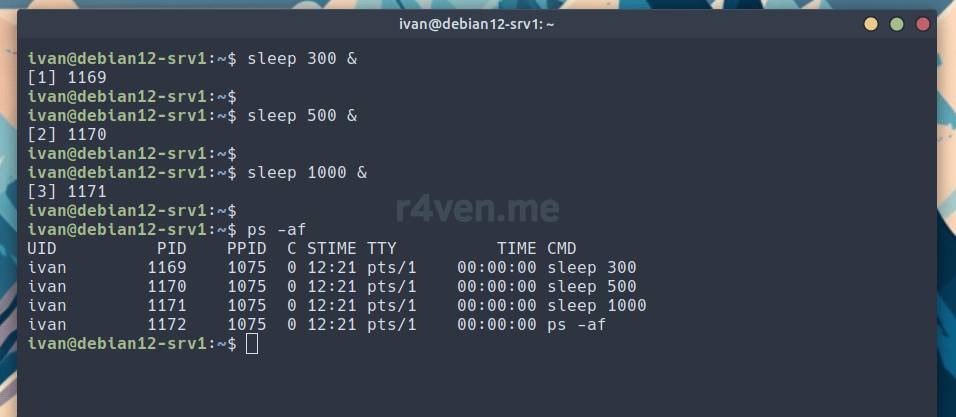
Now let’s send the SIGTERM (-15) termination signal using the pkill command. Reminder: this signal is the one used by default by termination commands:
pkill sleep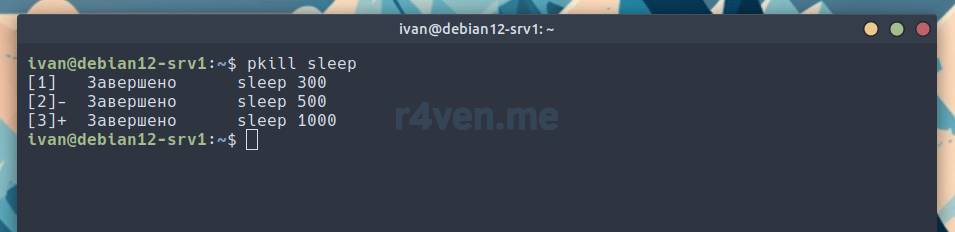
As you can see, the command found all processes whose name contains the keyword “sleep” and terminated them.
To terminate a specific process by the specified command, you need to add the -f option, and put the sought command/process name in quotes:
sleep 333 &

pkill -f 'sleep 333'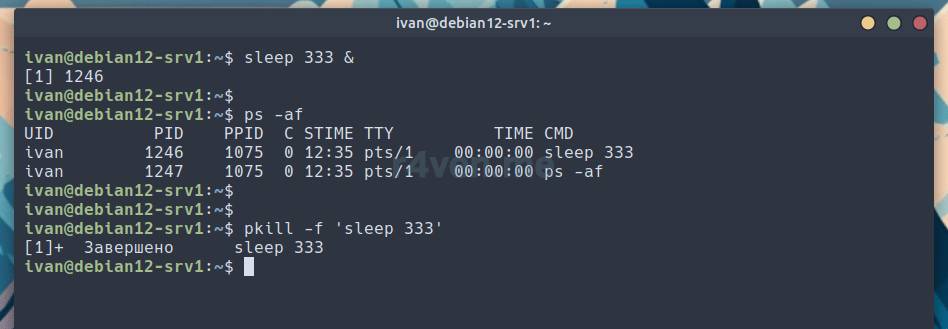
To send another signal, for example SIGKILL, we simply specify the corresponding code:
sleep 555 &

pkill -9 -f 'sleep 555'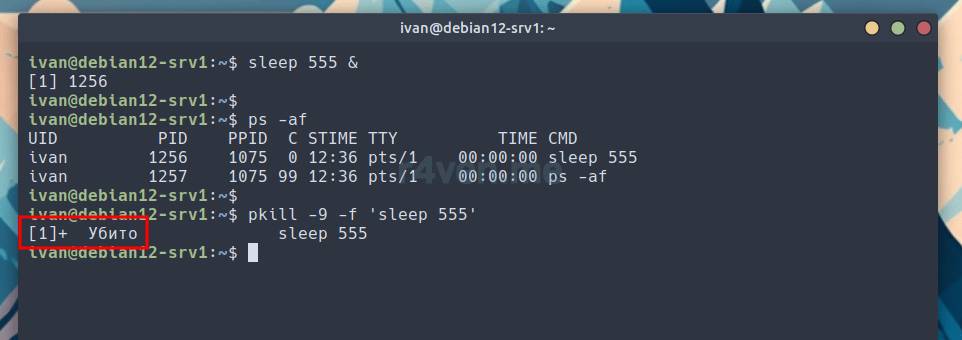
For the pkill command, you can pass the signal’s name instead of its code to specify the signal, for example like this:
pkill -KILL sleep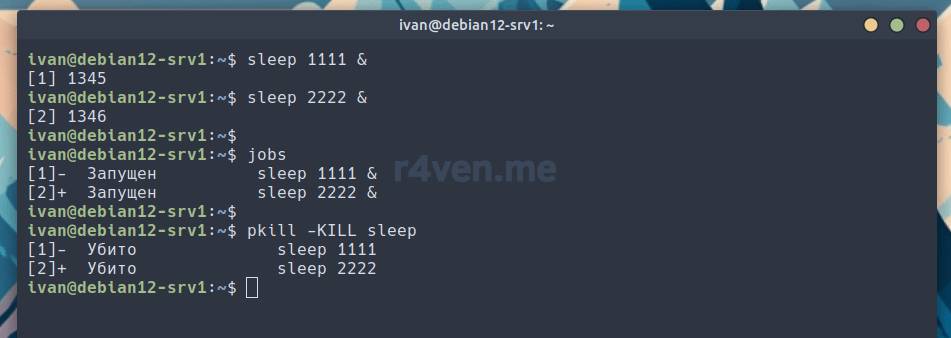
Console process manager — htop
I’d also like to mention such utilities as console process managers, which display the system state in real time. There is a huge number of them, but one of the most popular is htop.
Description:
The htop command is an interactive terminal system monitor that lets you track the current system state, CPU load, memory, active processes, and much more in real time.
Syntax:
htop [options]Commonly used options:
-d <seconds>— set the update interval in seconds;-u <username>— show only the processes of the specified user;-p <PID>— track only the specified process;-s <COLUMN>— sort the process list by the specified column;-t— show processes in a tree structure;-H— show individual threads along with processes;-M— sort processes by memory usage;-P— sort processes by CPU usage.
htop is an enhanced version of the minimalist top manager, which, by the way, is installed out of the box in almost all Linux distributions. Compared to top, htop has broader functionality for displaying and filtering processes, as well as a more readable look plus color formatting.
The htop utility is not preinstalled in either Linux Mint or Debian 12. But it’s always available in the standard repositories.
Let’s install it:
sudo apt install htop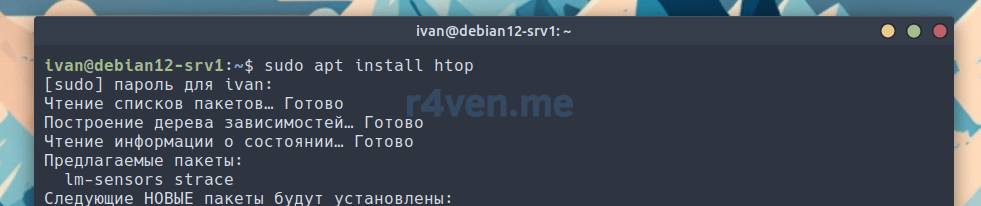
And run it:
htop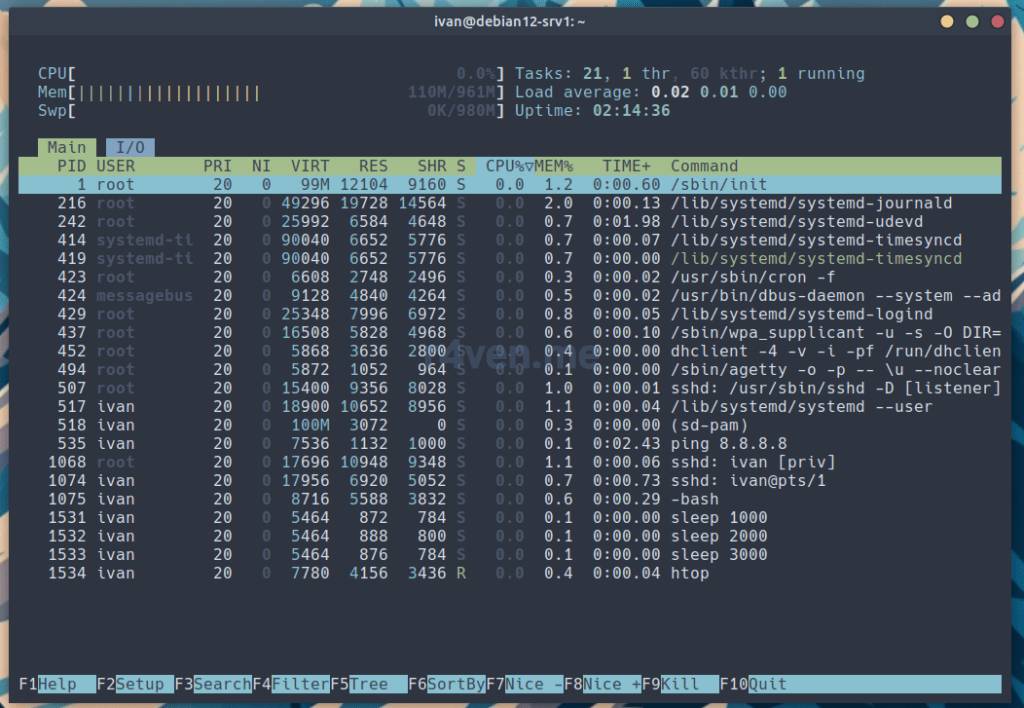
The manager has convenient navigation with the arrow keys, as well as calling functions with the F* keys (see the hints at the bottom of the htop window).
For example, pressing the F5 key lets you display processes as a tree:
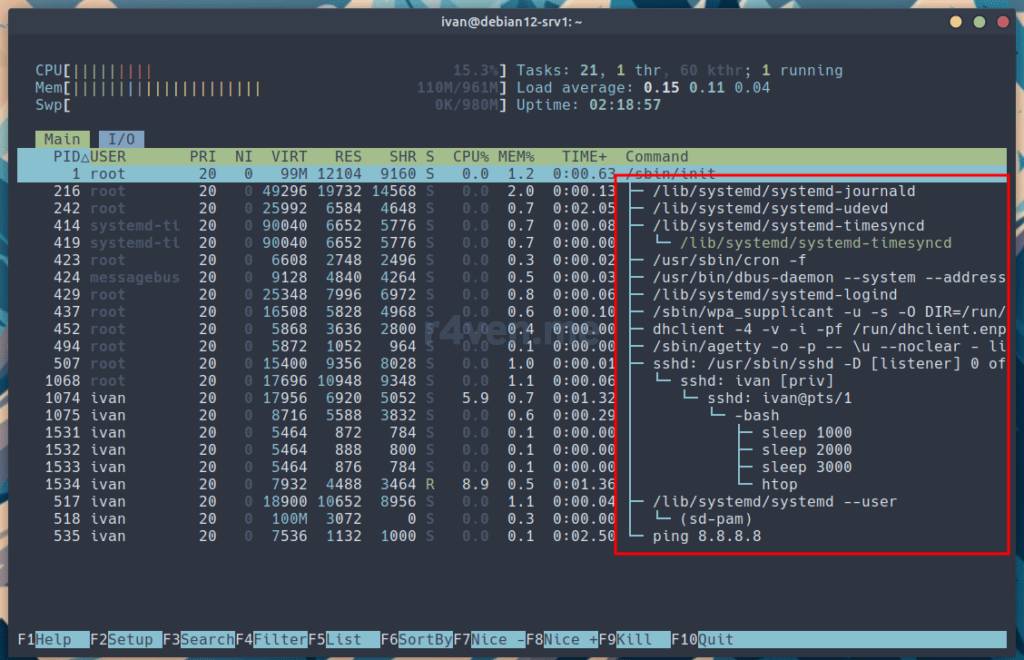
You can also filter processes by name, terminate them, and change their priority.
Let’s kill off a couple of hanging sleep processes.
Move the cursor to the desired process and press F9. On the left, a list of available signals to send will appear, some of which we discussed earlier:
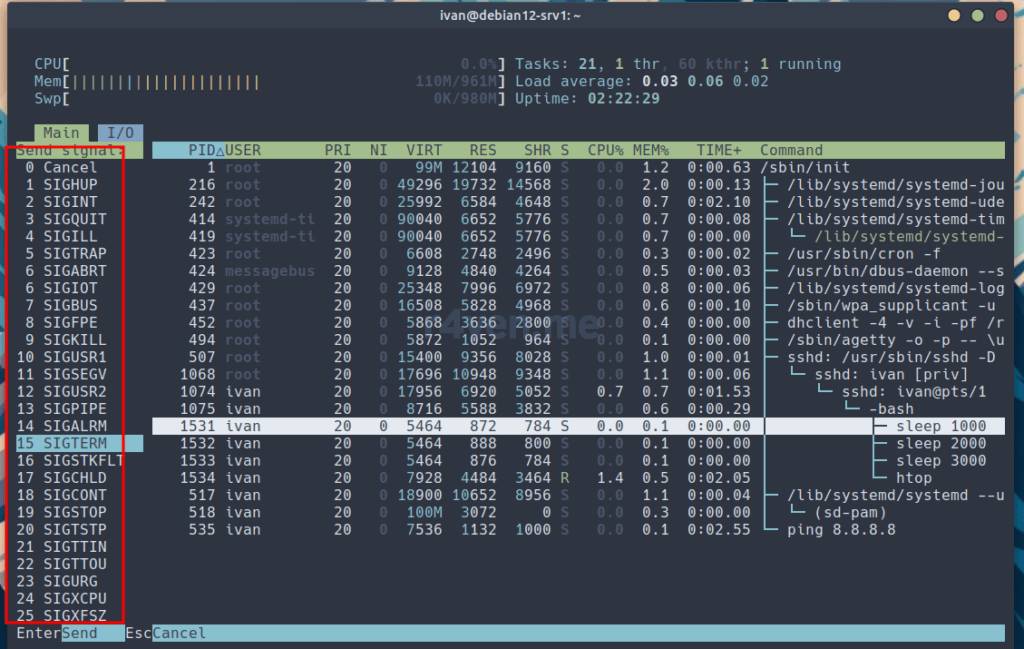
After selecting the desired signal and pressing Enter, it will be sent to the specified process.
Another interesting feature of htop is the ability to configure the default appearance. But that’s already getting into details.
Process managers in general are a topic for a separate post) I might do one in the future.
Conclusions
In this article we briefly looked at the possibilities of working with processes in Linux from the command line. We talked about processes running in the current shell session, and covered the commands: jobs, fg, bg.
Then we became familiar with ways to view system processes. Here we used the commands: ps, pgrep, pstree.
After that we learned how to send various signals to running processes, including signals to terminate their execution.
We also studied a bit of the popular console process manager — htop.
The topic of processes in Linux is very extensive. The point of this article is to master minimal skills for working with processes from the Linux command line. Despite this, the material turned out to be quite extensive, which is why some topics had to be excluded. For example, a detailed breakdown of process states or their niceness/priority level (nice). I recommend you study these topics on your own. You’ll find links to all the sources below)
Thanks for reading! Good luck administering your life processes)
If you have any questions, feel free to ask them in our telegram chat.
Useful sources
- Process — Wikipedia
- jobs command manual (EN) — OpenNET
- ps command manual — Linuxlib
- kill command manual — man.archlinux.org
- Processes in Linux — OpenNET
- nice command — Wikipedia
- Working with processes in Linux — Merionet
👨💻And…
Don’t forget about our Telegram channel 📱 and chat
Or maybe you want to become a co-author? Then click here🔗
💬 All the best ✌️
That should be it. If not, check the logs 🙂

Comments