
Today we’ll learn how to manage file permissions in Linux-based systems. In this note we will cover the following commands: id, chmod, chown. Let’s go)
🖐️Hey!
Subscribe to our Telegram channel @r4ven_me📱, so you don’t miss new posts on the website 😉. If you have questions or just want to chat about the topic, feel free to join the Raven chat at @r4ven_me_chat🧐.
Preface
The topic of file access control in Linux is very extensive. In this article I didn’t aim to cover it all, but simply to bring the novice reader up to speed and demonstrate frequently used tools. You can read a more detailed article on Linux permissions on Habr. Now, let’s get started.
📝 Note
Some of the material (mainly the tables with descriptions) was borrowed from the book “The Linux Command Line” by William Shotts.
All examples in this article were run in the console of the Linux Mint distribution, whose installation and setup I described in detail in the article: Installing Linux alongside Windows.
I also recommend reading the other articles in the Linux command line series.
About file permissions in Linux
In the Unix security model, a user can own files and directories. If a user owns a file or directory, they can control access to it. Users can also belong to a group consisting of one or more users, and be granted access permissions to files and directories for group members, which are defined by the owners. In addition to permissions for the group, the owner can also define certain access permissions for everyone else, referred to in Unix terminology as world.
William Shotts, “The Linux Command Line”
In Linux the following basic access permissions for files and directories are defined:
- read permission (
r— read); - write permission (
w— write); - execute permission (
x— execute).
If you look at the output of the ls command with the -l option in a directory with files, you can find out the current permissions of these files:
ls -l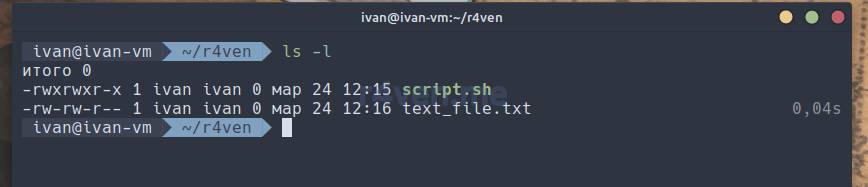
The first 10 characters in the command output are the file’s attributes.
💡 Tip
We covered the ls command output in detail in the article: Linux command line, navigating the system and viewing directories: pwd, ls, cd commands.
These 10 characters are split into blocks. The image below shows their description:
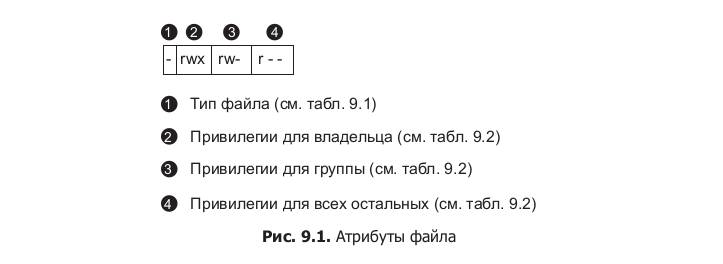
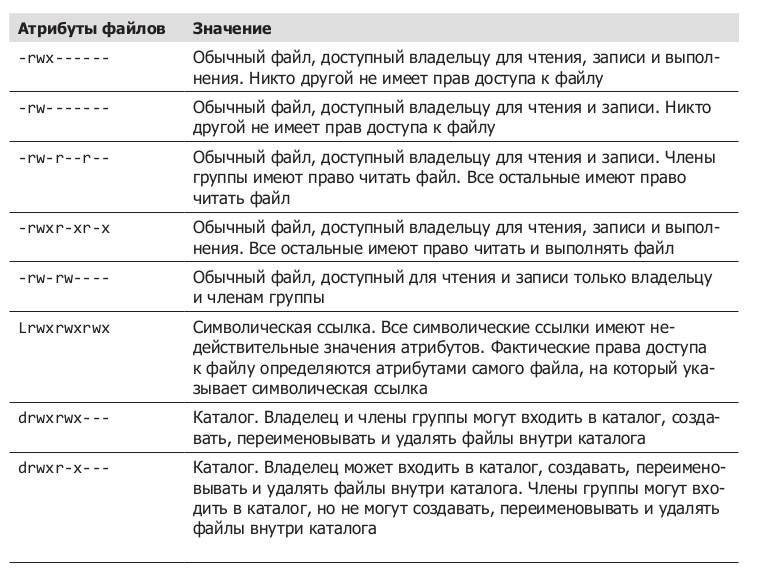
The first character indicates the file type. The image below shows the file types commonly used in practice:
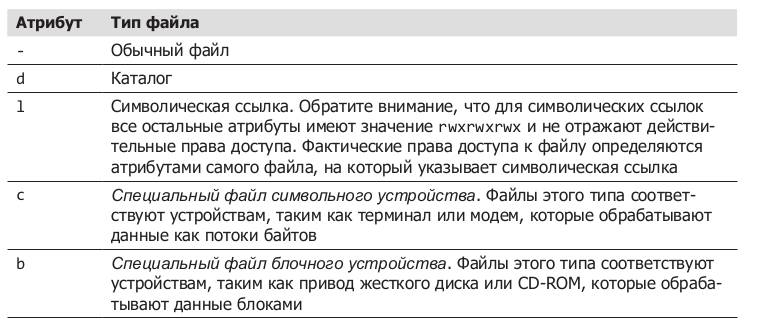
The remaining nine characters define the read, write, and execute permissions for the owner, group, and everyone else. They are also called access modes.
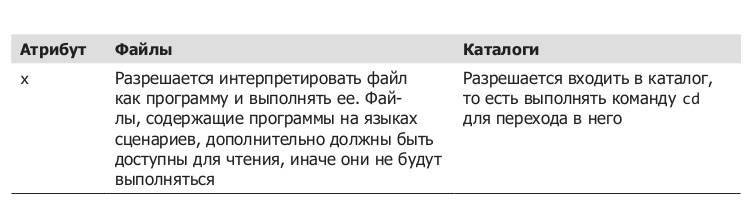
It’s worth noting that each of these modes has a different effect on different file types. Below is a brief description of each mode in the case of regular files and directories:
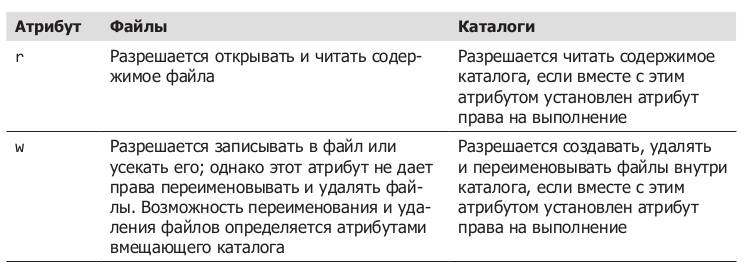
Description of access modes for files and directories
The image below shows common examples of set modes with their descriptions:
List of commands
So, today our toolset will be expanded with the following commands:
| Command | Description |
|---|---|
id | lets you get information about a system user and their groups |
chmod | change mode, lets you change file access modes |
chown | change owner, lets you change the owner and owner group of files |
The id command — user and group information
Since the Linux file permission system implies interaction with such entities as the owner and the owner group, let’s study the id command, which can be used to get information about system users and their groups.
Syntax:
id [options] [username]Commonly used options of the id command:
| Option | Value |
|---|---|
-u | outputs the uid of the specified user |
-n | outputs the group name instead of the uid (used together with -u) |
Usage example:
id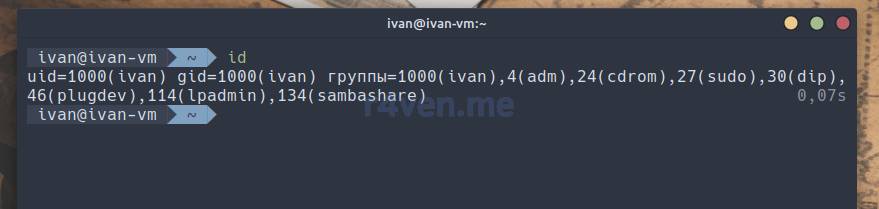
📝 Note
When a user account is created in Linux, it is assigned a user identifier — user ID, also known as uid, and a primary group identifier — group ID or gid.
The output of the id command without arguments displays the uid, gid of the current user, as well as the list of groups they are a member of.
To find out information about another user, you need to pass their name or uid as an argument:
id root

id 0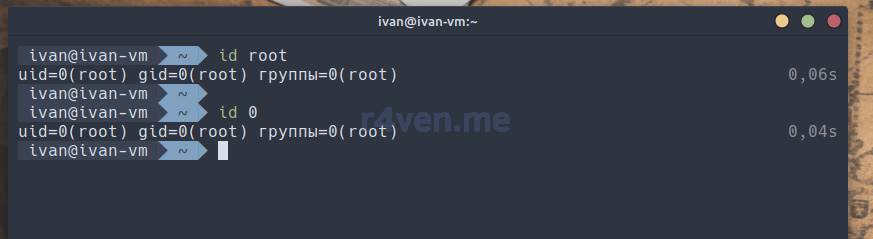
Note that the root user’s uid is always 0. This constant is often used in scripts to check whether a program is running as the superuser.
id -u ivan

id -nu ivan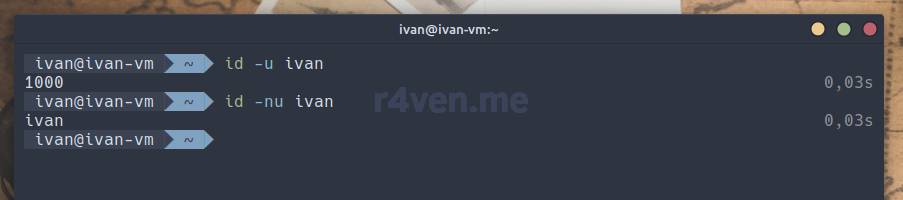
All information about users and groups is stored in system text files:
/etc/passwd— information about user accounts;/etc/group— information about groups;/etc/shadow— information about user passwords.
The chmod command — managing read/write/execute attributes
The chmod command is used to manage file access modes in Linux.
Syntax of the chmod command:
chmod [options] mode fileCommonly used options of the chmod command:
| Option | Value |
|---|---|
-v | output diagnostic messages for each file |
-R | recursively change files and directories |
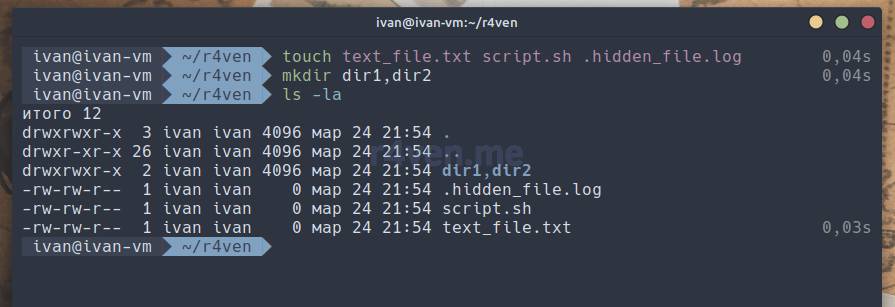
For practice, let’s create a few files and directories:
touch text_file.txt script.sh .hidden_file.log

mkdir dir1 dir2💡 Tip
We covered the commands from the example above in the article: Linux command line, working with files: touch, mkdir, cp, mv, rm commands.
Now let’s use output redirection to fill these files with some information:
cat /etc/passwd > text_file.txt

echo "printf 'Hello R4ven'" > script.sh

history > .hidden_file.log💡 Tip
We talked in more detail about the standard stream redirection mechanism in the article: Linux command line, input and output redirection: the “>”, “<”, “|” operators.
And let’s copy a couple of files into the created directories:
cp /usr/bin/ls ./dir1/

cp /usr/bin/cat ./dir2/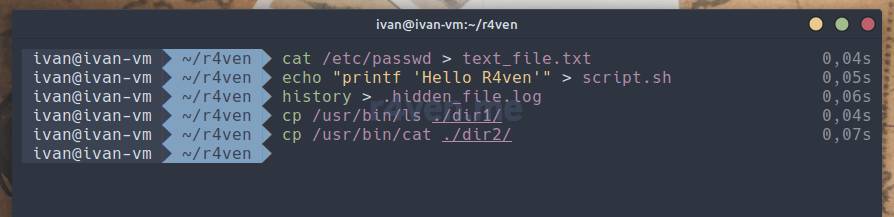
By default our simple files have read access for everyone. Let’s remove this attribute from the text_file.txt file with this command:
chmod -r text_file.txtWithout additional parameters, the -r syntax (remove read) removes the read attribute for everyone: user, group, and others.
Now when we try to output its contents, we’ll get an error:
cat text_file.txt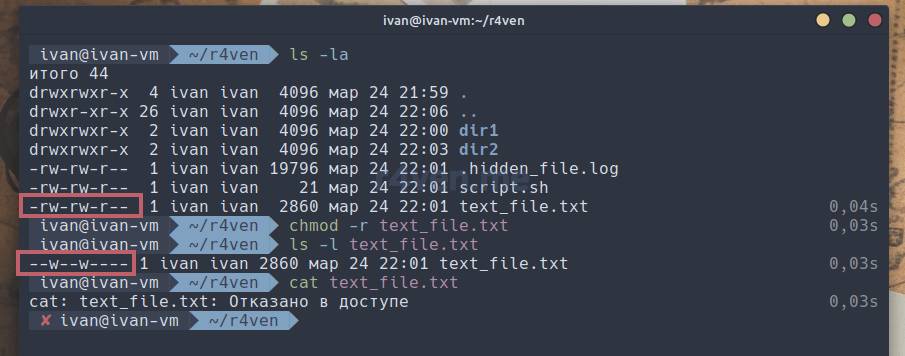
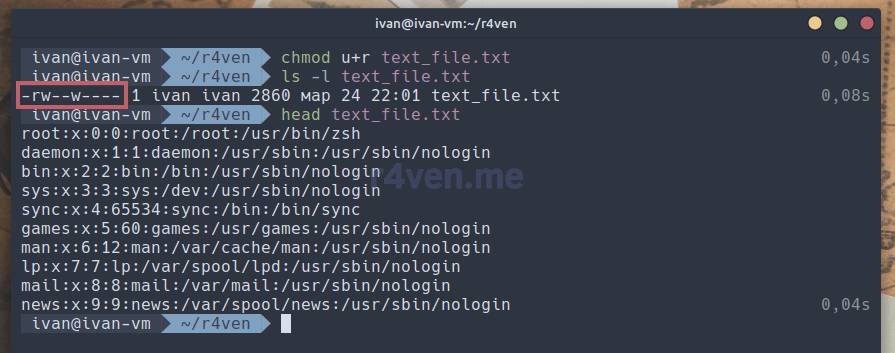
Now let’s restore read access, but only for the file’s owner, i.e. for us:
chmod u+r text_file.txt

cat text_file.txtAs you might guess, the + character means “add” the following r attribute. Before the added attribute we set the u (user) parameter, telling the chmod command to make the mode change only for the file’s owner:
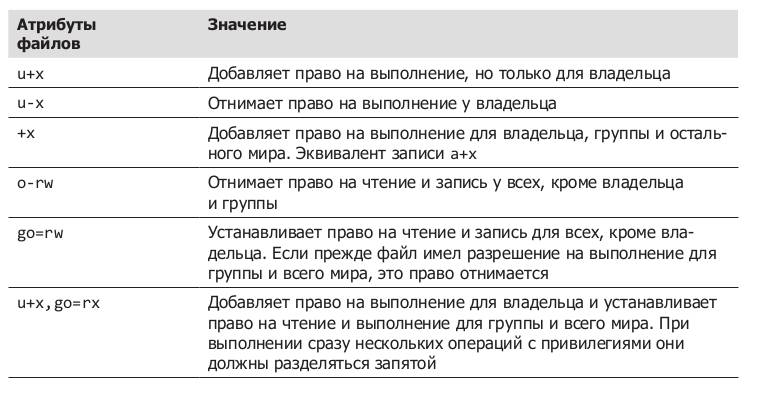
Below are the possible parameters of the chmod command with descriptions, as well as examples of possible attribute combinations:

Now, in the same way, let’s add execute mode for the script.sh file only for the owner and the owner group, and try to run it:
chmod ug+x script.sh

./script.sh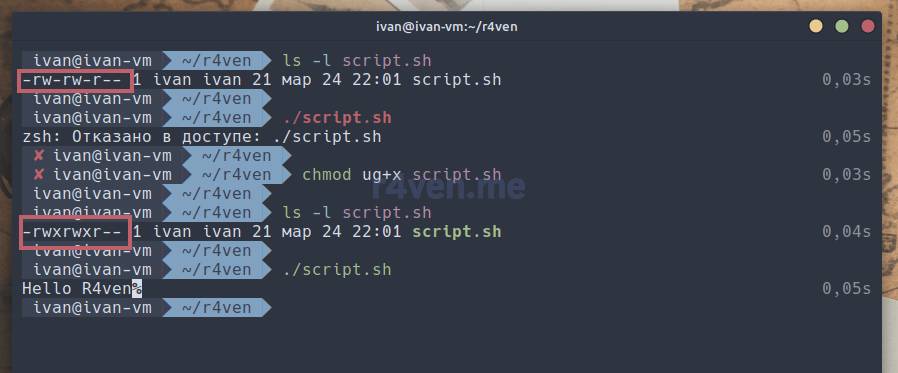
Now let’s remove the write attribute for everyone from the hidden .hidden_file.log file and try to write something to it. Then we’ll restore the write attribute for the owner and write to it again:
chmod ugo-w .hidden_file.log

echo "TEST" > .hidden_file.log

chmod u+w .hidden_file.log

echo "TEST" > .hidden_file.log

cat .hidden_file.log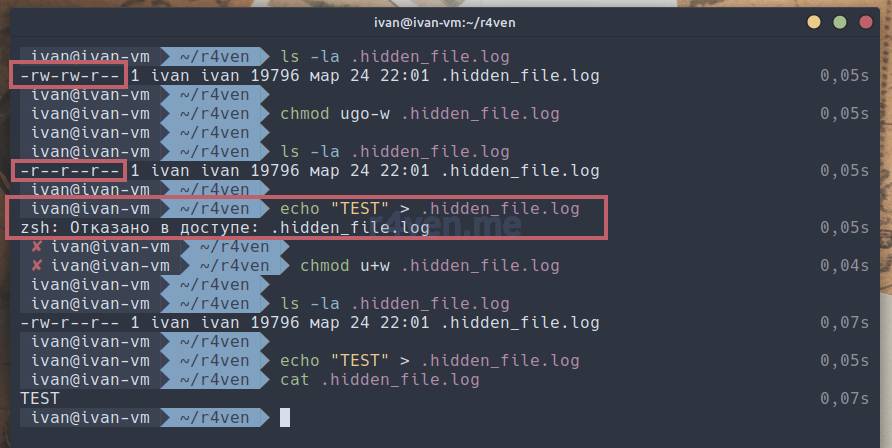
This is how access mode manipulation happens. Let’s move on.
As indicated in one of the tables above, to enter a directory, it must have the execute attribute — x. By default this attribute is set for everyone on directories.
Let’s try in practice the situation of completely removing this attribute from the dir1 directory:
chmod -x dir1

ls -l ./dir1

cd ./dir1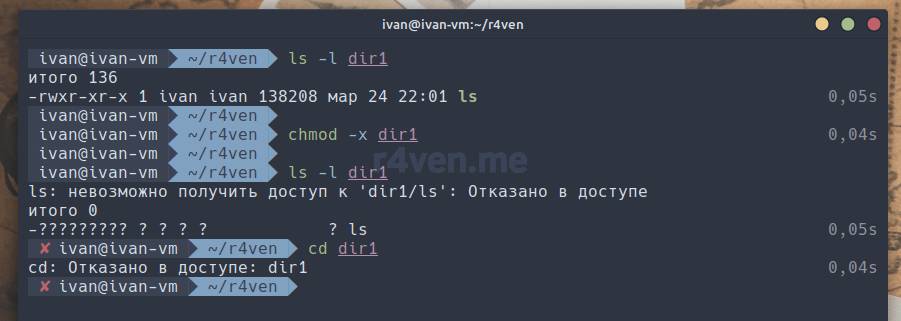
We were unable to read the contents of this directory, nor to enter it.
To restore access to the directory:
chmod +x dir1

ls -l ./dir1In all the examples up to this point, we’ve looked at the symbolic method of setting file permissions. But there’s also a format for setting access modes using octal equivalents (numbers from 0 to 7). This format is also very popular.
The main thing to remember:
4— read (r)2— write (w)1— execute (x)
As well as summing these representations, i.e. 4+2=6 would mean the read and write attribute rw- and so on. Since attributes have three groups, correspondingly setting modes can look like this:
775 — equivalent to rwxrwxr-x.
Below is the equivalence of mode codes in different numeral systems:
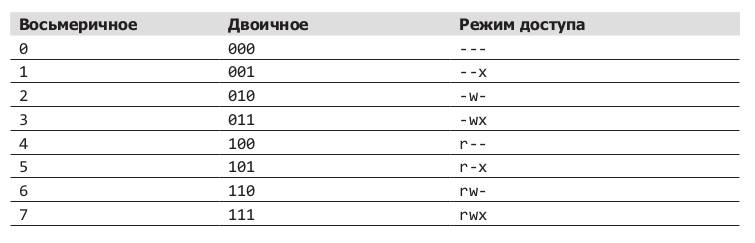
As an example, let’s grant full access to everyone (rwxrwxrwx) for the dir2 directory using this method:
chmod 777 ./dir2

ls -l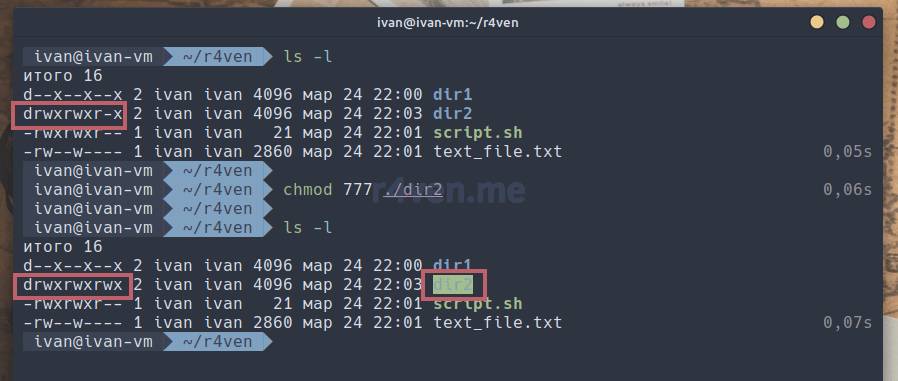
As you can see, when full access to a directory is opened, our dir2 even gets highlighted specially in the ls command output.
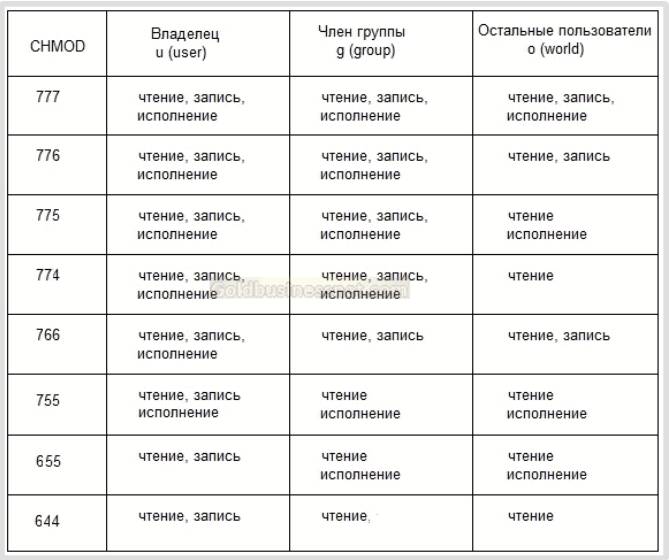
Below is an image found online, with common examples of octal access modes for the chmod command:
The chown command — assigning owner and group
The chown command is used to change the owner and group of a file or directory. It’s important to note that using this command requires superuser privileges.
chown can change the owner and/or group of a file depending on the first argument.
Syntax of the chown command:
chown [options] [owner][:[group]] fileCommonly used options of the chown command:
| Option | Value |
|---|---|
-v | output diagnostic messages for each file |
-R | recursively change files and directories |
Here are a few examples:
sudo touch root_owner.txt

ls -l ./root_owner.txt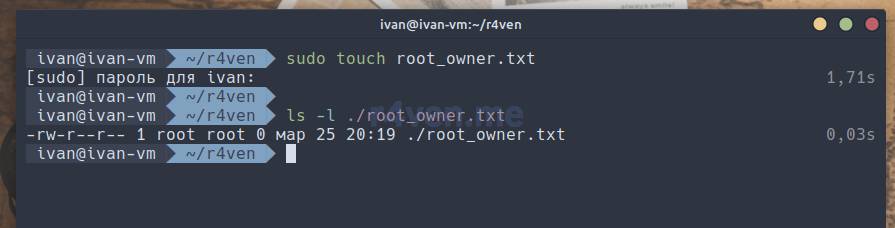
We see that the file’s owner and group have the value root root. When trying to change the owner NOT as the superuser:
chown ivan:ivan root_owner.txt

ls -l ./root_owner.txtWhere ivan is my username.
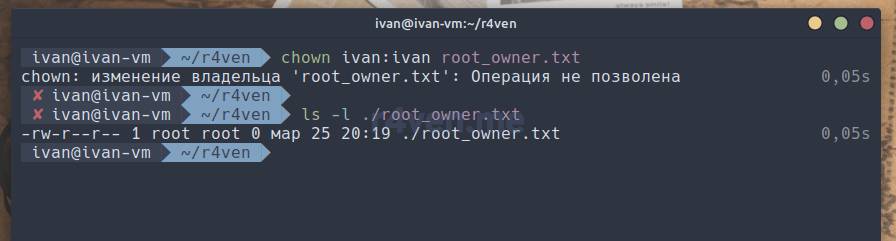
We get an error. Now let’s actually specify the new owner:
sudo chown ivan: ./root_owner.txt

ls -l ./root_owner.txt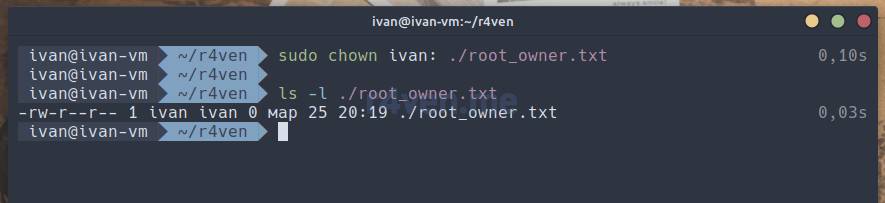
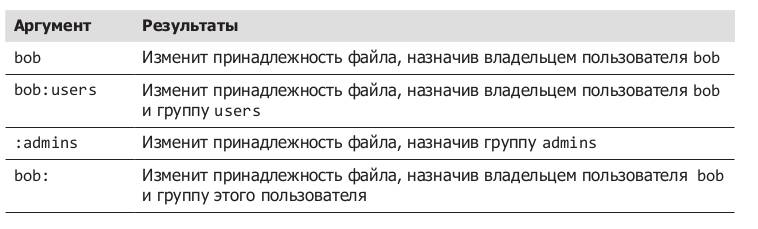
If, after the parameter defining the owner (ivan:), you don’t explicitly specify a group after the colon, the specified owner’s default group will be substituted automatically. In this example that’s ivan:ivan.
The image below shows some examples of chown command arguments:
The chgrp command
In older versions of Unix, the chown command changed only the file’s owner, not the group. To change the group, another command was provided, chgrp. It works almost the same way as chown, but has more restrictions. We won’t cover it, just know that it exists.
Conclusions
Today we covered one of the important parts of Linux-based operating systems: managing basic file access, in other words — file permissions. We learned about:
- the
idcommand, which can be used to get information about users and their groups; - the
chmodcommand, thanks to which you can manage file access modes in the system; - the
chowncommand, which lets you change/assign the owner and owner group of files.
Try to practice more often. After all, theory without practice is like a CPU without RAM)
Thanks for reading. Good luck!
Useful sources
- Linux permissions (chown, chmod, SUID, GUID, sticky bit, ACL, umask) — Habr
- id command manual — OpenNet
- chmod command manual — OpenNet
- chown command manual — OpenNet
👨💻And…
Don’t forget about our Telegram channel 📱 and chat
Or maybe you want to become a co-author? Then click here🔗
💬 All the best ✌️
That should be it. If not, check the logs 🙂

Comments