
We continue studying the Linux command line. Today we’ll learn how to properly run commands on behalf of another user, including the root user. We’ll get familiar with the su and sudo commands, and also learn how to correctly grant limited privileges to users and groups.
Along the way, let’s figure out why sudo su is like saying: “Open the door for me,” and then demanding again: “And let me in right now!"😁.
🖐️Hey!
Subscribe to our Telegram channel @r4ven_me📱, so you don’t miss new posts on the website 😉. If you have questions or just want to chat about the topic, feel free to join the Raven chat at @r4ven_me_chat🧐.
If you’re new to the world of Linux, I recommend reading my previous command-line articles:
- Introduction: types of commands, plain text, file system, shell prompt
- Navigating the system and viewing directories: pwd, ls, cd commands
- Output and reading contents: echo, cat, less commands
- Working with files: touch, mkdir, cp, mv, rm commands
- File links: the ln command
- Input and output redirection: the “>”, “<”, “|” operators
- Command execution control: the “&&”, “||”, “;” and “&” operators
- Processes: jobs, fg, bg, ps, pgrep, kill, pkill, htop commands
- File permissions: id, chmod, chown commands
Preface
The topic of privileges in Linux is very extensive. In this article we’ll only cover working with the su and sudo commands, as the most popular tools. But there are also many other mechanisms, for example capabilities, SELinux, AppArmor, and PolicyKit in general, and of course ACL (Access Control Lists). You can go crazy just from the variety🤯.
So, let’s get started.
The su command
su (Substitute User or Set UID or Switch User or Super User — substitute/switch user, superuser) is a classic command and utility of the same name in Unix-like operating systems, allowing a user to log in under a different name without ending the current session. Most often used to run some commands or temporarily log in with superuser privileges to perform administrative tasks. Simple and clear 😉.
The author of this program is Dennis Ritchie. If you believe the English Wikipedia, the first release of this utility was on November 3, 1971. Almost 53 years ago😲. And despite this, it’s still popular today. Truly the Unix philosophy in action: “a program should do one thing and do it well.”
So, the syntax:
su [options] [-] [username]If you don’t explicitly pass a username to the command, the name root will be used.
A feature of the command is that it asks for a password every time it’s run. Only if it isn’t already being run as the root user.
Commonly used options:
-or-l(login) — simulate a “full” login under the user’s shell (make the shell a login shell);-c(command) — run the command passed after it (in quotes);-g(group) — substitute the user’s group, works only for root.
Let’s get to practice. If you type in the terminal:
su -
We’ll be asked for the root superuser password, after which we’ll switch to it.
If you explicitly pass the desired username to the command, for example:
su - ivan
Then, accordingly, we’ll activate a shell session under their name.
There’s a fundamental difference between specifying the - or -l option and omitting it. If you don’t specify the option, then when switching to another user, your current working directory and part of the user’s environment (env) won’t change. Here’s an example:
whoami

echo $USER

su

whoami

echo $USER📝 Note
The whoami command outputs the current username to the terminal.
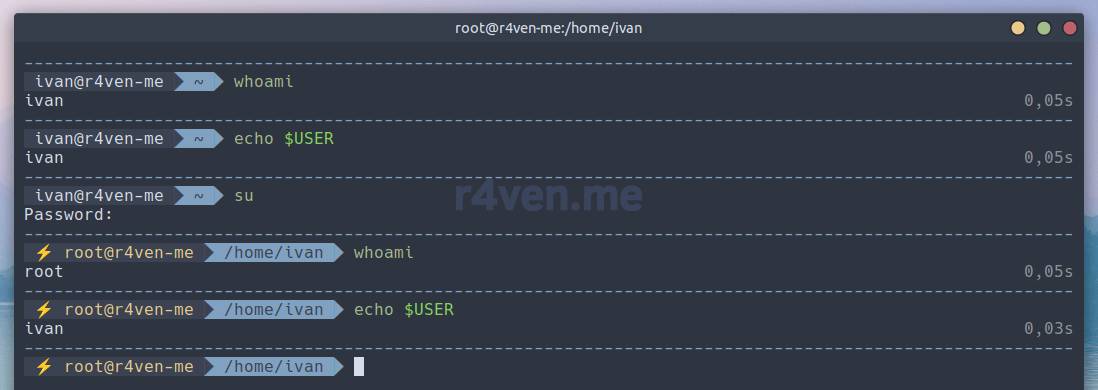
Here we can see that after switching to the superuser account, the $USER environment variable, which contains the name of the current user, was not updated. It’s important to remember this nuance, especially when writing scripts, if they use the su command.
Now let’s try running a single command, without switching users:
su -c 'whoami'
And now using a hyphen:
su -c 'pwd'

su - -c 'pwd'📝 Note
The pwd (print working directory) command outputs the user’s current working directory to the terminal.

I hope you understood the difference. And a couple more examples to reinforce it.
With a hyphen:
su -

su - ivan -c 'whoami'
Without:
su -c 'whoami && pwd'📝 Note
The command execution control operator — && allows the second command to run only if the previous one succeeded. More about such operators here.

The sudo command

sudo (Substitute User and do, literally “substitute the user and do”) is also a command and utility of the same name, allowing you to delegate certain privileged resources to users while logging their actions.
And for almost the whole time I thought that sudo = super user do 😳
sudo comes preinstalled with most UNIX and UNIX-like operating systems, but, for example, “pure” Debian is not on that list. In the case of this distribution, the sudo utility needs to be installed separately!
Unlike the classic su, sudo provides more flexible tools for configuring privilege escalation. Most often, sudo is used to set a clear list of commands available to run on behalf of another user, including root.
Syntax:
sudo [options] commandCommonly used options:
-s(shell) — run a shell on behalf of another user, same assudo bash(as an example);-i— also run a shell on behalf of another user, but similarly to a native system login (login shell);-u(user) — lets you specify the user on whose behalf the command will be executed;-e(edit) — edit a file, using the console editor specified in the$EDITORvariable (nano, vim);-l(list) — output the list of commands available to run viasudo;-S(stdin) — accept the password from standard input (stdin);-E(env) — run commands while preserving the current user’s environment (env).
Let’s start practicing with a common but rather comical situation — when the following command is used to obtain root privileges:
sudo su
Essentially, there’s nothing terrible about it, but it’s incorrect syntactically.
Instead, it’s recommended to use the following commands:
sudo -s

# or

sudo -i

# or

su -The thing is, when you run sudo su, you create an extra process. You end up running two different commands at once.
For a demonstration, let’s run:
sudo su

ps

exit

sudo -s

ps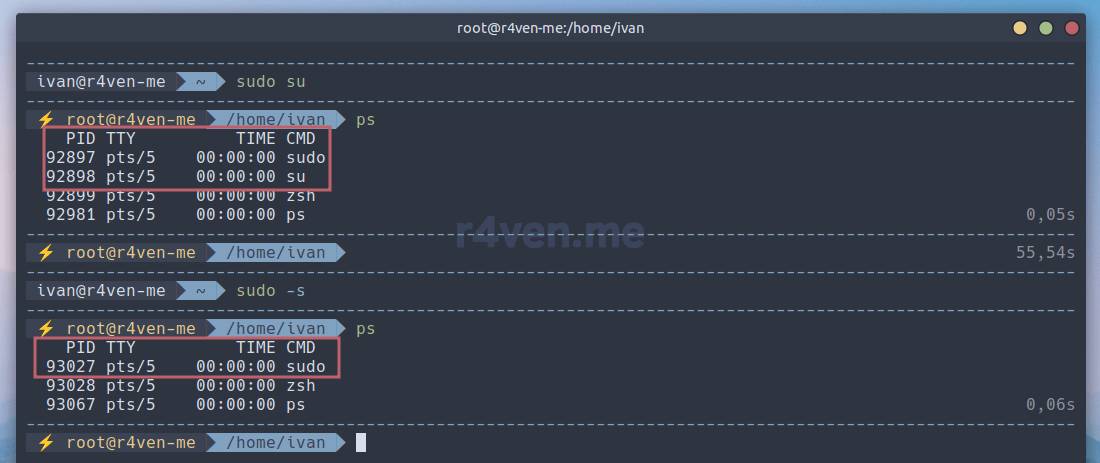
As you can see at the top of the screenshot, there’s one more process🤷♂️.
Now let’s try running a single command, without switching to another user:
sudo -u postgres 'whoami'📝 Note
This example uses the postgres user, on whose behalf PostgreSQL DBMS processes are run by default.

And to switch to another user’s shell (analogous to su - <user>), let’s run:
sudo -iu postgres

whoami

pwd
In this case both the working directory and the environment will belong to the target user.
Sudoers files
We’re now smoothly getting to the main feature of the sudo utility — sudoers files. These are files in which, following a strict syntax, you can finely configure the delegation of privileges for users and groups.
The main configuration file is located at: /etc/sudoers. It’s usually already filled with default and commented values.
By default, this file already sets maximum privileges for the sudo group on Deb systems (Debian, Ubuntu, Linux Mint) and wheel for RPM (RHEL, Centos, Fedora, OpenSuse).
📝 Note
Why wheel? Probably how it happened historically. Google translate from the English Wikipedia: In Unix operating systems, the term “wheel” refers to a user account with a wheel bit — a system setting that grants additional special system privileges that allow the user to execute restricted commands that regular user accounts do not have access to.
Users of this group have the ability to switch to the root account.
To check, run:
sudo cat /etc/sudoers

groups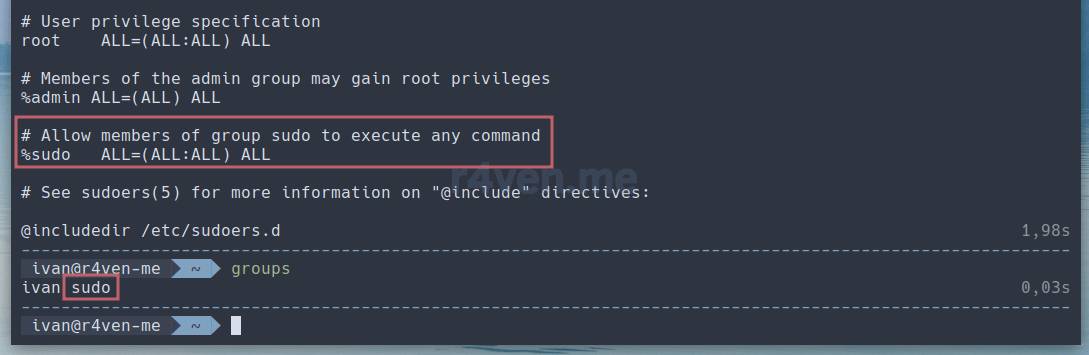
To extend the standard sudo configuration, it’s recommended to create separate files in the /etc/sudoers.d directory. Often, various distributions already have some files there. For example, in Linux Mint, there’s:
ls -l /etc/sudoers.d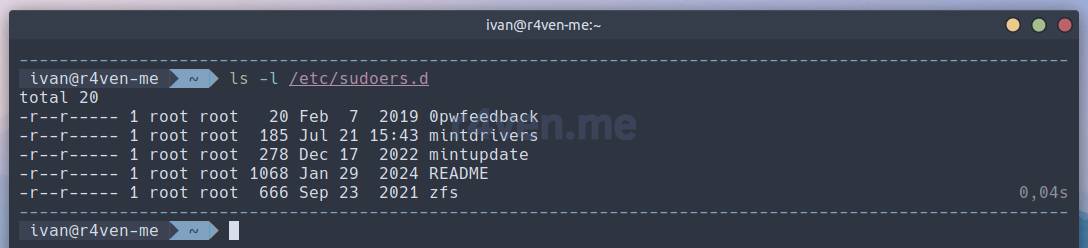
It’s recommended to create such files using the special visudo command, which checks the file’s syntax before saving it, and shows a warning in case of an error.
Let’s create such a file. But first let’s choose the default console editor with this command (for Deb systems):
sudo update-alternatives --config editor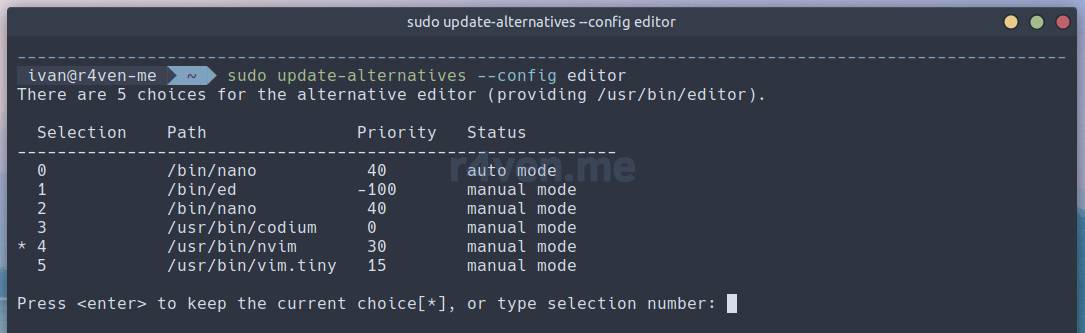
Of course we choose 😉, because I haven’t restarted my computer in a while😁
💡 Tip
Before making any changes to the sudoers files, you need to open several backup terminals with a root session. If you make even one syntax mistake in the file, root access via sudo will disappear. You’ll have to log in as root directly or use su. I warned you.
Now let’s create a file with the list of available commands for the account from the example above — postgres and the group — ivan:
sudo visudo -f /etc/sudoers.d/postgres📝 Note
The -f option is used to explicitly specify the path to the sudoers file.
The content might look like this:
Cmnd_Alias PG = \
    /usr/sbin/ldconfig, \
    /usr/sbin/setcap CAP_NET_ADMIN\,CAP_NET_BIND_SERVICE+epi /usr/lib/postgresql/16/bin/postgres, \
    /usr/bin/systemctl status postgresql, \
    /usr/bin/systemctl start postgresql, \
    /usr/bin/systemctl stop postgresql, \
    /usr/bin/systemctl restart postgresql, \
    /usr/bin/journalctl * postgresql, \
    /usr/bin/cat /var/log/auth.log

postgres ALL = (root) NOPASSWD: PG
%ivan ALL = (postgres) NOPASSWD: ALLI won’t go through the commands themselves, I’ll just describe the sudoers directives:
Cmnd_Aliasdefines an alias for a list of commands —PG(arbitrary), which actually contains the commands, separated by commas. The backslash character is an escape character. Used, for example, to escape line-break characters or the comma character, which, by the way, is part of the syntax in sudoers!postgres ALL = (root) NOPASSWD: PGin this line:postgres— the account for which the list of commands available viasudois set;ALL =— the hosts for which usingsudois allowed;(root)— the user on whose behalf the specified commands are allowed to run;NOPASSWD:— disables the password prompt when running the command viasudo;PG— the alias defined by theCmnd_Aliasparameter
%ivan ALL = (postgres) NOPASSWD: ALLin this line:%ivan— the system group (in this exampleivan), whose users can run commands viasudoon behalf of the user specified after it;ALL =— the hosts for which usingsudois allowed;(postgres)— the user on whose behalf the specified commands are allowed to run;NOPASSWD:— disables the password prompt when running the command viasudo;ALL— the ability to run any commands available to the specified user, on their behalf.
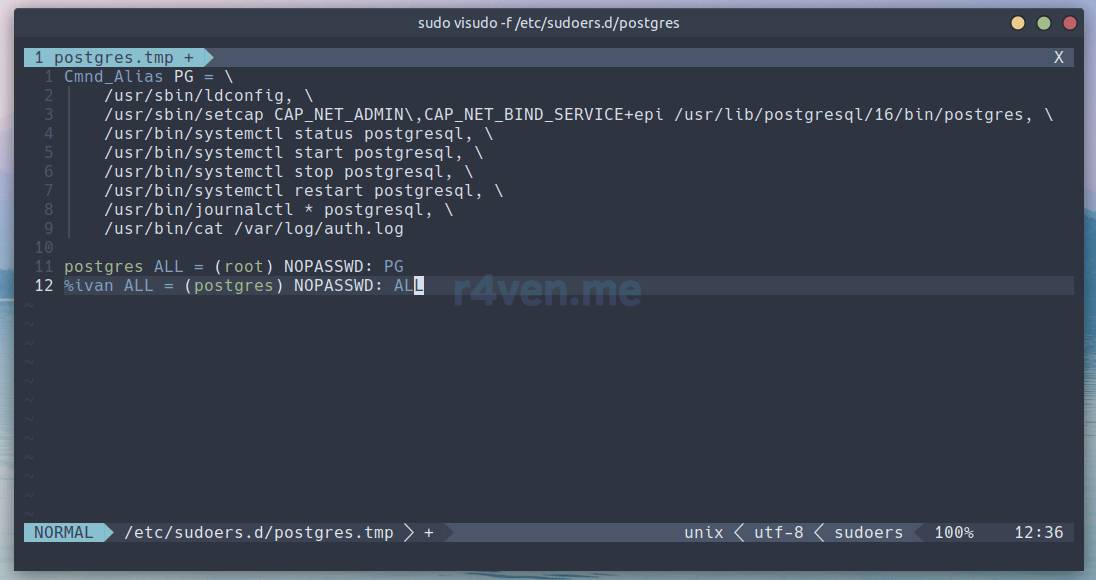
Save and exit the editor.
Liked my Neovim config?
You can easily create a similar one by following the article: Neovim — Installing and configuring a code editor with IDE features in just a few commands.
If you make a mistake, you’ll see a message like this indicating where you went wrong:

Type e and press Enter to return to the editor. You need to know about the letter e, since the program doesn’t give any hints, quite harsh really🤔.
If you filled everything in correctly, visudo will let you save the file and close the editor.
In the example above, we set up full access to the postgres user for members of the ivan group. And in turn, we allowed postgres to run a strict list of commands on behalf of root.
Let’s check:
sudo -l

sudo -iu postgres

sudo -l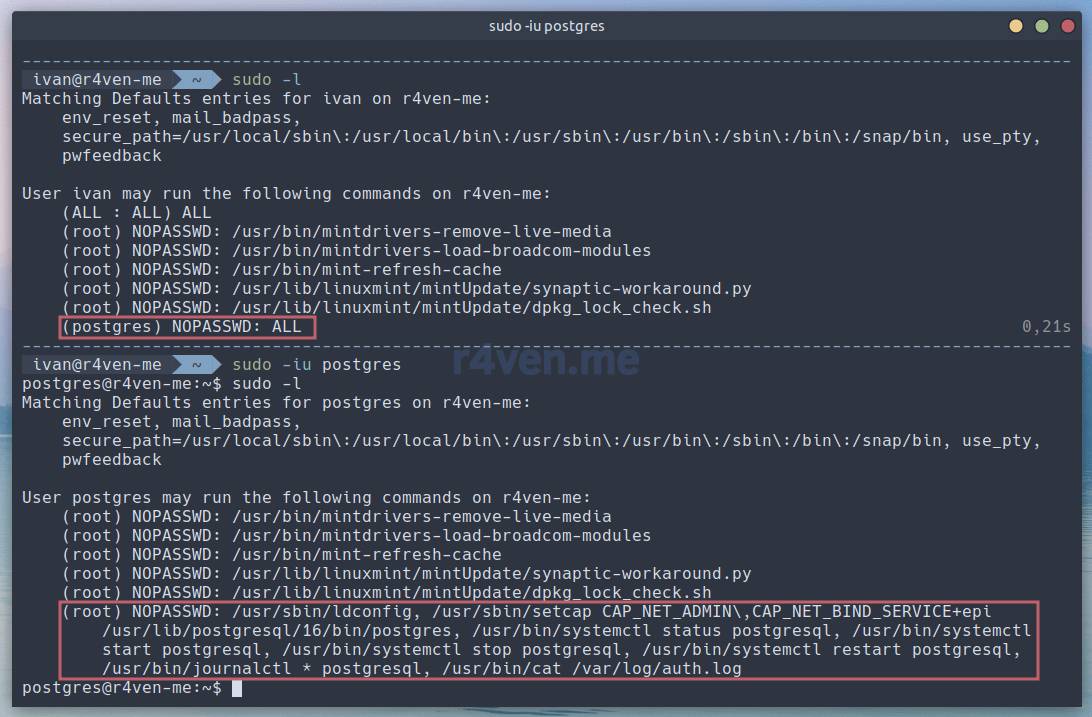
When entering an allowed command, it will simply run🤷♂️. And when using a command not in the allowed list, and if your user isn’t added to the admin group (sudo or wheel), the sudo utility will, as expected, deny its execution. Example:
sudo systemctl status postgresql

sudo systemctl enable postgresql
Well, I think I’ve told you everything.
Oh, and just recently I learned that when using sudo, the $PATH environment variable becomes irrelevant. For the sudo utility, a special secure_path directive is set in the /etc/sudoers file with a list of directories where executable files are stored:
Defaults secure_path="/usr/local/sbin:/usr/local/bin:/usr/sbin:/usr/bin:/sbin:/bin:/snap/bin:/opt/bin"Now you know about this too☺️.
Viewing the sudo event log
By default the sudo program logs its actions to the system log, aka syslog. In Linux distributions using systemd as the init system, you can view the log of actions related to sudo using the journalctl utility:
sudo journalctl | grep -i sudoIf you need to watch sudo usage in real time — add the -f or --follow option:
sudo journalctl --follow | grep -i sudo
Note that the executed commands also end up in the log.
If you need to save the action log to a file, you can configure this by adding the corresponding parameter to the main config file /etc/sudoers. Open it for editing with the command:
sudo -E visudo📝 Note
The -E or --preserve-env option lets you run commands using the current user’s shell environment. This is most often needed to use the console editor you want, specified in the $EDITOR variable. In my case that’s .
And add the line:
Defaults logfile="/var/log/sudo.log"
Save the file and close the editor. Just in case, let’s check the permissions on the log file:
sudo ls -l /var/log/sudo.logIt should look like this:

If not, set restricted permissions manually:
sudo chmod 600 /var/log/sudo.log📝 Note
We talked about file permissions in more detail here.
If you need to record the output of commands executed via sudo, similarly add the following logging setting to the /etc/sudoers file:
Defaults log_input, log_outputNow, after every command executed with sudo, its entire output will be saved in the /var/log/sudo-io directory.
To view saved output, a special sudoreplay command is used (damn magic). Example of viewing the first saved command:
sudo head -n15 /etc/sudoers

sudo sudoreplay /var/log/sudo-io/00/00/01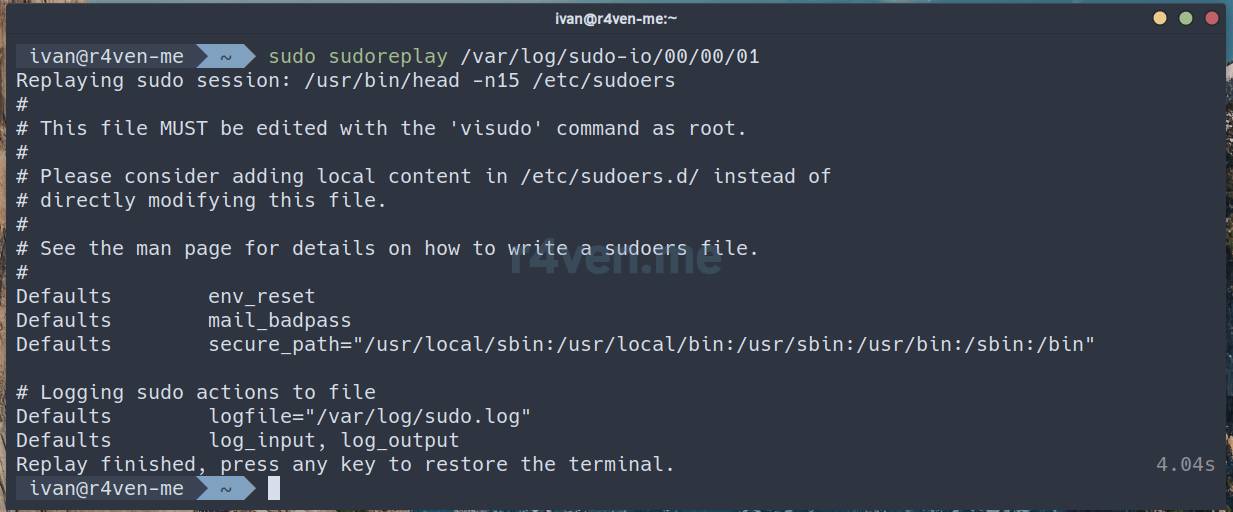
It’s worth warning you that in this mode even sessions of pseudo-graphical programs, such as console editors (vim, nano) and visualizers (top, htop), are recorded, which can quickly fill up disk space.
Afterword
We’ve taken another step on the path of studying the Linux command line. As I said at the beginning of the article, the topic of privileges, and security in general, in the world of Linux is very extensive and will always be relevant. So try to spend time not only learning technologies, but also using them safely.
Thanks for reading. Good luck! And try to do everything with a sound dose of security in mind.
Useful materials
👨💻And…
Don’t forget about our Telegram channel 📱 and chat
Or maybe you want to become a co-author? Then click here🔗
💬 All the best ✌️
That should be it. If not, check the logs 🙂

Comments