
This post is part of a series about smoothly switching from Windows to Linux. If you missed it, here’s a list of the previous parts:
- Try Linux right inside Windows
- Installing Linux alongside Windows
- Initial setup of Linux Mint 20
- Installing Windows applications on Linux
Today we’ll configure the appearance and desktop layout of the Linux Mint Cinnamon edition to our own preferences.
DISCLAIMER!
I’d like to point out right away that all the actions described in this guide are done at your own risk. Please understand this. My blog is just a platform where I talk about my experience and share my opinion on various things and phenomena.
In this guide I’ll show you how I customize my Linux Mint Cinnamon desktop. The actions described in this post are merely recommendations. I don’t claim any exclusivity or authority. This is working with free and open-source software. That’s its whole point — freedom and freedom of choice, including for self-expression.
Thanks for understanding 😉
Ivan Cherniy
A small digression.
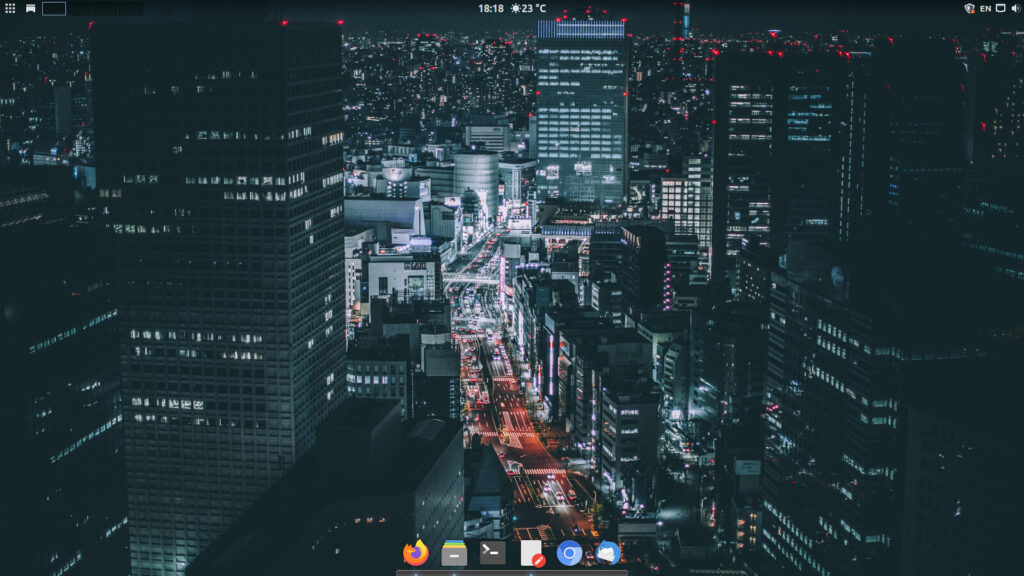
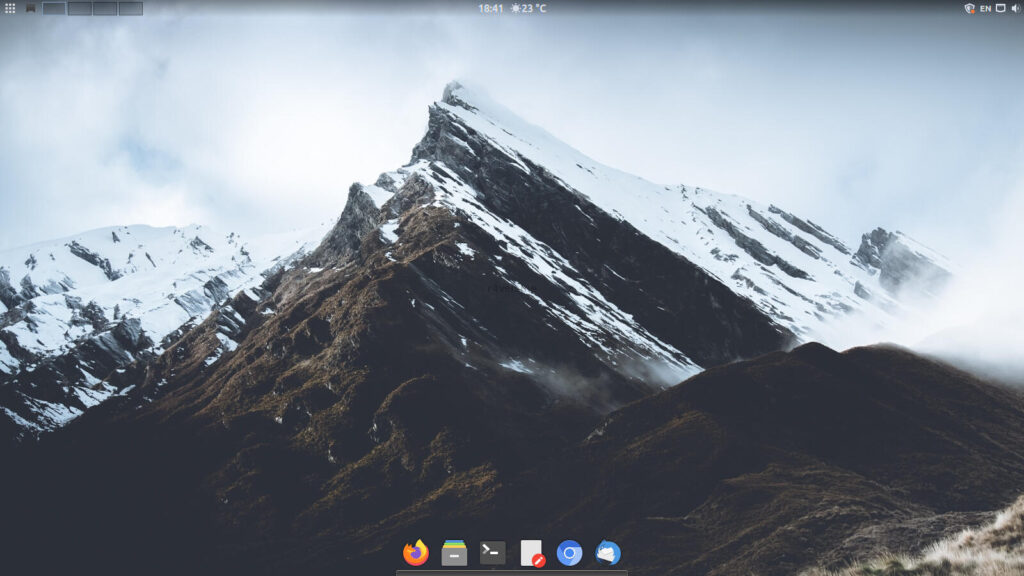
There are many variants of color schemes/palettes. I consider this to be a purely individual thing. Everyone can have their own specific preferences, and some people might not bother about it at all, preferring the harsh default. I personally prefer to style my desktops with the Nord color palette from the cool folks at the Arctic Ice Studio project. As the layout, in the case of Linux Mint Cinnamon, I chose the Pantheon desktop style from the ElementaryOS distribution.
So, as they say, less words, more pictures.
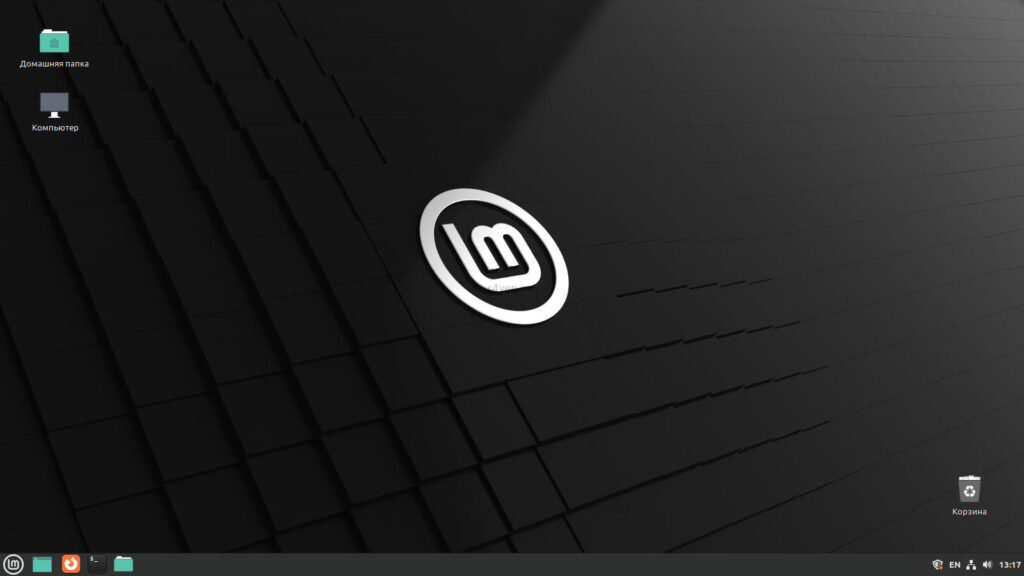
Before and after
Before:
After:
Downloading and extracting the archive
Download the archive from the link:
Archive contents:
- Hack — the monospace powerline font Hack Nerd Font Mono for the text editor and terminal
- Nordic-bluish-accent — a dark gtk theme with the Nord color palette
- Nordic-bluish-accent-standard-buttons — a dark gtk theme with the Nord color palette (standard window buttons instead of colored ones)
- Nordic-Polar — a light gtk theme with the Nord color palette
- Nordic-Polar-standard-buttons — a light gtk theme with the Nord color palette (standard window buttons instead of colored ones)
- pixelfun3 — a mouse cursor theme (light)
- pixelfun3-eclipse — a mouse cursor theme (dark)
- Walls — a dozen wallpapers from my blog for variety 😉
- xed — a folder with the Nord theme file for the native Xed text editor
- gtk.css — a css file with the config for the native Gnome-terminal
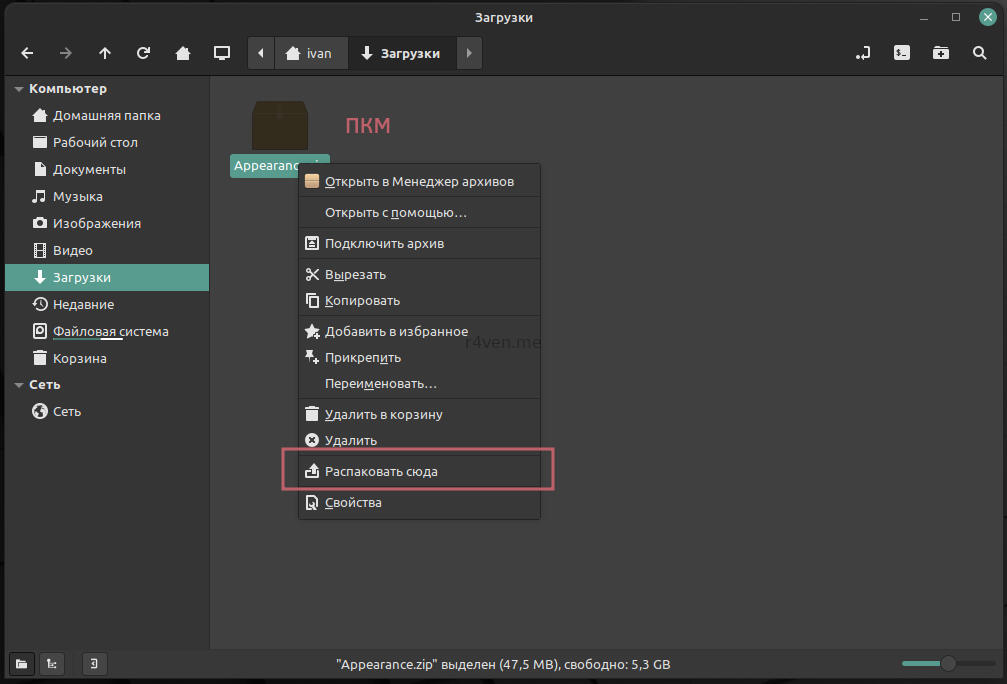
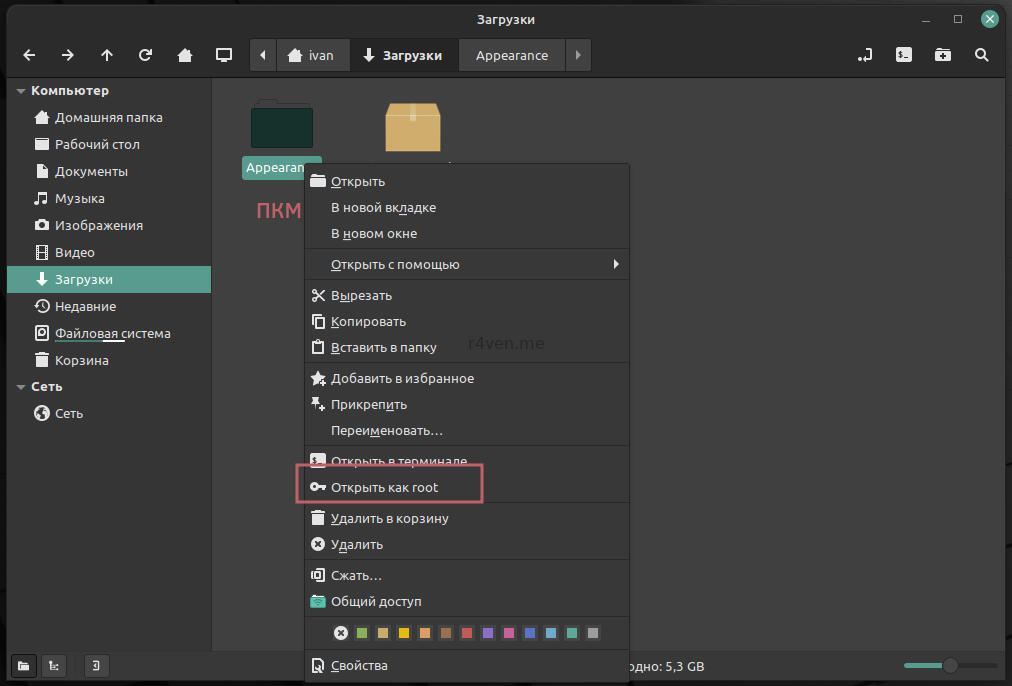
Extract it and open the extracted folder as root using right-click on it.
🖐️Hey!
Subscribe to our Telegram channel @r4ven_me📱, so you don’t miss new posts on the website 😉. If you have questions or just want to chat about the topic, feel free to join the Raven chat at @r4ven_me_chat🧐.
Why root? We’ll be copying the appearance files to a system directory so they’re available at the system level, not just for a specific user. They can also be placed in the user’s home directory: ~/.themes ~/.icons ~/.local/share/fonts which is recommended, but is inconvenient for me. After all, we fully control the system 😉 So:
Copying files from the archive into the system
For convenience, after opening the Nemo file manager as root, press F3 to activate the two-pane mode.
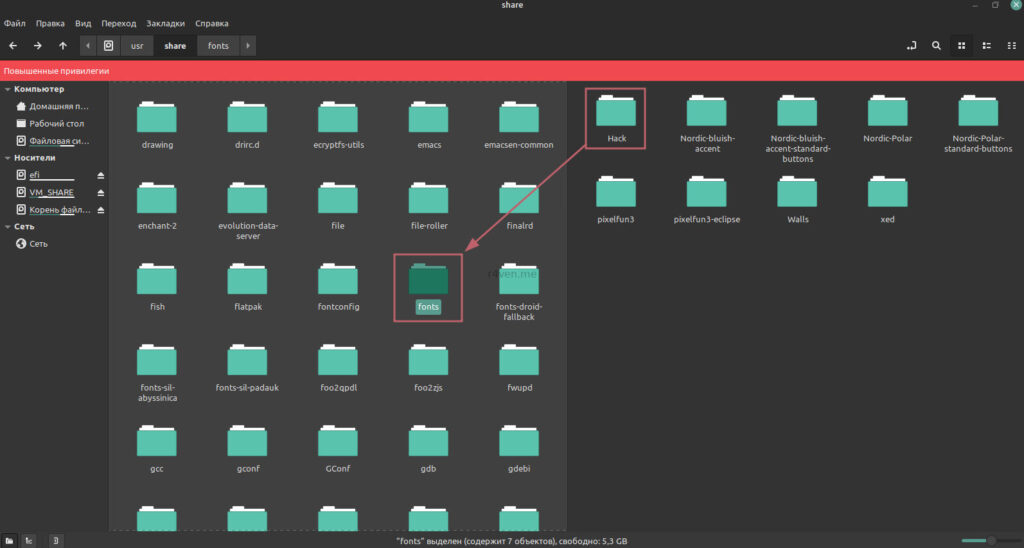
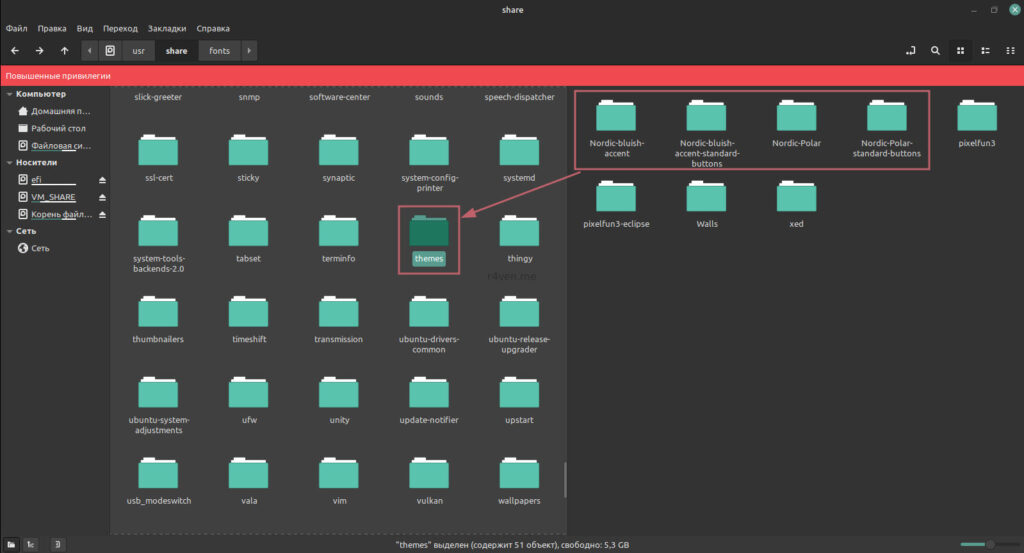
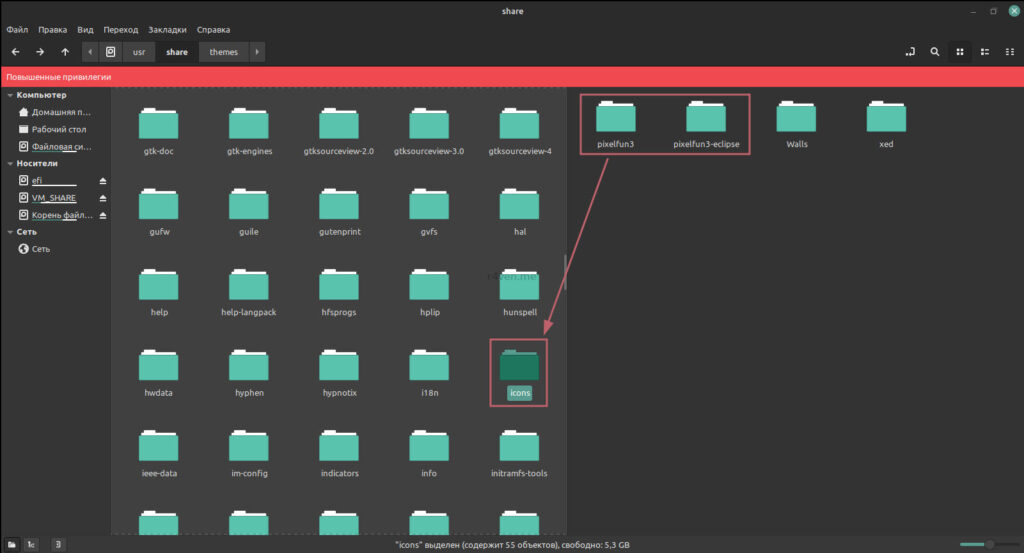
The global user configuration files of the Linux system are located in the /usr/share/ directory.
Let’s go there and copy the folders from the archive one by one to the corresponding system folders. Copy the Hack directory with the icon font to the /usr/share/fonts folder, copy the Nordic gtk theme file to the /usr/share/themes folder, and the mouse cursor theme folders pixelfun3 to the /usr/share/icons folder:
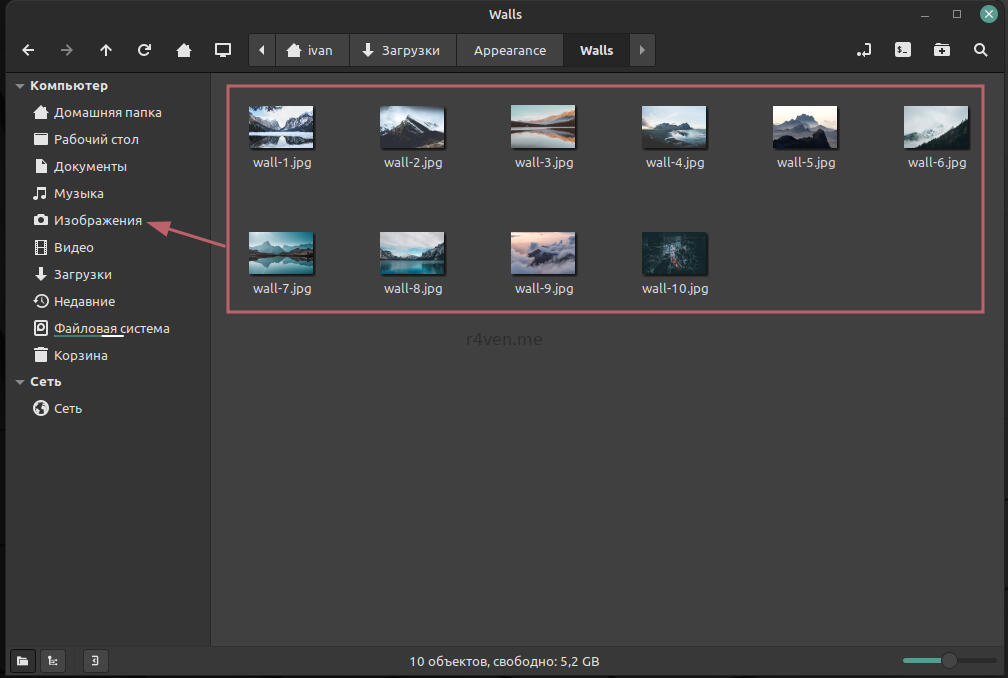
We can close the file manager window running as root, switch to the regular window, and copy the contents of the Walls folder into the Pictures folder in the home directory:
Installing the necessary components via the terminal
We’ll install the modern flat Papirus icons, the minimalist Plank dock, and the git utility, which we’ll need a bit later, via the terminal. Papirus icons are also in the standard repositories, but we’ll connect the developers’ repository and install the latest version. Run these three commands one by one:
sudo add-apt-repository ppa:papirus/papirus
sudo apt update
sudo apt -y install papirus-icon-theme papirus-folders plank gitThe papirus-folders utility lets you globally change the folder color when using Papirus icons. For the Nord theme, the best folder color is bluegrey. Don’t close the terminal, run this command:
sudo papirus-folders -C bluegreyNow it’s time to activate all the downloaded and installed elements.
Activating the font, theme, mouse cursor, and wallpaper
Go to the system settings (in the main menu) and configure the first three items of the Appearance section one by one:
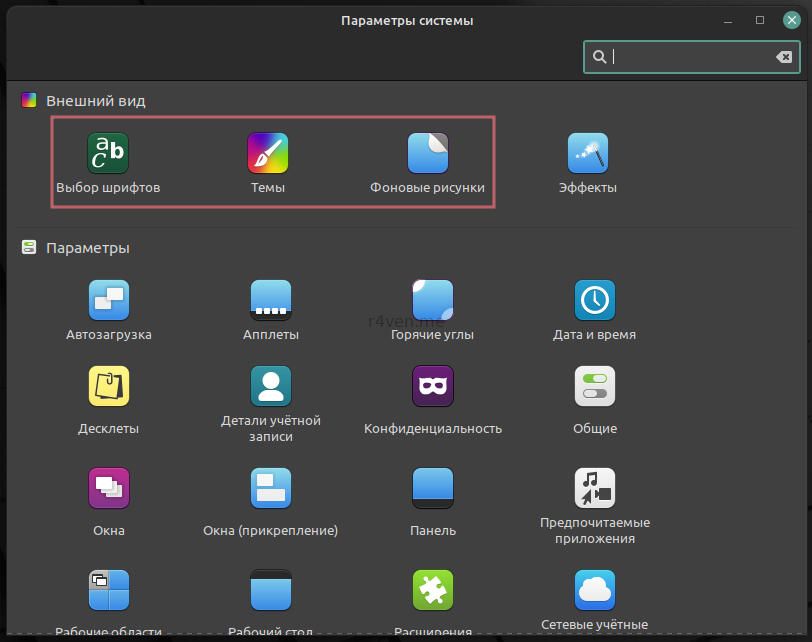
Change the monospace font, activate the Nordic theme (for all items choose the variant from the same theme), and change the desktop wallpaper:
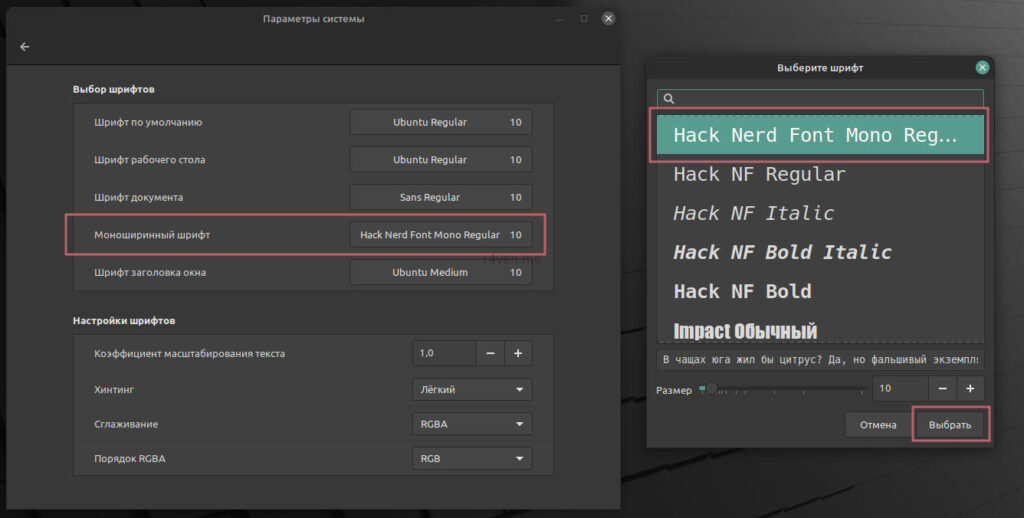
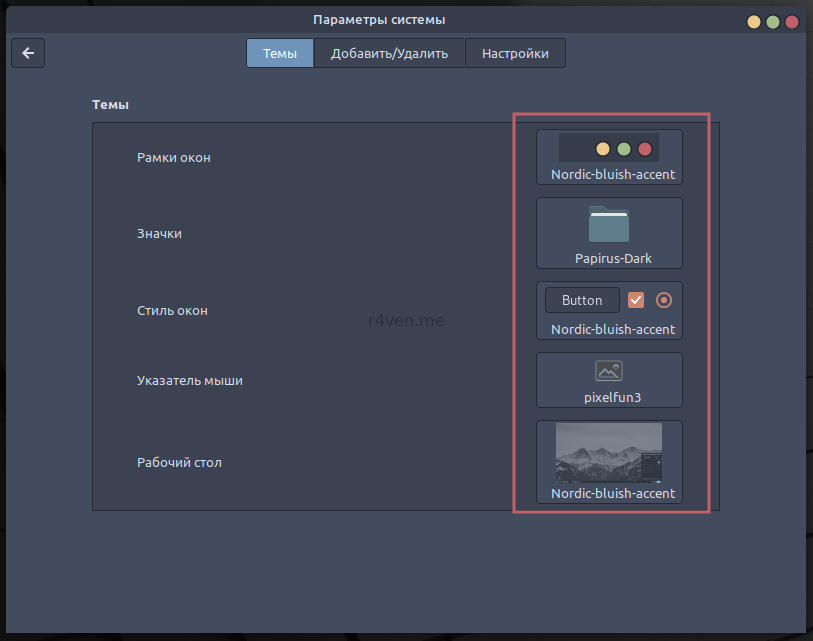
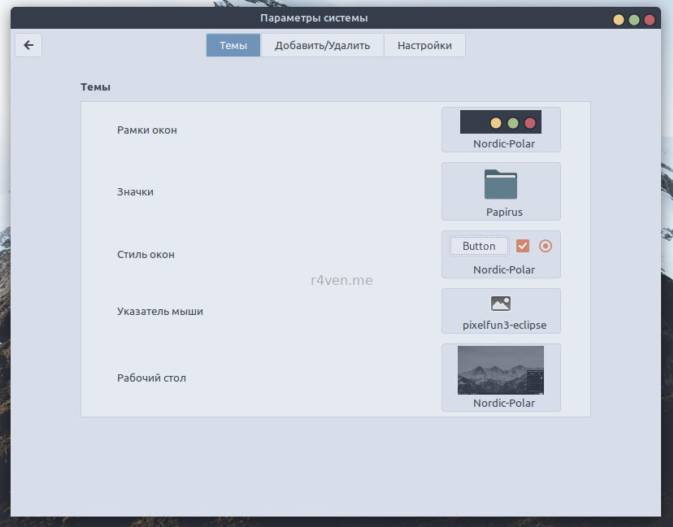
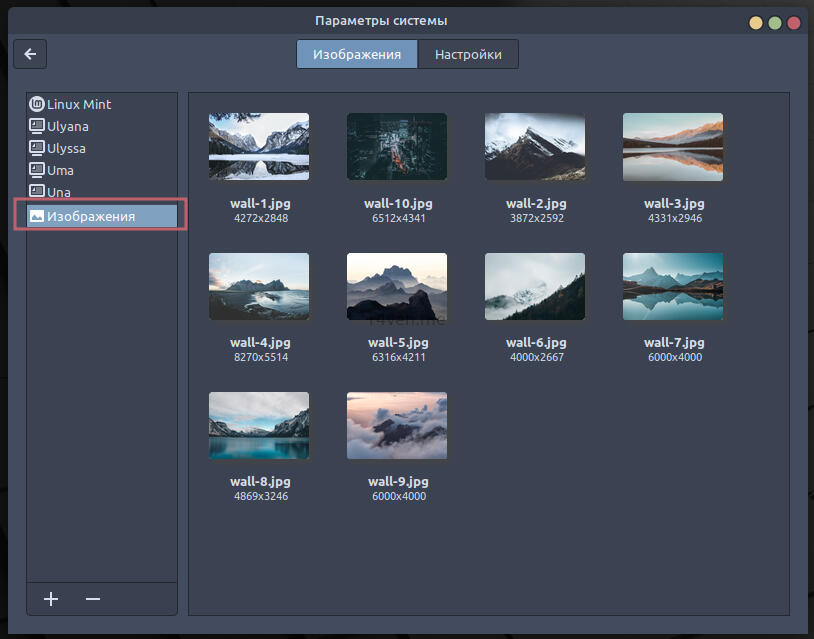
For those who don’t like the colored window control buttons (like in MacOS, only on the right), the theme’s developer kindly made a separate theme where the colored buttons are replaced with standard ones. In that case, choose the Nordic-bluish-accent-standard-buttons or Nordic-polar-standard-buttons theme everywhere, depending on your preference.
A separate note on Papirus icon compatibility with the Nordic theme: for correct display of monochrome icons on the panel and in other programs when using the Nordic-bluish-accent theme, choose Papirus-Dark, and for Nordic-polar choose plain Papirus.
Configuring the appearance of the text editor and terminal
Xed text editor
Let’s activate the Nord theme for Linux Mint’s native text editor — Xed. Xed is a minimalist but quite functional text editor with obvious similarities to Sublime Text. It’s this latter code editor that the Linux Mint developers really like, and they probably drew inspiration from it when creating their own. So, let’s open our Xed by typing “text editor” in the main menu and go to its preferences:
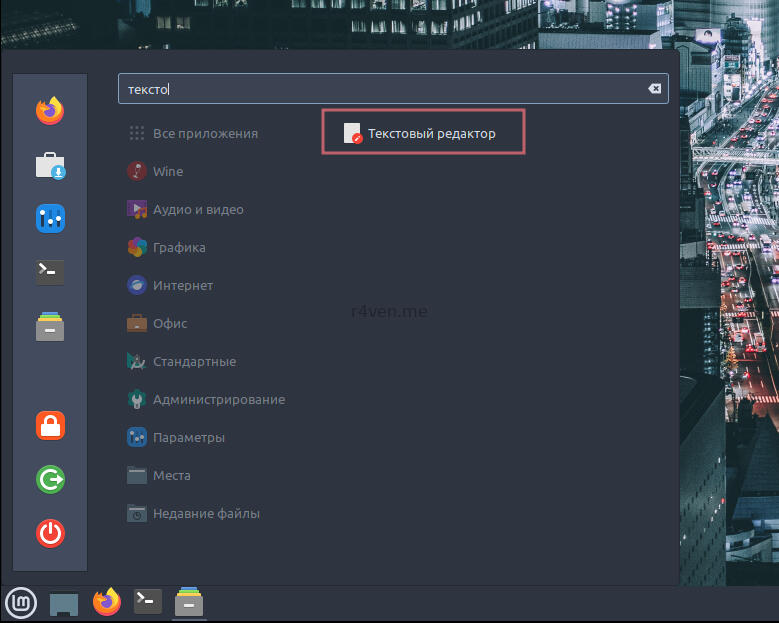
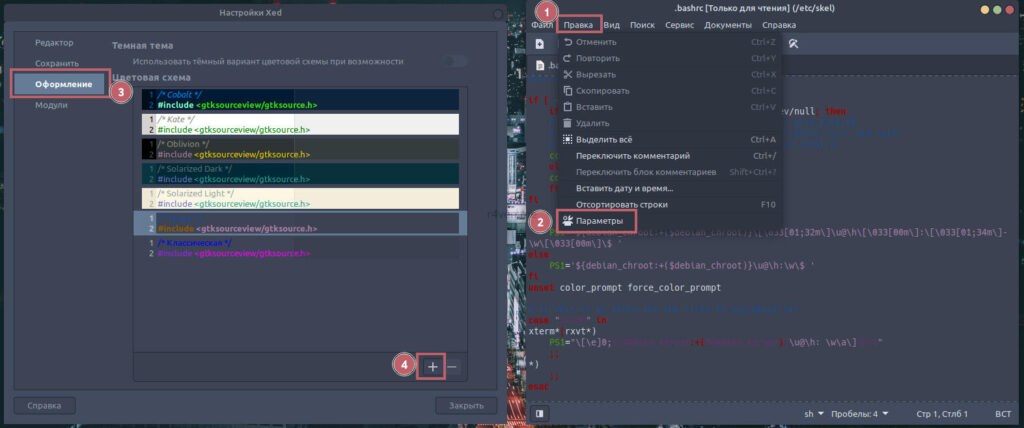
Next, go to the Style tab and click the plus sign there. Now find the xed folder from the previously downloaded archive, in it there will be a styles folder, and in it the file nord.xml. Import it and activate the color scheme:
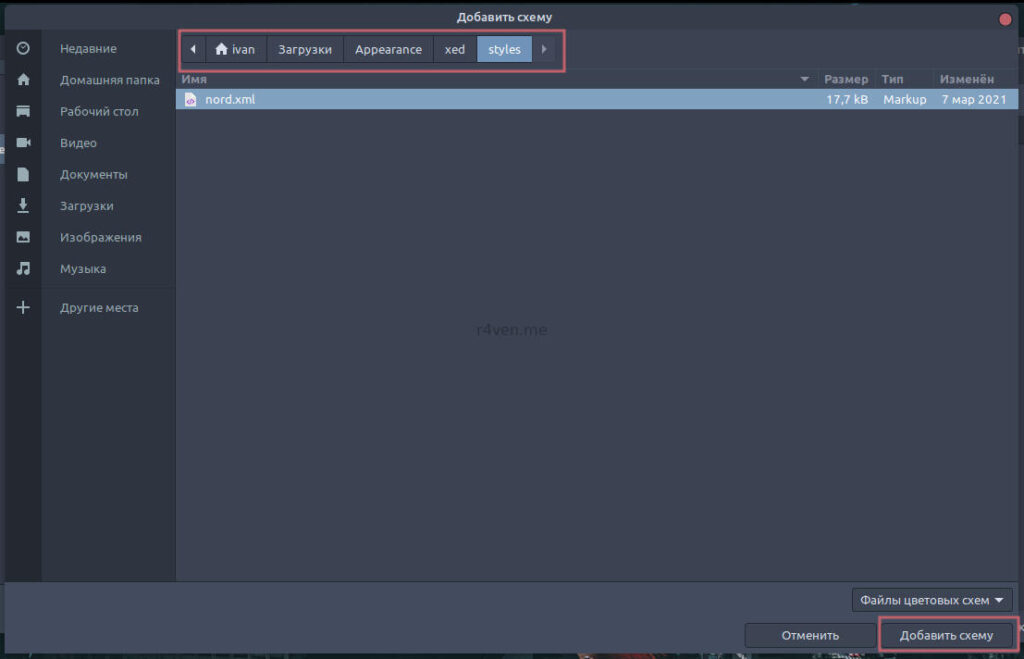
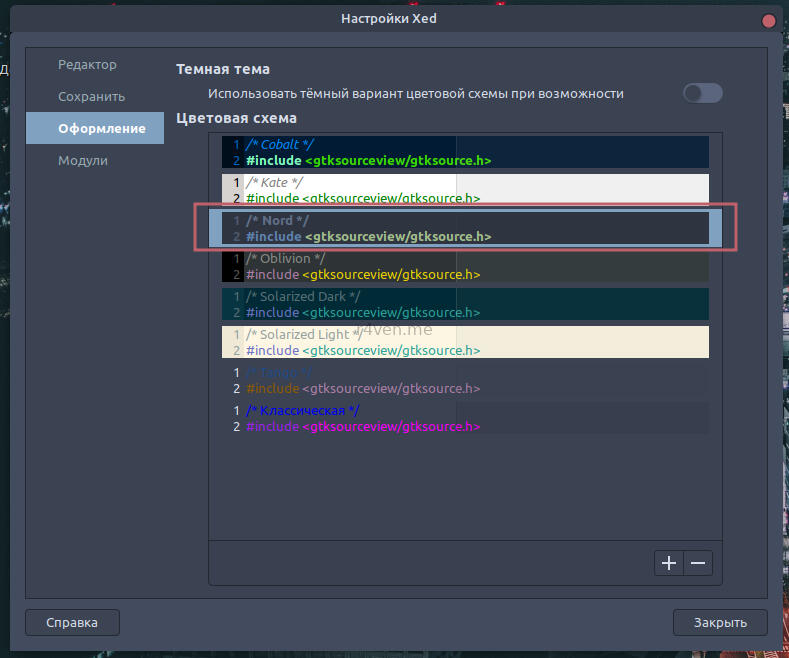
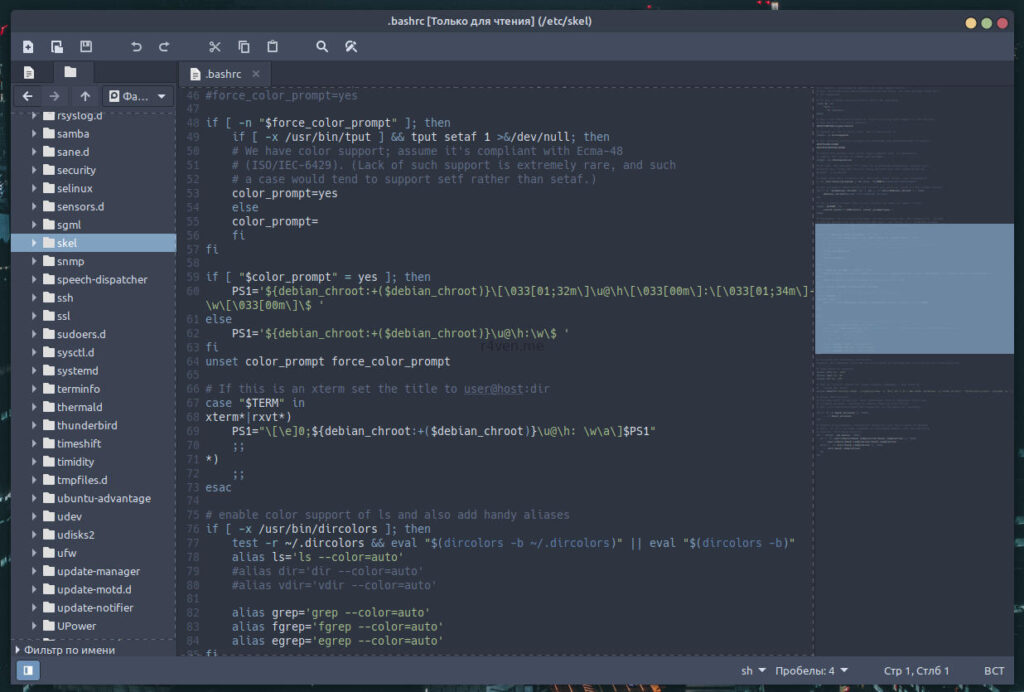
I recommend exploring this editor’s settings in more detail, it has basic features for a code editor. For editing text files and various configs, this is more than enough. By changing a couple of settings and adding a color theme, you can get something like this:
Gnome Terminal
Now let’s style our built-in terminal. By default, since Linux Mint is based on Ubuntu, and the Cinnamon desktop environment runs on Gnome shell, the system uses the terminal from the Gnome desktop environment. It’s not that rich in settings, but it does its job perfectly. With its help we’ll download and then activate the officially supported Nord theme for it. Here we’ll need the git program we downloaded earlier. Run these two commands one by one:
git clone https://github.com/arcticicestudio/nord-gnome-terminal.git
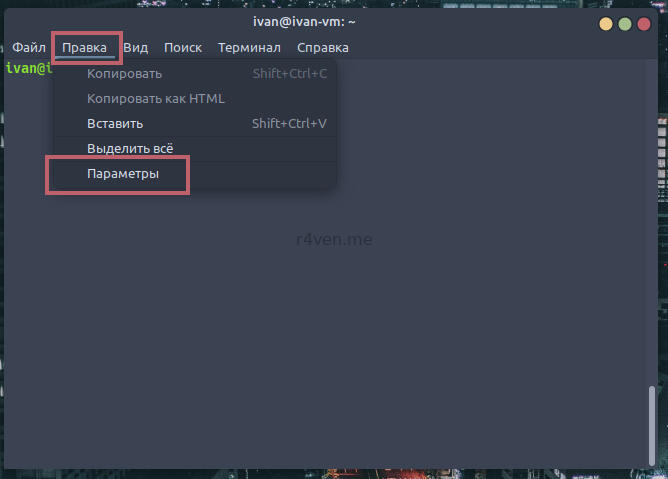
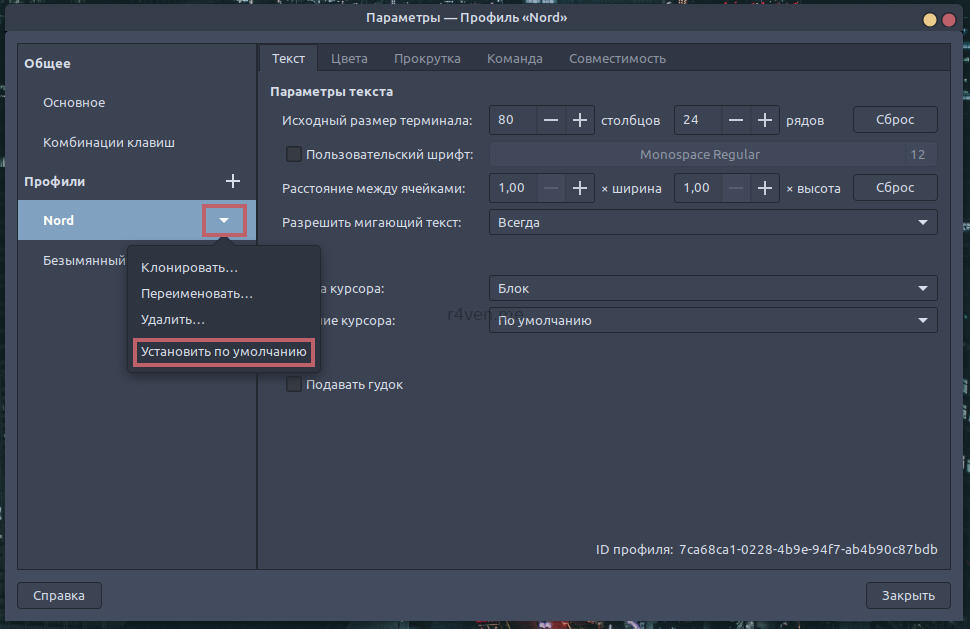
./nord-gnome-terminal/src/nord.sh && rm -rf nord-gnome-terminalAfter the commands complete successfully, right-click on the terminal window, go to preferences, and change the default color profile to Nord:
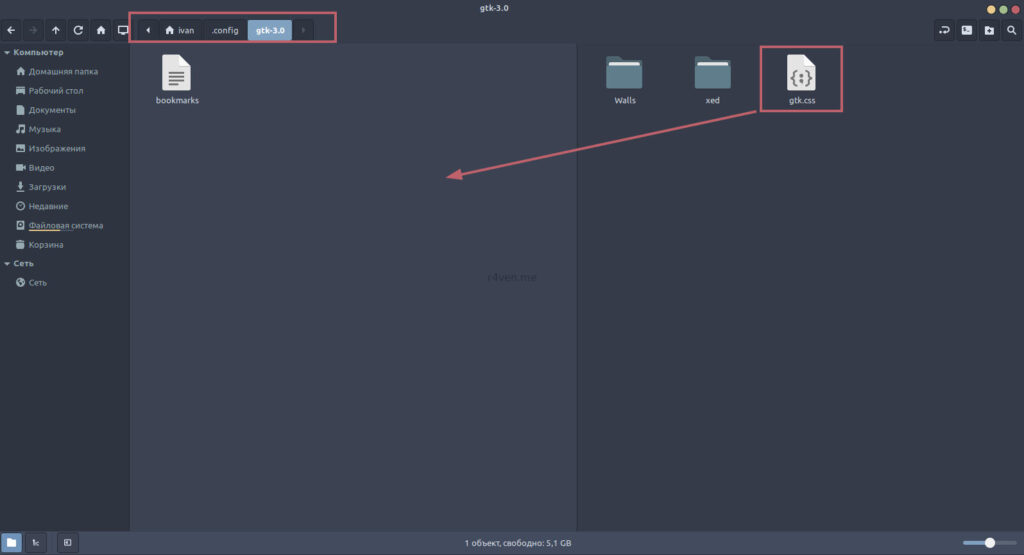
Let’s add one more touch, although it’s not necessary, but it’s all for the sake of aesthetics 😉 Let’s add some small margins around the edges for displaying the terminal content. Copy the gtk.css file from our archive into the ~/.config/gtk-3.0/ folder
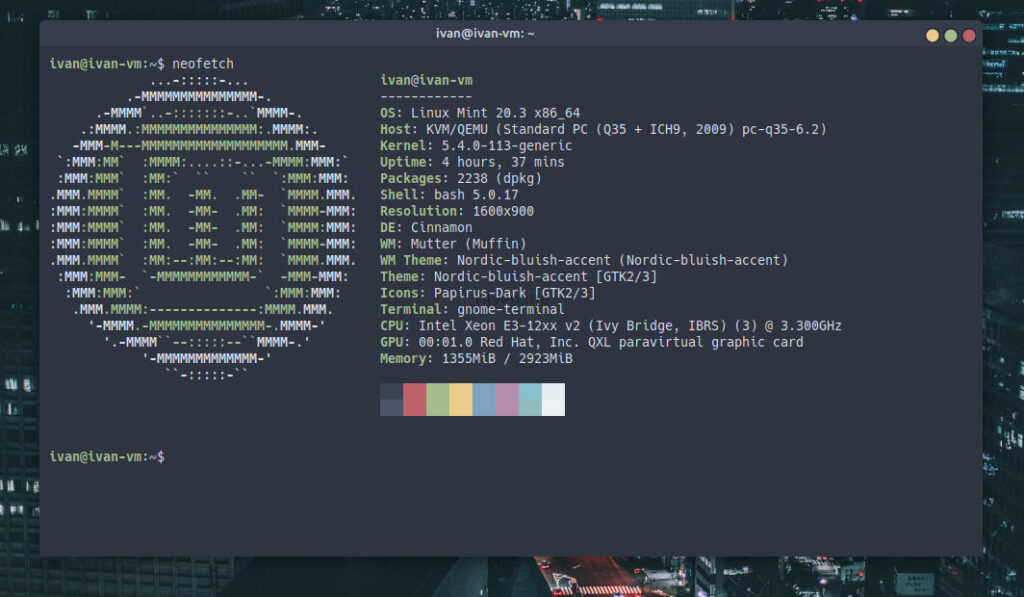
In the settings, disable the display of the top menu and the scrollbar, and get a minimalist and stylishly styled terminal like this.
Run the neofetch command to check and display general information about the system:
Configuring the desktop panel and enabling the Plank dock
Configuring the standard panel
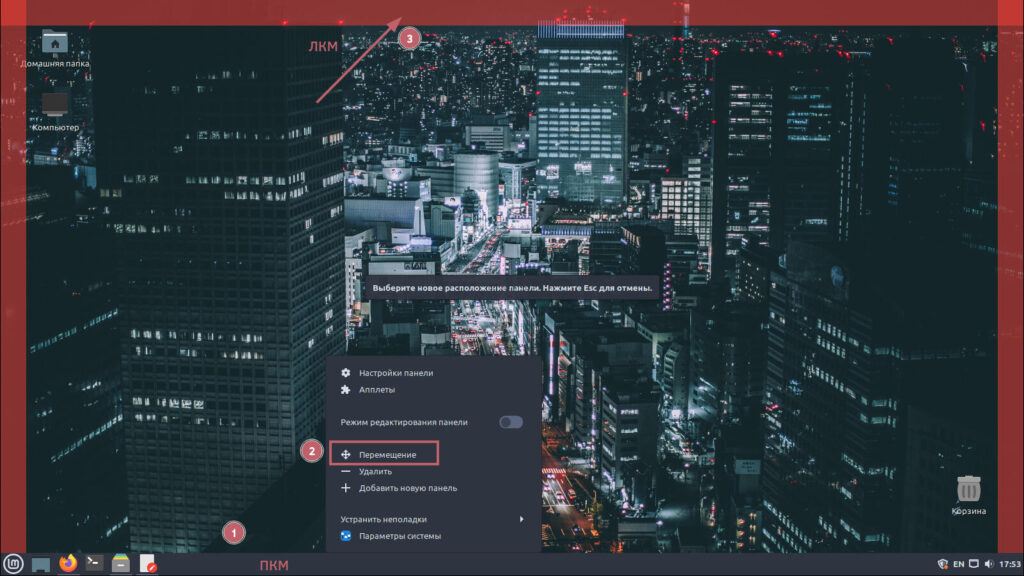
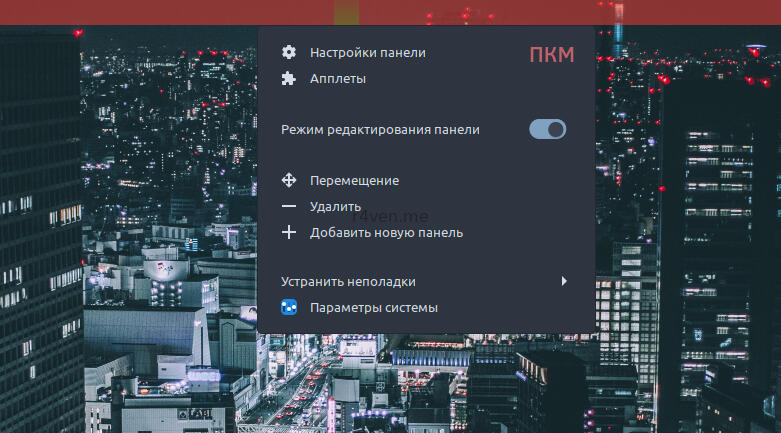
Now let’s move on to configuring the panel. Right-click on the bottom panel, then Move, and then left-click on the top red border:
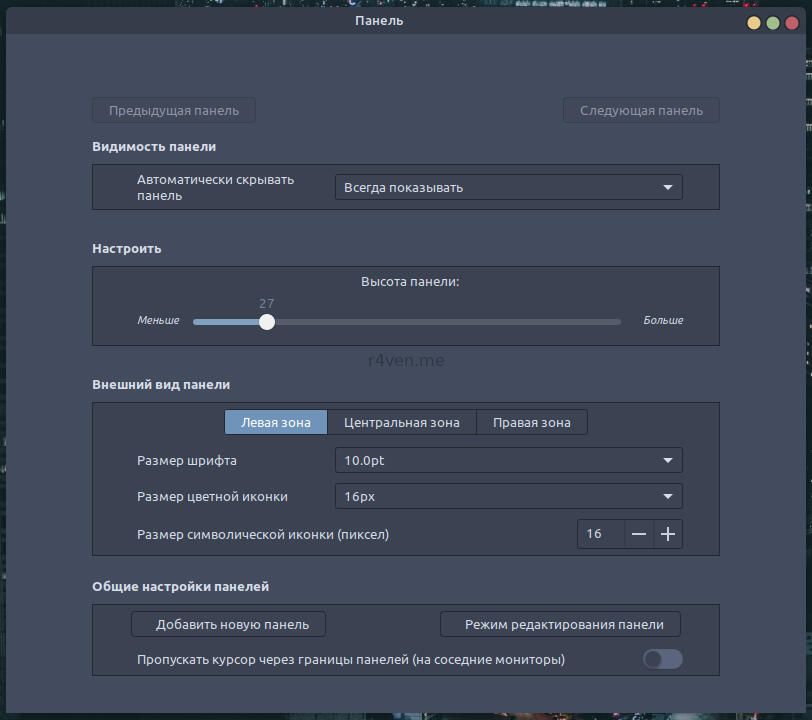
Now right-click on the panel again and go to Panel settings. Set everything as in the screenshot, only for the central zone set Font size to 12.0pt, in the right zone leave everything the same as set in the left one:
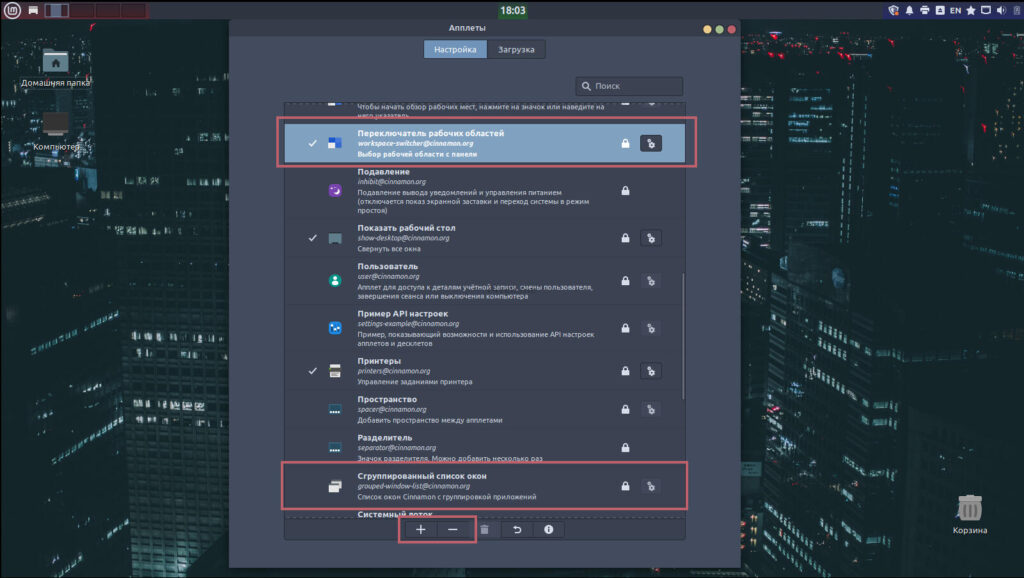
Now right-click on the panel again and click Applets. Then disable Grouped window list by pressing minus and activate Workspace switcher by pressing plus.
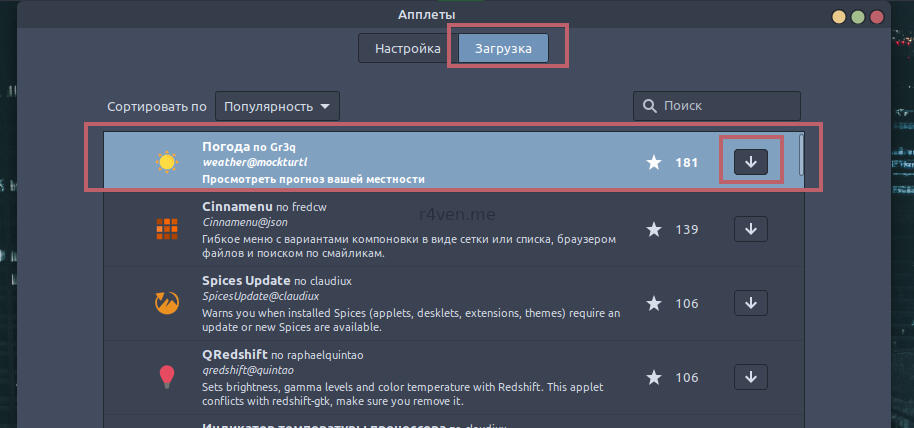
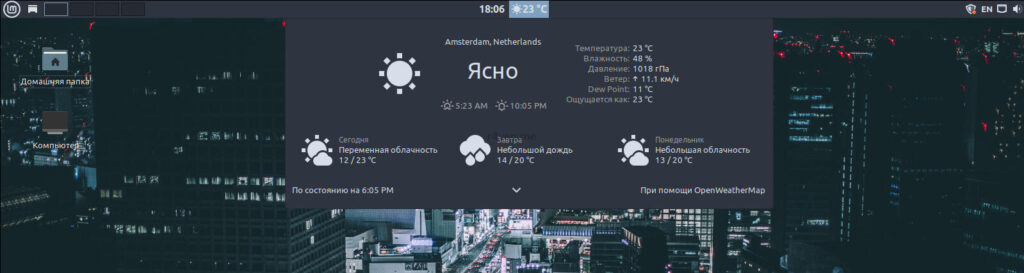
Then go to the Download tab to download the weather applet for our panel. After that, on the neighboring tab, activate its display on the panel, like the previous applets:
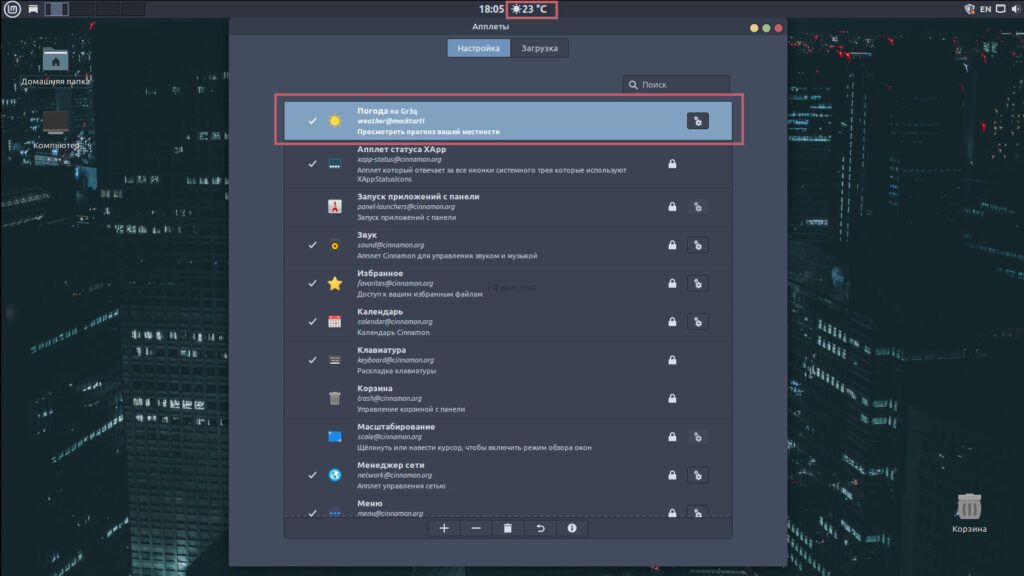
And right-click on the panel again, but now click the Edit panel toggle and use the mouse to move the time and weather applets from the right side to the center, and the Workspace switcher to the left side. It should look like this:
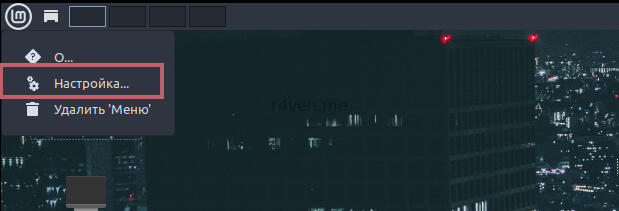
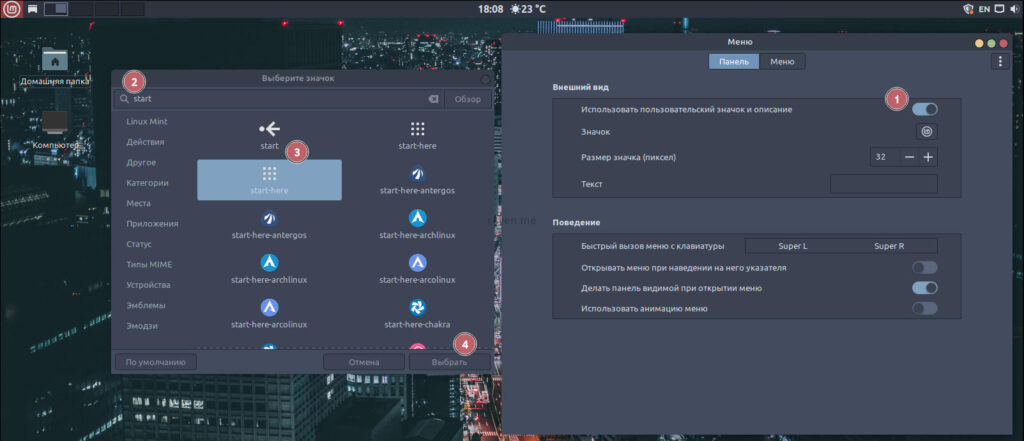
At the next step I usually change the standard Linux Mint main menu icon to the system menu icon. This isn’t necessary, but I like it better this way:
Disabling icon display on the desktop
Since minimalism rules the day today, and the old concept of a “desktop” cluttered with tons of icons is, imho, no longer relevant, we’ll disable their display. Right-click on the desktop and:
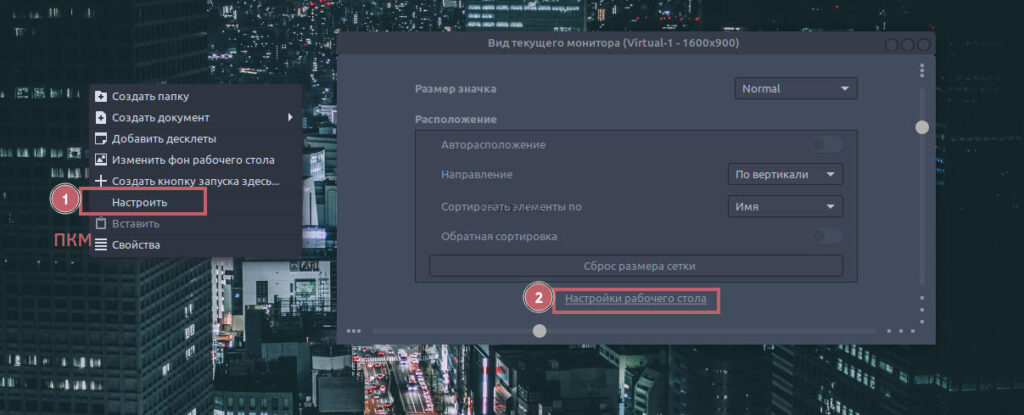
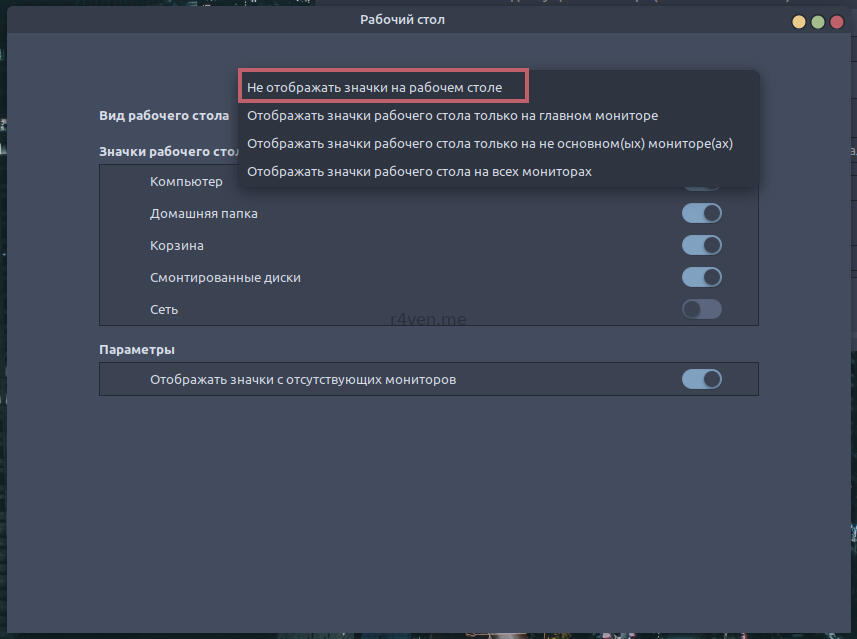
Activating the Plank dock and adding it to autostart on login
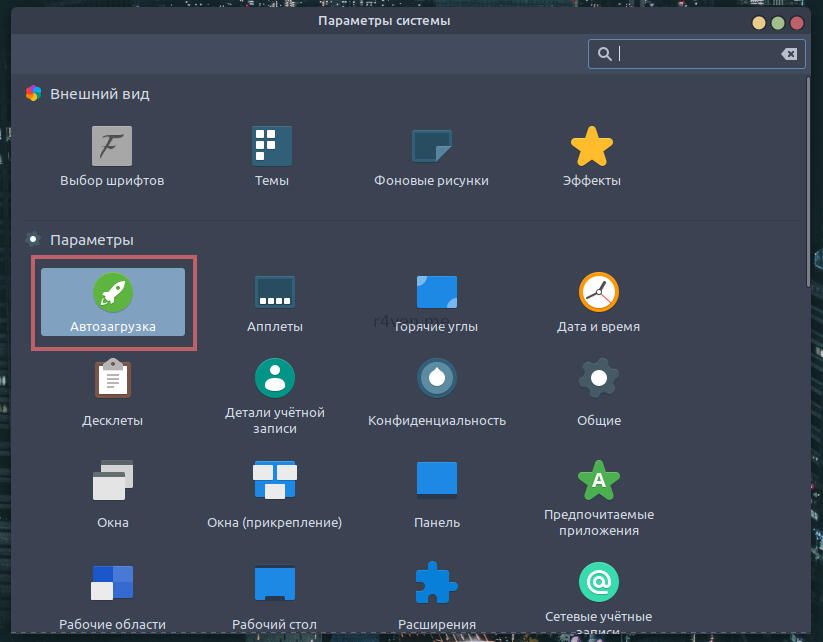
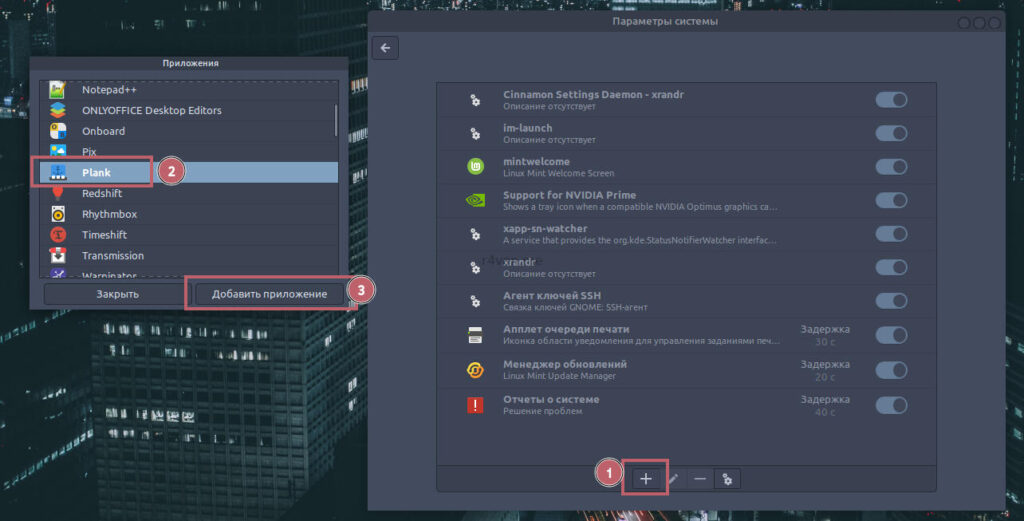
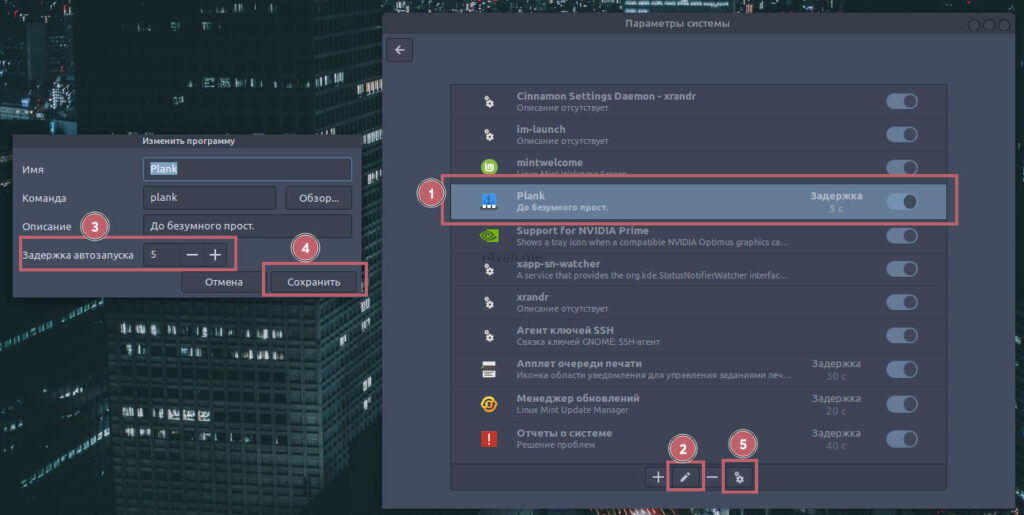
We installed this panel, a la MacOS, together with the icons in step 3 from the standard repositories. To enable it and activate autostart, go to system settings, in the Startup Applications section. Click the plus sign, then Select application, find Plank in the list, and click Add application. Now click the pencil icon and set the delay time to 5 sec. — this is needed for the dock to start correctly in case of an abrupt logout-login.
Everything is set up, let’s launch the panel by clicking the gear:
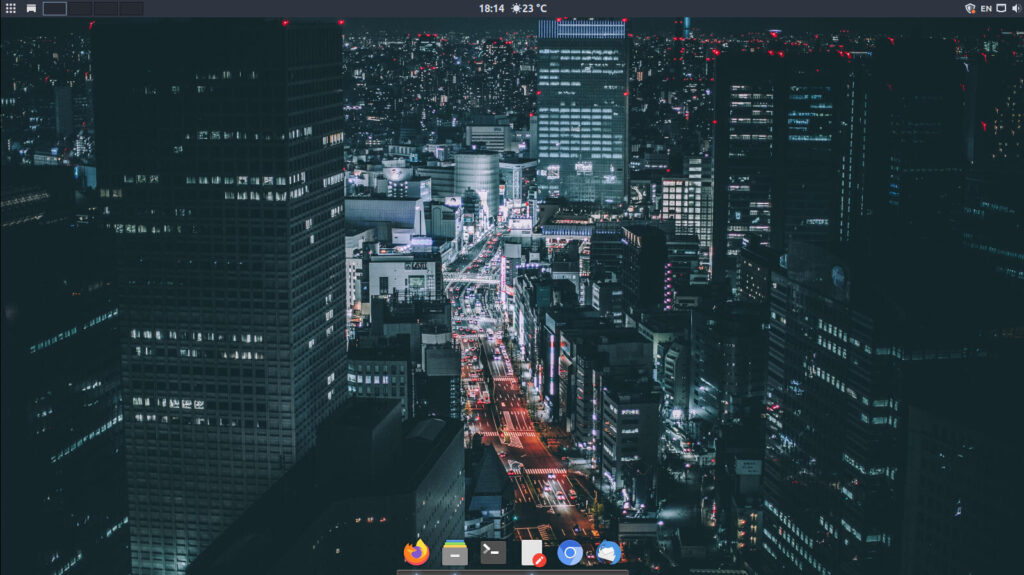
We get this desktop layout:
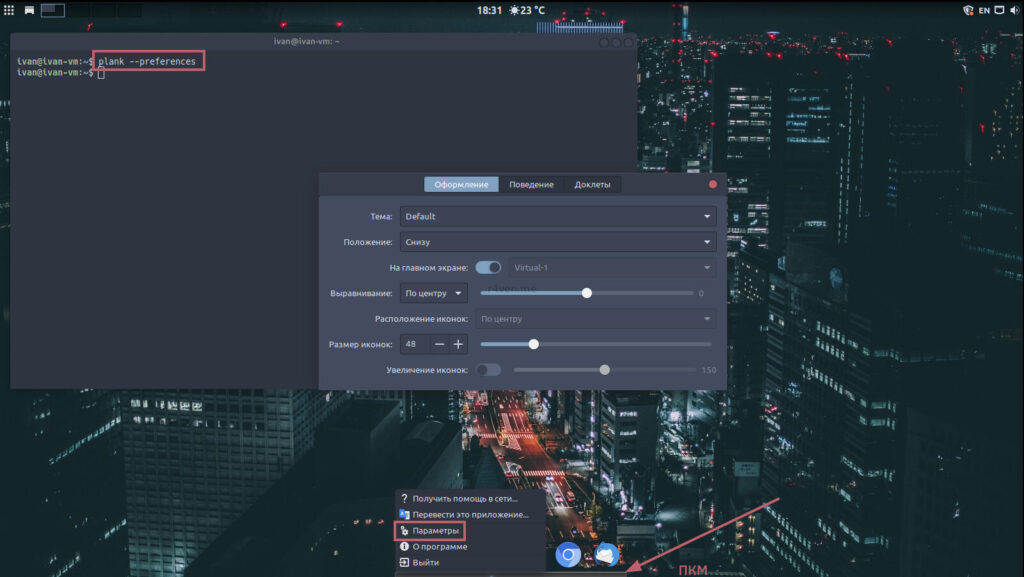
Getting into the dock’s settings section isn’t that easy 😉 To do this you need to right-click on the panel itself, but this doesn’t always work because of the small space for this maneuver. Instead, you can call this menu from the terminal by running plank --preferences, or try to click into the right corner anyway:
Enabling transparency of the standard panel
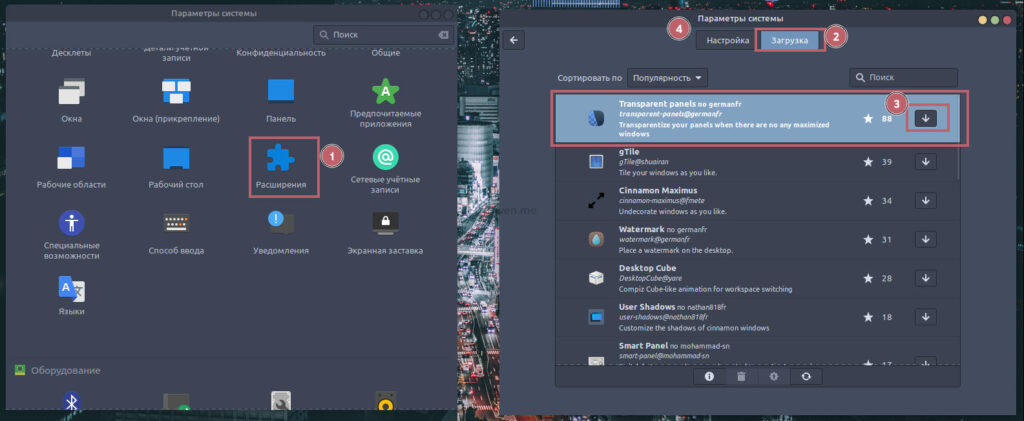
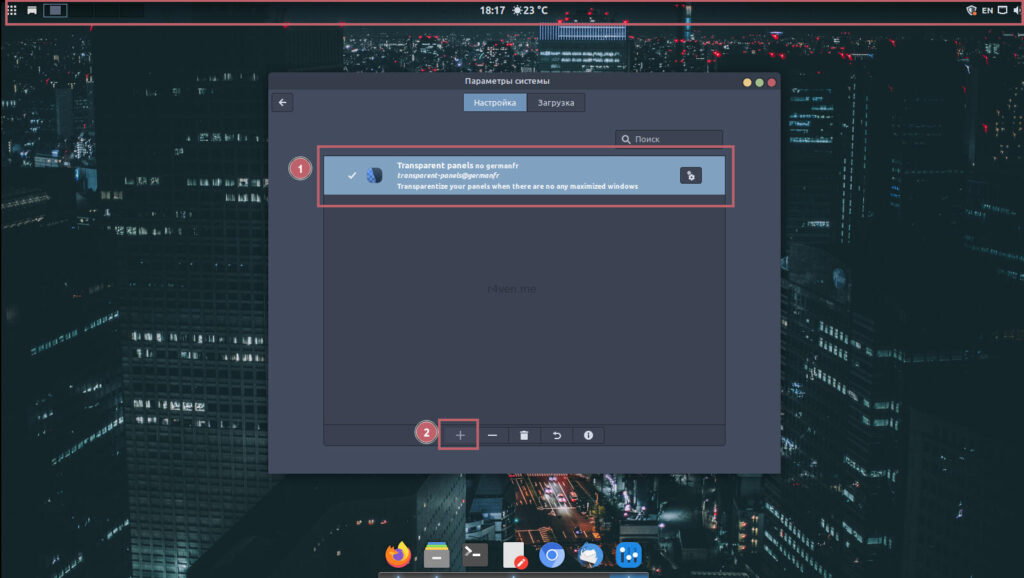
This is also optional. Personally, I like it. To do this, go to system settings, in the Extensions section. Download and activate the panel transparency extension (Transparent panels). It’s usually first in the list. Activate it:
Configuring the login screen
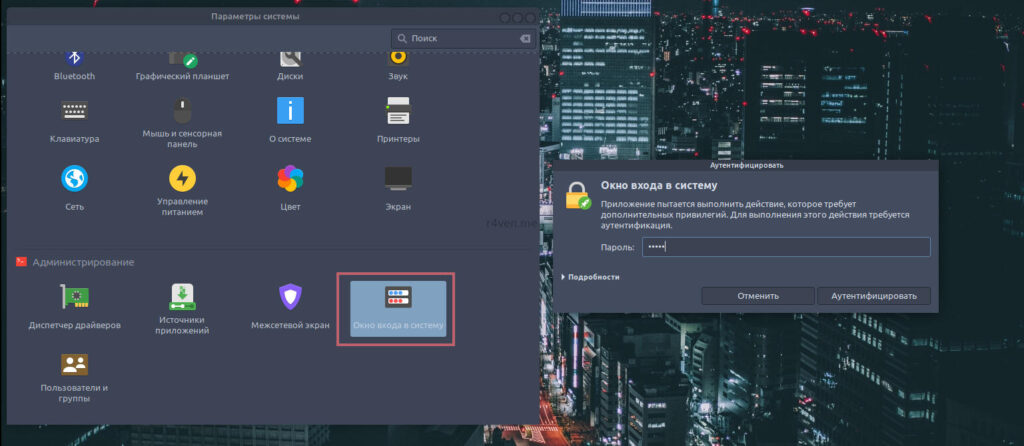
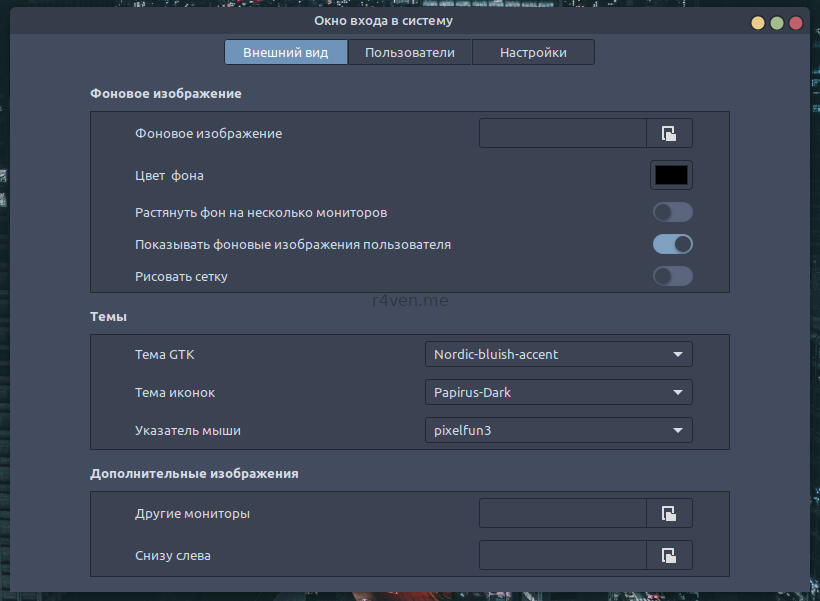
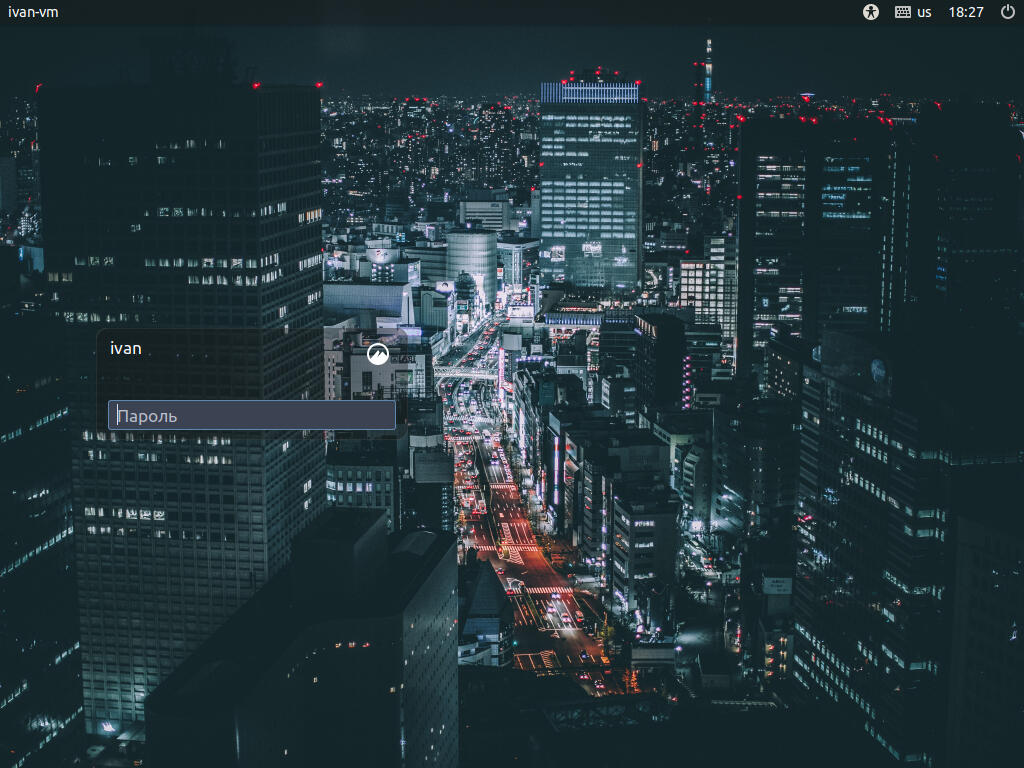
As I already mentioned in the post about the initial setup of Linux Mint, the login screen runs as the root user, and accordingly it’s configured on its behalf. For the whole system to be styled consistently, it’s worth setting the same themes and icons for the login screen as well. To do this, go to system settings again, in the Login Window section, and configure:
Result
The road was long, but here’s what came out of it 😉
The Nordic-bluish-accent theme:
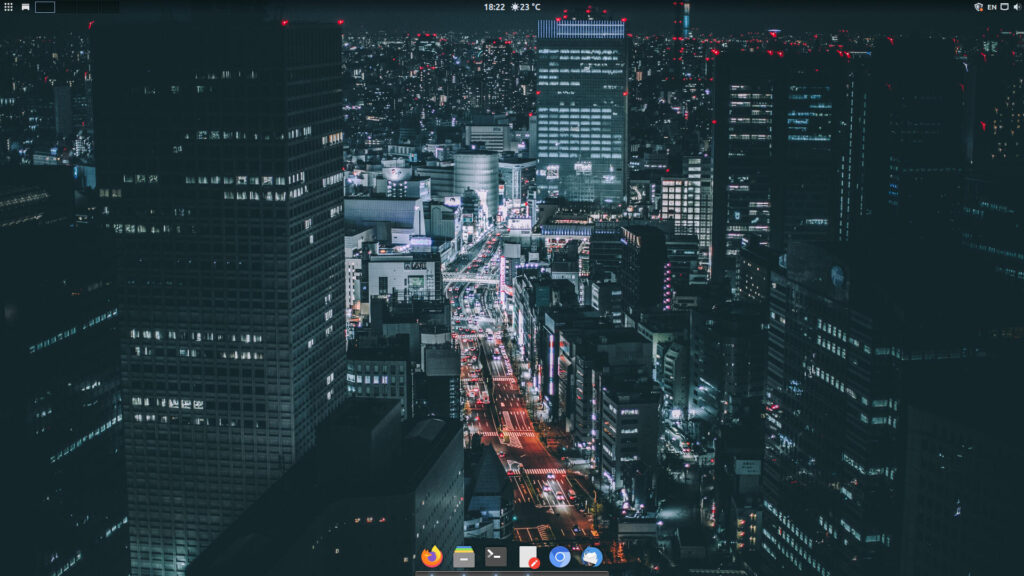
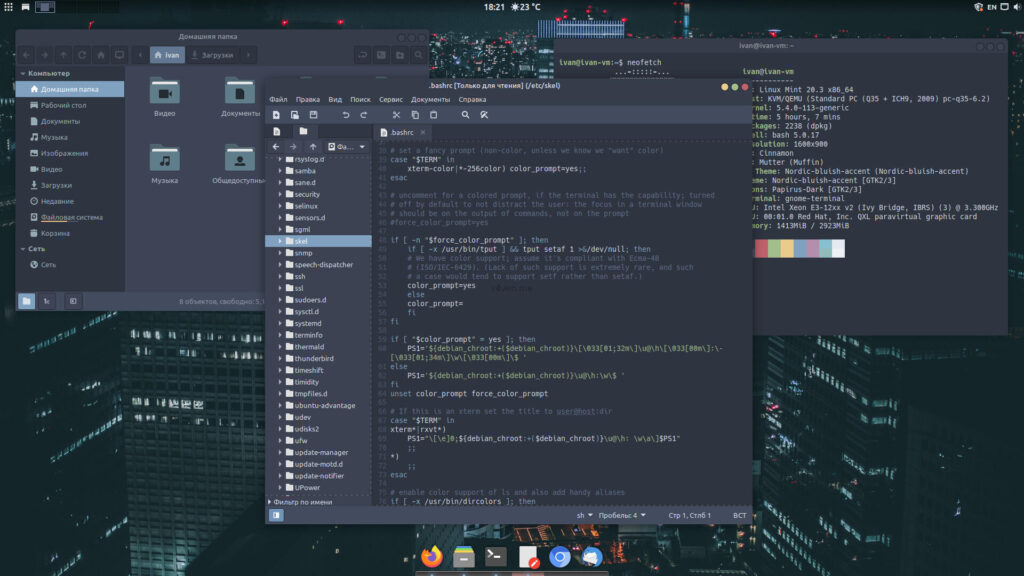
The Nordic-polar theme:
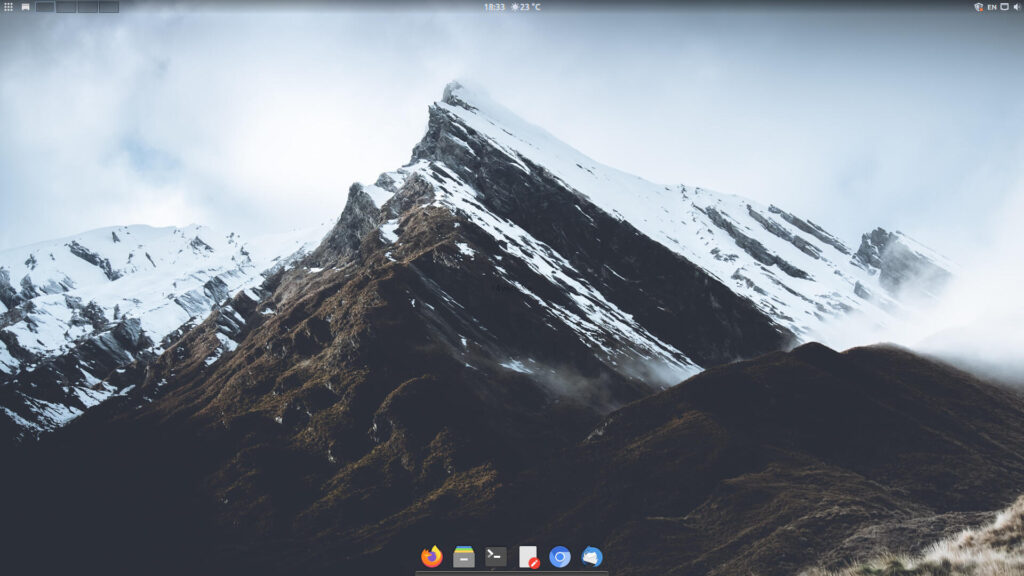
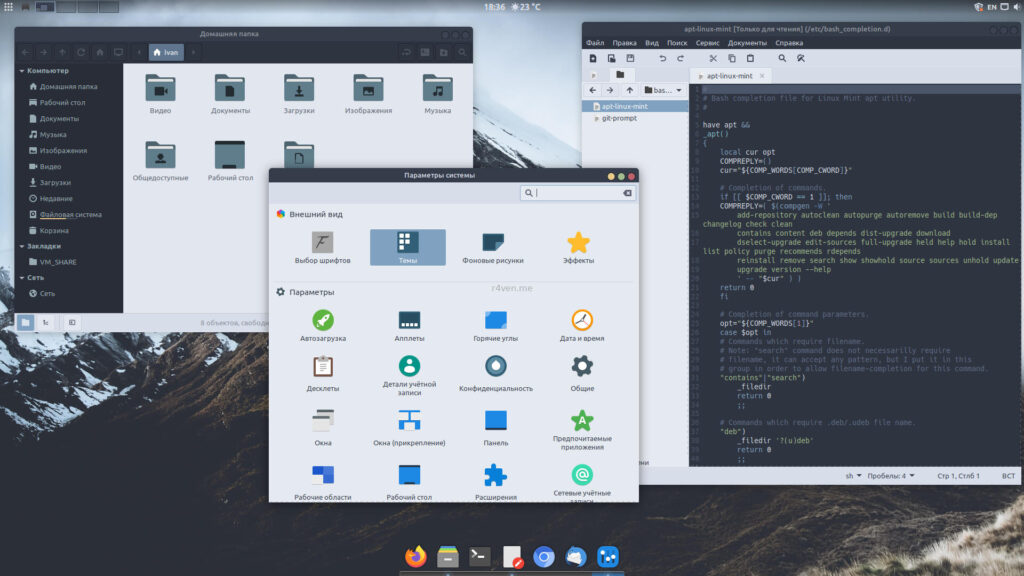
That’s all for today. Thanks for your interest! Study Linux 😉
Useful links and sources:
- The Arctic Ice Studio project — Nord theme
- GitHub of the Nordic theme’s creator
- GitHub of the Papirus icon creators
- Nerd icon fonts
- Pantheon desktop from Elementary OS
👨💻And…
Don’t forget about our Telegram channel 📱 and chat
Or maybe you want to become a co-author? Then click here🔗
💬 All the best ✌️
That should be it. If not, check the logs 🙂

Comments