
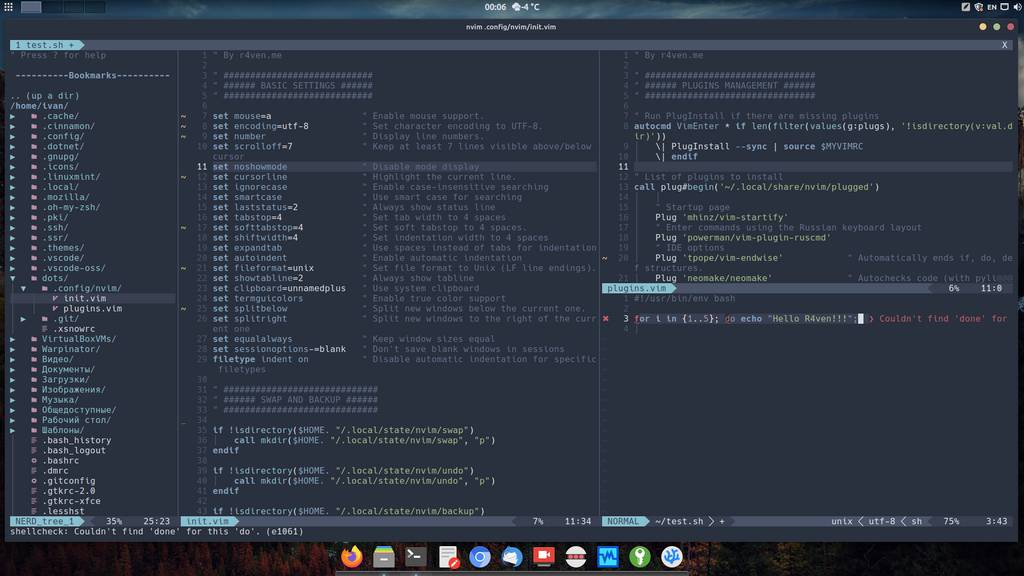
Today we’ll finish configuring our console editor Neovim: we’ll install and set up a list of plugins that will transform its appearance and add IDE features to its functionality. Among the main ones: the Nord theme, linter integration for programming languages, git support, a side panel with a project file tree, and, since Neovim has LSP support, connecting an autocompletion library based on the Python language server. And much more.
🖐️Hey!
Subscribe to our Telegram channel @r4ven_me📱, so you don’t miss new posts on the website 😉. If you have questions or just want to chat about the topic, feel free to join the Raven chat at @r4ven_me_chat🧐.
TLDR
Installing and configuring Neovim for the lazy:
# install required packages
sudo apt install -y shellcheck pylint bat

# install Nord theme for the bat utility (needed for fzf)
echo 'export BAT_THEME="Nord"' >> ~/.profile

# install the vim-plug plugin manager
curl --create-dirs -fLo ~/.local/share/nvim/site/autoload/plug.vim https://raw.githubusercontent.com/junegunn/vim-plug/master/plug.vim

# copy the base Neovim config
curl --create-dirs -fLo ~/.config/nvim/init.vim https://raw.githubusercontent.com/r4ven-me/dots/main/.config/nvim/init.vim

# copy the Neovim plugins config
curl --create-dirs -fLo ~/.config/nvim/plugins.vim https://raw.githubusercontent.com/r4ven-me/dots/main/.config/nvim/plugins.vim

# install plugins
nvim -e -c 'PlugInstall' -c 'qall!'

# check the installation
nvim ~/.config/nvim/plugins.vimIntroduction
The number of existing plugins for Vim/Neovim is uncountable. Thanks to flexible configuration options, plugins exist for every taste. There’s a ton of guides on the internet about setting them up.
In this article I’ll talk about the plugins I personally use, and also show how easy they are to install and configure — you just need to copy the config, and installation and setup will happen automatically.
All actions were performed in a Linux Mint 21 (Ubuntu 22.04) distribution environment. In other distributions, the steps are +- similar.
Preparation
For the asynchronous code checking plugins to work correctly, as well as syntax highlighting in fzf popup windows, you need to install special libraries and packages that will serve as sources for the plugins’ operation.
Since bash and python appear in my example, we install these packages:
sudo apt install -y shellcheck pylint batshellcheck— a linter for bash/sh;pylint— a linter for python;bat— a syntax highlighting utility for outputting text in the console (we need it for thefzfplugin).

Package installation
Let’s immediately set the color theme for the bat utility using an environment variable:
echo 'export BAT_THEME="Nord"' >> ~/.profile && . ~/.profile
Setting the variable for bat
This variable can also be set in your shell’s file: ~/.bashrc or ~/.zshrc. It’s up to you.
Also, to display icons in the terminal from the Neovim color theme, a Powerline font is required. Any Nerd font will do, which you can download here: https://www.nerdfonts.com/font-downloads.
Personally, I prefer the monospace font Hack. The font needs to be placed in /usr/share/fonts.
I won’t miss the opportunity to mention my article about customizing Linux Mint, which also describes font installation: Customizing Linux Mint 20/21 + Nord theme.
List of Neovim plugins to install
So, below is the list of plugins that I actively use in my Neovim:
| Plugin | Description |
|---|---|
| vim-startify | A custom startup page displaying a list of recently opened files and sessions, when the editor is launched without arguments (Vim/Neovim). Plugin page on github |
| vim-plugin-ruscmd | Allows you to enter vim commands using the Russian keyboard layout (Vim/Neovim). Plugin page on github |
| vim-endwise | Automatically completes if, do, def structures in various programming languages (Vim/Neovim). Plugin page on github |
| neomake | A plugin for asynchronous code checking. Supports various programming languages and linters, such as pylint for Python and shellcheck for bash/sh (Vim/Neovim). Plugin page on github |
| bash-support | Provides support for Bash scripts (Vim/Neovim). Template creation, etc. Plugin page on github |
| vim-gitgutter | Highlights changes in a Git repository (Vim/Neovim). Plugin page on github |
| vim-autopair | Automatically inserts or deletes brackets/quotes as you type (Vim/Neovim). Plugin page on github |
| fzf | The executable file of the fuzzy search utility — fzf. This plugin is needed for the fzf.vim plugin (below) to work correctly in deb based distributions (Vim/Neovim). Plugin page on github |
| fzf.vim | Integrates fzf with Vim/Neovim, providing an advanced search interface and additional functions (Vim/Neovim). Plugin page on github |
| vim-commentary | Simplifies commenting and uncommenting code in various programming languages using key commands, such as gcc for lines and gc for code blocks (Vim/Neovim). Plugin page on github |
| indent-blankline.nvim | Displays visual guides for indentation levels (Neovim only). Plugin page on github |
| jedi-vim | Provides Python Language Server Protocol (LSP) support via the Jedi library (Vim/Neovim). If the vim-python-jedi package is not installed on the system, the plugin will additionally install it in the plugin’s directory. Plugin page on github |
| nerdtree | A plugin for displaying a side panel with project files (Vim/Neovim). Plugin page on github |
| vim-devicons | Adds colored file type icons for NERDTree (Vim/Neovim). Plugin page on github |
| nerdtree-git-plugin | Enhances NERDTree with Git status flags (Vim/Neovim). Plugin page on github |
| nord-vim | The official Nord color scheme plugin (Vim/Neovim). Plugin page on github |
| lightline.vim | A lightweight and customizable status line (Vim/Neovim). Plugin page on github |
| vim-fugitive | This plugin displays the current Git branch in the status line (Vim/Neovim). In our case it’s used together with the lightline.vim plugin. Plugin page on github |
| nvim-scrollview | Adds a scrollbar to visualize position in the file (Neovim only). Plugin page on github |
| vim-floaterm | Provides a floating terminal window in editor sessions (definitely works in Neovim, for vim read the docs). Plugin page on github |
List of Neovim plugins to install with descriptions
The list isn’t small, but it’s not as long as it could be. Don’t forget that each new plugin you connect loads the editor to some extent. So it’s not recommended to get carried away. When working with the plugins listed above, I didn’t notice any issues with Neovim’s operation. Provided, of course, everything is set up correctly. Let’s get to editing the config.
Editing the config
Before continuing, I want to clarify that the steps below assume you already have a base Neovim config. If not, just copy mine from the GitHub repository with this command:
curl --create-dirs -fLo ~/.config/nvim/init.vim https://raw.githubusercontent.com/r4ven-me/dots/main/.config/nvim/init.vimReference for the command above:
curl— is a utility for interacting with the web over data transfer protocols, such as http;--create-dirs— create directories along the path of the downloaded file;-f— terminate the command in case of HTTP errors;-L— follow redirects;-o— allows you to specify the path where to place the downloaded file;

Installing vim-plug
If you’re interested in the details of my base config’s content, feel free to read the articles:
Next, we open our base Neovim config:
nvim ~/.config/nvim/init.vim
Uncomment 2 lines, if they are commented out:
set noshowmode
set showtabline=2And insert this code at the end of the file:
Skip this step if you copied the config from GitHub.
" Auto install plugin-manager: vim-plug
let data_dir = has('nvim') ? stdpath('data') . '/site' : '~/.vim'
if empty(glob(data_dir . '/autoload/plug.vim'))
    silent execute '!curl -fLo '.data_dir.'/autoload/plug.vim --create-dirs  https://raw.githubusercontent.com/junegunn/vim-plug/master/plug.vim'
else
    runtime plugins.vim
endif
Adding the vim-plug launch and auto-install code
This block of code is executed when Neovim starts. It checks whether the vim-plug plugin manager is installed, which is needed for conveniently downloading and installing other plugins. If the manager is missing, it’s downloaded and installed automatically in the appropriate directory.
Save the file and close the editor:
:wqNow let’s open a new file with plugin settings:
nvim ~/.config/nvim/plugins.vim
Insert the following code into it:
" By r4ven.me

" ################################
" ###### PLUGINS MANAGEMENT ######
" ################################

" Run PlugInstall if there are missing plugins
autocmd VimEnter * if len(filter(values(g:plugs), '!isdirectory(v:val.dir)'))
    \| PlugInstall --sync | source $MYVIMRC
    \| endif

" List of plugins to install
call plug#begin('~/.local/share/nvim/plugged')

    " Startup page
    Plug 'mhinz/vim-startify'
    " Enter commands using the Russian keyboard layout
    Plug 'powerman/vim-plugin-ruscmd'
    " IDE options
    Plug 'tpope/vim-endwise'            " Automatically ends if, do, def structures
    Plug 'neomake/neomake'              " Autochecks code (with pylint, shellcheck, etc.)
    Plug 'WolfgangMehner/bash-support'  " Bash support (see :h bashsupport.txt)
    Plug 'airblade/vim-gitgutter'       " Git highlight
    Plug 'solvedbiscuit71/vim-autopair' " Insert or delete brackets, parens, quotes in pairs
    Plug 'junegunn/fzf'                 " Fuzzy finder (exec file)
    Plug 'junegunn/fzf.vim'             " Fuzzy finder (requires fzf & bat to be installed)
    Plug 'tpope/vim-commentary'         " Work with comments (gcc, gc)
    Plug 'wincent/indent-blankline.nvim'" Indentation guides
    Plug 'davidhalter/jedi-vim', { 'on': 'JediClearCache' } " Python LSP
    " NERDTree FM with icons and Git
    Plug 'preservim/nerdtree'           " NERDTree plugin
    Plug 'ryanoasis/vim-devicons'       " File icons for NERDTree
    Plug 'Xuyuanp/nerdtree-git-plugin'  " Git status flags
    " Appearance
    Plug 'arcticicestudio/nord-vim'     " Nord theme
    Plug 'itchyny/lightline.vim'        " Lightline
    Plug 'tpope/vim-fugitive'           " Branch name in lightline
    Plug 'dstein64/nvim-scrollview'     " Scrollbar
    " Float terminal in Neovim session
    Plug 'voldikss/vim-floaterm'

call plug#end()

" ###################################
" ###### PLUGINS CONFIGURATION ######
" ###################################

" ----- vim-startify ------
" Sets folder with session files
let g:startify_session_dir = '~/.local/state/nvim/sessions/'
" Sets bookmark file path
let g:startify_bookmarks = systemlist("cut -sd' ' -f 2- ~/.local/state/nvim/NERDTreeBookmarks")

" ----- neomake -----
" Neomake requires installed 'makers' packages, e.g., 'pylint' for Python, 'shellcheck' for sh/bash
" Also use ':lopen' or ':lwindow' to see the list of Neomake check results
" F7 key enables automake
nnoremap <F7> :NeomakeEnable<CR>:call neomake#configure#automake('nrwi', 500)<CR>:Neomake<CR>
inoremap <F7> <esc>:NeomakeEnable<CR>:call neomake#configure#automake('nrwi', 500)<CR>:Neomake<CR>a
" Shift + F7 key disables automake
nnoremap <S-F7> :NeomakeDisable<CR>:NeomakeClean<CR>
inoremap <S-F7> <esc>:NeomakeDisable<CR>:NeomakeClean<CR>a
" Shfit + <F7> for alacritty and gnome-terminal
nnoremap <F19> :NeomakeDisable<CR>:NeomakeClean<CR>
inoremap <F19> <esc>:NeomakeDisable<CR>:NeomakeClean<CR>a

" ----- jedi-vim -----
" F8 activates Jedi Python LSP
autocmd FileType python map <F8> :JediClearCache<CR>
autocmd FileType python imap <F8> <ESC>:JediClearCache<CR>a

" ----- bash-support -----
" See help ':h bashsupport.txt'
"  let g:BASH_CustomTemplateFile = '~/.config/nvim/templates/template.bash'

" ----- fzf.vim -----
" F2 key opens FZF window with file preview
" Ctrl+T, Ctrl+X, or Ctrl+V to open file in a new tab, split, or vsplit
nnoremap <silent> <F2> :Files<CR>
nnoremap <silent> <S-F2> :Buffers<CR>
" Shift + <F2> for alacritty and gnome-terminal
nnoremap <silent> <F14> :Buffers<CR>
" Sets the size of the FZF window
let g:fzf_layout = { 'window': { 'width': 0.9, 'height': 0.6  }  }
" Sets the size and position of the preview area
let g:fzf_preview_window = 'right:50%'

" ----- nerdtree -----
" Displays the bookmarks table on startup
let NERDTreeShowBookmarks = 1
" Show hidden files
let NERDTreeShowHidden=1
" Enter key in the NERDTree window opens the file in a new tab
let NERDTreeCustomOpenArgs={'file':{'where': 't'}}
" Sets arrow looks
let g:NERDTreeDirArrowExpandable = '▶'
let g:NERDTreeDirArrowCollapsible = '▼'
" Sets the bookmarks file path
let g:NERDTreeBookmarksFile = expand("~/.local/state/nvim/NERDTreeBookmarks")
" Binds the 'F3' key to toggle NERDTree
nnoremap <F3> :NERDTreeToggle<CR>
" Exit Vim if NERDTree is the only window remaining in the only tab
autocmd BufEnter * if tabpagenr('$') == 1 && winnr('$') == 1 && exists('b:NERDTree') && b:NERDTree.isTabTree() | quit | endif
" Close the tab if NERDTree is the only window remaining in it.
autocmd BufEnter * if winnr('$') == 1 && exists('b:NERDTree') && b:NERDTree.isTabTree() | quit | endif

" ----- nord-vim -----
colorscheme nord " Sets Nord theme
let g:nord_cursor_line_number_background = 1 " Highlights the background of the line number column in the cursor line
let g:nord_uniform_status_lines = 1 " Applies consistent styling to all status lines
let g:nord_bold_vertical_split_line = 1 " Makes the vertical split line between windows bold
let g:nord_uniform_diff_background = 1 " Provides a consistent background color for diff blocks
let g:nord_bold = 1 " Makes text rendered in the Nord color scheme bold
let g:nord_italic = 1 " Applies italic styling to text in the Nord color scheme
let g:nord_italic_comments = 1 " Makes comments in the Nord color scheme appear in italic style
let g:nord_underline = 1 " Adds an underline to text

" ----- lightline.vim -----
let g:lightline = {
      \ 'colorscheme': 'nord',
      \ 'active': {
      \   'left': [ [ 'mode', 'paste' ],
      \             [ 'readonly', 'relativepath', 'modified', 'gitbranch' ] ]
      \ },
      \ 'component': {
      \   'obsessionstatus': '%{ObsessionStatus()}'
      \ },
      \ 'separator': {
      \   'left': '', 'right': ''
      \ },
      \ 'subseparator': {
      \   'left': '', 'right': ''
      \ },
      \ 'component_function': {
      \   'gitbranch': 'FugitiveHead'
      \ },
      \ }

" ----- nvim-scrollview -----
let g:scrollview_current_only = v:true " Views the scrollbar only in the current window
let g:scrollview_winblend = 75 " Sets the level of transparency
let g:scrollview_excluded_filetypes = ['nerdtree'] " Does not show the scrollbar in NERDTree window

" ----- vim-floaterm -----
let g:floaterm_width = 0.7 " Sets the width of the terminal window
let g:floaterm_height = 0.7 " Sets the height of the terminal window
let g:floaterm_keymap_toggle = '<F4>' " F4 key toggles the terminal
" Run shell or Python script in floaterm by pressing F6 key in command or insert mode
autocmd FileType sh,python map <buffer> <F6> :w<CR>:FloatermNew! chmod ug+x <C-R>=shellescape(@%, 1)<CR> && bash -c ./<C-R>=shellescape(@%, 1)<CR><CR> bash -c 'read -p "Press Enter to exit..."' && exit<CR>
autocmd FileType sh,python imap <buffer> <F6> <esc>:w<CR>:FloatermNew! chmod ug+x <C-R>=shellescape(@%, 1)<CR> && bash -c ./<C-R>=shellescape(@%, 1)<CR><CR> bash -c 'read -p "Press Enter to exit..."' && exit<CR>

" ----- OTHERS -----
" Source the session if .session.vim exists in the current dir
if argc() == 0 && filereadable("./.session.vim")
    execute "source ./.session.vim"
    autocmd StdinReadPre * let s:std_in=1
    autocmd VimEnter * NERDTree | if argc() > 0 || exists("s:std_in") | wincmd p | endif
    autocmd BufWinEnter * if getcmdwintype() == '' | silent NERDTreeMirror | endif
endif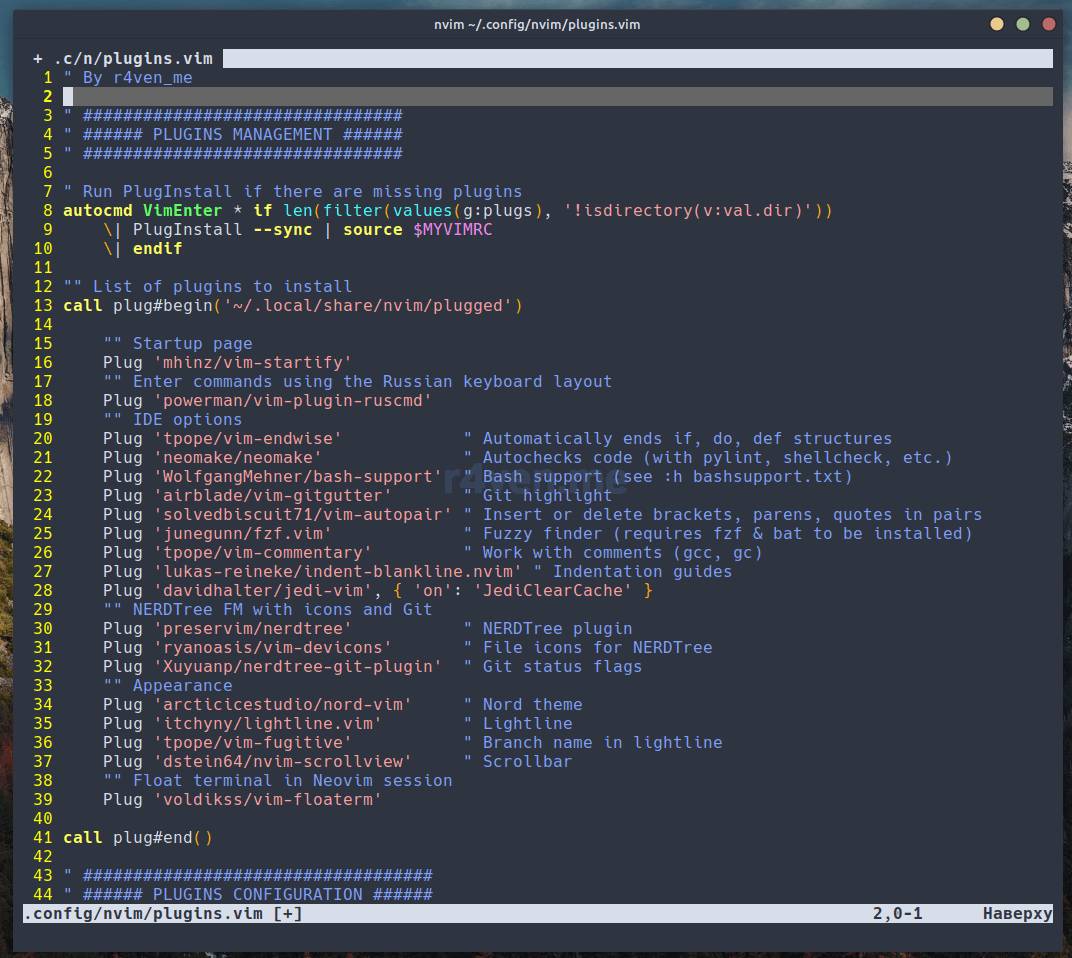
Filling in the Neovim plugins config file
Save, close:
:wqYou can also copy this file from my GitHub with the command:
curl --create-dirs -fLo ~/.config/nvim/plugins.vim https://raw.githubusercontent.com/r4ven-me/dots/main/.config/nvim/plugins.vim
Installing plugins
In the end we should have two files:
ls -l ~/.config/nvim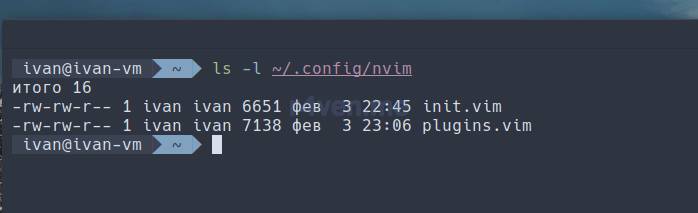
Then reopen the editor, and plugin installation will begin automatically. Make sure to wait for it to complete:
nvim ~/.config/nvim/plugins.vim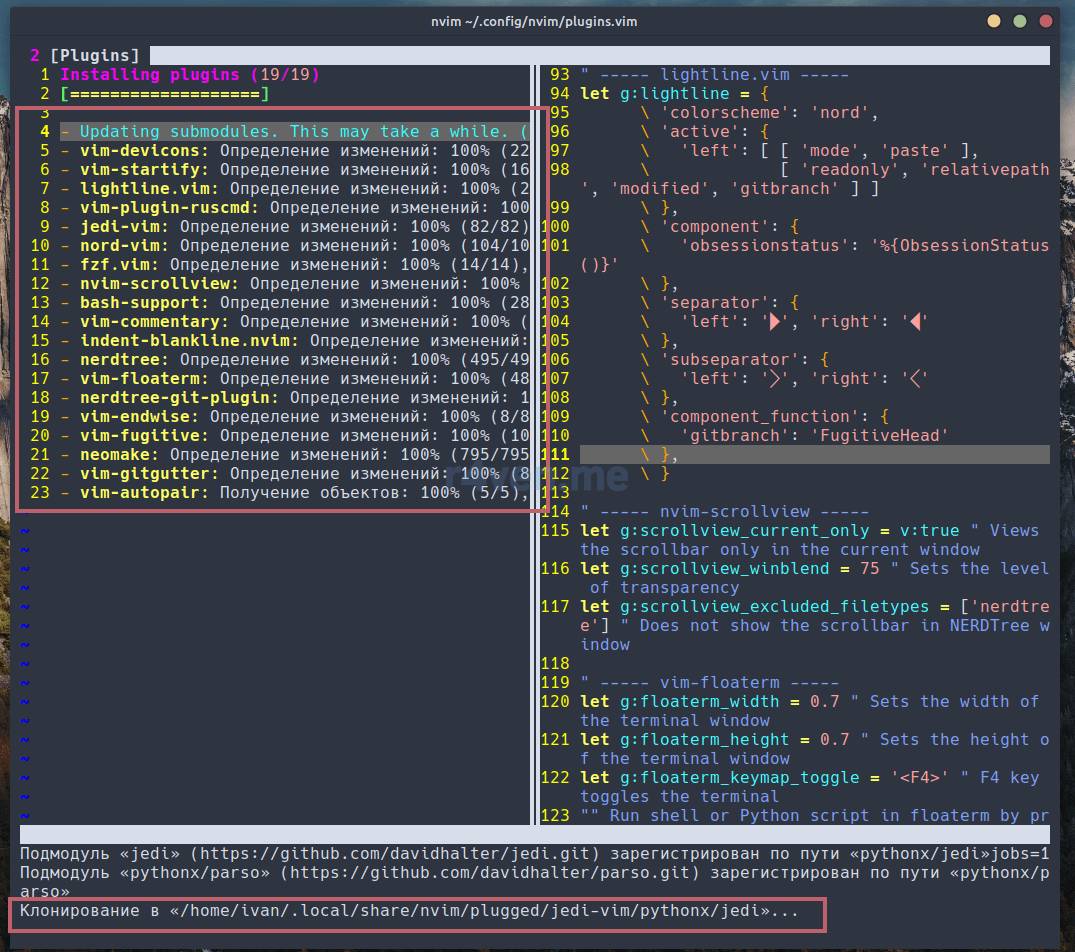
Installing plugins
If you see an error like this, don’t panic, just press Enter:

No big deal)
Save and exit the editor:
:wqOpen the plugins file again, and it should look like this:
nvim ~/.config/nvim/plugins.vim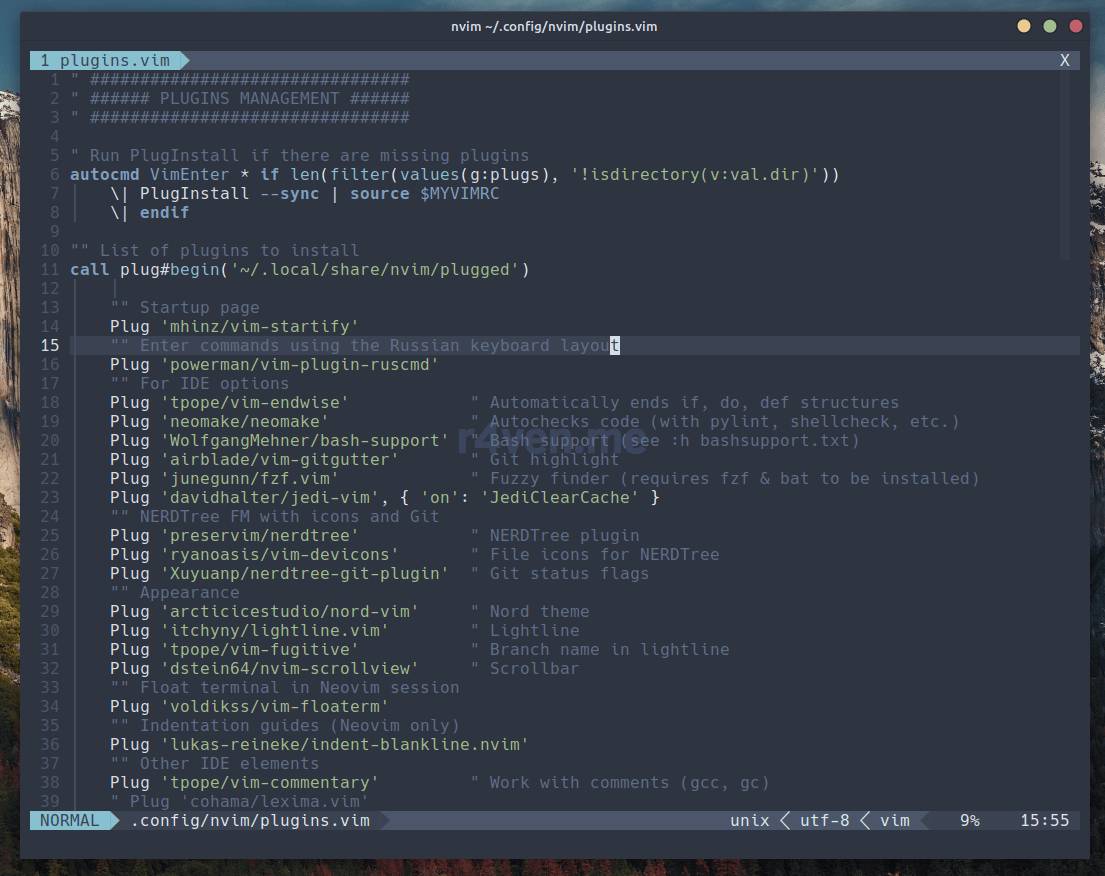
Neovim after installing plugins
When new plugins are added to the list, their download will happen automatically after the editor is launched.
To remove a specific plugin, delete the line with the plugin’s name (or comment it out), then restart the editor and run the command:
:PlugCleanAnd confirm by pressing y.
Demonstration of some plugins in action
- Pressing
F2opens a file search window across the system. Pressing Enter on the specified file opens it in the current Neovim buffer. You can close the window with theEsckey:
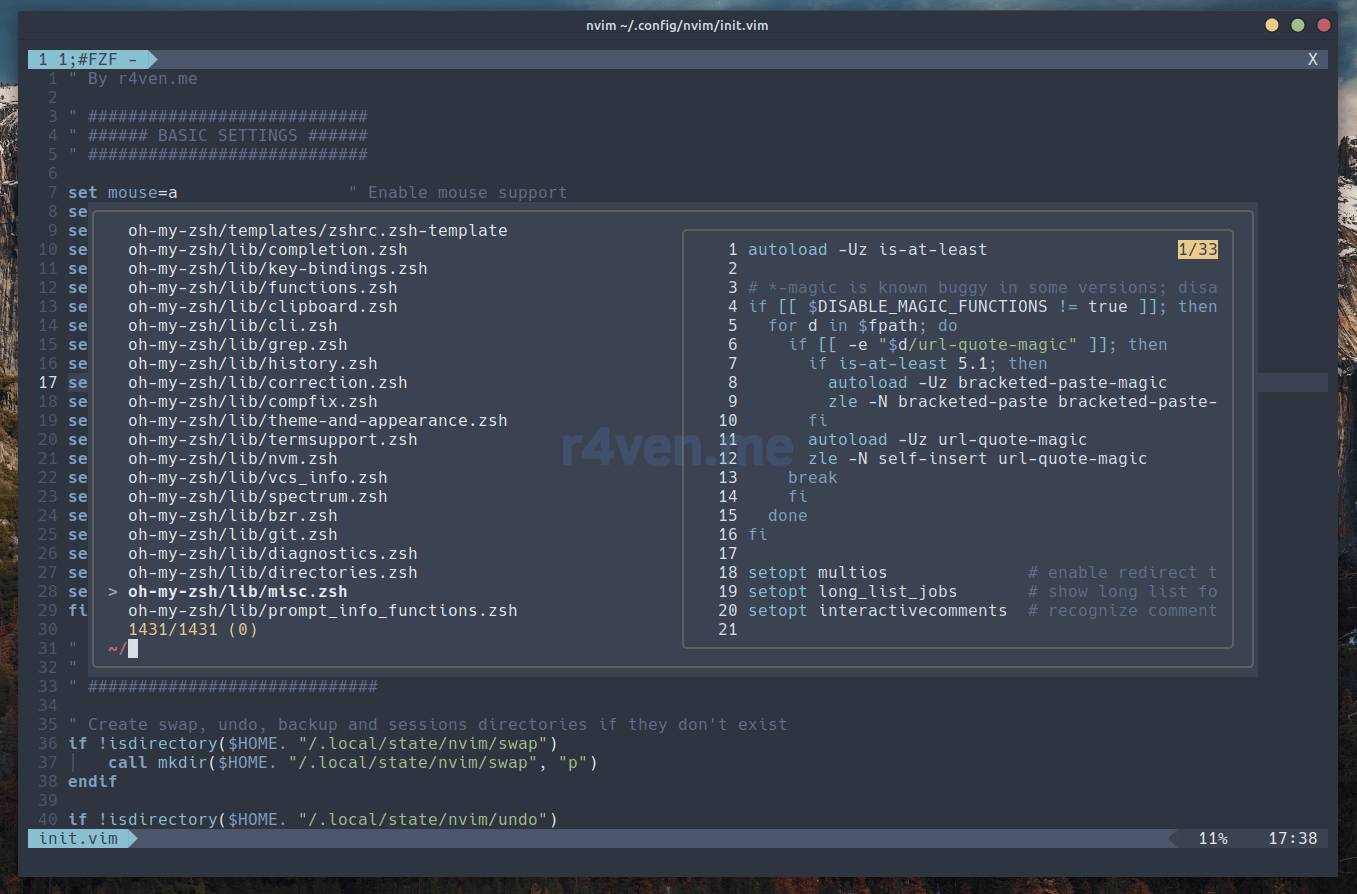
Search with fzf
- Pressing
Shift+F2opens the list of Neovim buffers in the fzf popup window:
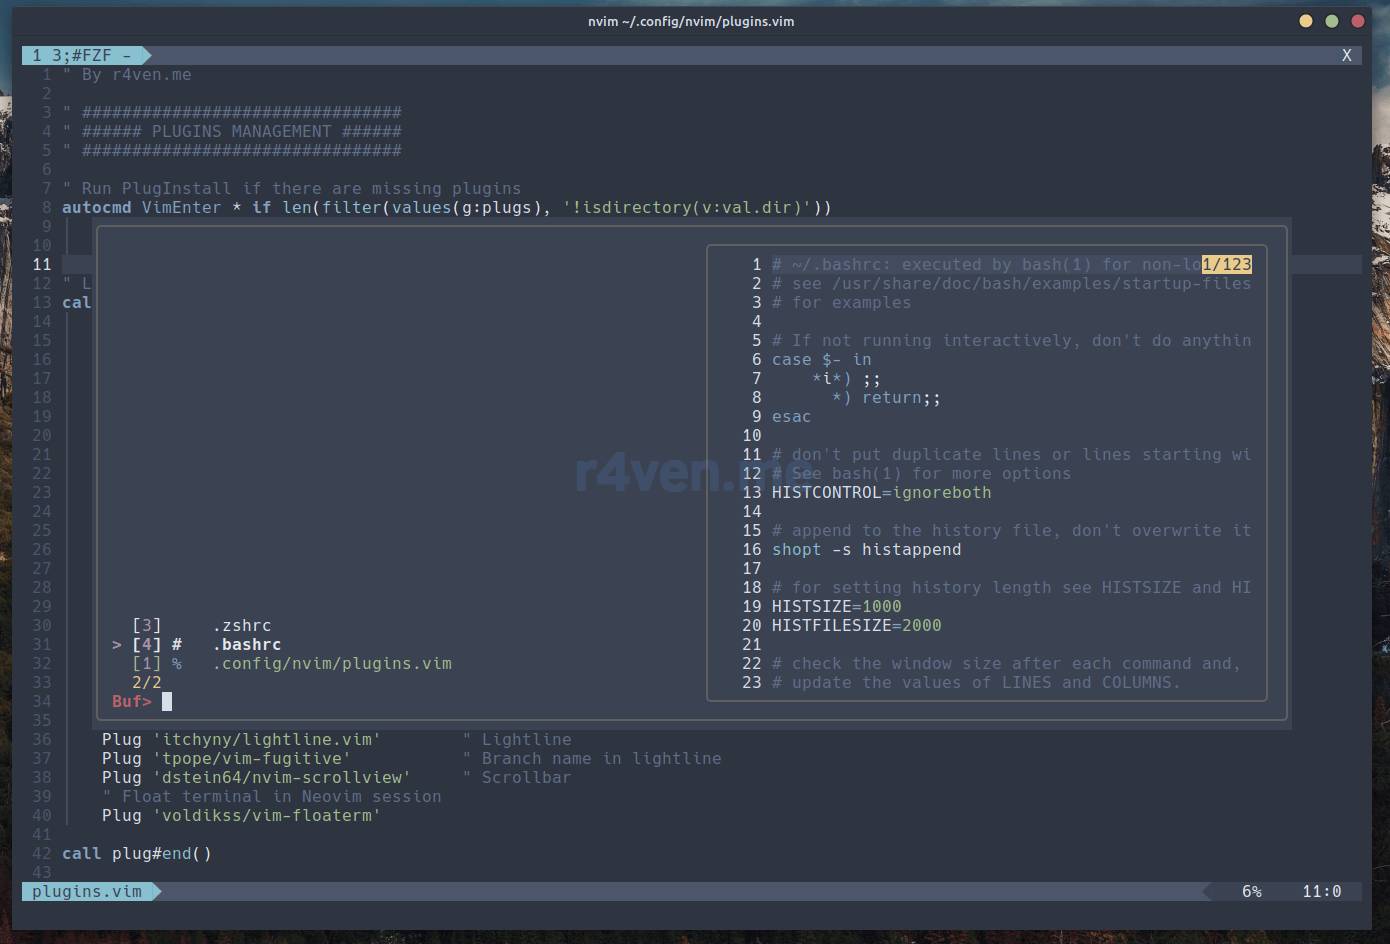
Buffer list with fzf
- Pressing
F3opens a side panel with the file tree of the directory from which the editor was launched:
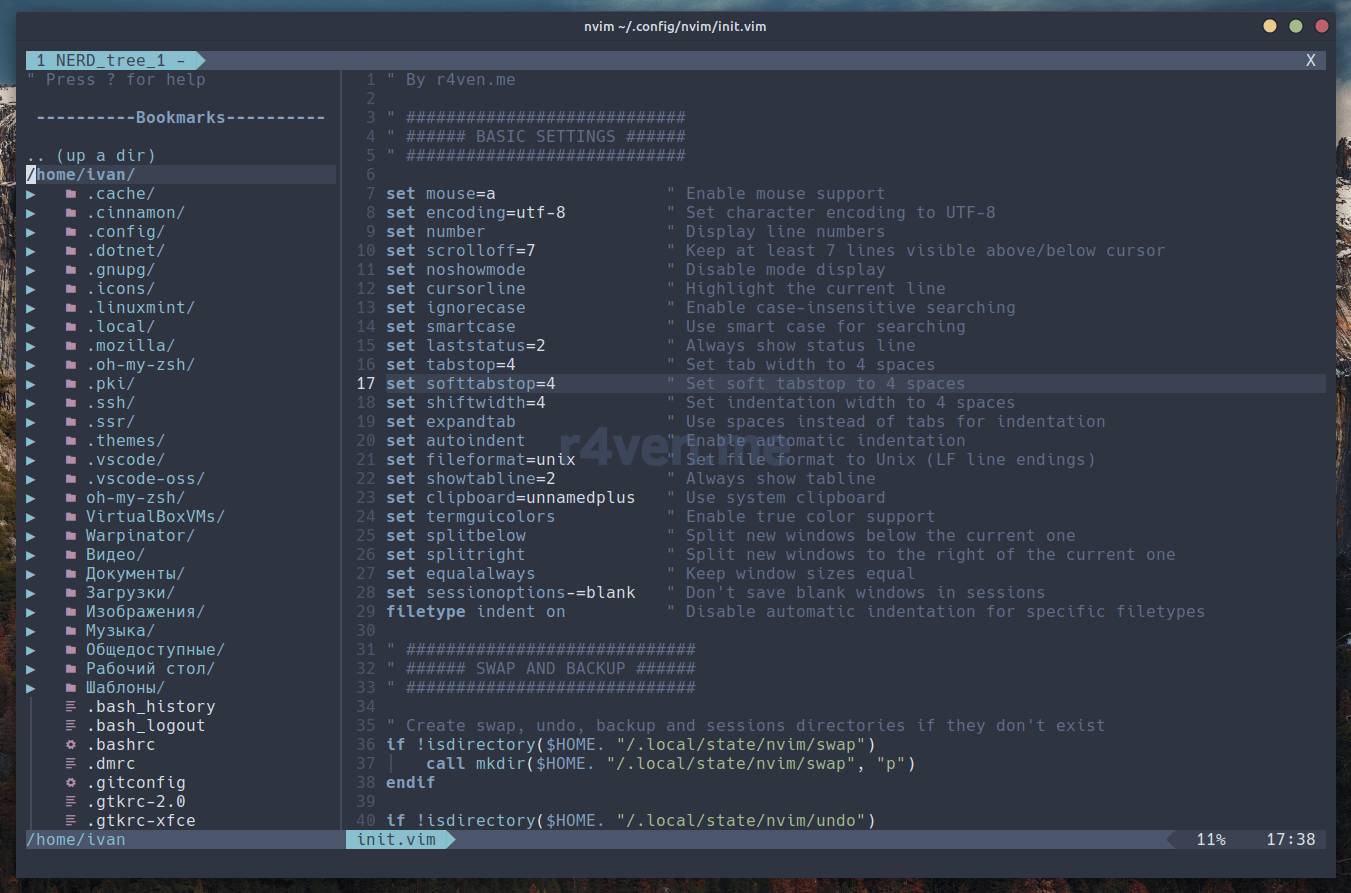
NERDTree side panel
- Pressing
F4opens a simple terminal in a popup window. You can work in it just like in a regular one. Pressing F4 again minimizes the window, but the session doesn’t close. Press F4 again to bring it back:
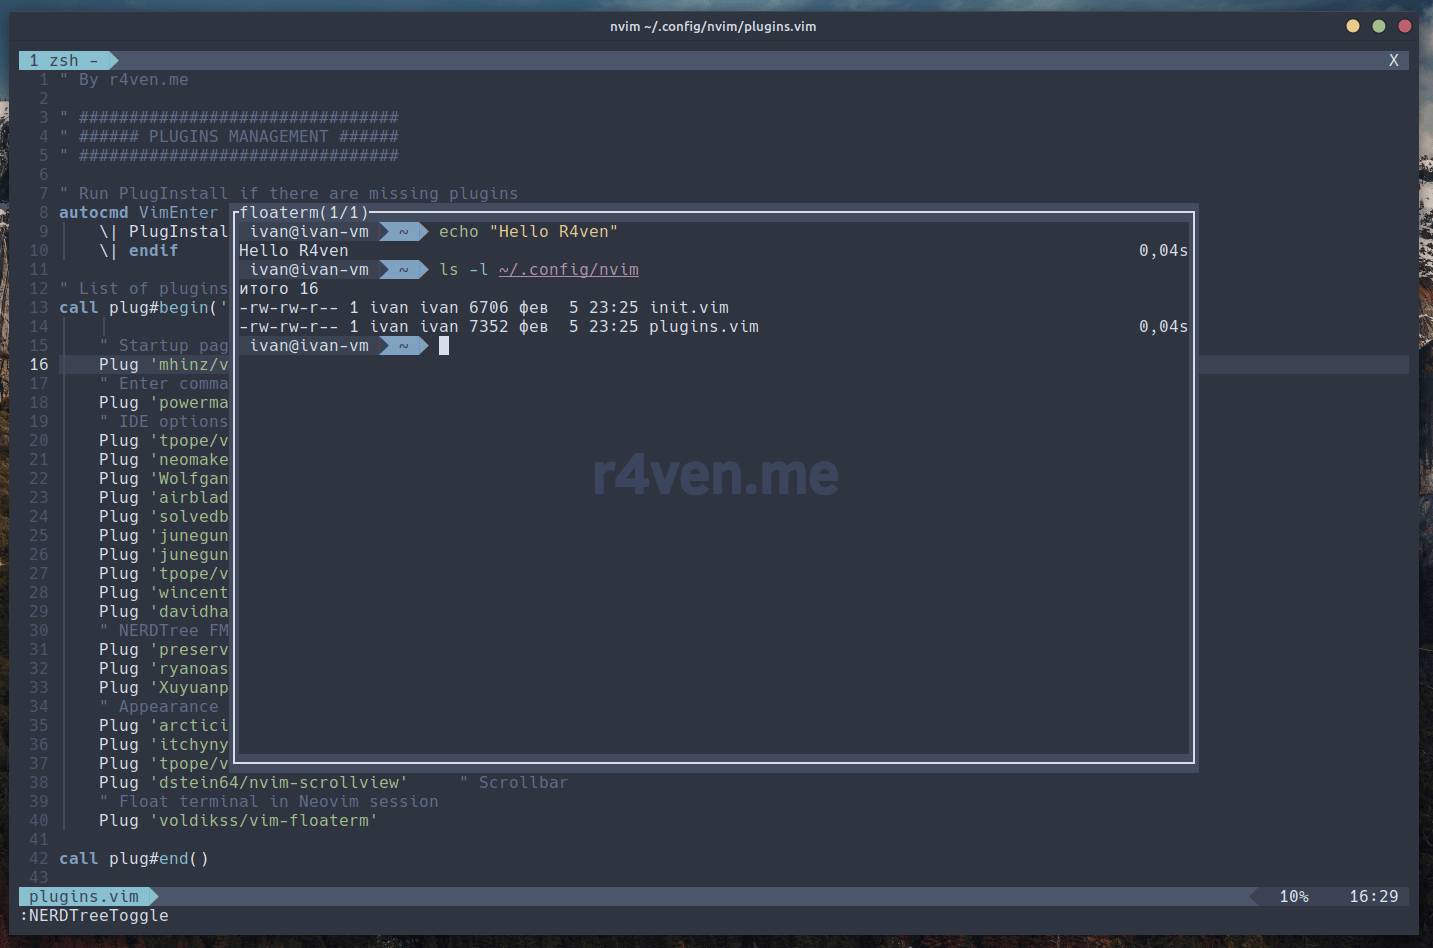
Floating terminal
- If you’ve configured Neovim following my articles, you’ll remember that
F5is bound to run the current file as an executable, if it has a.shor.pyextension. Since we have a “floating terminal”, pressing F6 will execute the current file in a popup window:
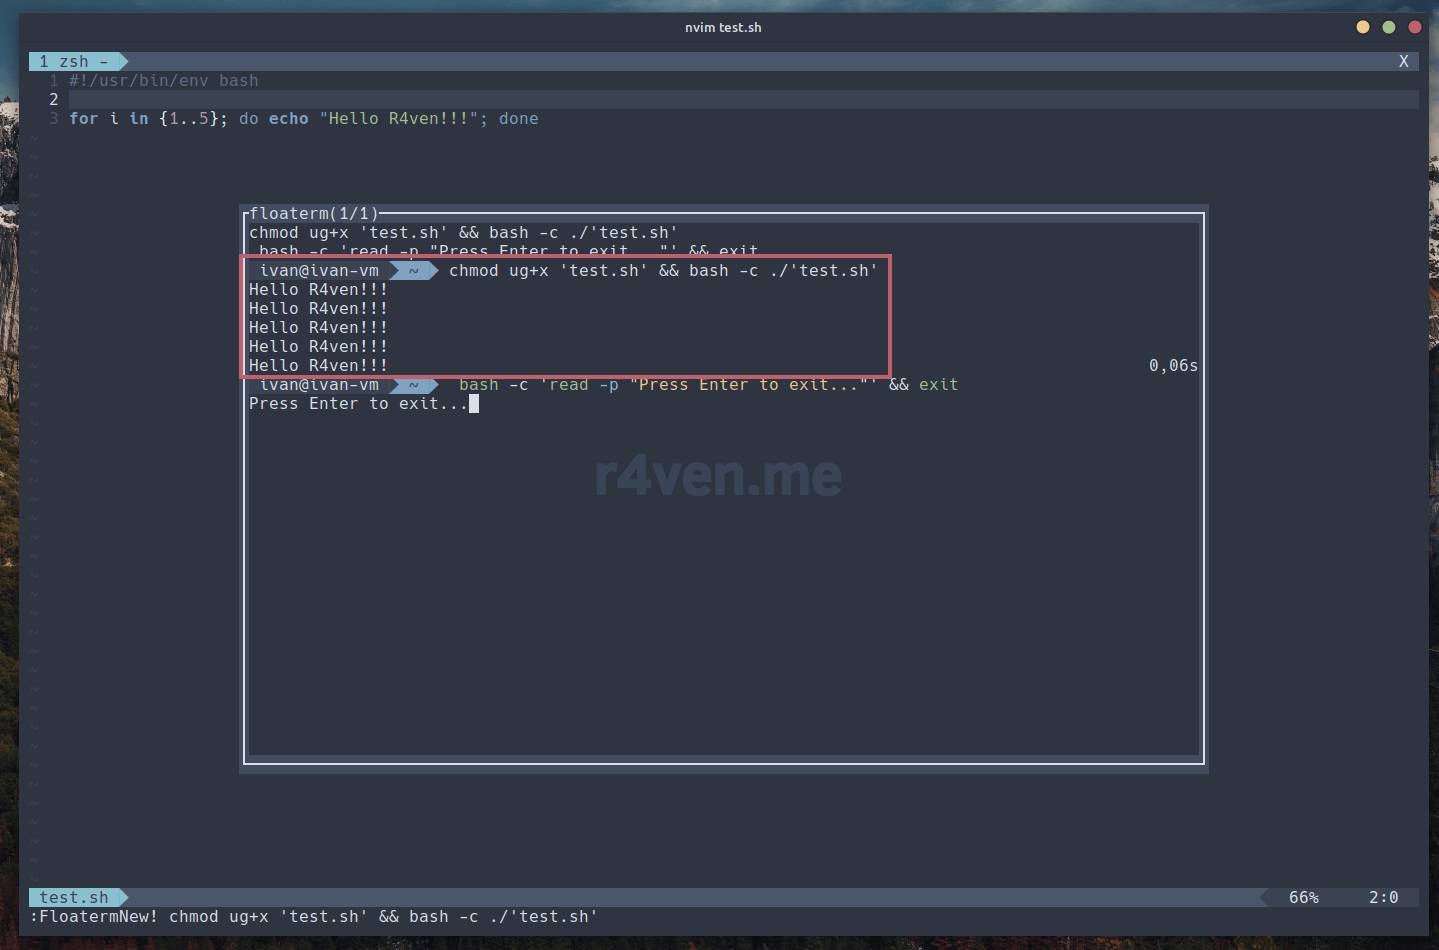
Running a script in the floating terminal
- Pressing the
F7key activates the static code analyzer for shell and python files. Provided that the linter packages are installed on the system (we did this at the beginning of the article). It looks like this:
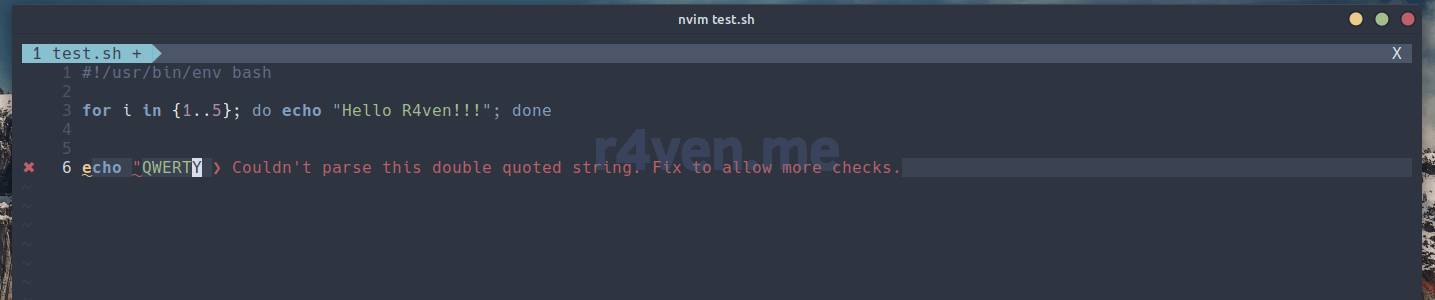
The shellcheck linter at work

The pylint linter at work
To disable the linter, press F7 again.
- And pressing
F8activates Jedi — the autocompletion library for Python:
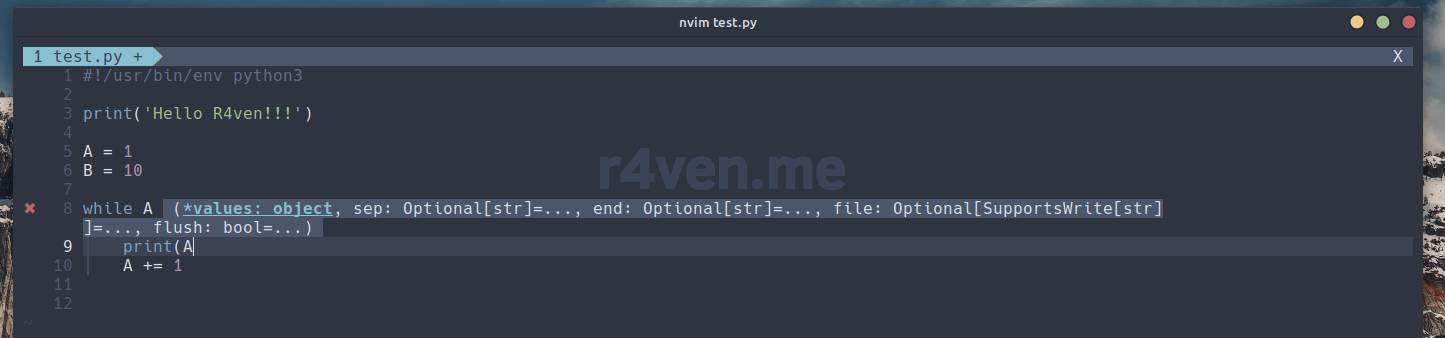
LSP working with Jedi
I recommend not using Jedi and Neomake at the same time, since Jedi already includes syntax checking.
The editor also supports git, comments via hotkeys, has a scrollbar, and much more. The full list is presented in the table. See the documentation for details on configuring each plugin, links are also in the table.
Feel free to adapt my config to suit yourself) Spending a little time studying it, you’ll realize it’s not difficult.
Conclusion
Phew… now our Neovim editor is ready for active use.
It’s beautiful and practical. And most importantly, very fast in operation. The entry threshold for vim-like editors is of course high, but in my personal opinion, it’s worth it. This is the way of classic Unix, which was formed back at the dawn of IT technologies and has only gotten better over time.
If you still have questions, or simply want to discuss the “hardships” of working in *vim — welcome to our chat on Telegram: @r4ven_me_chat.
If for some reason you made it through this entire article, but have never worked with Vim/Neovim, be sure to check out the introductory part: VIM – Console editor: an introduction. This will shed some light on certain aspects of console text editors.
My next step will be adapting these configs, written in vim-script, to the lua format. I suspect this will also be fun)
Thanks for reading. Keep in mind that today, knowing how to exit *vim is a full-fledged hard skill)
Good luck!
Useful sources
Links to the plugin sources are in the table at the beginning of the article)
👨💻And…
Don’t forget about our Telegram channel 📱 and chat
Or maybe you want to become a co-author? Then click here🔗
💬 All the best ✌️
That should be it. If not, check the logs 🙂

Comments